|
|
|
|

|
|
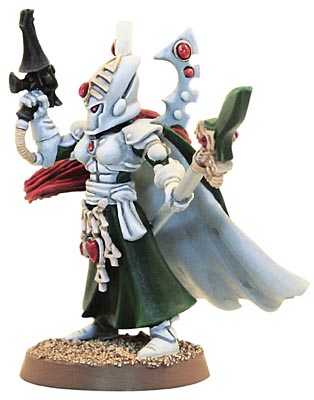
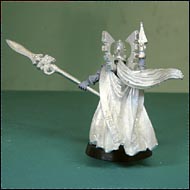
 acha is one of the most powerful Seers of the Biel Tan Craftworld. It was she who sealed away a dangerous daemon in the Maledictum stone and has since kept watch over it so that he is not freed. Unfortunately, her recent predictions have revealed to her the interference of Captain Angelos of the Blood Ravens chapter.
Macha tempted the former to destroy the daemon when the Space Marine, unknowingly destroyed the stone that imprisoned it.
She goes into battle armed with an ancient Singing Lance and a Shuriken Pistol.
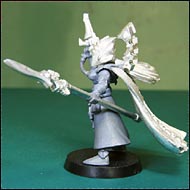
Here, we will show you how to create a Macha miniature.
Rather than basing it on an already existing Great Seer variant, our conversion will use mostly plastics to make the work easier.
Also note that we are using the new Foundation Paints to help give life to our courageous Eldar. acha is one of the most powerful Seers of the Biel Tan Craftworld. It was she who sealed away a dangerous daemon in the Maledictum stone and has since kept watch over it so that he is not freed. Unfortunately, her recent predictions have revealed to her the interference of Captain Angelos of the Blood Ravens chapter.
Macha tempted the former to destroy the daemon when the Space Marine, unknowingly destroyed the stone that imprisoned it.
She goes into battle armed with an ancient Singing Lance and a Shuriken Pistol.
Here, we will show you how to create a Macha miniature.
Rather than basing it on an already existing Great Seer variant, our conversion will use mostly plastics to make the work easier.
Also note that we are using the new Foundation Paints to help give life to our courageous Eldar.
|
|
|
Conversion difficulty: medium 
|
Click on the image for a 3D view
|
|
|
|
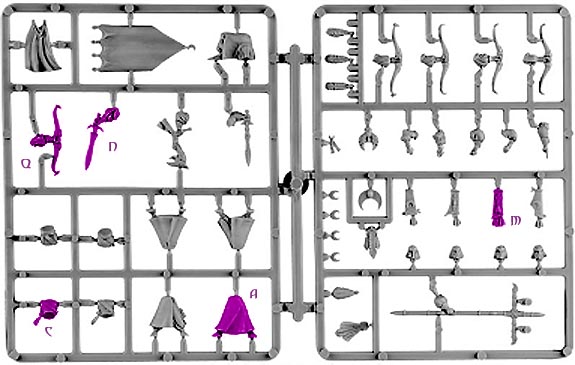
1 |
Classic Eldar Seer |
|
1 |
Great Seer Lance |
|
1 |
Eldar Guardians Sprue |
|
1 |
Dire Avenger: Arms with Pistol |
|
1 |
High Elf Archers Sprue |
|
1 |
Archaon: Horse's Tail |
|
1 |
Cape of Zacharias the Eternal |


 |
 |
 |
|
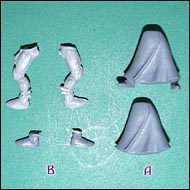
The Legs
We will combine the legs of the High Elf Archer (A) with the feet of an Eldar Guardian (B ).
Detach these three parts using clippers. You will need to remove the High Elf's feet where they meet bottom of the robe. The Eldar Guardian's legs must be cut just above the ankles.
Notice that the archer's robe has a sort of satchel on the back that will also have to be removed. When you put everything together, you'll notice that the legs will be longer than on the original model.
|
|
|
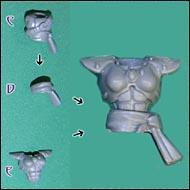
The Waist and Torso
Get the archer's torso (C). Cut just above the belt. This belt is all that you will be using. (D). You'll also have to remove the strap by filing it down, and narrow the width of the belt a lttle bit.
We are going to place the female Eldar Guardian's torso piece (E) on top of the belt.
For this, you will need to trim the base of this torso to about the middle of the third abdominal armour plate. Try to make sure that the torso piece is properly aligned with the top surface of the belt piece. In our example, the belt is at a slight angle, and so the bottom of the torso had to be filed to match this angle.
|
|
|
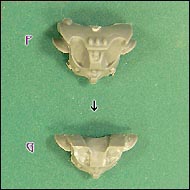
The Back
This is part of the conversion that needs the most precision, because you will need to trim the Guardian's back so that it matches the shape of the head, the dorsal crests and the hair.
The entries have been removed as well as the whole bit above the shoulders and around the neck.
Carefully examine the differences between the photos of the original back(F) and the converted piece (G).
|
|
 |
|
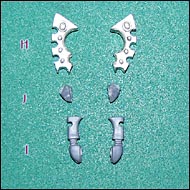
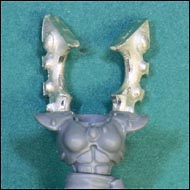
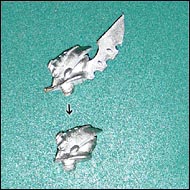
The Dorsal Crests
You will have to saw off the two crests from the classic Seer (H) and position them on the Guardian's dorsal "winglets." (I) These "winglets" will need to be trimmed down so as to create a flat base (J) on which to place the Seer's dorsal crests.
Try to make sure that they are as symmetrical as possible.
|
|
 |
 |
 |
 |
|
The Wraithbone Loincloth :
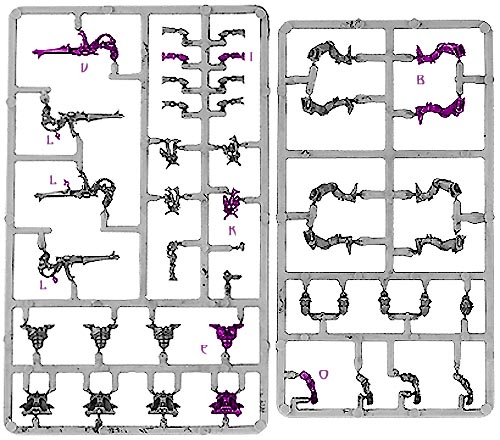
To make the bits that hang from the belt, we are going to use some runes from a Guardian Sprue as a base (K) as well as the runes and gems present on the Catapults of the Guardians (L), and the heart, emblem of the Biel Tan Craftworld, which can be taken from a High Elf quiver (M).
|
|
|
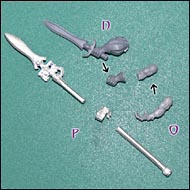
The Left Arm :
We'll use a glove taken from an archer's arm (N) and placed on a guardian's arm (O).
The classic Seer's Lance
(P) has been separated from its original hand and attatched to the newly-created arm..
|
|
|
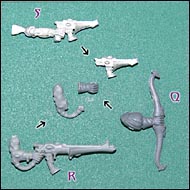
The Right Arm
Once again we'll use an arm that comes from the archers (Q) and another that originated from a shuriken catapult (R). We will attatch to these the pistol from the metal Dire Avenger's arm
(S).
|
|
 |
 |
 |
|
The Head
The crest and goatee will have to be removed from the Seer's head before attatching it.
|
|
|
The Cape :
The cape will be placed squarely on the shoulders.
Note how the lance is in contact with both the cape and the robe, for more stability.
|
|
|
The Hair
Finally, the hair falls naturally in place between the dorsal crests and right at neck-level. All you'll need to do is slightly trim the tip of Archaron's horse's tail.
|
|
|
The Finishing touches
It will be absolutely neccessary to make the connection between the cape and the shoulders seamless by using Green Stuff*. It will be the same for the connection between the hair and the neck.
|
|
The Painting
For this model,
Foundation Paints were extremely helpful. The figure was basecoated in Spray White Primer* in three light coats.
The White of the armour is a base ofAstronomican
Grey shaded with Codex Grey
et highlight using a mix of;Astronomican
Grey and an ever-increasing quantity of Skull White until a pure white is attained.
The coat, the bands on the bape, and the lance's blade were given a base Orkhide
Shade highlighted successively with Dark Angel Green, Snot Green and a mixture of Snot Green and Skull White.
The Wraithbone elements received a base coat of Dheneb Stone shaded with Graveyard Earth and highlighted with Kommando Khaki mixed with Bleached Bone. The gems received a base of Mechrite Red, shaded with Scorched Brown and highlighted with Blood Red.
The Shuriken Pistol is painted with Charadon Granite, shaded with Black Ink and highlighted using Codex Grey..
|
Feel free to inform us of your thoughts and send us your photos!
|
- Conversion,
painting, and article by Nicolas Fournel
|
|
* Hazardous product or tool, please observe the usage guidelines.
|
|
Dawn
of War, le logo Dawn of War, GWI,
le logo GWI, Games Workshop, GW, 40k, Chaos,
Eldar, Ork, Warhammer, le logo Warhammer 40,000,
Space Marine, les emblèmes de chapitres Space Marines
et toutes les races, logos de races, insignes,
lieux, personnages, illustrations et images du
jeu Dawn of War et de l¹univers de Warhammer
40,000 sont soit ®, (tm) et/ou © Games
Workshop Ltd 2000-2007, au Royaume-Uni et dans
d¹autres pays du monde, et sous licence.
Tout matériel est © Copyright Games
Workshop Limited 2007 sauf le Code Source du
jeu Dawn of War qui est © 2007 THQ Inc.
|

|
|
|
|
|
|
|
|
|