Little icon, big
impact
Section: workshop > photoshop
Author:
Trevor Morris
Posted: 28/01/2003 11:30:40 AM

Have a quick look along the links toolbar or bookmarks
menu of your Web browser, and what do you see? Dozens of look-alike icons.
Yet among them there may be a few that stand out, precisely because they
don't use that same generic glyph. Instead, they use a tiny version of
their own brand or logo, called a "favicon" (short for "favourites icon"),
to uniquely identify their Web page to any 5.0 or later browser.
Yahoo! (the US site, not the Australian version), Google, The Sydney
Morning Herald and The Age newspapers are four such sites. But you don't
have to be a major league Web player to use this clever trick. You just
need to know how to create an iconic version of your brand and how to make
a Web browser use this instead of the default icon.
There's no shortage of dedicated icon editing programs. Two of the best
include Microangelo and IconForge, which we've included on this month's
cover CD set. But there's plenty to be said for using Photoshop to create
icons. For starters, icon editors are often more tedious to work with than
Photoshop because they don't support vector shapes, styles or even layers.
And as you're already familiar with Photoshop's tools and interface, it's
easier to dive right into designing your icon than relearning a new
program. Finally, after forking out over $1,000 for Photoshop, you'd
certainly expect to be able to draw icons with it!
The only caveat is that Photoshop can't natively export to the ICO icon
file format, so you'll still have to rely on a third party converter to
save the icon in the correct format. But there are plenty of freeware
applications that can handle that task.
Creating the icon
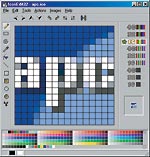
For this Workshop we set about creating a favicon with the APC logo.
Your own site's favicon could be a miniaturised version of your logo or
brand, or a totally new graphic.
If you have a reference for the
source image (we used the APC Web site), perform a screen capture or open
the original image. Create a new document using the following settings.
Name: Favicon. Width: 16 pixels. Height: 16 pixels. Resolution: 72ppi.
Mode: RGB Color. Contents: Transparent.
The canvas can't be any larger than 16 x 16 pixels, or the browser may
ignore the icon. Press Ctrl+0 (or double-click the Hand tool) to fit
canvas to the screen, which for a canvas this small, will zoom to the
maximum level of 1600%. To make it easier to see what you're doing, select
Window, Documents, New Window. This new document view will reflect any
changes made to the document in real time and real size.
In the main view (the 1600% view), establish a 1-pixel grid by choosing
Edit, Preferences, Guides, Grid & Slices. Turn the grid on (View,
Show, Grid) and turn Snap off (View, Snap).
Use the Eyedropper tool to sample the dark blue colour [#003399] from
the screenshot and then fill the canvas (the current layer). Select the
Elliptical Marquee tool and establish the following settings in the
Options palette. Feather: 0 px. Anti-aliased: On. Style: Fixed Size.
Width: 50 px. Height: 50 px.
Click near the top left corner of the canvas -- you should see the top
left quadrant of your circular selection -- and position it so that the
circle is about three pixels away from the left edge of the canvas and one
pixel away from the top. Use the Eyedropper tool to sample the light blue
colour [#8BAEE4] from the screenshot and then fill the current selection.
To quickly set the foreground colour to white, press D to reset the
default colours, followed by X to swap the foreground and background
colours. Select the Type tool, display the Character palette, and
establish the following settings. Font: Arial Black. Style: Regular. Size:
9 pt. Leading: Auto. Tracking: -50. Color: White. Anti-aliasing: None.
Even at the most precise setting of Sharp, the anti-aliasing is too
blurry for this very detailed work, so you'll have to anti-alias the
letters "by hand", later. Use the Type tool to enter the letters "apc".
Not all the pixels will fit, so use the Move tool to position the
left-most column of pixels just outside the canvas boundaries. Duplicate
the type layer, right-click on the layer in the Layers palette and choose
Rasterize Layer. Turn off the original layer type layer.
Select the Eraser tool and set the Brush (or Master Diameter) to 1
pixel, the Mode to Pencil and the Opacity to 100%. Erase the two pixels
above and below the centres of both the "p" and the "c". Now use the
Pencil tool again with a 1-pixel brush to extend the tail of the "p" by an
extra pixel row.
The precise nature of icon art means every pixel counts, and in this
case that means doing even the anti-aliasing "by hand." Set the opacity
for both the Pencil and Eraser tools to 50%. Use the Pencil tool to place
a single pixel on the corners of all the letters as well as one more under
the crest of the "a".
To create a drop shadow for the letters, duplicate the current layer
and fill it with black while preserving the transparency -- assuming that
black is still the background colour, the quickest way to do this is to
press Ctrl+Shift+Backspace. Move this layer below the white text layer.
Select the Move tool and use the cursor keys to move the shadow layer one
pixel right and one pixel down. Complete the shadow by changing its layer
opacity to 60%.
To complete the logo, reselect the original type layer and use the
Eraser tool to partially erase the lower centre of the "a" as well as the
upper and lower centres of the "p" and "c". Now select the entire canvas
and choose Edit, Copy Merged to place a copy of the icon into the
Clipboard.
Saving your icon
Now you need to convert this image into an icon. One way is to paste
the image into an application capable of saving an icon file, such as the
icon editors IconForge and Microangelo. We've included a full working
version of the nimble IconForge on this month's cover CD, plus a 30-day
trial version of Microangelo 5.5 suite. There's also a series of Photoshop
plug-ins named Icon Builder, which are available for Windows, Mac OS X and
Mac OS 9.x; we've included trial versions of these on the CD, although at
US$69 each they're quite expensive.
 Whichever application you use, add or select a 16 x
16, 256 colour image format and delete any other selected image formats.
Paste the icon image into the editor or plug-in and then save the icon as
an Icon File (ICO) named "favicon.ico". Whichever application you use, add or select a 16 x
16, 256 colour image format and delete any other selected image formats.
Paste the icon image into the editor or plug-in and then save the icon as
an Icon File (ICO) named "favicon.ico".
Adding the Favicon to your Web page
Now you need to associate the favicon with your Web page. The simplest
way is to save the icon with the default name of "favicon.ico" into the
root directory of your domain -- for example, www.apcmag.com/favicon.ico.
An alternative is to name the icon anything you like and include a
<link> tag within the <head> section of your Web page(s) that
contains the exact URL of the icon to be used. For example:
<html>
<head>
<title>APC Magazine
Home Page</title>
<link rel="shortcut icon"
type="image/x-icon" href="http://www.apcmag.com/apc.ico"
/>
</head>
Each time a visitor bookmarks your Web page, their browser will
download your icon and associate it with your site's URL. This association
remains in effect until the user empties their browser's temporary
Internet cache.
.gif)
|