Audio Amplifier with LM386
This is another simple amplifier able to deliver even 0.5W of audio, it is a very used circuit in QRPs and RX by radio-amateurs in the whole world.
I usually have modules for this amplifier ready for immediate use, and usually build from 3 to 5 modules each time.
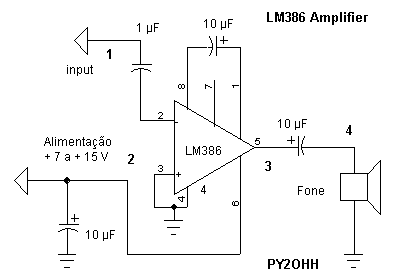
The circuit is based in the traditional LM386 IC, which is very used in portable equipment, because it works with voltages between 5 and 15 Volts.
It can show a linear voltage gain of 200, that is, 46 dB (20*log(Vout/Vin) ou 20*log200 = 46db) that can be adjusted externally, adding a 10 µF (+ positive to pin 1) and a series resistor to the pin 8. In the gain extremes we have 26 dB gain without a capacitor and 46 dB of gain with a 10 µF capacitor without series resistor. Another intermediate values can be obtained so the datasheet must be looked up.
The used resistors and capacitors come from junk recycling.
The circuit :
Construction
We use a printed circuit board with rectangular islands cut with a hand saw.
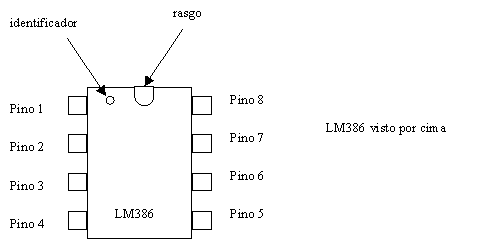
How to identify the LM386
Preparing the project board :
Cut the board to the 15x18mm size, consider an additional mm due to the saw cut. Firstly trace with a rule and pen. After the cut, clean with a file or sandpaper.
Trace the islands (rectangles) following the design below, hold to the shop table edge with a cramp and with a well sloped hand saw cut the cupper forming the islands, be careful not to go out of the design.
In the dollar shops there is a chinese mini saw bow on sale, with several blades enclosed, which makes a narrower cut. The cramps are also on sale there.
After the cut clean with a sandpaper and remove the oxide with a palha de aço.

Building the integrated circuit :
The LM386 is mounted with legs up, just like a dead bug, hence the name, I suggest to the beginners to do a mark in order to determine certainly which is the pin 1.
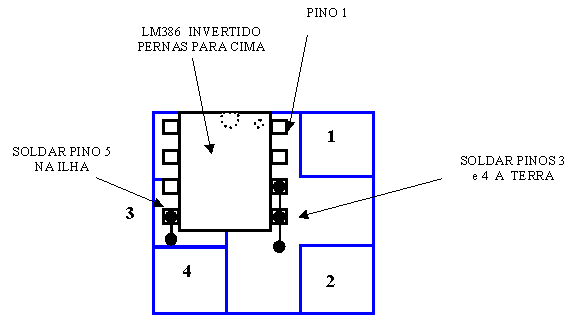
The pins 3, 4 and 5 must be cut short allowing a wire to be soldered to the cut terminals.
The wires used herewith will be obtained by the remnants of parts terminals (capacitors and resistors), all terminal surplus must be saved for the future circuits.
After adjusting the integrated solder the pins 3, 4 and the ground with a naked wire as shown in the image. Also solder the pin 5 to the island as shown.
The islands size can be increased and it will depend on the builder skill, on the available parts size and ... on builder age ( hi !). We already built a SMD this way with a 10x10mm board (the SMD came from a junked modem).
Good luck my friends !
PY2OHH Miguel
Áudio Amplificador com LM386
Outro amplificador simples que pode render até 0,5W de áudio, é um circuito muito utilizado em QRPs e RX por radioamadores de todo o mundo.
Costumo ter módulos deste amplificador para uso imediato, e costumo montar de 3 a 5 módulos.
O circuito é baseado no tradicional integrado LM386, que é muito utilizado em equipamentos portáteis, pois trabalha com tensões entre 5 e 15 Volts .
Pode apresentar um ganho linear de tensão de 200 ou seja 46 db (20*log(Vout/Vin) ou 20*log200 = 46db) que pode ser ajustado externamente, adicionando um capacitor de 10 µF (+ positivo no pino 1) e um resistor em serie entre os pinos 1 e 8 . Nos extremos de ganho temos: sem capacitor 25 db de ganho e com um capacitor 10 µF sem resistor em serie o ganho será de 46 db . Outros valores intermediários podem ser obtidos para tanto o datasheet deve ser consultado
.Os capacitores e resistores utilizados são reaproveitamento de sucata.
O circuito :
Montagem
Utilizamos uma placa de circuito impresso com ilhas retangulares cortadas com uma serra manual.
Como identificar o LM386
Preparando a placa de montagem :
Cortar a placa no tamanho de 15x18mm considerar 1mm a mais devido ao corte da serra. Primeiro trace com uma régua e caneta esferográfica. Após o corte rebarbar com uma lima ou lixa.
Traçar as ilhas (retângulos) conforme desenho abaixo, fixar na borda de uma bancada com um grampo (sargento) e com uma serra manual bem inclinada cortar o cobre, formando as ilhas, tome cuidado para não ultrapassar a traçagem.
Nas lojas de R$1,99 é vendido um mini arco de serra chinês, que vem acompanhado de diversas laminas, que faz um corte mais fino. Os grampos de marceneiro, bem como o sargento também são vendidos por lá.
Após o corte rebarbar com um lixa e tirar o óxido com uma palha de aço.
Montando o circuito integrado :
O Lm386 vai montado de pernas para cima, tal qual um inseto morto, daí o nome, sugiro para os iniciantes que façam uma marcação afim de saberem com certeza qual é o pino 1.
Os pinos 3, 4 e 5 devem ser cortados curtos permitindo que um fio seja soldado nos terminais já cortados.
Os fios aqui utilizados serão obtidos do corte de excesso dos componentes (capacitores e resistores) toda a sobra de terminais de componentes deve ser guardada para os próximos circuitos.
Após ajustar o integrado soldar os pinos 3 , 4 e a terra com um fio desencapado conforme ilustrado na figura. Soldar também o pino 5 na ilha conforme ilustrado.
O tamanho das ilhas pode ser aumentado e dependera da habilidade do montador, do tamanho dos componentes disponíveis e ... da idade do montador ( hi !). Já montamos SMD neste estilo com uma placa de 10x10mm (o SMD veio de um modem sucateado).
Boa sorte amigos
PY2OHH Miguel