1-The SFF
Programs required:
-Mugen character maker 2.0 beta or higher (MCM2)
-Adobe Photoshop or analog (any PCX ediitor)
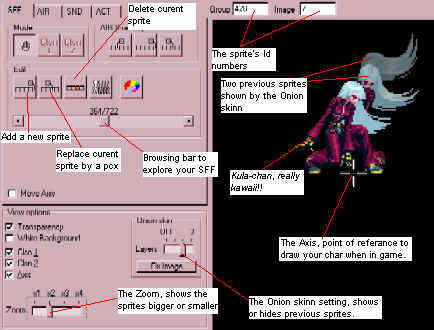
The easiest part to start with is the character's graphics. The SFF file contains all of the character's visual info, ordered in groups and images. Open the MCM and start exploring it. For now we'll stay on the first tab Labeled SFF. Select the SFF menu on top of the screen and use the "open" option to try out opening your favorite mugen chars' graphics. You may browse through all of their sprites using the browsing bar on the middle left. You can also see the pieces the stages consist of if you open their respective SFFs.
Once you've played around with it and had fun for a while, you may start thinking of arranging your own char's graphics. Now you have two options: draw your char out of nowhere or edit a char you've already got from somewhere else. In any case, always remember MCM won't ask you to save your work when you're closing it, so save your work all the time before you forget.
(Skip to original char making)
Editing a character
In the first case, you should start by selecting the char of your preference and the sprites of his you want to edit. Go onto the exact sprite, and then in the SFF menu select "Export to PCX..." I recommend this option over "Export all to PCX..." because with the first one you may name the extracted file yourself with an appropriate label. If you have the first sprite of Vega's jump animation, call it "Vegajump01". If you export all at a time, they'll be numbered unmethodically, so you got "Vega0001", "Vega0002"... and if you want to find the firs of the jumping sprites, it'll be something like "Vega0356". Slower is safer. You won't edit all sprites at a time anyway.
The MCM extracts the sprites into PCX format. Open these using your favorite program, I believe the easiest for this task is Adobe Photoshop because it opens PCX directly and has quite comfortable image editing tools. Another possibility is opening the files with Ms Photo editor and copying them to Ms Paintbrush to work on them there and copy them back once you're done. That second option might be more comfortable for Mspaint freaks like me, who learned to use the PC for the first time by drawing in Paintbrush. Whatever program you use, change the character round until he looks the way you want. Yes, you have to do it sprite by sprite. Yawn! That's just the reason why I'm not doing more characters myself. Anyway, notice that as you edit the character you can't or shouldn't use colors not included in the original palette. If you do it in Mspaint and then copy it back to Photoed, the colors will go ugly. Check the palette in Photoshop under "Image -> Mode -> Color Table..." In Photoed you don't have that option, so you'll have to work a lot more with the eyedropper.
Once your edited sprites are done, go back to the MCM, go to each sprite you modified and press the "Replace sprite" button or select the option in the SFF menu. Then, search out the image equivalent to the one you are replacing. Thus you can easily make another char look different without messing with any programming.
But you probably want your char to have new moves besides the ones the old one had. To do that, first you need to search out the old sprites you want to turn into new ones. You can put the character into new positions by cutting different body pieces from here and there and pasting them together. Flip and turn them until they fit, add some extra color to hide the attachments and there you go, a new position for the old char.
Of course, don't overwrite the old positions with the new ones. Use "Save as..." I don't even need to tell you that, do I? Shame on you. If the original size of the image happens to be too little space for your new complexion, try copying your work this far and using "Resample" or "Image size". The pictures size will change and it will all look ugly. Paste your stuff again and will look fine. This way you keep the same palette, which is very important.
Once you have your new sprites, add them in the MCM using the "Add sprite" button or selecting that option in the SFF menu. It's highly recommended you give all of your new sprites the same group number, an unused one of course. That is, a new group number for each new move you're adding. Also, use the "Onion skin" option to make sure your new sprites are in a position congruent with the old ones. If they're not, just click on the image in the black field and drag it round until it's where it should be.
Creating an original character
Ooh... So you chose the hard way. Okay, first of all draw all of your character's sprites. Yeah, sounds bad. But it's quite worse than it sounds. Bwahahahahaha! Make sure not to use all too much colors, smooth gradients or so. Also make sure your char has a hard edge. Little edge gradients will look horrible once in mugen.
You will have to put them all into 256-color mode, using the same palette in each and every one of them. Select the sprite that has the most colors and in Photoshop use "Image -> Mode -> Indexed Color". Set the palette option to "Adaptive" and the dithering to "None". Photoshop will create a palette containing all of your image's colors (unless you used more than 256, which I told you not to). Make sure the color you meant to be transparent is in the lower right corner. If it's not, search it out and replace it.
Once you've made your palette, copy and paste all of your sprites onto the pic that has the pal, using "Image size" to make the pics fit exactly and "Save as..." to store them with differenced names. Save them all in PCX format, for it's the only file type the MCM will read. If there are colors your original palette does not contain yet, add them in "Image -> Mode -> Color Table" by replacing one of the blacks that may have been left over.
Now you have all of your sprites, add them in the MCM using the "Add sprite" button or selecting that option in the SFF menu. It's highly recommended you give a new group number for each new move you're adding. Check the default animation numbers in your mugen-docs directory under air.txt, chapter III.
Once your sprites are inside the MCM you should see them on the screen that started being black. Notice also the little white cross in the center. It's not a dirty spot but the Axis. This is the point of reference from which mugen will start drawing your char when in the game. Drag your sprite to a position where the Axis is at its central bottom, between its two feet, (if it has some). Also, use the "Onion skin" option to make sure your new sprites are in a position congruent with the old ones. If they're not, just click on the image in the black field and drag it round until it's where it should be.