Bioelectronics
The most important
electronic device to make or buy is a zapper-a
compact pulse generator
operating from a common 9 volt battery whose output is about 30 KHz. It
kills all parasites, bacteria, viruses, molds, and fungi even though their
individual resonant frequencies are either higher or lower (50 KHz to 900
KHz). Building a zapper is described in an earlier chapter.
The next-most
useful device to have is a Syncrometer.TM It lets you diagnose yourself
and monitor your progress until you are cured. It consists of an audio
oscillator circuit with your body as part of the circuit. Utilizing samples
of parasites or pollutants, it lets you test for them in any product or
body tissue. I include a design that you can make yourself.
A third very useful
device is a frequency generator. You can use it to electrocute individual
organisms, or together with the Syncrometer TM
to find an organism's particular
frequency. You need one that operates in the parasite, bacteria and virus ranges,
from 50 KHz to 900 KHz. It must also be able to select a particular frequency,
like 434 KHz, quickly and accurately. Frequency generators are available for
as little as $300.00, but it is worth paying a little more to get a digital
display of the frequency.
The
Discovery
What makes me think I can find things in the human body that a blood test can
not? What new technology makes this possible? Why is electronic testing superior
in many ways to chemical methods? What are my claims of electrically killing
parasites based on?
In 1988 1 discovered a new way to scan a body organ. It was electronic. We already
can "see" an organ with a sonogram, X-rays, computerized tomography (CAT) scan,
or with magnetic resonance imagery (MRI). These techniques can identify abnormal
shapes in an organ without having to explore or guess. But my new electronic technique
can check for viruses, bacteria, fungi, parasites, solvents and toxins, and in
addition is simple, cheap, fast and infallible. Electricity can do many magical
things; now we can add detecting substances in our body to that list.
The method rests on radio
electronic principles.,
If you match, very precisely,
the capacitance and inductance properties of an external circuit so that its
resonant frequency is the same as the emitted frequency coming from somewhere
else, the circuit will oscillate. This means there will be positive feedback
in an amplifier circuit. You can hear it. Like when a public address system
squeals.
The external circuit I use
is called an audio oscillator, quite easy to build or buy. Your body
provides the emitted frequencies. When you combine the audio oscillator circuit
with your body, and you hear resonance, then you have detected a match!
Something in your body matches something in the circuit on the test plate. By
putting a laboratory sample of, say, a virus on the test plate, you can determine
if your body has that virus by listening for resonance. Hearing resonance is
easy if you're a radio technician
or musician. Others must patiently practice. The details are given in the Bioelectronics
chapter.
You do not have to be an
expert in anything to learn the electronic detection method. But a keen sense
of hearing helps.
In 1988 1 learned a way to
put anything on my skin, blindfolded, and identify it electronically in a few
minutes. I could taste something without flavor and identify it electronically.
The system worked fine for detecting things in the skin and tongue. Would it
be reliable for internal organs, too?
A whole world of discovery
lay ahead of me. I wanted to know what was in my inner ear causing tinnitus,
in my eyes causing pain, in my stomach causing indigestion and a thousand other
things.
But behind the daily excitement
of new discoveries, a gnawing question lingered in my mind. How is this possible
without some pretty high frequency energy source, radio frequency in fact, running
through my circuit? My audio oscillator was only 1000 Hz (hertz, or cycles
per second); radio frequency is hundreds of thousands of Hz. And the phenomenon
could be produced with an old-fashioned dermatron', too, that only puts
out DC (direct current)-no frequencies at all!
A high frequency energy had
to be coming from somewhere. Was it me? Ridiculous!
But there was a way to test.
If my own body was putting forth the high frequency energy, it could be bled
off and diverted into the ground with a correct size capacitor. This should
stop the feedback oscillations. This turned out to be true; it was stopped.
But ridiculous kept ringing in my ears and I tried an
1The dermatron was invented
decades ago and made famous by Dr. Voll. Establishment science disdained it!
other test.
If there was indeed radio frequency (RF) running through my circuit I should
be able to block it with the right snap-on choke. It did block. I thought of
a third test. If this was truly a resonance phenomenon I should be able to add
a capacitance to this circuit and see the resonance destroyed. Then add an inductance
and see the resonance return. It did just that. I made graphs of the relationship
between capacitance and inductance. They were entirely reproducible.
Then why couldn't I see the
RF on my RIF oscilloscope? Probably because it was high frequency energy,
not high energy frequency, and I didn't know how to amplify it above
the background noise level. It was nevertheless not convincing. Yet much too
tantalizing to ignore.
I thought of yet a fourth
test. If I was really producing RF radiation that could be channeled through
a circuit, I should be able to interfere with it by adding another RIF radiation
from an outside source. I added a frequency from my frequency generator, first
at 1,000 Hz. Now there was no resonance. It interfered. Did this mean that my
body was not producing radiation at 1,000 Hz? Or was my 1,000 Hz radiation being
matched and canceled? I raised the frequency gradually, from 1,000 to 10,000
to 100,000 to 1,000,000 Hz. There was no resonance anywhere, and I couldn't
draw any conclusions. It was 5 o'clock on Sunday afternoon. Quitting time. But
one last look at my generator reminded me that it could reach 2,000,000 Hz and
I was just at 1,000,000. One more quick experiment wouldn't take much time.
I cranked it to 1,800,000 Hz. And now a resonance screamed out! Was I "hearing
things?" No more interference. I did it over and over. Why was it resonating
now and not before? Had I arrived at my body's own bandwidth (transmission
range), and this was the reason it no longer interfered?
I found the lowest frequency
that resonated to be 1,562,000 Hz. All frequencies that I checked (about 2,000)
from there up to 2,000,000
(my frequency generator would go no higher) also resonated.
A year later I purchased
a better frequency generator to search for the upper end of my bandwidth. Any
frequency between 1,562,000 and 9,457,000 Hz could be added to the circuit and
produce resonance.
It seemed obvious,
then, that the human body broadcasts electrically, just like a radio station,
but over a wide band of frequencies and very low voltages, which is why it has
not been detected and measured until now.
Everything Has A Unique Frequency
It was a busy year, now 1989. 1 was determined to find a bandwidth for other
living things: I found them for flies, beetles, spiders, fleas, ants. They were
between 1,000,000 Hz and 1,500,000 Hz; cockroaches were highest amongst insects
I tested.
Then came a dismaying finding.
A dead insect had a bandwidth too! Much narrower, and near the top end of the
same range it had when living, but distinctly present. So it wasn't altogether
a living phenomenon.
But if dead things had a
resonant bandwidth, then maybe a prepared microscope slide of a dead creature
could be used, and my trips to the garden and telephone calls to abattoirs (for
meat parasites) could cease. That was a lucky thought. My first slide was of
the human intestinal
fluke, a huge
parasite, scourge of humanity. I had just found it to be present in the liver
(not intestine) of every cancer sufferer I saw. The (dead) adult parasite
had a resonant frequency around
434,000 Hz. Slides of that parasite's redia resonated nearby (432,000 Hz), as
did its other stages.
Dead things still resonated!
The entire catalog of biological supply companies, hundreds of specimens of
viruses, bacteria, parasites, molds, and even toxins, were now available to
research with this new technique!
Suddenly an idea bolted out
of the blue. If a person were to hold on to the frequency generator while it
was generating 434,000 Hz, what would happen to the adult fluke, if you were
infected with it?
I tested this plan that same
week on myself, not with the fluke but with Salmonella bacteria and Giardia
and Herpes that I carried chronically. After a 3 minute treatment,
I retested myself. I could no longer find them in my organs! There were no emissions
at their characteristic frequencies. I repeated and repeated. Were they really
dead? Maybe they were just numbed or were suddenly hiding. But symptoms were
gone quickly too. My Herpes lesion stopped tingling. It was all too simple
and unbelievable.
But was it safe? Within three
weeks I had reliable data regarding the necessary level of electrical treatment.
It only took 5 volts for three minutes at the specific frequency. It is not
as if you had to use house current which would kill you, along with the
parasite.
Selective Electrocution
In twenty minutes (three minutes at six different frequencies) a whole family
could get rid of this parasite. Cancer cases showed that in a few hours the
universal cancer marker, orthophospho-tyrosine could be banished from
their bodies by killing this same parasite.
"Incurable"
HIV cases lost their virus in a few hours, too. Laboratory retesting for HIV
came back negative! Most cases of pain got immediate relief if I could identify
the correct "bug" and have its frequency found by the next office visit. This
seemed to be absolute proof that living things had an essential high frequency
output of some kind of energy.
What was actually happening
to the bacteria or parasites? If I could kill something as large as an Ascaris
worm or intestinal fluke, then perhaps I could kill something even larger, like
an earthworm or flea, something I could see with my own eyes instead of having
to imagine its demise inside my body.
Ten minutes at a :frequency
chosen near the top of their broadcast range seemed to anesthetize them. But
they didn't die. Later I checked the body bandwidth (the range of frequencies
they emit) of each. The earthworms had lost a lot of their bandwidth, both at
the top and bottom. The fleas seemed hardier; they had only lost a little. However
they did not recover, even weeks later, from this loss.
Could it harm humans to douse
them with RF frequencies in their own bandwidth? Quite probably, if the
voltage were high enough. There was no need to experiment, though, because the
parasites we want to kill have characteristic frequencies that do not overlap
the characteristic frequencies of a human. In fact, they are far away (see
the chart on page 17).
So my electronic method attacking
illness was born. Find the resonant frequency of a bacterium, virus or parasite
using a slide or dead bit. Treat the living invaders inside the human body with
this frequency and in a matter of minutes they are no longer transmitting their
own bandwidths-they are dead or sick and will be removed by our white blood
cells.
It was a worrisome truth.
Perhaps the department of defense would use this knowledge and develop super
high voltage devices to kill people ("enemies") somewhere in the world. But
I couldn't let sick people suffer. Besides, it would probably require
a voltage much like lightning to kill people from a distance. Possibly a way
could be found to shield yourself from frequencies harmful to humans by wearing
a choke (inductor) coil which suppresses these frequencies. Remember, there
was no recovery, just a slow death for my experimental animals. It must not
happen to humans!
Meanwhile, people must be
alerted that they can safely kill their invaders and heal their chronic illnesses.
Invaders that have been increasing exponentially due to lowered immunity in
recent decades. Possibly this is true for all species on our planet. The pollution
of the entire biosphere has been increasing and with it the prospect of acquired
immune deficiency syndrome (AIDS) for all of us.
Remember, though, that the
true challenge is not to kill our invaders but to regain our health and immunity.
More than just parasites
are making us sick! Pollution is too. Selective electrocution rarely makes people
completely well. Sick people always have an environmental factor that must be
corrected also.
How do we do that? The ship
of "progress", of increasingly complex, processed foods and products, must be
turned around and simplicity become our goal. Survival is in simplicity of food
intake, simplicity of life habits. Did Ralph Waldo Emerson foresee this when
he said "To be simple is to be great"? Or will daily parasite and pathogen electrocution
become another crutch that makes us just enough better that we can continue
a detrimental lifestyle? Yet another "Band-Aid" treatment for our poisoned planet?
Bioradiation
Strange as it appears, it now seems obvious that every living creature broadcasts
its presence like a radio station, the sun, or the stars. I have named it
bioradiation.
Perhaps it is the same energy as the Asian chi; perhaps it is merely related
to it. Perhaps it is the energy that runs along the meridians discovered eons
ago by Asian practitioners.
Perhaps it is the energy
that faith healers and religious teachers know how to harness, perhaps not.
Perhaps it is the energy
that psychics perceive and that drives occult phenomena, perhaps not.
What is truly amazing is
that ordinary persons have discovered such energy well ahead of scientists.
Persons using the cc
art" of kinesiology, pendulums,
radionics, dousing rods and many other forms of "strange energy" have no doubt
harnessed a part of this bioradiation. It is a tribute to the generally high
intelligence of common people and to their open-mindedness that they discovered
this energy, in spite of opposition from scientists of today.
Over a century ago the scientists
of Europe proposed the existence of a "life force" called "elan vitale." They
were scorned out of existence (and out of jobs). Young scientists, (including
myself) were systematically taught to scorn this idea. Of course we were also
taught that a good scientist was unemotional, does not scorn ideas, has
a completely open mind, and
does not rule something
out until it is disproved to their satisfaction. The youthfulness of college
years is so susceptible to prejudices of all kinds, and the desire for acceptance
is so great, that special effort needs to be made to teach neutrality. Or at
least to distinguish between emotion and fact. Where have these basic pedagogic
principles gone? I was indeed inspired with the phrase "search for truth" but
then promptly led down the path of
" search for acceptance."
I do not
know what bioradiation, this electrical broadcast from our cells, is made of
Only its frequency was noticed and caught (modulated) in such a way as to be
measurable. And this frequency, 1,520,000 to 9,460,000 Hz (for a human infant)
is in the radio frequency (RF) range2.
Anyone who is experienced with RF knows its strange behavior.
Not strange in the "unknown" sense but in the amazing
sense. Circuits don't need to be complete or closed for it to
travel. Bodies and objects can "pick it up" without being in the circuit. These
amazing properties are due to the capacitive and
inductive properties of objects all around us, including ourselves.
I
Zapping Bugs
By zapping I
mean selectively electrocuting
pathogens. For years I used a commercial frequency generator to "zap" one pathogen
after another.
First I made a chart of the
frequencies for most of the bacteria and viruses in my collection (over 80,
see page 561). Then I would test the sick client for each one of these, and
hope they did not have one for which I didn't have a sample. Even persons with
a simple cold typically had a dozen they tested positive to (not just A
denovirus).
Next it was time to tune in the frequency generator to a dozen frequencies for
three minutes each. The total process, testing and treatment, would take about
two hours. They frequently got immediate relief But often the relief would be
temporary. What I didn't know at that time was that viruses could
2 AM radio broadcasts are from
540,000 Hz to 1,600,000 Hz (slight overlap with lower end of human band), FM
is 88,000,000 to 108,000,000 Hz (out of the human range). infect
a larger parasite such as a roundworm. Until you killed your roundworm and your
virus, you would keep getting the virus back promptly.
In 1993
my son, Geoffrey, joined me and we tried a new approach. He programmed a computer
controlled frequency generator to automatically cover all the frequencies populated
by all the parasites, viruses, and bacteria, from 290,000 Hz to 470,000 Hz.
It spent about three minutes for every 1000 Hz it covered. This was more efficient,
but it meant spending Len hours being zapped.
Again,
the results were disappointing. Arthritis pain, eye pain, colds were improved,
but not completely cured overnight. Months later I would find that organisms
were transmitting as low as 170,000, and as high as 690,000 Hz. My specimen
collection was obviously incomplete. To cover this larger range, spending three
minutes for every 1000 Hz, would take 26 hours. Still worth doing if it would
indeed help all our illnesses. But even this method of zapping was not 100%
effective for reasons yet to become clear.
In 1994
my son built a hand held, battery operated, accurate frequency generator. The
purpose was to enable everyone to kill the intestinal fluke at 434,000 Hz with
a low cost device. Enough benefit would be derived from zapping at various frequencies
that I thought everyone should know how to make one. When I tested it on one
of my own bacteria, however, three others at much different frequencies died
also! This had never happened before. When I tested it on others, even though
they had dozens of pathogens, all were killed!
Subsequent
testing showed it was not due to some unique design, or special wave form produced
by the device. It was due to battery operation!
Any positively
offset frequency kills all bacteria,
viruses and parasites simultaneously
given sufficient voltage (5 to 10 volts), duration (seven minutes), and frequency
(anything from 10 Hz to 500,000 Hz).
Before this I had always
set my commercial frequency generator to alternate between positive and negative
voltage. Now I tried setting it to alternate between positive and zero voltage
(positive offset). It was just as effective as the battery operated frequency
generator my son designed.
Generating positive offset frequencies is the best
way to kill all pathogens quickly.
But it takes more than one treatment.
It takes three treatments to kill everything. Why? The first zapping
kills viruses, bacteria and parasites. But a few minutes later, bacteria and
viruses (different ones) often recur. I conclude they had been infecting the
parasites, and killing the parasites released them. The second zapping kills
the released viruses and bacteria, but soon a few viruses appear
again. They must
have been infecting some of the last bacteria. After a third zapping I never
find any viruses, bacteria or parasites, even hours later.
Why didn't the virus inside
the parasite die with the first zapping? It may be because electricity travels
on the exterior of things. The body of the parasite shielded the interior. This
is why my earlier, promising work spending hours on a frequency generator gave
only partial or temporary improvement-it was only
done once, not three times. And it explains why a single treatment with a frequency
generator or zapper frequently gives you a cold!
Zapping does not kill shielded organisms
such as those that may be in the middle of your stomach or intestines. The electricity
travels along the stomach or intestine wall, not through their contents.
So zapping is still
not perfect, but can bring such manifest relief that everyone should buy or make
one. Parts cost less than $25.00; the plans are in the next chapter.
The Bioradiation Spectrum
Everything emits a characteristic range of frequencies (bandwidth). In general,
the more primitive the organism, the lower its bandwidth. Advanced animals have
higher frequencies and the range is wider.
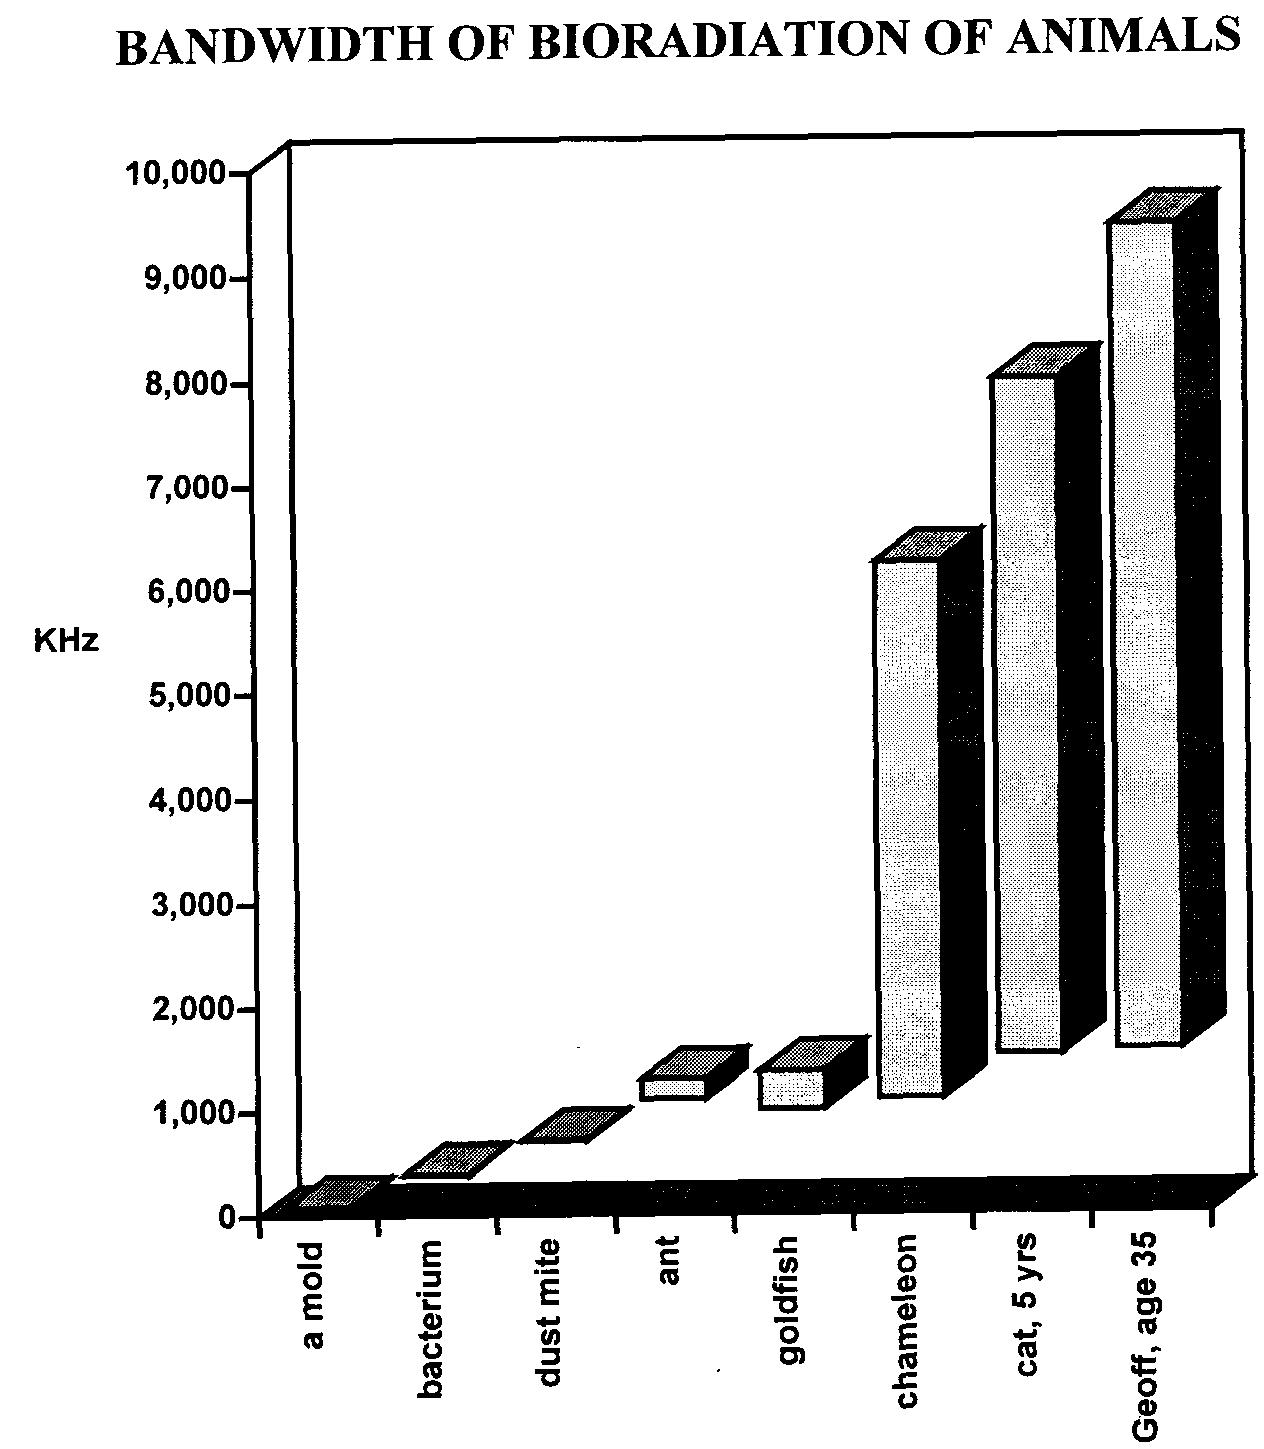 Fig.
I Selected animal bandwidths.
Fig.
I Selected animal bandwidths.
The human range is
from 1520 KHz to 9460 KHz. Pathogens (molds, viruses, bacteria, worms, mites)
range from 77 KHz to 900 KHz. Fortunately for us we can work on zapping pathogens
in the lower ranges without affecting humans in the upper range.
BIORADIATION OF TYPICAL
PATHOGENS
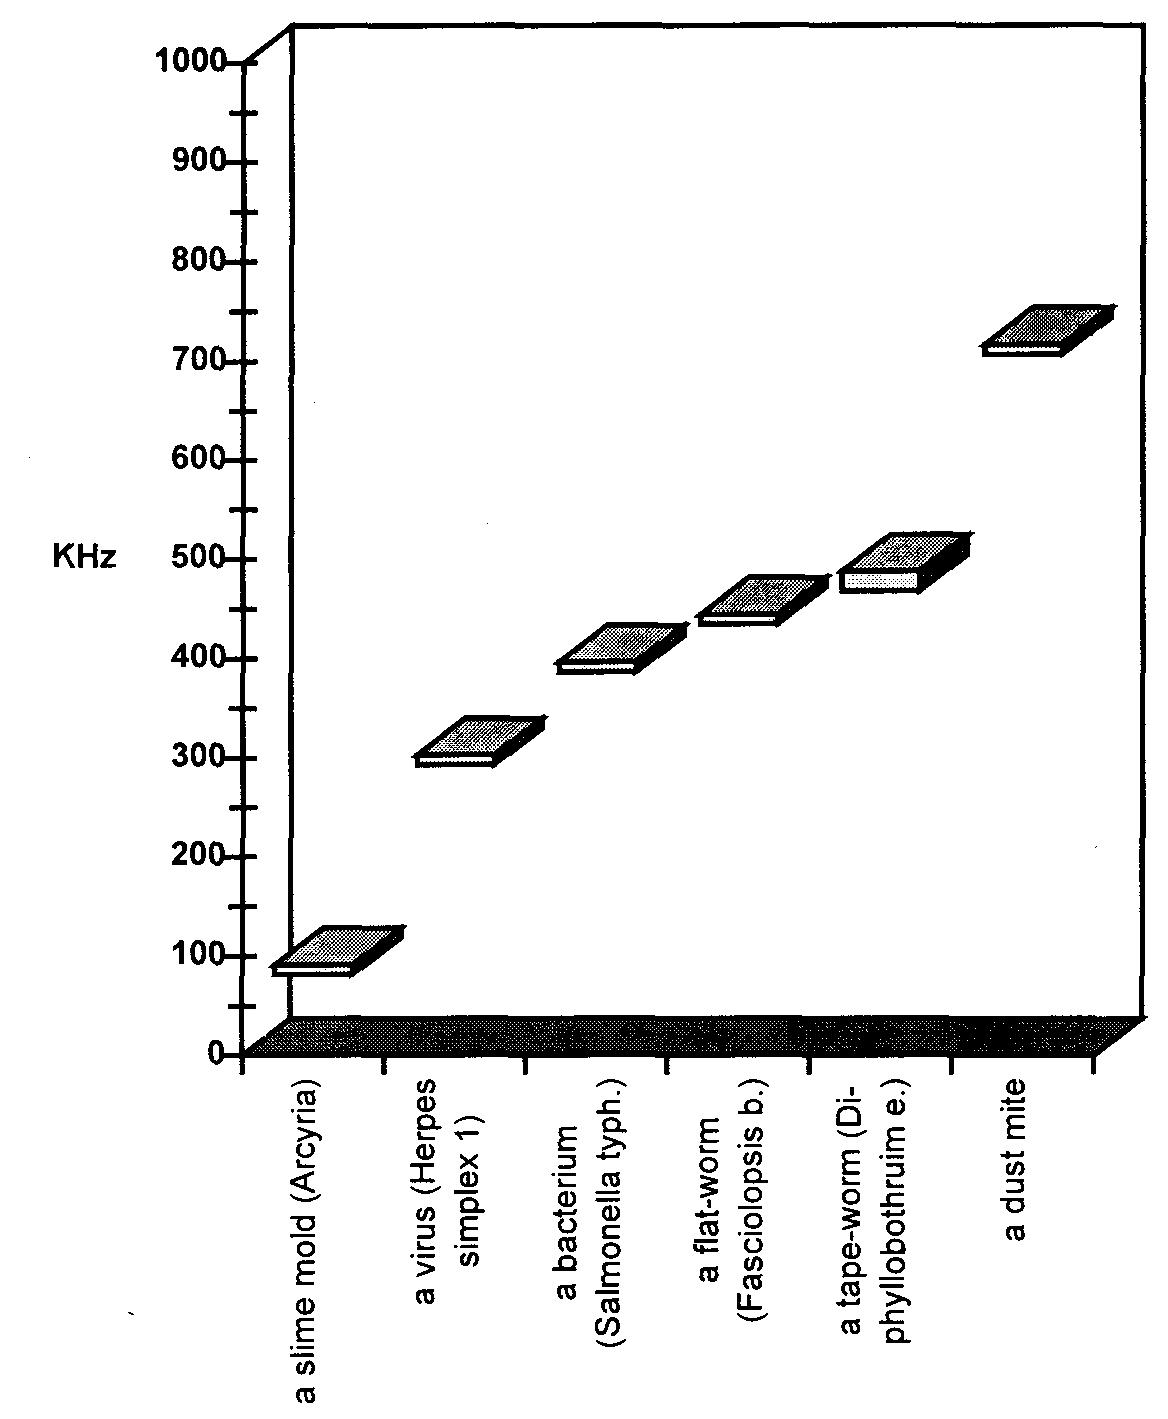 Fig.
2 Selected pathogen bandwidths.
Fig.
2 Selected pathogen bandwidths.
Applying an alternating electrical
voltage within an organism's bandwidth injures it. Small organisms with narrow
bandwidths are extinguished quite readily (three minutes at five volts).
Positively offset frequencies
can kill the entire range of small organisms (viruses, bacteria, parasites)
in just seven minutes.
Building
A Zapper
Being able to kill your bacteria and other invaders with electricity becomes
much more of a panacea when you can do it all in three 7 minute sessions.
No need to single out specific frequencies or to sweep through a range of
frequencies one KHz at a time. No matter what frequency it is set at (within
reason), it kills large and small invaders: flukes, roundworms, mites, bacteria,
viruses and fungi. It kills them all at once, in 7 minutes, even at 5 volts.
How does it work? I suppose
that a positive voltage applied anywhere on the body attracts negatively charged
things such as bacteria. Perhaps the battery voltage tugs at them, pulling
them out of their locations in the cell doorways (called conductance channels).
But doorways can be negatively charged too. Does the voltage tug at them
so they disgorge any bacteria stuck in them? How would the positive voltage
act to kill a large parasite like a fluke? None of these questions can be
answered yet.
Other fascinating possibilities
are that the intermittent positive voltage interferes with electron flow in
some key metabolic route, or straightens out the ATP molecule disallowing
its breakdown. Such biological questions could be answered by studying the
effects of positive frequencies on bacteria in a lab.
The most important question,
of course, is whether there is a harmful effect on you. I have seen no effects
on blood pressure, mental alertness, or body temperatures. It has never produced
pain, although it has often stopped pain instantly. This does not prove its
safety. Even knowing that the voltage comes from a small 9 volt battery does
not prove safety, although it is reassuring. The clotting of red blood cells,
platelet aggregation and functions that depend on surface charges on cells
need to be investigated. But not before you can use it. Your safety lies in
the short period of exposure that is necessary. Viruses and bacteria
disappear in 3 minutes'
tapeworm stages, flukes, roundworms in 5; and mites in 7. One need not go
beyond this time, although no bad effects have been seen at any length of
treatment.
The first seven minute
zapping is followed by an intermission, lasting 20 to 30 minutes. During this
time, bacteria and viruses are released from the dying parasites and start
to invade you instead.
The second seven minute
session is intended to kill these newly released viruses and bacteria. If
you omit it, you could catch a cold, sore throat or something else immediately.
Again, viruses are released from the dying bacteria. The third session kills
the last viruses released.
Do Not Zap If You Are Pregnant
Or Wearing
A Pacemaker.
These situations have not been explored yet. Don't do these experiments yourself
Children as young as 8 months have been zapped with no noticeable ill effects.
For them, you should weigh the possible benefits against the unknown risks.
That is all there is to
it. Almost all. The zapping current does not reach deep into the eyeball or
testicle or bowel contents. It does not reach into your gallstones, or into
your living cells where
Herpes
virus lies latent or
Candida fungus
extends its fingers. But by zapping 3 times a day for a week or more you can
deplete these populations, too, often to zero.
Killing The Surviving Pathogens
The interior of gallstones may house parasites inaccessible to the zapping.
Eliminate this source of reinfection by flushing them out with liver cleanses
(page 552).
Although
the center of the bowel contents is often unaffected by electric current,
which lets bowel bacteria like Shigella, Escherichia coli (E. coli)
and parasite stages survive, sometimes it is nearly all sterilized by zapping.
This results in considerable shrinkage of the bowel movement. Eliminate remaining
parasites and bacteria with a single dose (2 tsp.) of Black Walnut Hull Tincture,
Extra Strength (see page 543).
There is no way of distinguishing
between "good" and "bad" bacteria with either of these methods. However even
good bacteria are bad if they come through the intestinal wall, so zapping
targets mostly "bad" bacteria. The good news is that perfect bowel habits
often result in a few days. Evidently, the good bacteria are benefited by
killing the invasive ones. Homemade yogurt and buttermilk (see Recipes)
are especially good at recolonizing the bowel. But it does not seem wise
to culture yourself with special commercial preparations and risk getting
parasite stages again when you can become normal so soon anyway. If you do
decide to take some acidophilus bacteria to replenish your intestinal
flora make sure you test for parasites like Eurytrema first.
When a large number of
parasites, bacteria and viruses are killed, it can leave you fatigued. Try
to give yourself a lowstress day after your initial zapping. But there are
no significant side effects. I believe this is due to the second and third
zapping which mops up bacteria and viruses that would otherwise be able to
go on a feeding frenzy with so much dead prey available.
To build your zapper you
may take this list of components to any electronics store (Radio Shack part
numbers are given for convenience).
Zapper Parts List
Item Radio
Shack Catalog Number
large shoe box
9 volt battery
9 volt battery
clips 270-325 (set of 5, you need 1)
On-Off toggle switch 275-624A
micro mini toggle switch
1 KOhm resistor 271-1321
(set of 5, you need 2)
3.9 K Ohm resistor 271-1123
(set of 2, you need 2)
low-current red LED 276-044
or 276-041 or 276-045
.0047 uF capacitor 272-130
(set of 2, you need 1)
.01 uF capacitor 272-1065
(set of 2, you need 1)
555 CMOS timer chip 276-1723
(set of 2, you need 1)
8 pin wire-wrapping socket
for 276-1988 (set of 2, you need 1) Note: Radio
the chip Shack is discontinuing
all wire wrap sockets. Find
another parts store or
use 276-1995 (but the legs
are much shorter and harder
to attach clips to).
short (12") alligator clip
leads any electronics shop, get 6
Microclip test jumpers
278-017 (you need 2 packages of 2)
2 bolts, about 1/8" diameter,
2" hardware store
long, with 4 nuts and 4
washers
2 copper pipes, 3/4" diameter,
4" hardware store
long
sharp knife, pin, I
Hints for absolute novices: Don't let unusual vocabulary
deter you. A "lead" is just a piece of wire used to make connections.
When you remove a component from its package, label it
with a piece of tape. A serrated kitchen knife works best as does
a large safety pin. Practice using the microclips. If the metal
ends are L-shaped bend them into a U with the long-nose pliers
so they grab better. Chips and chip holders are very fragile. It is
wise to purchase an extra
of each in case you break the connections.
Give this to an electronics
person or make it yourself in a shoebox by using the following instructions.
Resistor color
1K=Brown-Black-Red-(tolerance-typically gold,silver,or red) 3.9K=Orange-White-Red-(tolerance)
 Fig. 3 Zapper schematic. Assembling The Zapper
1. You will be using
the lid of the shoe box to mount the components. Save the box to enclose the
finished project.
2. Pierce two holes
near the ends of the lid. Enlarge the holes with a pen or pencil until the bolts
would fit through. Mount the bolts on the outside about half way through
the holes so there
is a washer and nut
holding it in place
on both sides. Tighten.
Label one hole "grounding
0
Gro 0
ding Bolt
bolt" on the inside and outside.
3. Mount the 555
chip in the wire
wrap socket. Find the
"top end" of the chip by searching the outside surface carefully
for a cookie-shaped bite or hole taken out of it.
Align the chip with
the socket and very gently squeeze the
pins of the chip
into the socket until they click in place.
4. Make 8 pinholes
to fit the wire wrap socket. Enlarge them slightly with a sharp pencil. Mount
it on the outside. Write in the numbers of the pins (connections) on both the
outside and inside, starting with number one to the left of the
"cookie bite" as
seen from outside.
After number 4, cross
over to number 5
and Bolt Grounding
Bolt continue.
Number 8 .0
will be across from
number 1.
5. Pierce two holes
1/2 inch
apart very near to pins 5, 6, 7, and 8. They should be less
than 1/8 inch away. (Or, one end of each component can
share a hole with the 555 chip.) Mount the .01 uF ca The
other handhold is attached to the other bolt. Connect the scope ground wire
to one end of the resistor. Connect the scope probe to the other end of the
resistor. Turn the zapper ON and grasp the handholds. Read the voltage on the
scope. It will read about 3.5 volts. Calculate current by dividing voltage by
resistance. 3.5 volts divided by I KOhm is 3.5 ma (milliamperes).
Using The Zapper
1. Wrap handholds in one
layer of wet paper towel before using. Grasp securely and turn the switch
on to zap.
2. Zap for 7 minutes, let
go of the handholds, turn off the zapper, and rest for 20 minutes. Then 7
minutes on, 20 minutes rest, and a final 7 minutes on.
Trying the zapper on an
illness to see "if it works" is not useful. Your symptoms may be due to a
non-parasite. Or you may reinfect within hours of zapping. The best way to
test your device is to find a few invaders that you currently have (see Lesson
Twelve, page 492, or Lesson Twenty Seven, page 509). This gives you a starting
point. Then zap yourself. After the triple zapping, none of these invaders
should be present.
Simple Purser
If you are ill or want a reliable zapping, make the first model. However,
there is another way to make a zapper if you can not afford to build the first
model.
An ordinary battery is
a source of positive voltage. It is the positive voltage that eliminates so
many parasites at once, not a specific frequency. So although the zapper's
frequency is about 30 kHz (thirty thousand "zaps" per second), even 5 Hz (five
"zaps" per second),
about as fast as you can tap the battery with your hand, is moderately
effective!
You must be connected to
both terminals. One will be marked + (positive) and the other - (negative).
If you simply touch these terminals with your wet fingers, nothing much happens.
That is because your resistance to the current starts going up right away,
so less and less current passes through you.
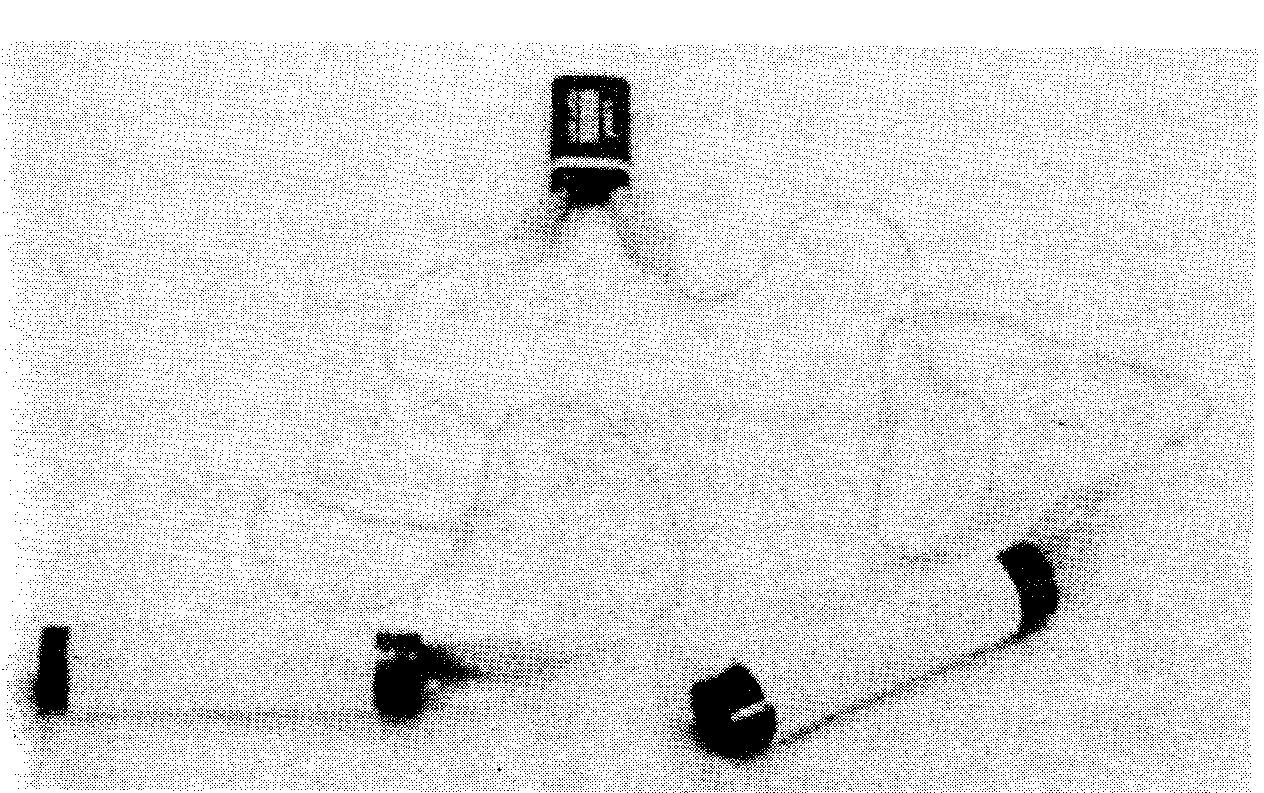 Fig. 5 Simple pulser.
However if you Lap the
positive terminal with your wet hand, and tap it at a fairly high rate, your
body's capacitors come into play. Capacitors only take part in the flow of
electricity when they are charged and discharged. Tapping the terminal starts
and stops the voltage so capacitors charge and discharge. This kind of resistance
to current flow is much smaller.
The faster you tap, the
greater the frequency of current pulses and the lower this kind of resistance
becomes. Now you can have a considerable sustained current flow through your
body.
If you can tap even twice
per second (2 Hz) for ten minutes without interruption you can give yourself
a zapping that is moderately effective. Remember to take an intermission of
twenty minutes and then repeat to avoid catching new viruses. After a second
twenty minute intermission repeat zapping a third time.
Using The Simple Pulser
1.
Wrap each handhold with
9 volt battery
one layer of wet paper
2 short (12") alligator clip leads (from
towel. Place each on a
any electronics shop)
2 copper pipes, 3/4"
diameter, 4" long
non-conductive surface,
(from a hardware store)
like a plastic bag.
2. Connect the positive
battery terminal to one handhold and the negative terminal to the other handhold
using alligator clip leads.
3. Don't let the handholds
touch.
4. Place a clock in front
of you to time yourself.
5. Pick up the right handhold
with your right hand.
6. Leave the left handhold
on the table. Tap it with your left hand, preferably the fleshy part of the
palm. You may brace yourself with your fingers on the plastic. Keep up a steady
pace as fast as you are able.
7. When you get tired pick
up the left handhold with your left hand and tap with your right hand. Keep
changing off with the least interruption.
8. Repeat a second time
20 minutes later, and a third time 20 minutes after that.
A single 9 volt battery
will wear out rather quickly used this way. Put two together, in' parallel,
for longer lasting power. This requires two more short alligator clips. Connect
positive terminals of the batteries to each other, and the negatives also.
Making A Syncrometer
This is
an audio oscillator circuit in which you include yourself by means of a
handhold. You listen to the current in your circuit with a loudspeaker.
Other oscillator circuits will work, too. A lot of fascinating opportunities
present themselves with this concept.
I have
previously published three ways to build the Syncrometer circuit.35 Here
is the circuit diagram:
4700pf moly
cap .1 mfd 16v cap 2N2907 PNP min output transf 8-90OU 150 .25w res 3 AA
batteries speaker (like RadioShack 277-1008C)

Fig.
79 Syncrometer schematic.
If you
are not an electronics enthusiast, you can still assemble a Syncrometer
using a hobby kit. No soldering is required. Here is what you need:
Making a Hobby
Kit Syncrometer
Item Radio Shack Cat.
No.
200 in One Electronic
Project Lab by 28-262
Science Fair
3 AA 1 1/2 volt batteries
35In The
Cure for all Cancers and The Cure for HIV/AIDS.
Alligator clip test
jumpers You need 2. Handhold.
A four inch length of 3/4 inch
copper pipe, like for plumbing.
These dimensions
are critical to assure
maximum skin contact.
Probe. A banana plug.
Precision Mini-Hook Test
Lead Set (contains two,
you only need one)- 278-1160A
Pencil,
new.
Pig. 80
Syncromer parts list.
Build The
Electrosonic Human in the 200 in One Electronic Project Lab. It
takes about 10 minutes.
Later,
when you use the probe to press against your knuckle you may find getting
the right sound is painful. In this case try substituting the .005 microfarad
capacitor for the .01 microfarad capacitor in the circuit.
Attach
the Probe. The Archer Precision Mini-Hook Test Lead Set has a banana
plug for the probe on one end and a minihook on the other end for easy
attachment to the circuit. Tape a long, new pencil to the probe to make
it easier to hold. Connect the Probe to middle post of the primary side
of the transformer (it also connects to the negative battery post). You
will not be using the two connections the instuctions tell you to
hold.
Attach
the Handhold. Clip the Handhold to one end of an alligator clip test
jumper, and clip the other end to the base (B) of the transistor used in
the circuit.
Attach
an alligator clip to the post of the transformer that connects to the
two capacitors. This will go to the test plates.
Final test.
Turn the control knob on and keep turning the potentiometer to nearly the
maximum. (This reduces the resistance.
The schematic has a 150 ohm fixed resistor in place of the potentiometer.) Make
sure you have good batteries installed. Test the circuit by briefly touching
the Probe to the Handhold. The speaker should produce a sound like popping corn.
If it does not, check that your alligator clips are not bending the spring terminals
so much that other wires attached there are loose. Finally, turn switches OFF.
Making
Test Plates
This is
the box you attach to the basic Syncrometer circuit. It has test plates
to put your test substances and tissue samples on. The wiring in it is
arranged so that you can test for a toxin in a product, as well as search
in yourself This means you can search for Salmonella in the milk
or cheese you just ate, not just for Salmonella in your stomach.
Only if
the resonant frequency of an item on one plate is equal to the resonant
frequency of an item on the other plate will the entire circuit oscillate
or resonate! This implies the two plates have something in common. By putting
a known pure sample on one plate you can reliably conclude the other sample
contains it if the circuit resonates.
You may
build a test plate box into a cardboard box (such as a facial tissue box)
or a plastic box. Here are the instructions for the cardboard box model.
Test
Plates Parts List
Stiff paper.
Aluminum
foil.
A facial
tissue box is easiest. A plastic project box, about 7" x 4" x 1
1/2,"
makes a more
durable product, but requires a drill, and you should discard any metal
lid it comes with.
3 bolts
(tapered heads) about I inch long, 1/8 inch diameter and 6 washers and
nuts to fit.
toggle
switch with OFF-ON positions. Alligator clip test leads.
Test
Plates Assembly
Cut two
3-1/2 inch squares out of stiff paper such as a milk carton. Cover them
with 4 1/2 inch squares of aluminum foil, smoothed evenly and tucked snugly
under the edges. You have just made yourself a set of open capacitors.
Turn the box upside down and draw squares where you will mount them at
the ends of the box. Don't actually mount them, to save wear and tear on
them, until the rest of the box is complete.
Mount the
ON OFF switch on the front of the box, underneath the right hand plate.
Line it up so ON is downward and OFF is up. (An electronics shop can determine
this for you at the time of purchase.) Label the box with ON and OFF signs.
Two bolts
will be reserved for the plates. The third bolt is used as a terminal where
the current from the oscillator circuit will arrive. Make a hole on the
side of the box, near the left hand plate and mount the bolt so it sticks
half way inside and halfway outside the box. It does not matter whether
the head is inside or outside. Tighten it there with a nut on each side
of the box. Label it TERMINAL. It merely means connecting place.
Mark the
center of each square that you drew and each capacitor you built. Pierce
first with a pin; follow with a pencil until a round hole is made at the
center. Mount each plate with a bolt, fastening it below with a nut. Washers
are optional.
The left side
connection (terminal) gets attached to the left plate (bolt) with an alligator
clip. Use another clip to attach the same left plate (bolt) to the ON OFF switch
(there are two connections, use either one). Finally attach the ON OFF switch
connection you didn't use to the right plate (bolt). Make sure the connections
at the switch are not touching each other; you might tape them to guard against
this.
All these
connections should be checked carefully to make sure they are not touching
others accidentally. But if you leave the box open so you can see any problems
and use clear tape around connections to prevent accidental touching to
the wrong connection, it should work OK.
Finally,
trace your current. It comes in from the Syncrometer at the main terminal
on the left. It is brought to the left plate. When the switch is ON it
is simultaneously brought to the right plate. Notice that the plates are
not connected to anything else. They are simply capacitors, letting current
in and out momentarily and at a rate that is set by the frequency of the
oscillator circuit, about 1,000 hertz. This frequency goes up as the resistance
(of the circuit or your body ) goes down.
The probe
and handhold allow you to include yourself in the Syncrometer circuit.
You grasp these when testing. This makes you part of the circuit.
The speaker
lets you "listen" to the current. As resistance drops, current goes higher
and frequency goes up. As frequencies go higher in the circuit, pitch goes
higher. You will be comparing the sound of a standard "control" current
with a test current.
Using The
Syncrometer
Fill a
saucer with cold filtered tap water. Fold a paper towel four times and
place it in this dish. It should be entirely wet.
Cut paper
strips about I inch wide from a piece of white, unfragranced, paper towel.
Dampen a paper strip on the towel and wind it around the copper pipe handhold
to completely cover it. The wetness improves conductivity and the paper
towel keeps the metal off your skin.
* Start
with the test plate switch at OFF.
·
Turn the control knob (potentiometer) on, and to near maximum.
Touch each
plate with the probe, while holding the copper pipe with one hand. Only
the left plate should give you a sound from the speaker. Turn the test
plate switch ON. Now both plates should give you a sound when the probe
touches them.
Turn the
test plate switch OFF again.
Pick up
the handhold, squeeze it free of excess water.
Pick up
the probe in the same hand, holding it like a pen, between thumb and forefinger.
Dampen
your other hand by making a fist and dunking your knuckles into the wet
paper towel in the saucer. You will be using the area on top of the first
knuckle of the middle finger or forefinger to learn the technique. Become
proficient with both. Immediately after dunking your knuckles dry them
on a paper towel folded in quarters and placed beside the saucer. The degree
of dampness of your skin affects the resistance in the circuit and is a
very important variable that you must learn to keep constant. Make your
probe as soon as your knuckles have been dried (within two seconds) since
they begin to air dry further immediately.
With the
handhold and probe both in one hand press the probe against the knuckle
of the other hand, keeping the knuckles bent. Press lightly at first, then
harder, taking one half second. Repeat a half second later, with the second
half of the probe at the same location. There is an additive effect and
you get two chances to listen to the current. All of this takes less than
two seconds. Don't linger because your body will change and your
next probe will be affected.
Subsequent
probes are made in exactly the same way. As you develop skill, your probes
will become identical. Plan to practice for one or two hours each day.
It takes most people at least twelve hours of practice in order to be so
consistent with their probes that they can hear the slight difference when
the circuit is resonant.
For reference
you may wish to use a piano. The starting sound when you touch down on
the skin should be F, an octave and a half above middle C. The sound rises
to a C as you press to the knuckle bone, then slips back to B, then back
up to Csharp as you complete the second half of your first probe. If you
have a multitester you can connect it in series with the handhold or probe:
the current should rise to about 50 microamps. If you have a frequency
counter the frequency should reach 1000 Hz. You should arrive at C-sharp
just before the probe becomes painful.
Two things
change the sound of the probes even when your technique doesn't change.
1. The
patch of skin chosen for probing will change its properties. The more it
is used, the redder it gets and the higher the sound goes when you probe.
Move to a nearby location, such as the edge of the patch, when the sound
is too high to begin with, rather than adjusting the potentiometer.
2. Your
body has cycles which make the sound go noticeably higher and lower. If
you are getting strangely higher sounds for identical probes, stop and
only probe every five minutes until you think the sound has gone down to
standard. This could take five to twenty minutes. Learn this higher
sound so you can avoid testing during this period.
You may
also find times when it is impossible to reach the necessary sound without
pressing so hard it causes pain. You may adjust the potentiometer if that
helps.
All tests
are momentary.
This means
less than one second. It is tempting to hold the probe to your skin and
just listen to the sound go up and down, but if you prolong the test you
must let your body rest ten minutes, each time, before resuming probe practice!
For our
purposes, it is not necessary to locate acupuncture points.
Resonance
The information
you are seeking is whether or not there is resonance, or feedback oscillation,
in
the circuit. If there is the test is YES (positive). You hear resonance
by comparing the second probe to the first. You can never hear resonance
on the first probe, for reasons that are technical and beyond the scope
of this book. You are not merely
comparing pitch in the two probes.
During resonance a higher pitch is reached faster; it seems to want to
go infinitely high.
Remember
that more electricity flows, and the pitch gets higher, as your skin reddens
or your body changes cycle. These effects are not resonance.
Resonance
is a small extra hum at the high end of the probe. As soon as you hear
it, stop probing. Your body needs a short recovery time (10 to 20 seconds)
after every resonant probe. The longer the resonant probe, the longer the
recovery time to reach the standard level again.
Using musical
notes, here is a NO (negative result): F-C-B-C# (first probe) F-C-B-C#
(compare, it is the same sound). Here is a YES (positive) result: F-C-B-C#
(first probe) F-D (stop quickly because you heard resonance). In between
the first and second probe a test substance will be switched in as described
in lessons below.
It is not
possible to produce a resonant sound by pressing harder on the skin, although
you can make the pitch go higher. To avoid confusion it is important to
practice making probes of the same pressure. (Practice getting the F-C-B-C#
tune.)
Making Pure
Water for Testing Purposes
Since the
water you purchase is likely to have solvents in it and since your tap
water may be polluted with heavy metals and since your (or a store's) filtration
system may be clogged, it is important to make your own pure water.
Purchase
a "filter pitcher" made of hard, opaque plastic, not the clear or flexible
variety (see Sources). Fill the pitcher with cold tap water, only,
not
reverse osmosis, distilled, or any other water, since solvents do not filter
out as easily as heavy metals. The filter should be made of carbon only.
To make test substances, use fresh water in the pitcher and pour.
If your
water has lead, copper or cadmium from corroded plumbing, the filter will
clog in five days of normal use. So use this pitcher sparingly, just for
making test substances and for operating the Syncrometer.
Lesson
One
Purpose:
To
identify the sound of resonance in the circuit.
Materials:
Potentized
(homeopathic) solutions. Prepare these as follows: find three medium-sized
vitamin bottles, glass or plastic, with non-metal lids. Remove any shreds
of paper sticking to the rim. Rinse well with cold tap water. Then rinse
again with filtered water.
-Pour filtered
water into the first bottle to a depth of about 1/2
inch.
Add about 50 little grains of table salt using the tip of a plastic knife.
This is a "pinch." Replace the lid. Make sure the
outside
is clean. If not, rinse and dry. Now shake hard, holding it snugly in your
hand. Count your shakes; shake 120 to 150 times. Use elbow motion so each
shake covers about an eight inch distance. Shaken samples are different
from
unshaken ones, that's why this is so important. When done label the bottle
on its side and lid: SALT # 1. Wash your hands (without soap).
Next, pour
about the same amount of filtered water into the second and third bottles.
Open SALT #1 and pour a small amount, like 1/4 to 1/2 of a teaspoon (do
not use a spoon) into the second and third bottles. Close all bottles.
Now shake the second bottle the same as the first. Clean it and label it
SALT #2. Do the same for the third bottle. Label it SALT #2 also and set
aside for Lesson Four.
These two
solutions have unique properties. SALT 4 1 always
resonates. Use
#1 to train your ear. SALT 42 shouldn't resonate. Use #2 to hear
when you (your body's internal resistance) have returned to the standard
level.
Turn the
Syncrometer ON.
Place the
SALT #2 bottle on the right test plate.
Start with
the plate switch OFF.
Make your
first probe (F-C-B-C#).
Flip the
plate switch ON, taking only one half second. Brace your hand when switching
so it is a fast, smooth, operation.
Make the
second probe (F-C-B-C#). Total probe time is 2 1/2 seconds. Count it out,
"a thousand and one (done with first probe) a thou. (done with switching)
a thousand and one (done with second probe)."
7. The
result should be a NO (negative). If the second probe sounds even a little
higher you are not at the standard level. Wait a few more seconds
and go back to step 3.
8. If the
first result was NO, remove SALT #2 and put SALT 41 on. Put the test plate
switch back to OFF and repeat the test. This time the circuit was resonating.
Learn to hear the
difference
between the last two probes so that a resonant probe can be terminated
early (reducing rest time).
9. The
skin must now be rested. When SALT #1 is placed in the circuit there is
always
resonance
whether you hear it or not. Therefore, always take the time to rest the
skin.
10. How
can you be sure that the skin is rested enough? Any time you want to know
whether you have returned to the standard level, you may simply test yourself
to SALT #2 Oust do steps 3 through 6). While you are learning, let your
piano also help you to learn the standard level (starts exactly at F).
If you do not rest and you resonate the circuit before returning to the
standard level, the results will become aberrant and useless. The briefer
you keep the resonant probe, the faster you return to the standard level.
Don't exceed one half second when probing SALT #1. Hopefully you will soon
hear resonance within that time.
This lesson
teaches you to first listen to the empty plate, then to SALT #2, to check
for standard state. Then to compare the empty plate to SALT #1 to check
for resonance. In later lessons we assume you checked for your standard
level or are quite sure of it.
Practice
hearing resonance in your circuit every day.
White
Blood Cells
Checking
for resonance between your white blood cells and a toxin is the single
most important test you can make.
Your white
blood cells are your immune system's first line of defense. In addition
to making antibodies, interferon, interleukins, and other attack chemicals,
they also "eat" foreign substances in your body and eliminate them. By
simply checking your white blood cells for toxins or intruders you save
having to check every other tissue in your body. Because no matter where
the foreign substance is, chances are some white blood cells are working
to remove it.
It took
me two years to find this ideal indicator, but it is not perfect.
Tapeworms
are a notable exception. They can be encysted in a particular tissue
which will test positive, while the white blood cells continue to test
negative. Also, when bacteria and viruses are in their
latent form,
they
do not show up in the white blood cells. Fortunately, in their active form
they show up quite nicely. Freon is an example of a toxin that is
seldom found in the white blood cells; but typically, the white blood cells
are excellent indicators of toxins.
Making
a White Blood Cell Specimen
Obtain
an empty vitamin bottle with a flat plastic lid and a roll of clear tape.
The white blood cells are not going into the bottle, they are going
on
the
bottle. The bottle simply makes them easy to handle. Rinse and dry the
bottle. Make a second specimen on a clean glass slide if available. Squeeze
an oil gland on your face or body to obtain a ribbon of whitish matter
(not
mixed
with blood). Pick this up with the back of your thumb nail. Spread it in
a single, small streak across the lid of the bottle or the center of the
glass slide. Stick a strip of clear tape over the streak on the bottle
cap so that the ends hang over the edge and you can easily see where the
specimen was put (see photo). Wipe the lid beside the tape to make sure
all white blood cells are covered. For the Slide, apply a drop of balsam
and a cover slip (see Sources). Both types of preparation will give you
identical results. The bottle type of white blood cell specimen is used
by standing it on its lid (upside down) so that the specimen is next to
the plate. The lid is used because it is flat, whereas the bottom of most
bottles is not.
Lesson
Four
Purpose:
To determine your percent accuracy in listening for resonance.
Materials:
The
SALT #1 and SALT #2 solutions you made for Lesson One.
Method:
Move
the SALT #1 and SALT #2 labels to the bottom of the bottles so you can
not tell which bottle is which.
I . Turn
the Syncrometer ON.
2. Start
with the test switch OFF.
3. Mix
the bottles up, select one at random, and place it on the right plate.
4. Listen
to the current.
5. Flip
the plate switch ON and make your second probe.
6. Resonance
indicates a SALT #1, no resonance indicates SALT #2. Check the bottom.
Remember to rest after the SALT # 1, whether or not you heard resonance.
7. Repeat
steps 3 through 5 a number of times. Work toward getting three out of three
correct. Practice every day.
Trouble
shooting:
a) If you
repeat this experiment and you keep getting the same bottles "wrong", start
over. You may have accidentally contaminated or mislabeled the outside
of the bottle, or switched bottle caps.
b) If you
get different bottles wrong each time, the plates may be contaminated.
Wash the outside of the bottles and rinse with filtered water and dry.
Wipe the plates very gently too, with filtered water and dry. Or replace
the plates.
c) If all
the bottles read the same, your filtered water is polluted. Change the
filter.
Preparing
Test Substances
It is possible
to prepare dry substances for testing such as a piece of lead or grains
of pesticide. They can simply be put in a plastic bag and placed on the
test plate. However, I prefer to place a small amount (the size of a pea)
of the substance into a 1/2
ounce
bottle of filtered water. There will be many chemical reactions between
the substance and the water to produce a number of test substances all
contained in one bottle. This simulates the situation in the body.
Within
the body, where salt and water are abundant, similar reactions may occur
between elements and water. For example, a strip of pure (99.9% pure) copper
placed in filtered water might yield copper hydroxide, cuprous oxide, cupric
oxide, copper dioxide, and so forth. These may be similar to some of the
reaction products one might expect in the body, coming from a copper IUD,
copper bracelet or the copper from metal tooth fillings. Since the electronic
properties of elemental copper are not the same as for copper compounds,
we would miss many test results if we used only dry elemental copper as
a test substance.
Impure
Test Substances
It is not
necessary to have pure test substances. For instance, a tire balancer made
of lead can be easily obtained at an auto service station. Leaded gasoline
and lead fishing weights also make good test substances for lead. There
is a disadvantage, though, to using impure test substances. You are including
the extra impurities in your test. If your lead object also has tin in
it, you are also testing for tin. Usually, you can infer the truth by some
careful maneuvering. If you have searched your kidneys for leaded gasoline,
fishing weights and tire balancers and all 3 are resonant with your kidneys,
you may infer that you have lead in your kidneys, since the common element
in all 3 items is lead. (You will learn how to specify a tissue, such as
your kidneys, later.)
Using pure
chemicals gives you certainty in your results. You can purchase pure chemicals
from chemical supply companies (see
Sources). Your pharmacy, a child's
chemistry set, a paint store, or biological supply company can also supply
some.
The biggest
repository of all toxic substances is the grocery store and your own home.
You can
make test substances out of your hand soap, water softener salt, and laundry
detergent by putting a small amount (1/16 tsp.) in a 1/2 ounce glass bottle
and adding about 2 tsp. filtered water. (Or for quick testing just put
them dry or wet in a sealed plastic baggy.) Always use a plastic spoon.
Here are
some suggestions for finding sources of toxic products to make your own
toxic element test. If the product is a solid, place a small amount in
a plastic bag and add a tablespoon of filtered water to get a temporary
test product. For permanent use put it in a small amber glass bottle. If
the product is a liquid, pour a few drops into a glass bottle and
add about 2 tsp. filtered water. Keep all toxic substances in gla ss bottles
for your own safety. Small amber glass dropper bottles can be purchased
by the dozen at drug stores (also see Sources). Seal your test bottles
with tape for safety and to prevent evaporation.
Aflatoxin:
scrape
the mold off an orange or piece of bread; wash hands afterward.
Acetone:
paint
supply store or pharmacy.
Arsenic:
1/16
tsp. of arsenate pesticide from a garden shop. A snippet of flypaper.
Aluminum:
a
piece of aluminum foil (not tin foil) or an aluminum measuring spoon.
lead.
(You will learn how to specify a tissue, such as your kidneys, later.)
Using pure chemicals
gives you certainty in your results. You can purchase pure chemicals from chemical
supply companies (see Sources). Your pharmacy, a child's chemistry set,
a paint store, or biological supply company can also supply some. The
biggest repository of all toxic substances is the grocery store and your own
home. You
can make test substances out of your hand soap, water softener salt, and laundry
detergent by putting a small amount (1/16 tsp.) in a 1/2 ounce glass bottle
and adding about 2 tsp. filtered water. (Or for quick testing just put them
dry or wet in a sealed plastic baggy.) Always use a plastic spoon.
Here are
some suggestions for finding sources of toxic products to make your own
toxic element test. If the product is a solid, place a small amount in
a plastic bag and add a tablespoon of filtered water to get a temporary
test product. For permanent use put it in a small amber glass bottle. If
the product is a liquid, pour a few drops into a glass bottle and
add about 2 tsp. filtered water. Keep all toxic substances in glass bottles
for your own safety. Small amber glass dropper bottles can be purchased
by the dozen at drug stores (also see Sources). Seal your test bottles
with tape for safety and to prevent evaporation.
Aflatoxin:
scrape
the mold off an orange or piece of bread; wash hands afterward.
Acetone:
paint
supply store or pharmacy.
Arsenic:
1/16
tsp. of arsenate pesticide from a garden shop. A snippet of flypaper.
Aluminum:
a
piece of aluminum foil (not tin foil) or an aluminum measuring spoon.
Aluminum
silicate: a bit of salt that has this free running agent in it.
Asbestos:
a small piece of asbestos sheeting, an old furnace gasket, 1/4 inch of
a clothes dryer belt that does not say "Made in USA", or a crumb of building
material being removed due to its asbestos content (ask a contractor).
Barium:
save
a few drops from the beverage given clients scheduled for an X-ray. Lipstick
that has barium listed in the ingredients.
Benzene:
an old can of rubber cement (new supplies do not have it). A tsp.
of asphalt crumbs from a driveway.
Beryllium:
a
piece of coal; a few drops of "coal oil" or lamp oil.
Bismuth:
use
a few drops of antacid with bismuth in it.
Bromine:
bleached
"brominated" flour.
Cadmium:
scrape
a bit off a galvanized nail, paint from a hobby store.
Cesium:
scrape the surface of a clear plastic beverage bottle.
CFCs
(freon): ask an electronics expert for a squirt from an old aerosol
can that used freon as a cleaner. (Squirt into water, outdoors, put the
water in a sample bottle.)
Chromate:
scrape
an old car bumper.
Cobalt:
pick
out the blue and green crumbs from detergent. A sample of cobalt containing
paint should also suffice.
Chlorine:
a
few drops of pure, old fashioned Clorox,TM
Copper:
ask
your hardware clerk to cut a small fragment off a copper pipe of the purest
variety or a 1/4
inch
of pure copper wire.
Ergot:
a teaspoon of rye grains, or rye bread. Add grain alcohol to preserve.
Ether:
automotive supply store (engine starting fluid).
Ethyl
alcohol (grain alcohol): the purest "drinking" alcohol available. Everclear
TM
in
the United States, Protec tm (potable) in Mexico.
Fiberglass:
snip
a fragment from insulation.
Fluoride:
ask
a dentist for a small sample.
Formaldehyde:
purchase
37% at a pharmacy. Use a few drops only for your sample.
Gasoline:
gas
station (leaded and unleaded).
Gold:
ask
a jeweler for a crumb of the purest gold available or use a wedding ring.
Kerosene:
gas station.
Lead:
wheel balancers from a gas station, weights used on fishing lines, lead
solder from electronics shop.
Mercury:
a
mercury thermometer (there is no need to break it), piece of amalgam tooth
filling.
Methanol:
paint
supply store (wood alcohol).
Nickel:
a
nickel plated paper clip, a washed coin.
Patulin
(apple mold): cut a sliver of washed, bruised apple.
PCB:
water from a quarry known to be polluted with it (a builder or electrical
worker may know a source).
Platinum:
ask
a jeweler for a small specimen.
Propyl
alcohol: rubbing alcohol from pharmacy (same as propanol or isopropanol).
Use a few drops only, discard the rest. Do not save it.
PVC:
glue
that lists it in the ingredients (polyvinyl chloride).
Radon:
leave
a glass jar with an inch of filtered water in it standing open in a basement
that tested positive to radon using a kit. After 3 days, close the jar.
Pour about 2 tsp. of this water into your specimen bottle.
Silicon:
a
dab of silicon caulk.
Silver:
ask a jeweler for a crumb of very pure silver. Silver solder can be found
in electronics shops. Snip the edge of a very old silver coin.
Sorghum
mold: 1/8 tsp. sorghum syrup.
Styrene:
a chip of styrofoam.
Tantalum:
purchase
a tantalum drill bit from hardware store.
Tin:
scrape a tin bucket at a farm supply. Tin solder. Ask a dentist for a piece
of pure tin (used to make braces).
Titanium:
purchase
a titanium drill bit from a hardware store.
Toluene:
a
tube of glue that lists toluene as an ingredient.
Tungsten:
the
filament in a burned out light bulb.
Vanadium:
hold
a piece of dampened paper towel over a gas stove burner as it is turned
on. Cut a bit of this paper into your specimen bottle and add 2 tsp. filtered
water.
Xylene:
paint
store or pharmacy.
Zearalenone:
combine
leftover crumbs of three kinds of corn chips and three kinds of popcorn.
This list
gets you off to a good start. Since few of these specimens are pure, there
is a degree of logic that you must apply in most cases. If you are testing
for barium in your breast, a positive result would mean that a barium-containing
lipstick tests positive and a barium-free lipstick is negative.
A chemistry
set for hobbyists is a wonderful addition to your collection of test specimens.
Remember, however, the assumptions and errors in such a system. A test
for silver using silver chloride might be negative. This does not mean
there is no silver present in your body; it only means there is no silver
chloride present in the tissue you tested.
You are
bound to miss some toxins; don't let this discourage you. There is more
than enough that you can find.
The most
fruitful kind of testing is, probably, the use of household products themselves
as test substances. The soaps, colognes, mouthwash, toothpaste, shampoo,
cosmetics, breads, dairy products, juices and cereals can all be made into
test specimens. Put about 1/8 tsp. of the product in a small glass bottle,
add 2 tsp. filtered water and
1/4
tsp.
grain alcohol to preserve it. For temporary purposes use a plastic baggy
and water only. If you test positive to your household products in your
white blood cells you shouldn't use them, even if you can 'not identify
the exact toxin.
For a list
of toxins and solvents I use, see page 571. To order pure substances see
Sources for "chemicals for testing."
Making
Organ Specimens
To test
for toxic elements or parasites in a particular organ such as the liver
or skin, you will need either a fresh or frozen sample of the organ or
a prepared microscope slide of this organ. Meat purchased from a grocery
store, fresh or frozen, provides you with a variety of organ specimens.
Chicken, turkey, beef or pork organs all give the same results. You may
purchase chicken gizzards for a sample of stomach, beef liver for liver,
pork brains for brain, beef steak for muscle, throat sweet breads for thymus,
tripe for stomach lining. Other organs may be ordered from a meat packing
plant.
Trim the
marrow out of a bone slice to get bone marrow. Scrub the bone slice with
hot water to free it of marrow to get a bone specimen. Choose a single
piece of meat sample, rinse it and place it in a plastic bag. You may freeze
it. To make a durable unfrozen sample, cut a small piece, the size of a
pea, and place it in an amber glass bottle (1/2
oz.).
Cover with two tsp. filtered water and 1/4
tsp.
of grain alcohol (pure vodka will do) to preserve it. These need not be
refrigerated but if decay starts, make a fresh specimen.
Pork brains
from the grocery store may be dissected to give you the different parts
of the brain. Chicken livers often have an attached gallbladder or piece
of bile duct, giving you that extra organ. Grocery store "lites" provides
you with lung tissue. For kidney, snip a piece off pork or beef kidney.
Beef liver may supply you with a blood sample, too. Always wash hands and
rinse with-grain alcohol after handling raw meat.
I use 1/2
oz
amber glass bottles with bakelite caps (see Sources) to hold specimens.
However, plastic bags or other containers would suffice. After closing,
each bottle is sealed with a ParafilinTM strip to avoid accidental loosening
of the cap. You may use masking tape.
To make
a specimen of skin, use hangnail bits and skin peeled from a callous, not
a wart. A few shreds will do. Remember, they must be very close to
the test plate when in use-, add 2 tsp. filtered water and 1/4tsp. grain
alcohol.
Making
a Complete Set of Tissue Samples
My original
complete set was made from a frozen fish. As it thawed, different organs
were cut away and small pieces placed in bottles for preserving in filtered
water and grain alcohol. In this way, organs not available from the grocery
store could be obtained. The piece of intestine closest to the anus corresponds
to our colon, the part closest to the stomach corresponds to our duodenum.
The 2 layers of the stomach and different layers of the eye, the optic
nerve and spinal cord were obtained this way.
Another
complete set of tissue samples were obtained from a freshly killed steer
at a slaughter house. In this way the 4 chambers of the heart were obtained,
the lung, trachea, aorta, vein, pancreas, and so forth.
Purchasing
a Complete Set of Tissue Samples
Slides
of tissues, unstained or stained in a variety of ways for microscope study
give identical results to the preparations made by yourself in the ways
already described. This fact opens the entire catalog of tissue types for
your further study. See Sources for places that supply them.
Fig.
82 Some purchased parasite and tissue slides.
You now
have a set of organ samples, either fresh, frozen, preserved or on slides.
You also have a set of test substances, whether chemical compounds, or
elements, or products. Your goal is to search in your own organs and body
tissues for the substances that may be robbing you of health.
Keeping
yourself healthy will soon be an easy, daily routine.
Body
Fluid Specimens
Each of
these fluids should be prepared by putting about 1/4
tsp.
in a 1/2oz
amber
glass bottle. Add about 2 tsp. filtered water and 1/4
tsp.
grain alcohol for preservation. Undiluted specimens do not work
for reasons that are technical and beyond the scope of this book. It is
important not
to shake the specimen, but to mix gently.
Urine.
It
is desired to have a pure, uninfected urine sample as a tissue specimen.
Since this cannot be proved with certainty, obtain several urine samples
from different persons whom you believe to be healthy and make several
test specimens in order to compare results. Label your specimens Urine
A (child), Urine B (woman), Urine C (mine), and so forth.
Semen.
A sample from a condom is adequate. Aged specimens (sent by mail, unpreserved
and unrefrigerated) work well also. Use one to ten drops or scrape a small
amount with a plastic knife.
Blood.
One
to ten drops of blood should be used. Clotted or chemically treated blood
is satisfactory. A blood smear on a slide is very convenient.
Milk.
Cow's
milk is too polluted with parasites to be useful. Electronically, a dead
specimen is equivalent to a live specimen, so that pasteurization of the
milk does not help. A human milk specimen is preferred.
Saliva.
Use
your own, if you have deparasitized yourself and test negative to various
fluke stages. Otherwise find a well friend or child.
Specifying
a tissue is the most powerful investigative technique in your arsenal.
Any
of your tissue samples can be tested for any of your toxic substances.
You Can Now
Test Three Different Ways!
When you
test with a substance on one plate and nothing on the other, you are searching
your entire body for that substance. Such a test is not very sensitive.
By putting
a tissue sample on the other plate you are testing for the substance specifically
in that tissue, and this is much more sensitive. The tissue need not be
the white blood cells. To find mercury in your kidneys you would use a
mercury sample on one plate, and a kidney sample on the other. The technique
is the same as when you use white blood cells.
If you
put a substance on each plate, a resonating circuit means the two samples
have something in common. For example, if you have mercury on one plate
and some dental floss on the other, a positive result indicates mercury
in the floss.
Lesson
Five
Purpose:
To
watch substances travel through your body.
Materials:
Prepare
a pint of brown sugar solution (white sugar has propyl alcohol pollution)
using filtered water. Use about I tsp. brown sugar, 1/8 tsp. vitamin C
(to detoxify sorghum mold), and a pint of filtered water. Do not shake
it; gently mix. Make a sample bottle by pouring about 1/2
inch
into a clean used vitamin bottle. Rinse and dry the outside of the sample
bottle. Finally wash your hands with plain water.
Method:
1.Test
your skin for the presence of brown sugar, using the newly made sample
bottle and your skin specimen. It should not be there (resonate) yet.
2.Prepare
a paper applicator by tearing the comer from a white unfragranced paper
towel. Fold it to make a wick.
3.Dip the
paper wick in the pint of sugar water and apply it to the skin of your
inner arm where you can rub freely. Rub it in vigorously for about
10 seconds (otherwise it takes minutes to absorb). Leave the shredded wick
on the skin and tape it down with a piece of clear tape about 4 inches
long (this increases the time you have to work). Quickly wash your fingers.
4.Place
your skin tissue specimen on one plate and the sugar specimen bottle on
the other plate.
5.Probe
for resonance every 5 seconds. As soon as you hear resonance, implying
that the skin has absorbed the sugar solution (which may take a full minute),
replace the skin specimen with one of liver and listen for resonance again.
There should be none, yet.
6.Alternate
between the skin and liver. Soon the skin will be clear and the liver will
resonate. Also check the pancreas and muscles to see how quickly sugar
arrives there.
7.Check
white blood cells and kidneys. It should not appear here (unless
it is polluted with a toxin).
8.After
five to ten minutes the sugar will be gone from all of these tissues and
your experiment is ended. Wash your arm with plain water.
Notice
that you have only a few minutes to get all your testing done after the
skin has absorbed the test substances.
True Origins Of Viruses
Your body can eliminate
any virus in a short time, such as hours or days. It can even keep up with a
steady stream that is coming from tapeworm stages!
Let us apply these new insights
to several diseases we are familiar with. Let us speculate what could really
be happening.
Epstein Barre Virus (EBV)
is a mysterious disease because in spite of building up antibodies, it attacks
repeatedly. I only see EBV if the person also has Eurytrema (pancreatic
fluke) in the pancreas. When the fluke is gone, I no longer find EBV in the
white blood cells. This suggests that the virus comes from the fluke. As each
fluke dies and is finally removed, the body's white blood cells can catch up
with the viruses and you begin to feel better again, which can be as quick as
one day. But reinfection with an EBV-carrying Eurytrema (plus a wood
alcohol containing beverage to allow the fluke to go to the pancreas) can spark
the next recurrence.
Shingles is a recurrence
of chicken pox. I always find Ascaris in persons with shingles! Unfortunately,
killing the Ascaris does not cure shingles. Herpes Zoster (the
shingles/chicken pox virus) is known to hide in nerve cells. Perhaps 4scaris
facilitates it's release, or simply suppresses the immune system in a way
that allows it to suddenly multiply.
Polio was once a scourge.
At that time, we can theorize that a new large parasite was making its appearance.
Was a new animal association taking place in the early 1900's? Life was. indeed
becoming more urban with horse manure on all streets. Owning a dog for a house
pet was becoming an acceptable lifestyle. Could the tapeworms of these animals
give us a tapeworm stage that hosts polio virus? Many polio sufferers also had
migraines. These are caused by Strongyloides, a horse threadworm. Does
Strongyloides host polio virus?
The HIV virus infects us
during the time the intestinal fluke, Fasciolopsis buskii, is being hosted.
Persons test negative to HIV shortly after the fluke and its stages are eliminated.
Coxsackie viruses
give us some of our encephalitises. I never see Coxsackie viruses without
the bacteria, Bacteroides fragilis,
and I never see Bacteroides fragilis without Ascaris (a roundworm.) I conclude
that one lives inside the other!
We may be deriving viruses
from all the roundworms, flukes, tapeworms and bacteria that infect us! It would
be a fascinating study, simply to examine each of these parasites singly, searching
for their viruses with an electron microscope. They could also be searched for
using immunological methods.
Fortunately, your health
improvement does not need to wait on such studies. Your electronic technique
can detect them in your body long before you are made ill by them. You don't
need to know their hosts in order to stop hosting them yourself.
It is a time of great change
for this planet as pollution spreads from pole to pole. The growth of industrial
activity, mining, chemical manufacturing, the food "industry", and personal
habits like smoking have spread new chemicals to every comer of the globe. The
element polonium, which is radioactive and in tosmokebacco , is harmful to human
lungs, but may not be harmful to a small lung parasite, like Pneumocystis
carnii.
Benzene, which is a solvent
and extremely harmful to humans, may not be harmful to fluke parasites living
within us. Propyl alcohol facilitates the intestinal fluke but is toxic to us.
Parasites are doing abnormal
things. Is this because of pollution?
The tables are gradually
being turned against us in favor of our parasites and pathogens. Such
large changes are called evolutionary. Is the human species doomed, or will
some of us "adapt". Will some of us survive to pass on our "better" genes to
a new population of cancerresistant, AIDS-resistant, Alzheimer's-resistant,
etc.-resistant humans? How many of us will die trying?
The common cold should not be so common!