|
Please do not place this tutorial on any
other site, or claim them as your own. Thank You
Spiro Frame
Written By Chelle aka Swt99Kitty
For this tutorial you will need
Paint Shop Pro 7
Which you can get at www.jasc.com
A picture of your choice
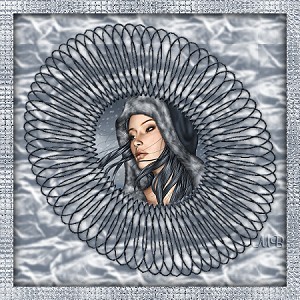
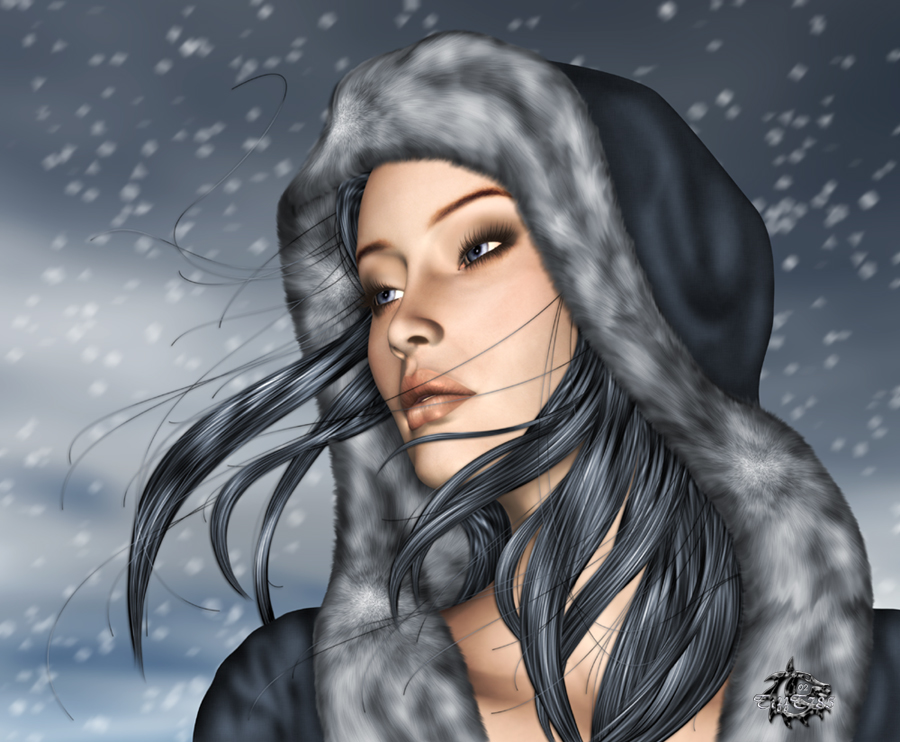
I am using Arctic Air By: TiffT785
This zip Swirl tube in psp format

Start by opening the image you want to use, hit shift+D and
a copy of your image should open, close the original.
Set the copy aside for a minute and open the 01Swirl
tube.Do the same to this as you did with the image. Close the original.
Be sure the tube is your active image. Go to Selections/select all.
Now with your selection tool click anywhere inside the tube image,
except for on the tube.
You should now have marching ants going all around the tube inside and out.
For this next part I am going to use a solid color (353D48), but you can use
your imagination. Get the bucket tool and fill the tube with a solid color from your image, or
something you think will look good, or you can use a pattern,
Super Blade Pro, possibilities are endless
After you have filled your swirl tube or applied your favorite filter go to
Effects/3D/Inner Bevel and here are the settings I am using
Bevel: Round, Width 8, Smoothness 13, Depth 2, Ambience 0,
Shininess 10, Color White, Angle 315, Intensity 69, Elevation 20
Or play around with it till you get something you like.
Selections/Select None.
Go to Image/Resize
Be sure all layers is NOT checked
Percentage of Original is checked, 85 width and height click ok
Effects/Sharpen/Sharpen
Now get your magic wand tool, Tolerance 0 Feather 0
Sample Merge NOT checked and click in the center of the tube.
You should not have ants marching just in the center of it.
Selections/Modify/Expand By: 2
Layers/New Raster layer, Click Ok
Layers/Arrange/Move Down
Set this aside for a second and activate the
picture you want to use.
If it is large you might want to resize it or using your seletion
tool just choose a protion of the image that you want to use.
Now go to Edit/Copy
Now back to the tube image, be sure its your active image
and go to Edit/Paste/Into Selection.
Selections/Select None
Layers/New Raster Layer
Layers/Arrange/Send to Bottom.
Flood fill this layer with White (#FFFFFF).
Layers/New Raster Layer
Select your eyedropper tool and choose a lighter color from
your image than you used earlier. I am using #6C7786 and set
your texture to Crumpled paper.
With your bucket tool flood fill the layer we just added.
Open the layer palette and turn off the bottom 2 layers
(Click on the glasses so they have a X over them).
Right click on layer 1, should be the one on top and click
Merge/Visible. Turn the other 2 layers back on, but be sure
the merged layer is the active layer. Will be highlighted.
Effects/3D/Drop Shadow and these are the settings I used
Vertical and Horizontal 1 Opacity 50 Blur 6.2
Color Black (#000000)
Layers/Merge/All Flatten
Almost done and bet you are glad, lets add a border.
Seletions/Select All
Selections/Modify/Contract By: 20
Selections/Invert
Effects/Texture Effects/Mosaic Glass
Here are my settings
Symetic is checked Number of columns and rows 50
Glass curvature 50 Edge curvature 0
Grout width 2 Grout opacity 80
Effects/3D/Drop Shadow
Settings are Vertical & Horizontal 0 Opacity 75 Blur 20
Color Black #000000
Apply this 2 times
Selections/Select None
Resize & Sharpen if needed and save. You are finished
This is another I made using different options :)
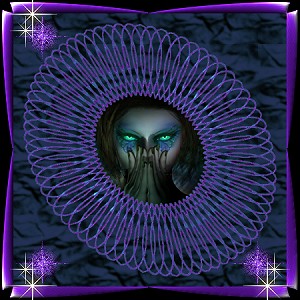 Using a picture named Psyche's Eyes also by TiffT785
Thank you for trying my tutorial, I hope you like your results
If you have any questions please email me at [email protected]
Please put Regarding your tutorial in subject line or it might
deleted. Thank You
Copyright � March, 2003 Chelle
To return to Kitty's main page
please click the link below.

|

