Kitty's PSP
Please let the whole page load, may take a minute or two
Please feel free to give this tutorial a try. Only thing I ask is that you do not take it and place it on another site or claim it as your own. Thank You
Kaleidoscope Tube Effect
By: Chelle aka SwtKitty99
Written in psp 7, but can be done in psp 6
Images resized for loading time
Please feel free to email me if you have any questions ([email protected])
Ok lets start
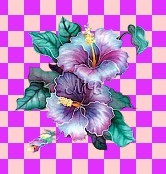
Find a tube you would like to use and open it in psp. I am using this one
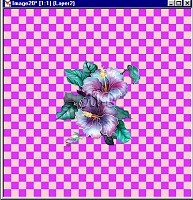
 Open a new blank image 400x400 transparent.
Activate the tube and go to edit~copy.
Now activate your new image and edit~paste~as new layer.
Your tube will be centered automatically in the image, but if its to large you will want to resize. You do not want it to close to the edges. This is what mine looks like after resizing.
Open a new blank image 400x400 transparent.
Activate the tube and go to edit~copy.
Now activate your new image and edit~paste~as new layer.
Your tube will be centered automatically in the image, but if its to large you will want to resize. You do not want it to close to the edges. This is what mine looks like after resizing.
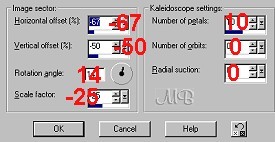
 Now the fun part...remember you do not have to use the same settings I do. This is to have fun and come up with your own image so play with it. Go to Effects~Reflection Effects~Kaleidoscope
Here are the settings I am going to use on this one.
Now the fun part...remember you do not have to use the same settings I do. This is to have fun and come up with your own image so play with it. Go to Effects~Reflection Effects~Kaleidoscope
Here are the settings I am going to use on this one.
 Play with the settings till you get something you like and also remember even if you use the same settings on another tube you will get a different image everytime, so yours will not look like mine :)
Now go to Effects~3D~Inner Bevel
and here are the settings I am using.
Play with the settings till you get something you like and also remember even if you use the same settings on another tube you will get a different image everytime, so yours will not look like mine :)
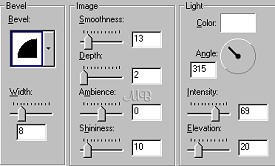
Now go to Effects~3D~Inner Bevel
and here are the settings I am using.
 Now go to Layers~Duplicate You will not see any difference in your image.
Now go to Image~Resize and here are the settings.
Now go to Layers~Duplicate You will not see any difference in your image.
Now go to Image~Resize and here are the settings.
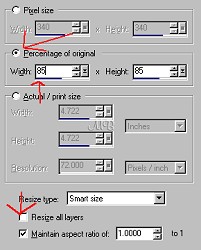 Be sure resize all layers is NOT checked
Now Effects~Sharpen.
At this point if you want you can rotate it by going to Image~Rotate
and here are the settings I used
Be sure resize all layers is NOT checked
Now Effects~Sharpen.
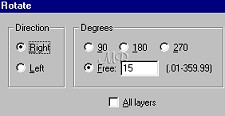
At this point if you want you can rotate it by going to Image~Rotate
and here are the settings I used
 Now Effects~Sharpen
Remember the rotating step is up to you, you dont have to do it if you dont like it and if you do and dont like it just undo...Love that undo button.
Now go to Layers~Duplicate again
And again repeat the resize. The settings are the same so all you have to do is go to Image~Resize and click ok Then Effects~Sharpen
If you did rotate then repeat that also and sharpen after you rotate. Settings are all the same.
If you want you can repeat these steps again to have 4 layers, but I am stopping at 3. So go to Layers~Merge~All Visible.
Now go to Layers~Add New Raster Layer, then Layers~Arrange~Send to Bottom.
This layer is going to be for your background. Be creative and do the way you want. Here is what I am doing.
With the eyedropper tool select a color from your tube...I am using a light purple.
Now with the bucket tool, I am flood filling the layer we just added.
Next go to Effects~Texture Effects~Texture, These are the settings I am using.
Now Effects~Sharpen
Remember the rotating step is up to you, you dont have to do it if you dont like it and if you do and dont like it just undo...Love that undo button.
Now go to Layers~Duplicate again
And again repeat the resize. The settings are the same so all you have to do is go to Image~Resize and click ok Then Effects~Sharpen
If you did rotate then repeat that also and sharpen after you rotate. Settings are all the same.
If you want you can repeat these steps again to have 4 layers, but I am stopping at 3. So go to Layers~Merge~All Visible.
Now go to Layers~Add New Raster Layer, then Layers~Arrange~Send to Bottom.
This layer is going to be for your background. Be creative and do the way you want. Here is what I am doing.
With the eyedropper tool select a color from your tube...I am using a light purple.
Now with the bucket tool, I am flood filling the layer we just added.
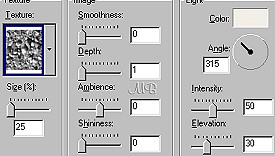
Next go to Effects~Texture Effects~Texture, These are the settings I am using.
 Now Layers~Merge~All Flatten
Next Selections~Select all
Then Selections~Modify~Contract
Settings will depend on how close your image is to the edge. My settings for contract are 20. If the ants are touching your design undo and try a lower number.
Next Selections~Invert
Then Effects~3D~Inner Bevel and apply the same settings you did before.
Now I am applying a Drop Shadow Settings are
Vertical and Horizontal 0 Opacity 100 Blur 10 Color Black
Selections~Select None
Now activate the tube you used for this and go to edit~copy
Now back you the image you have been working on and go to Edit~Paste~As New Layer. Resize if needed and place somewhere on your image. Add drop shadow if you want and any other tubes. Merge all flatten layers, Resize and sharpen if needed, Save and you are done :)
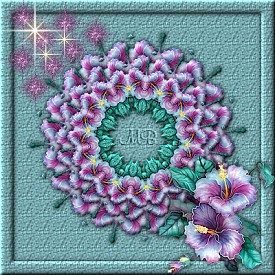
Here are my results.
This one I rotated the kaleidoscope layers
Now Layers~Merge~All Flatten
Next Selections~Select all
Then Selections~Modify~Contract
Settings will depend on how close your image is to the edge. My settings for contract are 20. If the ants are touching your design undo and try a lower number.
Next Selections~Invert
Then Effects~3D~Inner Bevel and apply the same settings you did before.
Now I am applying a Drop Shadow Settings are
Vertical and Horizontal 0 Opacity 100 Blur 10 Color Black
Selections~Select None
Now activate the tube you used for this and go to edit~copy
Now back you the image you have been working on and go to Edit~Paste~As New Layer. Resize if needed and place somewhere on your image. Add drop shadow if you want and any other tubes. Merge all flatten layers, Resize and sharpen if needed, Save and you are done :)
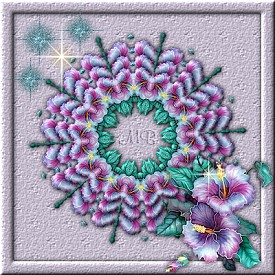
Here are my results.
This one I rotated the kaleidoscope layers
 And this one I did not rotate
 Hope you like and enjoy
(((((Hugs Chelle)))))
Hope you like and enjoy
(((((Hugs Chelle)))))
To return to the tutorial index please click below.

To return to main page please click below.

Copyright � March.2002 Chelle