|
Please feel free to give this tutorial a try.
Only thing I ask is that you do not take it
and place it on another site or claim it as your own.
Thank You

Cloning Dawn Name Tag By: [email protected]
Written with PSP 7
A friend saw a tag similar to this and asked
me to see if I could figure out how it was done.
Well this is as close as I could get.
I know this can be way improved, so play with it and
see what you come up with :)
Ok lets start
1st save this picture

Now chose the font you want to use. Make sure
it is a bold font for better effect. I am using Balloon
Step 1: Open a new image.
I am using size 400 x 400 transparent image.
Size will actually depend on your name.
Set your foreground color to null and background
color to white. Now get your font tool and click anywhere
inside your blank image. Here are the settings
I am using for my text.
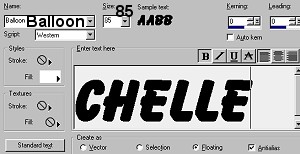
Click ok.Leave the marching ants around your name.

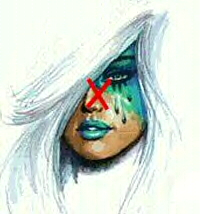
If you do not have the picture of Dawns
face open, open it now.
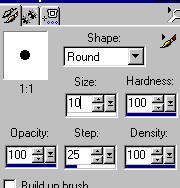
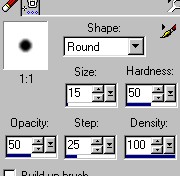
Next I am going to use the clone tool I am sure there
are easier ways to do this, but this is the best for me.
Here are the settings I am using.
Right click in the center of the picture of
Dawn about right here
Now go to the image you have your name on.
Now left click (hold it down) about in the middle of
the name...Drag around until you have filled the middle
letters of your name something like this.

Ok lets add a drop shadow. Go to effects/3D/Drop Shadow
using these settings.
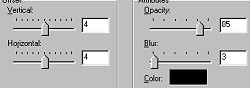
Or play with the settings.
Click ok when you have the settings the way you want.
You should still have ants going around your name at this point.
We are now going to add a glow to the name using eye candy 4000
You can do this also with eyecandy 3.0 using the glow,
just play with the settings till you get what you want.
Go to Image/plugin-filter/eye candy 4000/Gradient Glow
Here are my settings
And I am using the color #20A088
Or you can play with the settings, pick your own color
and when you have something you like click ok.
At this point this is what I have

Ok next, Go to Selection/Promote to Layer
Yes...those buggin lil marching ant are finally gone :)
Ok go back to your cloning tool , remember where we right
clicked on the picture of Dawn before...well you want to
click on that spot again. Then go back to the image with your
name and starting at the same point you did before left click
and clone more of the picture onto your name until you
get what you want.

Be sure you dont fill the entire letters in.
You want to still be able to see them. I might have
over did it a little bit on this one :)
After you get it the way you want you can take your
eraser tool, I used these settings
Go around the edges of the edges of what you added
just to soften it a bit.
Go to edit/copy. Now edit/paste/paste as new image.
Now you can go to Layers/Merge/merge all flatten
Tada....your done, unless you want to add a few tubes,
sparkles whatever.
I know this may not be written very well, but I tried
(((((Hugs Chelle)))))
To return to the tutorial index please click below.

To return to main page please click below.

Copyright � Jan.2002 Chelle
|

