| Chassis Braces |
| While working on the restoration of my car, one of the improvements I�ve considered is stiffening the chassis. My plans for the car are the occasional hard drive, and some track time several times a year. I am not creating a �track-only� car, or a show queen, but a driver. If I was going to all the effort and expense of taking care of the areas on the car that had cracked under hard driving, I didn�t want the fresh paint to crack all over again. |
 |
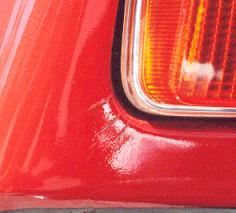 |
| If the paint was cracking, then the body was flexing excessively. Below left, are the cracks at the left tail light. To the right is the "Y" area behind the gill showing cracks there (Look closely). Stiffening the chassis seemed like a good idea. I started by reviewing various methods employed by others. I looked at pretty cars, fast-looking cars, and fast cars. Some people have been successful in just reinforcing the body in the areas that cracked, others added braces to the chassis before fixing the bodywork with one of several methods. I sat down with several beers and examined the chassis. I imagined how it responds to the various forces during hard driving, and what really caused the car body to crack in the first place. It�s the engineer in me, which I just can�t help. |
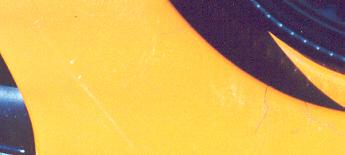 |
| Where the A-pillar attaches to the front fender and roof are two spots that tend to show cracks. The �Y�-area where the decklid meets the fender, near the front, is also susceptible to cracking. The outside lower corner where the taillight meets the rear fender is another likely area. |
| My car was no exception. A previous repair consisted of braising the top and bottom of the A-pillar. Not the best solution, as the proximity of brass and steel causes corrosion similar to rust. During the restoration I had this brass removed, welded stoutly, and then finished with lead, as an additional support piece was not necessary. The taillight corner had an additional piece of steel added, and then filled with lead. This technique was also used for the �Y� area. Click on tiny images for a larger view. |
| One solution to these symptoms is to just fill the affected area with lead. A better method is to weld material in the susceptible areas, or for an even stronger solution, to weld in a steel support piece then fill with lead. |
 |
| Notice the �Y� area to the right, where the weak area has been cut out to make ready for an additional steel support piece. |
 |
 |
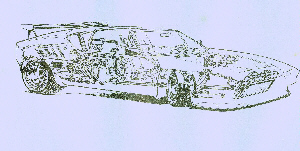
| Once the symptoms have been treated, the root cause can be addressed. This can range from simple to complex. A tube-frame with an 8-point cage would be great, but that is not practical for me. A 6-point would be great too. Even a 4-point roll bar is helpful. But we are getting ahead of ourselves. Let�s start at the beginning, review the work of others (I don�t need to re-invent the chassis.), and then see what improvements can be made. Now to the beginning�I thank Bill Santos for this image of his stock rear chassis brace, also called a wheel house support, or spreader bar. Not pretty, but somewhat functional. |
 |
| With original tires, shocks, springs, bushings, and sway bars, this might have been sufficient. With the advances in technology in the last 30 years, the chassis now needs some refinement. To visualize the effects, take a cardboard box and remove the top. When you push on a side at the top, the box will deflect. This is what is happening to the chassis in all three axis. There are several areas that would benefit from additional support. In the rear the upper shock mounts and the upper and perhaps lower A-arm mounts. |
| This next image is a pretty engine�and likely a fast engine. The �spreader bar� is good looking also. Too bad that it does not support the chassis as well as it could. Examine how it fits into the pockets. The compressing force is applied only through the flange to the mounting bolt in �shear�. This style is available in several forms and with and without the �DeTomaso Pantera� script. It is seen in many cars, and is available from most all the vendors. Is it an improvement over the stock bar ? Maybe this is an improvement due to the reduction in weight, but I doubt it helps stiffen the chassis. It could even be less effective than the stock brace. |
 |
| Seen at the Monterey 1997 Concourso Italiano, is another �Pretty Bar�. This is the base version, without the script or special finish. To enhance chassis stiffness the owner has installed a non-adjustable support below the spreader bar, between the upper A-arm mounts. |
 |
| As an alternative to the �Pretty Bar�, many vendors have a steel box-channel spreader bar. Most of the units I have seen look like the item in the following image. Notice how the end of the bracket completely fills the pocket. In the center is a turnbuckle. To install this type of bar correctly, fit it in place snugly, then add another turn or so. It may help to jack up one side of the rear of the car. |
| Do NOT crank on the turnbuckle with the expectation that you can correct excessive negative camber ! You will only damage your bodywork. Follow the instructions provided with the product. There are chromed versions, and aluminum (polished) versions of this style available. I�ve even seen one or two that did not have the turnbuckle. |

|