Welcome to my Second Tutorial, thank you for joining me. After Creating This for a Stationery I made, I received so many complements on it that I decided to offer a Tutorial On This Website for how to create it yourself. Please Be Patient with me, as I am still new to writing Tutorials. I hope you enjoy it.
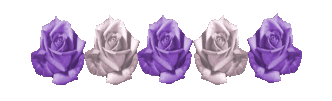
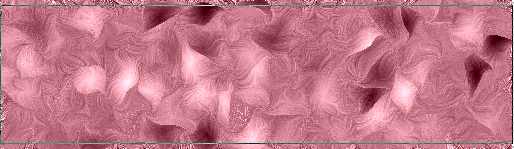
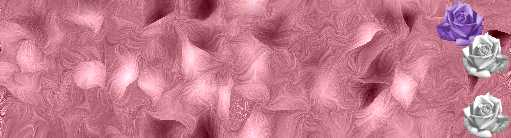
This is What We Will Be Making.
Rose Sparkle Background Tutorial
This tutorial was created using PSP 7. I have not tried to get the same effects in PSP 6, but I'm sure it will work for that version also. Tip: Make sure to Save Often....we don't want all of our work to get messed up!
You Will Need At Least A Working Knowledge of Paint Shop Pro and all of the Things Listed Below: Paint Shop Pro 6 or 7. If you do not have it you can download a free trial version at the Jasc Website
Eye Candy 3.1 Secomd Edition. You can download it at Eye Candy 3.1
FM Tile Tools: you can download it at the Fantastic Machines Website
White Sparkle and Rose Tube which you can Download Here
Ok, Now that we have everything that we need....Let's Get Started!
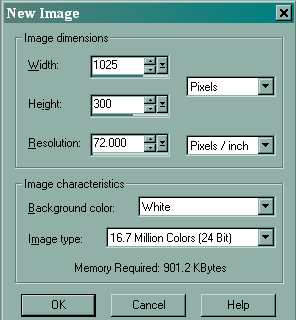
Open Paint Shop Pro 7 and Click File/New. Width:1024, Height:300, Resolution:72 Pixels/Inch. Make Sure that It Is Set to Pixels and not Centimeters or Inches as Shown Below.
Click on your Paint Can. 
Blend Mode: Normal, Match Mode: None, Opacity:100. Flood Fill. I used Color #D78898, but you can use about any color that you want to.
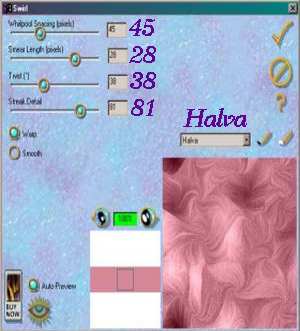
Click on Effects/Plugin Filters/Eye Candy 3.1/Swirl. Select "Halva" in the Dropdown Menu. Whirlpool Spacing:45, Smear Length:28, Twist:38, Streak Detail:81. Select Warp-Make Sure that it is Colored In. Leave Smooth Unselected-Not Colored In. Select Auto Preview and the Checkmark.
Crop your Background so that just a Little Bit of the Bottom and Top are Cut off...maybe about 1/8 of an inch or so.
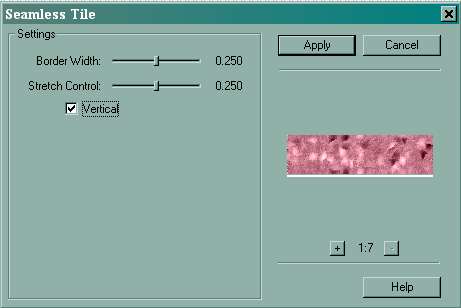
Now we need to make the Background Seamless.
Go to Effects Plugins/FM Tile Tools/Seamless Tile. Border Width: 0.250, Stretch Control: 0.250, Vertical: Checked as Shown Below.
Ok, now we need to Save. File/Save As, Rose Sparkle.psp, Click OK. Now We are going to add our Rose Edges.
Open The Roses Tube That We Downloaded Earlier in PSP. Use your selection tool set on rectangle and outline the upper left hand rose as Shown Below.
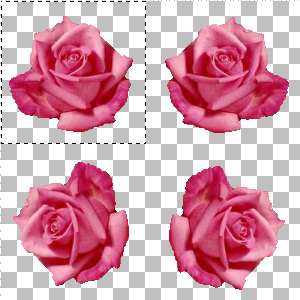
Copy and Paste This Rose as a New Image. Now, we need to Resize this Rose so that All Four of them Will Fit on our Background. To Do That, Go To Image/Resize and Resize to 96X92.
Now, save this Rose as whatever you want to call it. Copy and Paste this Rose as a New Layer onto your Rose Sparkle Background by Choosing Edit/Copy/Paste/As New Layer and name it Lavendar Rose. Move the Rose Layer Away from the Edge As Shown.
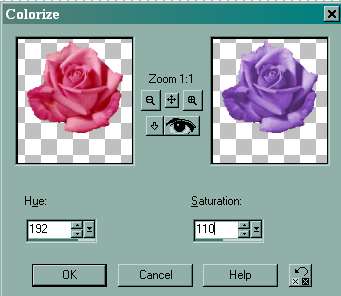
Now, we are going to make this Rose Lavendar. Make sure you are on your Lavendar Rose Layer. Go to Colors/Colorize. Set Hue to 192 and Saturation to 110 As Shown Below Click OK.
Now we are going to add our White Rose. Go Back to the Resized Rose File We Saved Before and Copy and Paste as New Layer Onto Your Rose Sparkle Background and Name this Layer White Rose. Lineup underneath your Lavendar Rose As Shown Below. We Will Make It White after We Place It Underneath Our Lavendar Rose.

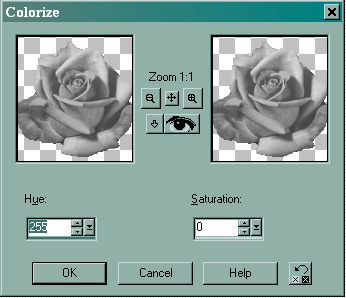
Make Sure you're on your White Rose Layer and Go To Colors/Colorize again. This time we want our Hue to be set to 255 and our Saturation Set to 0 As Shown Below. Click OK.
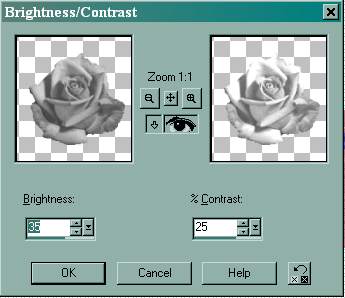
Now, to get the Brightness on the White Rose we need to go to Colors/Adjust Brightness/Contrast. Set Brightness to 35 and Contrast to 25 As Shown Below. Click OK.
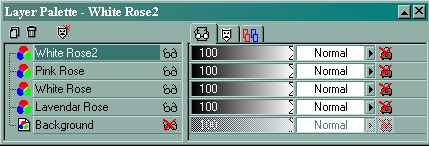
Now, we are going to Duplicate the White Rose Layer So That We Don't Have To Do All of This again. Go To Your Layer Palette.
Right Click With Your Right Mouse Button On Your White Rose Layer and drag your Mouse Ponter Down Until Duplicate Layer is Selected. Left Click With Your Left Mouse Button.
Name This Duplicated Layer White Rose 2. Now Click On Your Mover Tool.

Go To Your White Rose To Move Your Duplicated Layer and Place It As Shown Below.
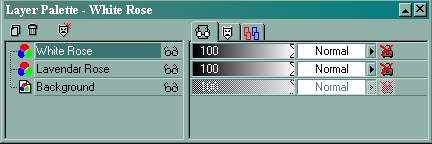
Now all we need to do is Add Our Pink Rose. Go Back to the Resized Rose File That We Saved Before. Copy and Paste As New Layer Inbetween The Two White Rose Layers. Your Layer Palette Should Look Like The Screenshot Below.
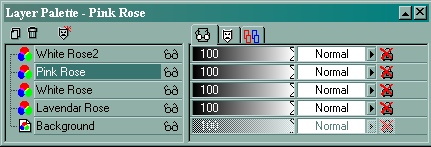
Name This Layer Pink Rose. Lineup the Pink Rose Between the Two White Roses with Your Mover Tool as shown below.
Save As Rose Sparkle.psp Now we are going to add a drop shadow to our Rose Edge. But First, we need to Merge Our Rose Layers. Go To Your Layer Palette and Make your Background Layer invisible by Left Clicking on the Sunglasses so that there is a Red X Over Them. Make Sure That One of your Rose Layers Is Highlighted. Your Layer Palette Should Look Like the One Below.
Now Go To Layers/Merge/Merge Visible and Left Click On It To Merge Your Rose Layers. Rename the Merged Layer "Rose Edge." Make Your Background Layer Visible Again By Left Clicking with Your Mouse On The Red X Crossing Out the Sunglasses. Save.
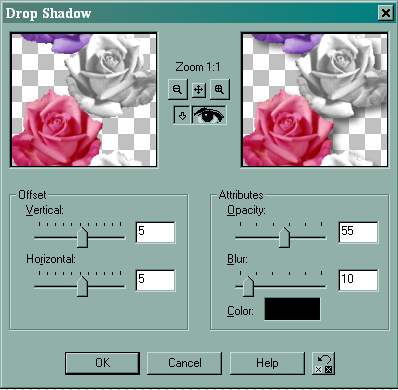
Make Sure You're On Your Rose Edge Layer. Go To Effects/3D Effects/Drop Shadow. Use the Following Settings. We Want Our Drop Shadow To Be Soft So We Are Going To Make The Opacity Somewhat Light. Horizontal:5, Vertical:5, Opacity:55, Blur:10. This Will Put A Drop Shadow On The Right Side Of Your Rose Edge.
Now, we are going to add another Drop Shadow, this time on the Left Side of the Rose Edge. Make Sure that You're Still on your Rose Edge Layer. Go To Effects/3D Effects/Drop Shadow Again. We Are Going to Use The Same Settings As Above, except this Time We Want the Horizontal and Vertical to be -5.
Now, all we need to do Is Put It On The Other Side of Our Background. Duplicate Your Rose Edge Layer and Just Go To Image/Mirror to get it on the other side. Notice that it is exactly in the same place on the Left Side of your Background that it is on the Right Side Of it...*S*
Now go to Layers/Merge All (Flatten) and Save it As Rose Sparkle Background.
Now we are going to Add Our Sparkles to It. CLick on your Picture Tube Tool and Choose the Sparkle White Tube.
Set Scale to 100 and Step to 200. Now, you can place the Sparkles Where I have them shown below. Or Wherever you want to place them. Remember, by adding your own touches to an image is what makes it your own!
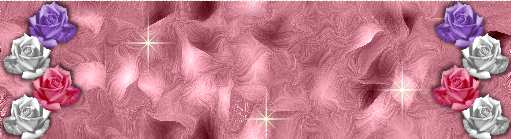
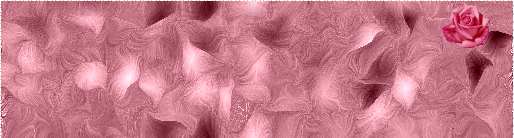
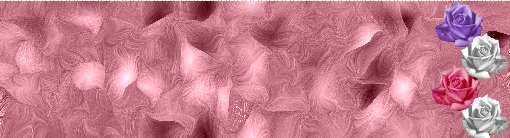
Now, My Rose Sparkle Background Looks Like The Screenshot Below When Finished.
I hope you've enjoyed this Tutorial and Please Stop Back In for Frequent Updates. Happy Creating!
|
|