
These ties were developed for someone who had a desire for being tied with a lot of rope. The appearance needed 6-8 parallel lines of rope, at numerous positions, but the time was limited for getting all the rope in place, and also removing it without too much tangling. All the above information assumes you have a little successful knowledge of DIY. If you have little ability and aptitude in this area, it may not be for you. The information here is presented in good faith, but the writer cannot accept responsibility for any subsequent accident or injury, however caused. All text and illustrations remain in the copyright of the author, but the author grants permission for an individual copy to be made for non-commercial purposes This page hosted by
 The trick was to work with a pre-tied loop so that the rope was always 'laid-down' with 2 lines at once, which saved time, and also the knot which tied the loop, worked as a pendulum weight, so in some situations the rope could be 'thrown' around rather than passed around.
The knot I chose to tie the initial loop, was a fisherman's knot, because it allows any slack in the rope to be easily adjusted, but many alternative knots would work for the purpose of making the loop.
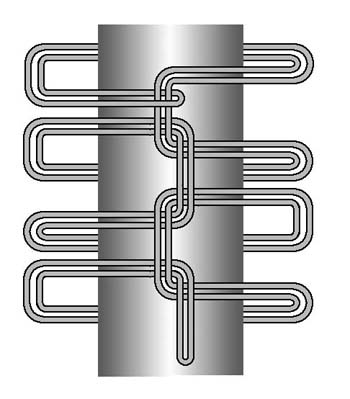
I use the loop by forming a bend farthest away from the knot, so that after all the hitching, the original knot is available at a convenient place to be re-tied or adjusted. The tie begins with a 'lark's head' knot/loop, which can be preformed and slipped over and into the intended place, or formed at the place, whichever is most convenient at the time? The remainder of the rope is then looped around and tied in half hitches, at each turn, for as many turns as required, or as many as the loop will extend to.
Using the half hitches rather than just looping around, reduces both spilling and loosening as the tying progresses. The reason I reverse the direction of the half-hitches at each successive position, is that progressive half-hitching in the same direction, can be slackened by rotating over time. Alternately reversing the direction of the hitches reduces this. It also gives a visually symmetrical appearance.
An additional use for this tie, is as a rope corset. The intermediate half-hitches can be individually tightened to achieve the desired 'profile'. A further single rope can be used to 'lock-off' the hitches after 'profiling' to prevent them re-adjusting over time.
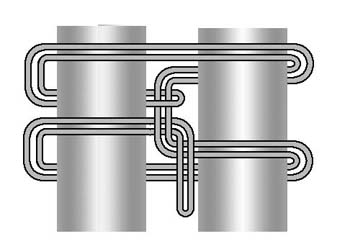 When the tie is used for two limbs, the free end of the loop from the initial lark's head knot can be passed between the limbs to prevent the whole tie being rotated. Alternatively, the chain-form of the first diagram, is better at transferring the load more equally over all the lines of rope, useful if the loop is linked to another tie.
I haven't shown a final knot to the tie, which can be as simple as an overhand knot, or more complex depending on how adept or experienced the subject is at escaping.
The next tie is really only suitable when a minimum of 8 parallel lines of rope are needed, but does resolve to a symmetrical central postion. It does require more 'understanding' than the previous tie, doesn't really hold until finished, but can be quicker overall.
 Again I haven't shown the final knot, but suggest an overhand knot at the minimum. Additionally the final loops may be be passed a second time through the two outer bends then the inner bend, to 'lock' the tie and prevent tightening under load (if the tie is used as a suspension point for instance?).
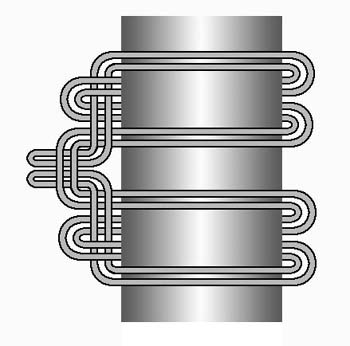
The next illustration is of the same 8 line symmetrical tie, using a combination of Prusik and 'half-hitch' ideas. I don't know if it makes the easier to understand, or not, but it was one way I found to reach the final arrangement, from the simpler principles I had considered? Another method is to get the 2 double bends in one hand and the 2 single bends plus a further double in the other, then weave the single bends through the doubles to get the final tie?
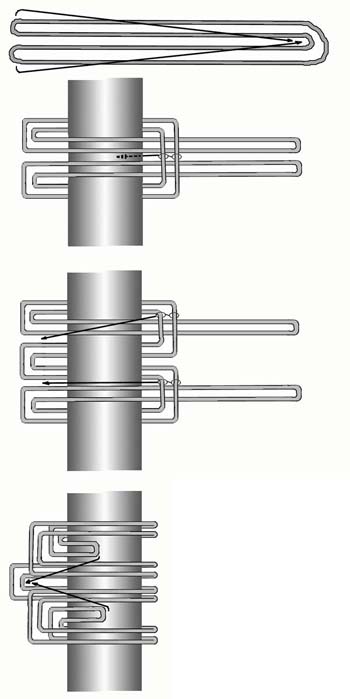
The 'tricktie loop' shown here last, was one of the first of this series I'd considered. It was initially devised to give the 'lots of rope' appearance but around the neck. I'm always dubious about the safety of rope around the neck, but it is a 'hot' look and 'feel' for those who like it. I was tring to devise something that would have the desired appearance, but would 'break' under a very light load. The principles are similar to the preceding ties, using a preformed loop and working toward the knot which forms the loop.
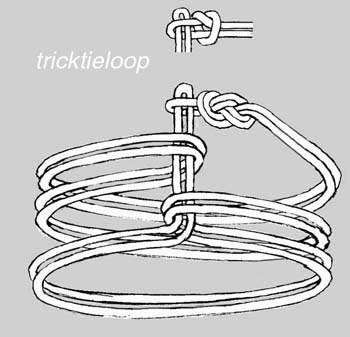 This time the first bend is used to form a standing part of the tie. Further bends are formed around this standing part, reversed at each turn, and finally the end of the original bend is passed through a loop, which is sized suitably to hold it, but will release it when subject to a slight load.
If the tie is intended to be used at the neck the final loop needs to be one which can't reduce in size, such as figure 8 as shown or bowline. The 'break' part should be tested to find the right size of the final loop. The final bend of the rope will often be slightly larger than the equivalent doubled rope, so just because the double rope passes freely through the loop doesn't mean the final bend will pass so easily? Alternatively the 2 loops could be just tied together with a single pure cotton thread? Whichever method is used none are totally risk free, any ligature around the neck has potentially fatal danger!
Although initially devised for around the neck, the quick release nature of the tie, and the loop principles, make it a useful general purpose quick tie. The undoing is especially good, part of the original design, which lets the tie 'fall away' when released. The interlocking final loops may be secured with snap hooks or padlocks, prior to release, or if a number of the ties are used, a seperate single rope or cord can be used to prevent the interlocking loops 'breaking' until intended.
The plastic-coated spiral spring, used for supporting lace curtains, is particularly suited to the last described purpose. It's stiff enough to act like a pin, but flexible enough to move like a rope. It's smooth coating allows it to be withdrawn quickly, and the multiple ties then fall away as if by magic!
Copyright Dev 2001. All Rights Reserved
Archiving and/or reposting of this material is permitted; but only if you include a statement of limitation of use, pertinent to the relocation. The author forbids you to make, distribute, or sell multiple copies of this material on paper, disk, or other fixed format.
However, individual readers may make single copies of this material for their own, non-commercial use.
![]() Get your own Free Home Page
Get your own Free Home Page