
The bed, table and chair are probably the first items of furniture to be used for adult purposes, and I will cover interesting examples of those elswhere. The next principal non-furniture item to be required, is a free-standing post. Although simple in concept, it poses some problems when required to be both portable, and suitable for adult use. The best candidate for this purpose is the builder's prop. These are readily available from builder's merchants and with a little ingenuity can be wedged in place as originally designed. This page hosted by
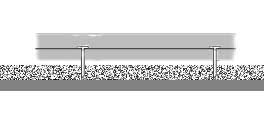
 The prop on its own would likely damage the ceiling and carpet if used 'naked'. I'm assuming here a flat ceiling of plasterboard covering timber joists. If you have a suspended lightweight ceiling with removeable tiles, you would need to assess the structural ceiling above, for a similar sound surface. The prop used alone would probably crack or break the plasterboard (or lath). A plywood panel is required to spread the load (pressure) from the prop and also increase the area of contact, so that friction can keep the prop upright, even when subject to dynamic sideways loading (of a thrusting human body for instance). The ply panel should be sufficiently wide to cover 2 (or more) of the joists and equal in length. The thickness should be sufficient to spread the load, 15mm or thicker. To increase the 'grip' of the ply plate to the ceiling, a sheet of 'rubber-crumb' carpet underlay between the plate and ceiling can be used, or any suitable soft but 'grippy' sheet material. Check the material does not mark the ceiling, before use. If you're not sure about the construction of your ceiling, get advice from someone who does. Most of the DIY stores have pamphlets covering those sorts of basics. The cheapest way to find your joist centres is by tapping across the ceiling surface and listening for the hollow and solid sounds produced. The relatively solid sounds are the joists, otherwise buy or hire a stud-finder.
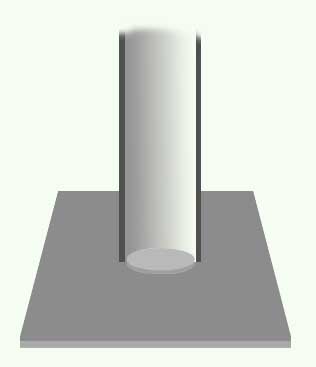
The prop should be positioned directly beneath a joist for the most rigidity and least chance of ceiling damage. If you have a hard floor, or smooth floor covering, it would be wise to use a similar plywood panel to protect it from the foot of the prop. The same is true for a carpeted floor, but prolonged use may cause the pile to be flattened. To avoid that, a technique can be borrowed from the world of Hi-Fi.
 Some speaker stands use spikes to achieve a rigid footing, even through carpet. If you take a 450x450x6mm and ply panel and hammer roofer's 'clout' nails through it at 100mm centres both ways, you will construct a small bed of nails. If you fix a second ply panel above the first, covering the nail heads, you will have a small platform equivalent to the speaker stands. It will be wise to file flat the extreme points of the nails, for safety and to prevent the load and pressure of the prop, driving the nails into any floorboards beneath.
If you want to try before you buy, or use occasionally, the props are available from 'tool-hire' shops. Hire can sometimes cost 25-50% of purchase cost for the cheaper items such as this, so consider buying and selling on. Measure and make sure you get a prop of suitable height for your location.
When you erect your post for the first time, watch for any hairline cracking which may show poor positioning or a weak spot in the ceiling. Listen for noises which sound of straining building construction. Don't over-tighten the prop, they are capable of supporting high loads and can easily jack ceiling and floor joists out of position. Once in position, if lateral (sideways) 'thrusting' loads will be applied, 'barge' the post before the event, to make sure it stays in place, and avoid disappointment and embarrassment later. You may find some 'play' in the post caused by the 'tolerance' between the two parts of the prop. This can be minimised by wrapping adhesive tape around the inner part of the prop, at the end and close to the 'jack', to reduce the space. Some props have holes in the plates to allow them to be screwed or bolted to the structure. Even if yours doesn't, it's worth drilling a couple, so that you can fix the prop plate securely to the ply plate. You may need to use an additional thickness of timber the same size as the prop plates, to take larger screws or coach bolts
If your partner likes the feel of cold steel against their flesh, the 'naked' prop is ideal. If something more cosy is required, the steel can easily be wrapped in blanket or thin carpet. This can be glued-on if appropriate. Another option is to clothe the prop with a suitable sized plastic water-pipe although the mechanics of this, and the subsequent erection of the post, will vary from prop-to-prop. The jacking mechanism and pin should be wrapped in padded material of some type, to prevent unwanted bruising from its projections. The joint between the two halves of the prop, and the pin-slot edges should be taped over, or padded, to prevent similar nipping.
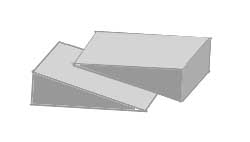 Another option for a post of a less robust 'scenery' type, is to use an adequate diameter plastic water pipe. Ends of carpeting sometimes come wrapped on similar pipes. The problem here is to wedge it in place. The plywood plates are still recommended to protect floor and ceiling. The wedging can be by folding timber wedges, which your local timber merchant or carpenter may be able to cut for you. You will probably need to secure the folding wedges, to prevent them sliding apart later. An alternative is the adjustable plate-foot used for scaffolding, obtainable from scaffolding merchants. It is advisable to cut circular plywood 'housing' plates, and screw them to the plywood floor and ceiling plates, to adequately grip the top and bottom of the pipe internally. The plastic pipe-post is obviously less robust than the steel prop, but timber packing can be used inside the pipe to increase the strength and rigidity.
The most obvious post material is timber, but the choice of cross section, finish, and timber type should be chosen with care. The wrong timber can warp, split and have splinters. Round hardwood bannister would appear to be most suitable, but its normal diameter of 50mm is unlikely to vertically span the required 2400mm, or greater, effectively. Larger timbers have increased weight and become unwieldy. One option is to construct a vertical box-beam of 100-150mm. from thinner timber to reduce weight.
The builder's prop is the only one of the three that can likely be used in most locations, the other two have to be made-to-measure.
If you do successfully adopt the builder's prop for your post you may consider obtaining a second prop so that your partner may restrained or suspended between them. It is not advisable to put both posts under the same ceiling joist. Two posts can also be used to support a beam. This should be sized to suit the span, (40mm dia. aluminium tube can span 1800mm). Fixing of the beam to the post can be by various means, depending on the material and dimensions of the beam. If your prop uses 50mm dia. tube for the 'thin' part, joint No.10 from the KeeClamp or PipeClamp equivalent will allow a 50mm tube to span between at any height on the 'thin' part. The unused 'pin' holes on the 'thin' bit can also be used to support a beam using suitable sized bolts, or the holes can be used to fix hooks, cross-posts or other items. The entire assembly including the beam should be tested by a person of the same weight as the intended user. A good test is to construct a garden swing seat from timber, and suspend it from the beam centre. Swinging on it and jumping up and down on the seat a few times, should reveal any weaknesses. If in doubt do not put your partner in a position where their feet would not reach the ground in a standing position (allowing the knees to bend), should there be an unexpected collapse of the assembly.
If suspension is the aim, the safety aspects concerning cuffs, circulation, nerve pressure etc. should be addressed before proceeding. These are dealt with, in detail, on various other resource sites.
The only remaining matter is to explain to others, the 'conventional' use for the post. For home owners who have occasional buiding work the builder's prop is an asset. For rented property dwellers less so. What would you say?
All the above information assumes you have a little successful knowledge of DIY. If you have little ability and aptitude in this area, it may be not for you. The information here is presented in good faith, but the writer cannot accept responsibility for any subsequent accident or injury.
![]() Get your own Free Home Page
Get your own Free Home Page