
Having often used the conventional ball and bit gags, I found myself requiring altrnative configurations. I haven't found these readily commercially available (possibly due to commercial safety issues, which I address later), so I developed the following DIY gags which suited my ideas more closely. Ballbit Gag No1
The first gag I required was a combination of a ball and bit, which seemed to feature often in some Klaw pictures and movies. I wanted the gag to easily disassemble for cleaning and also the bit part had to be 'tooth kind' but reasonably rigid. The ends of the bit were to have rings to accept equally a strap, rope or locks. Ballbit Gag No2
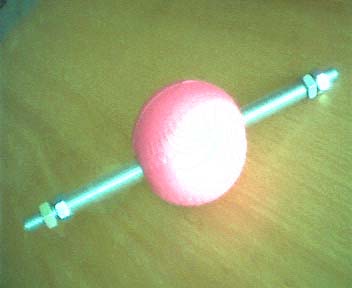
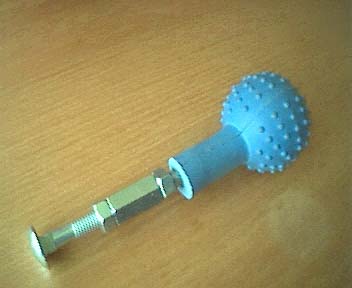
The next gag is a variation on the first, but in this case it was required that the bit part be rigidly fixed at the ends to other equipment. For this gag the most obvious material for the bit was commercially avaliable threaded rod, which could be cut to the exact length required, and takes hexagon nuts to achieve the fixing at each end. The problem was the thread of the rod isn't tooth friendly and cleaning of the the thread located close to the mouth would be inconvenient. The solution was to sheath the rod with a thick-walled piece of clear flexible PVC tubing. This protects the teeth from the rod thread, and seals the thread from contaminants close to the mouth position.
Ballgag Kit
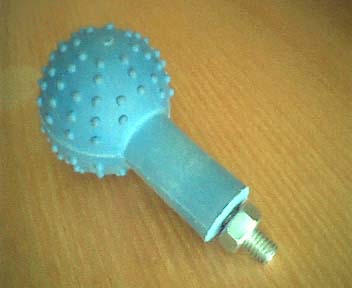
The third of the series is more of a kit of parts, then a single gag, although the basic gag is re-used in various configurations. The original was intended to be fixed again to other equipment, but this time the front was the fixing point, rather than the sides, as on the previous ballbit gag. The basic gag is made from half a commercially available 'barbell' dog toy. The end containing the bell is removed, to leave the remaining ball and shank. The shank part is drilled centrally with a gimlet, to approximately one third the depth of the ball. It's important that the hole be central as possible, otherwise the ball is likely to twist more easily around the threaded rod insert. Also if the hole isn't central, there's a small chance the rod may accidentally split out from the side of the ball.
Warning!! Although life isn't without danger, gags using rigid parts are more dangerous than those using flexible parts only. It's important to ensure anyone using this type of gag, doesn't collide suddenly with other rigid surfaces or equipment. After devising it, I felt that the 'Ballgag Kit' could benefit from an additional 'fence', which would prevent the ball being accidentally pushed deeper than anticipated, although I have seen similar gags used without this feature, and some may find it detracts from the flexibilty in use? Inflatable Gag Kit
The fourth gag was developed as the need for an inflatable gag, where the inflator and attached tubing can be removed, without the gag deflating, and if required something be attached, as in the previous kit gag.
Bonus Gag
The final gag here is made from the ball removed from the 'barbell', for the 'kit gag'. The ball has a captive bell which is best removed. A suitably sized plastic bead from a 'handycraft' store is required. The bead must be sized so that it can be inserted, when using a modicum of force, into the void vacated by the bell. After the correct size bead is found, it should be drilled centrally, so it an receive a small cable tie. In use, the cable tie attaches the bead to a suitable strap. The ball can then be pushed over the bead when used as a gag. All the above information assumes you have a little successful knowledge of DIY. If you have little ability and aptitude in this area, it may not be for you. The information here is presented in good faith, but the writer cannot accept responsibility for any subsequent accident or injury, however caused. This page hosted by
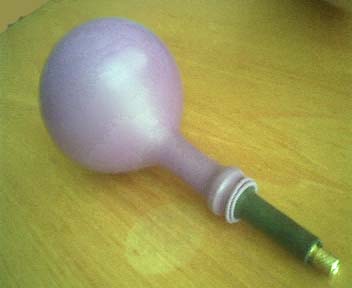
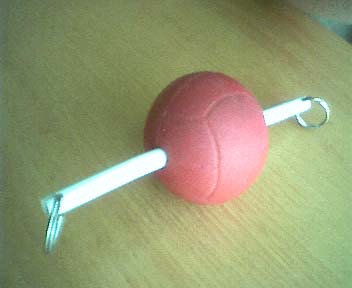 The ball is a commercially available child's toy dense foam ball. The ball was cored out to receive the bit, which is made from a short length of 6mm (1/4 inch) rigid PVC tubing (available from DIY stores). The end rings are small key rings, which thread into the holes drilled at each end of the tubing. The resulting ballbit gag gives the appearance of the Klaw gag, with the advantages of easy disassembly for cleaning, and the tooth friendliness of the bit part.
 The threaded rod needs to be wider than the subject's head, for it to be used in a frame which approaches from behind. When cutting threaded rod, use a nut previously threaded onto the part to be cut, to clear and re-set the thread after cutting and finishing. See the 'kit-gag' description below for a more detailed description of this technique.
The PVC tubing was a close fit, so it was heated in very hot water to make it more flexible and expand slightly whilst covering the threaded rod. The tubing wall thickness is 1.5mm and tough enough to survive a reasonable bite, but there's no reason why an additional tubing can't be added over the first, to double the protection and duty for repeated use.
The threaded rod needs to be wider than the subject's head, for it to be used in a frame which approaches from behind. When cutting threaded rod, use a nut previously threaded onto the part to be cut, to clear and re-set the thread after cutting and finishing. See the 'kit-gag' description below for a more detailed description of this technique.
The PVC tubing was a close fit, so it was heated in very hot water to make it more flexible and expand slightly whilst covering the threaded rod. The tubing wall thickness is 1.5mm and tough enough to survive a reasonable bite, but there's no reason why an additional tubing can't be added over the first, to double the protection and duty for repeated use.
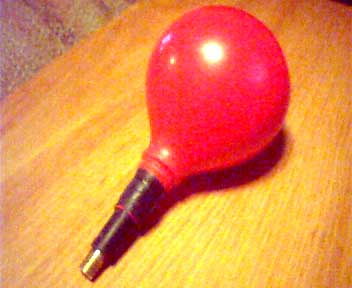
The ball in this case is a rather larger but softer foam centered ball. Any biting pressure will be taken by the bit, so the ball only needs to fill the remaining space as a gag.
The strapping/tying arrangements can be via the nut fixings, or using separate inboard attachments, to suit easier transfer from one location to another?
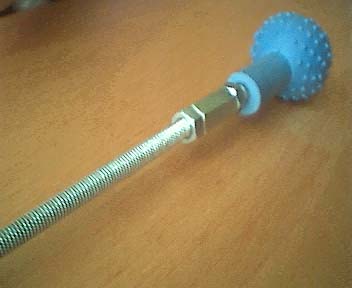 It's slightly easier to install the threaded rod if the rod-end is filed to a slight cone shape. 2-3 nuts can be locked on the rod at the appropriate point, to ensure the depth of the rod into the ball isn't exeeded, and also to give the spanner/wrench something to grip, without damaging the thread on the rod. After the rod has been screwed in, to the required depth, the outer stub length can be cut to suit. The cut edge should be filed smooth to remove burrs and also a minimum bevelled/cone edge filed *prior* to removing the nuts. If the bevel is filed after the nut removal it may be impossible to use a nut on the rod without recutting the thread. This process should always be followed when cutting threaded rod or shortening bolts. It's occasionally possible to fix an accidentally damaged thread, using a nut introduced from the opposite end of the rod.
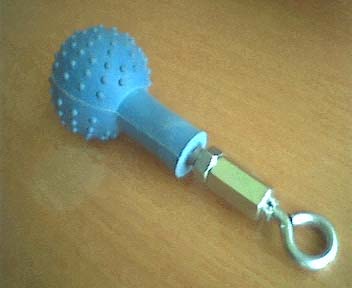 Once you have the basic ball with it's attached stub of threaded rod, it's easy to link it to other elements which use the same thread, by use of 'threaded rod connectors' which are just elongated hexagon nuts. You will require additional nuts either side of the connector, and by use of 2 spanners/wrenches of the same size, 'lock' each nut against the connector, to make the assembly rigid and not easily able to twist or become undone.
The additional pictures show the basic ball attached to a length of rod, a fixing eye and a coach bolt. I haven't included the strap/fastening details for picture clarity, also this type of gag may be used in a semi-'clamping' situation, where no other fastening is desired. Generally the minimum would be a strap, with a hole sized to fit tightly over the shank of the gag.
 Additional rod length is unlimited, if further connectors are used, but the rigidity falls fairly quickly, so metal tubing is probably better for lengthy extensions. The fixing eye can be used for fixing or tethering. The eye thread didn't match the connector thread, so an insert from soft aluminium sheet rolled into a tube made a suitable liner. The eye made tight screw fit inside the connector with the liner. The final picture shows the ball attached to a coach bolt. A number of bolts can be attached to a ply panel or a metal frame, such that frequent repostioning, of a 'Twister' game type can be done?
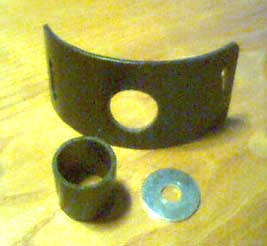 The current 'fence' for this gag uses a 'repair washer'(25mm/1" O/A dia.), a short section of suitably sized PVC plumbing tubing (20mm inner dia.) and a section of PVC roof guttering. The guttering is cut to a size which will cover the lips and a height equal to say twice the diameter of the shank of the ball. A hole is cut in the centre of guttering piece, the same diameter as the ball-shank. The shank is passed through the gutter-piece and a short length of PVC pipe passed over the shank behind the gutter-piece, to act as a spacer. The final part is the repair washer, which is put on the threaded rod, prior to the nut.
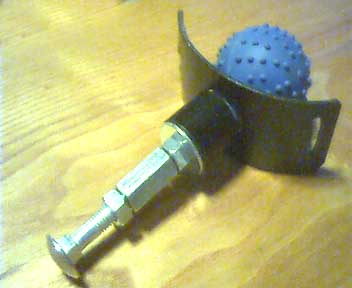 Any forward movement presses the front of the mouth onto the gutter-piece 'fence' which presses onto the spacer, and the spacer presses on the washer, which transfers the load to the threaded rod. The ball can't now be pushed further into the mouth than the position of the 'fence' will allow. The fence could still cause bruising around the mouth and possibly loosen the front teeth, if movement forward is sudden and with force, such as a fall, so additional foam padding in front of the fence may be advisable? Irrespectively, gags with rigid parts should be used with especially extreme care.
 The basis is a car wheel valve, available from any tyre fitting shop. Additional items required are 2-3 party balloons and a bicycle pump with a connector suitable for car valves (most mountain bikes use this size valve for simplicity and robustness). The party balloons should be inflated to about 6" dia. then deflated before the next step, which is to take a short thin rod which has no sharp edges (plastic pens and some pencils are suitable) and insert it inside the first balloon. The first balloon is then inserted inside a second balloon, an if required 1 and 2 inside a third balloon. Some rubber/latex friendly lubricant may help here.
 The car valve has a convenient flange to prevent it leaving the car wheel. The concentric neck of the combined balloons must be eased over this flange. It's best ensure your fingernails are cut and smooth before doing this, so that sharp edges don't cut the balloon material. The fit between the flange and the balloons should be sufficiently air tight for it's purpose as a gag. The configuration pictured above, has the flange not far inside the neck of the balloons. For a shorter overall gag, the flange can be inserted further into the neck of the balloons, as shown left, but some tape or banding may be reqired, to ensure the seal remains airtight. 'Self-amalgamating' tape is ideal for this purpose and preserves the black appearance of the car valve.
It's worthwhile checking that you can easily access and press the centre pin on the valve, to deflate the gag before use? The thread of the valve outer, is finer than that of the threaded rod used in the previous kit gag, although the same diameter. When I find a suitable adaptor between the two I'll report it here.
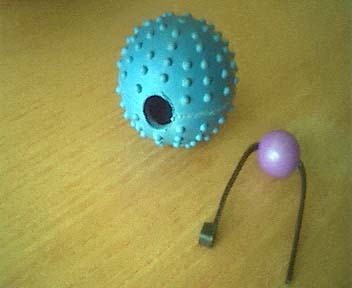
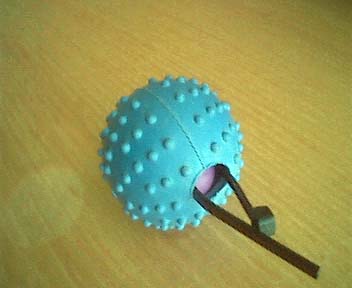 The ball can easily be removed from the strap for cleaning and sterilizing, without the need for the strap to be damaged. If necessary the bead can be removed from the strap for cleaning, or to use the same ball elsewhere.
![]() Get your own Free Home Page
Get your own Free Home Page