Old Dalton Village Blacksmith Shop
A bit of background:
Where I live in Dalton, NSW, a small private museum has recently opened
on the site of the Shearing Co-op (which actually existed before the town
was built around it. The main building of the museum is the original shearing
shed, restored by the owner, Brett Stone. There is another original building
on the site, which is also planned to be restored to its original size, utilising
existing piers for a now missing veranda on one side, which will become Brett's
workshop.
Now Brett has grand plans for his little museum to become a much bigger
museum, and one of those plans involves building a blacksmith's shop.
When Brett mentioned it to me, I told him that I would be interested in such
a venture, having done a very small amount of forging in the past, and still holding an
interest in the subject. A week or so later, Brett tells me he wants the
forge operational by early October, and since I am the chief blacksmith, I need
to come up with some plans!
So I did...
The Plans
|
First, I decided what I wanted the actual forge itself to look like.
many thanks here go to an excellent book by Aldren A. Watson, "The Blacksmith:
Ironworker and Farrier". It had some great detail on building a forge, with
several variations on a theme. I'm very glad I got this before we did
any actual work, because it stopped us from making a huge mistake right at
the start.
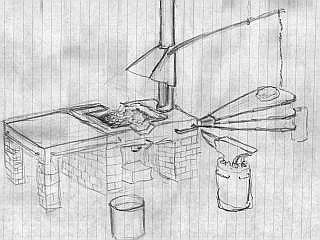
We decided to mix up a few of the ideas and play with it a little,
and so eventually I settled on this for the look I am after.(excuse the lined
paper, please). Basically what you see here is a brick base, with a concrete
slab and forge body, capped by a fairly basic chimney and hood.
|
|

|
That was all very well, but we needed a building to house it in.
Brett got hold of some recycled building materials from an old house that
was being torn down. Some log rafters, corrugated iron, wall slabs and old
red bricks, some of which have lovely heart-shaped frogs. Taking the sizes
of these materials into account, we decided on a fairly small rectangular
building with a lot of sliding doors (This will match the existing shearing
shed, and you don't need to worry about the wind slamming a door on someone).
Here's a rough sketch, with absolutely criminal perspective, making
the building look nearly twice the size it should. Astute observers will notice
that the anvil has changed position in this sketch, it will give us more elbow
room for strikers. The post vise and other fixed tools will probably be behind
the doors in this drawing. Also, I didn't draw in the bellows.
|
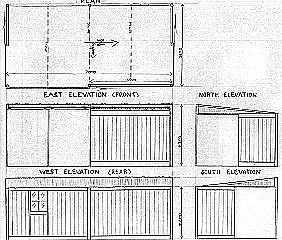
| Next, I drew up something a little more precise (Though
not too precise!) as the basis for a building application. That's still underway
at this stage, though preliminary conversations are hopeful. |
|
Work so Far
While we wait for the building application to go through, there's nothing
preventing us from building the forge in the meantime, so that's just what
we've done, or at least started to do.
|
I don't have any photos of the first stage, but since that was just
two rectangles of concrete, I guess you can probably imagine it.
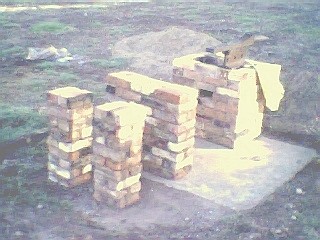
The second stage of building is complete with the brickwork which
will support the forge, table slab and chimney. Huge thanks to Andrew Cahill
from Yass for the advice, guidance and plain old work he put in to help here.I'm
sure his further assistance will be invaluable in the future.
Also in these shots you can see a rough anvil we had for a short
time. The owner decided not to donate it after all, though, so we lost that
anvil.
In the background of the second shot you can see the strange device
we havewhich has something to do with wagon tires. More discussion of that
below.
Also in the second shot you can just make out the frog on two bricks,
the near right corner, and inside the Tuyére hole. I hope to replace
these shots with more detailed ones once I finish the roll of film and scan
them in.
|
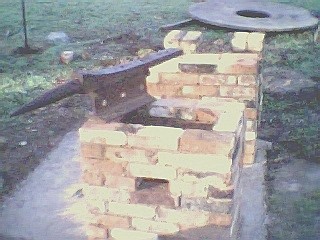
Stage three is now complete with the pouring of the
concrete slab and pan. This is reinforced concrete with bars of reinforcing
metal projecting to make tool racks.
|

|

|
Same angle as the second bricks-only photo, shows tool rails at
rear of body.New anvil in the background. |
| Shot from the front, shows the table slab supports
and the pleasant rural landscape. That's a cow in the top right. |

|

|
A look down onto the slab.
|
| Moving slightly closer, you can see the hole for the
hearth fairly clearly. |

|

|
The table slab suffered a little from rain too soon after pouring,
so we didn't get the nice smooth surface I was hoping for. Not that it really
matters. |
Neat Stuff
We've got a nice little collection of old smithing stuff that has been
found and either bought or donated from around the area, a lot of which we
plan to use. We have some small stuff that I don't have shots of, drifts,
tongs, hammers, a post drill, that sort of stuff. These are just the
real important or interesting things.
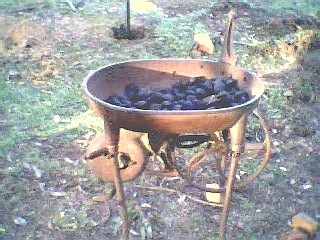
| This portable forge will be one of our first projects
once the forge is working. We need to replace the lever arm, de-rust and grease
it, and fix a new ash gate. A new hood will also be called for. If anyone
can give me some detailed shots of a working lever arm on one of these, I'd
be eternally grateful. |
|

|
We have some anecdotal evidence stating that this
disc of iron/steel was used for bending wagon tires, but it looks exactly
like the device described in Alex W. Bealer's "The Art of Blacksmithing"
for fitting tires to wheels, so I'm not so sure. It could have been used for
both things, which would be typical of Australian thrift. |
This set of double action bellows was what first got me thinking
about blacksmithing again. This picture is not the clearest,and I'll replace
it with a better shot when I can convince Brett to clear it off and drag it
outside in the light.
|

|

|
This is our new anvil, which is very heavy, has a
pretty good face, and a lovely bounce and ring to it. The only problem is its
complete lack of table and horn. Aside from that, it seems to be in very good
condition and will probably be mostly used for hardy tools once we get a
complete anvil. |
Here's the other side. Many thanks to Moss Hartmann of Canberra for
his generous donation.
|

|