Here I will explain how to use your 3D Rendering program and Adobe Photoshop to create images that require 3D glasses like the one below.
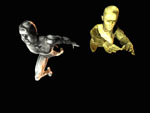
First you will need to compose your image. I started with leaving my camera at x=0, y=0, z=0. To help give that "comin' at'cha" effect I changed the aspect ratio of my camera. When you screw with it it should sort of look Virtogish.Then on my horizontal axis(in this case, x) I moved the camera a few clicks to the left. Then I rendered the image. I then moved the camera to the right an equal number of clicks. What I mean is if the first position was at 0.0008 then then next should be at -0.0008. Thats not a hard and fast rule but it allows for a low margin of error.
|
|
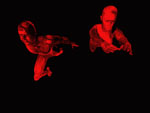
Then you need to turn each image into a grayscale image to remove the color info. Next convert them back to RGB. Doing this will allow you to create he red and blue colors. Turn your left angled pic red by selecting "Image", "Adjust", then "Hue/Sat..". On the panel that pops up check "colorize". On the Hue parameter, move the selector all the way to the left. Move Saturation all the way to the right (you may not need to totally saturate it to get the effect however). Move the lightness down to about -50. For the right angled view, do the same thing. Only this time set the hue to 200. Create a new blank document of equal dimensions to your original image. Paint the area black in that new image create layer 1 and copy your left angle image to that layer. Create layer 2 and copy the left angled image to that layer also. Set each layer to "screen".
|
|
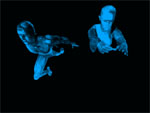
The 3D in your image will work at this point but both images appear slightly transparent. To eliminate this, I go back to my bottom layer image, wich in this case is the blue one, and create an alpha channel matte.Then I copy that matte into a newly created "alpha channel". Doing this makes it easier to insert a background image and not have it be seen through your objects in your image.
|
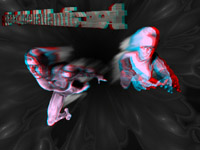
After you "flatten" the layers you get the image shown at the top pf this page. Thats it for this tutorial. I hope this helps and I have to say that I'm not the brainiac that came up with this. These type of images are called "anaglyphs. These have been around since the creation of the camera, practically. Some are "true" 3D. Others are 2D images that have been turned into anaglyphs simply by moving the red and/or blue channels of an image. Often the image in the foregrund is left unaltered to help facilitate the 3D effect.duesentrieb, one of the contributors to Renderosity.com told me how after I saw his images at Renderosity.