|
|
|
|

|
This site will no longer be updated, please visit http://pixel-tickler.com instead. |
|
|
||||||||||||||||||||||||||||
|
||||||||||||||||||||||||||||
|
Step 1: Unzip the image provided for this tutorial or make certain that you have a duplicate copy of the image you want to try this on then apply a gaussian blur set at a radius of 10. |
||||||||||||||||||||||||||||
|
PSP6 users: image/blur/gaussian blur. |
PSP7 users: effects/blur/gaussian blur |
|||||||||||||||||||||||||||
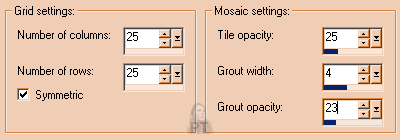
| Step 2: Apply Antique Glass with setting as shown in screen shot. | ||||||||||||||||||||||||||||
| PSP6 users: image/effects/antique mosaic | PSP7 users: effects/texture/antique mosaic | |||||||||||||||||||||||||||
|
|
||||||||||||||||||||||||||||
|
|
||||||||||||||||||||||||||||
|
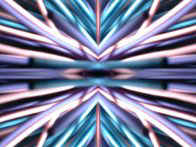
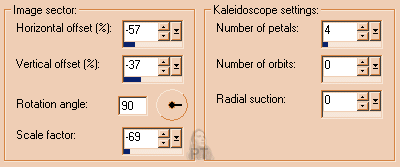
Step 3: Apply Kaleidoscope with setting as shown in screen shot. |
||||||||||||||||||||||||||||
|
PSP6 users: image/effects/kaleidoscope |
||||||||||||||||||||||||||||
|
PSP7 users: effects/reflections effects/kaleidoscope |
||||||||||||||||||||||||||||
|
|
||||||||||||||||||||||||||||
|
||||||||||||||||||||||||||||
|
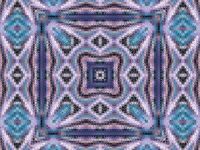
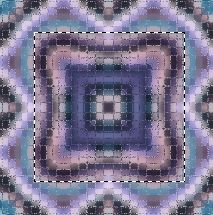
Step 4: Here's where things get a little tricky, not because this is going to be difficult, but because you now have several options. You are going to be using the selection tool to select a portion from the center of your image to be your tile. Choose square, anti-alias and no feathering. |
||||||||||||||||||||||||||||
|
||||||||||||||||||||||||||||
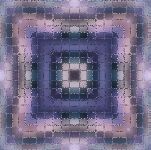
| Step 5: Now go to selections and convert to seamless pattern. You now have a seamless tile that you can use in all sorts of ways. To make this background, I added a new layer, flood filled with white and then lowered the opacity to make a muted background. Isn't it cool what you can do with a picture of a koosh ball? |
 |
|||||||||||||||||||||||||||
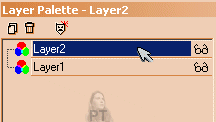
| Step 6:As you can see this tile is still a little too dark to use as a background. Go to your layers palette and promote to a layer. Add a new layer and flood fill with white. Go back to your layers palette and click on the white layer and still holding your left mouse button down, drag the white layer beneath the tile layer. | ||||||||||||||||||||||||||||
|
|
||||||||||||||||||||||||||||
| Step 7: Your tile should now be visible. Use the slider to lower the opacity which will give your tile a muted look so that text can be placed on top of it easily. | ||||||||||||||||||||||||||||
|
Click here to view a full page example of a seamless mosaic tile background. |
||||||||||||||||||||||||||||
|
Download the PDF of this
tutorial here. |
||||||||||||||||||||||||||||
 |
||||||||||||||||||||||||||||
| Updated 02/06/02 | |||
| Copyright ©
1999-2002 All rights reserved. All graphics on this site are property of Pixel-Tickler and are protected under US and International copyright laws and may NOT be copied, stored or offered for sale without written permission from the owner unless so stated otherwise. PSP tutorial groups may use these tutorials as part of their weekly lessons. If you have any questions regarding the content or images used on this site, drop me a note at news://news.annexcafe.com/annexcafe.psp.tutorials. I browse there regularly. |
|||