|
|
|
|
|
This site will no longer be updated, please visit http://pixel-tickler.com instead. |
|
|
||||||||||||||||||||||||||||||||
|
||||||||||||||||||||||||||||||||
|
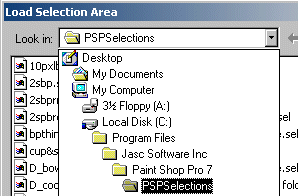
Chances are, if you are reading this tutorial, you have tried to open a selection in PSP without using the load from disk option. You can't merely open up a selection from a folder and hope that PSP will open it or you will get an error message along the lines of "The specified file cannot be identified as a supported type." So, here's what you do: |
||||||||||||||||||||||||||||||||
|
||||||||||||||||||||||||||||||||
| Step 2: Browse your hard drive (normally default drive is labeled "C") for the Program Files Folder, click on the little plus marks. Find the Jasc Software inc folder. Keep clicking on the plus marks until you open up the PSP7 Folder. It should now be highlighted. | ||||||||||||||||||||||||||||||||
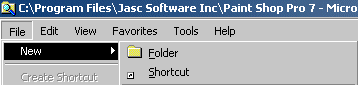
| Step 3: Go to the top of your screen to File , New, Folder | ||||||||||||||||||||||||||||||||
|
||||||||||||||||||||||||||||||||
| Within the larger window on the right side of your screen a little folder icon should now be showing called "New Folder". | ||||||||||||||||||||||||||||||||
|
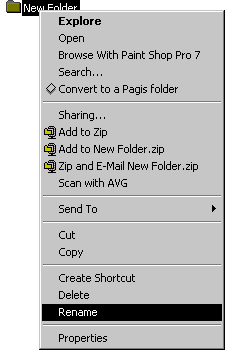
Step 4: Now you need to rename this folder. Using your mouse, right click on the "New folder" so that a menu similar to the one shown to the right appears. Your menu will not look exactly as mine does. You should now be able to rename the folder. I called mine PSPSelections, but just selections will suffice. What is important is that you remember what you named the new folder. Step 5: If you haven't already opened PSP, do so now. Hopefully, the author of the tutorial has already told you what size file you should have started with, i.e. "Open up a new image 150 by 150 transparent background." I am going to assume that you have a program such as WinZip that unzips files and you know how to use it. Much like you just created this new folder, you can browse to it and extract selection files from your un-zipping program or save selections you create into it within PSP. |
|
|||||||||||||||||||||||||||||||
|
||||||||||||||||||||||||||||||||
|
Download the PDF of this tutorial
here. |
||||||||||||||||||||||||||||||||
|
|
||||||||||||||||||||||||||||||||
 |
||||||||||||||||||||||||||||||||
| Updated 06/14/02 | |||
| Copyright ©
1999-2002 All rights reserved. All graphics on this site are property of Pixel-Tickler and are protected under US and International copyright laws and may NOT be copied, stored or offered for sale without written permission from the owner unless so stated otherwise. PSP tutorial groups may use these tutorials as part of their weekly lessons. If you have any questions regarding the content or images used on this site, drop me a note at news://news.annexcafe.com/annexcafe.psp.tutorials. I browse there regularly. |
|||