|
|
|
|
This site will no longer be updated, please visit http://pixel-tickler.com instead. | |||||
|
|
|||||
|
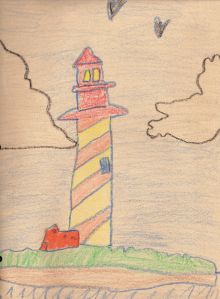
Scanned or picture of a child's drawing, preferably colored with crayons or colored pencils |
|||||
|
Soft Plastic (Located under effects/ textures) |
Inner Bevel |
||||
|
Borders |
Magic Wand |
||||
|
Eye Dropper |
Kaleidoscope |
||||
 |
|||||
|
You may use this image, because I drew it when I was 10. Right click, save as to a folder on your computer, or right click, copy and paste into PSP7.
If you are using my image, go ahead and set your background color to #EBD2B1. If you are using your own, use the eyedropper to select a color from your image that pleases you. |
|||||
 |
|||||
|
Step 2: We will start the framing technique. You will be adding 3 sets of borders using the Image/Add Borders tool. Add a symmetrical border of 5 pixels. This will be referred to as the inner border. |
|||||
|
|||||
|
|
|||||
| Step 3: Use the magic wand with these settings: Match Mode RGB, Tolerance 0, Feather, 0 and select the outer border. Hold down your shift key and select the inner border. Both of these selections should now show marching ants. Go to Effects/3D Effects/Inner bevel. Select the metallic preset, but change the shininess value to 60. | |||||
| Next: Go to selections, select none (Control +D). Use the magic wand on the middle border and hit the delete key on your keyboard. Do not deselect this section as it needs to remain active for the next step. | |||||
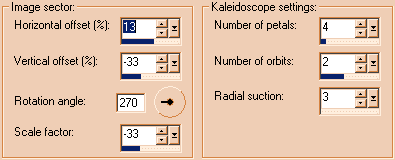
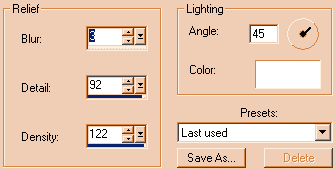
| Step 4: Go to Effects/Reflection Effects/Kaleidoscope and use the following settings: | |||||
|
|
|||||
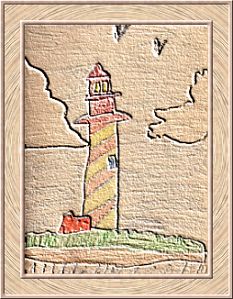
| You can always adjust these settings if this is not the effect you want. Here's my finished image: | |||||
|
|
|||||
|
Download the PDF of this
tutorial here. |
|||||
 |
|||||
| Updated 02/07/02 | |||
| Copyright ©
1999-2002 All rights reserved. All graphics on this site are property of Pixel-Tickler and are protected under US and International copyright laws and may NOT be copied, stored or offered for sale without written permission from the owner unless so stated otherwise. PSP tutorial groups may use these tutorials as part of their weekly lessons. If you have any questions regarding the content or images used on this site, drop me a note at news://news.annexcafe.com/annexcafe.psp.tutorials. I browse there regularly. |
|||