THE MAKING OF A CALABASH PIPE - PAGE 7 OF 8
THE FINAL STAGE
All the parts of the pipe were ready, but some more work was necessary, before starting assembling them. First, I had to silver-plate the cup of the bowl, and the bronze band.
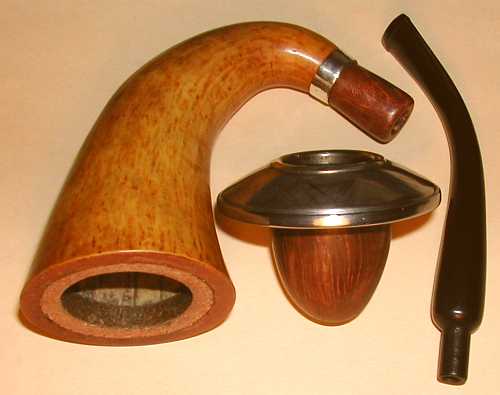
The same friend who gave me the piece of cork for the gasket (thanks Alex!), also gave me a liquid named "Silverlife", used in silver-plating metalic surfaces. It's not a paint, it really adds a thin coat of pure silver that bonds with the metal. I applied the liquid with a cloth, I rubbed it for a minute, and then I wiped the excess material. The result was impressive! I repeated the process three times on the surface of the cup and the band, so the silver layer became thicker and more durable. I polished both the silver cup and the band with a cloth buffing wheel, attached on my drill. Then, I used the same buffing wheel to polish the gourd and the briar ferrule. Since I don't have a special polishing wax, I used an ordinary brown drawing wax-crayon. I applied a thick coat of wax on all surfaces by drawing, I melted it over an alcohol lamp, and started buffing immediately. The result wasn't the glass-like surface of a new pipe, but the antique look of my calabash doesn't need it. Next, I polished the stem with the buffing wheel, and I applied a coat of graphite on the tenon and the mortise by drawing with an ordinary 2=B pencil, as a dry lubricant. I did the same on the inside surface of the cork gasket, because it was the time to insert the bowl in place.
Inserting the bowl in the gasket for the first time is a risky process. The gasket is still too thick, as it has to be (see "the cork gasket"), so the bowl inserts very hardly, and the extreme pressure can easily crack the gourd. First, I wet the cork with an ear-tip, to make it more flexible, carefully not to wet the gourd. Then I applied a drop of olive oil on the outer surface of the bowl. While holding tight the top of the gourd with one hand, I inserted slowly and carefully the bowl in place, by pressing and twisting it. When the bowl was all the way into the gourd, and the cup was sitting properly on the top, I checked around the gourd for cracks, and I left the pipe for 24 hours.
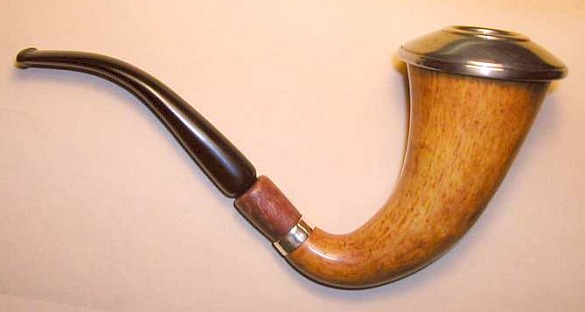
Next day, the gasket was dry, and formed in the shape of the bowl, so every next time, removing and reinserting the bowl, was easier. Placing the stem, was not a problem, as the mortise of the ferrule was in the exact diameter of the tenon, and both were already lubricated with the pencil graphite.The first real gourd calabash pipe made in Greece, was assembled, and ready to smoke !
<= BACK
 HOME
NEXT =>
HOME
NEXT =>
