
Microsoft FrontPage Tutorial
A homepage is the "top" of your set of Web pages. It is where most people start exploring your Web Presentation, and it is
the URL of that homepage you will give to people when you tell them to check out your Web site. The homepage generally contains
an overview of the content available from that starting point, much like a table of contents. The links in your homepage are like
bookmarks, marking your favorite or most used pages within the Web. If your content is small enough it may simply fit on one page.
Basic to use Frontpage
-To open Microsoft frontpage Xp -Click start Programs Microsoft frontpage
-The inside the program you will see menu bar and put together with, file , edit , view , insert , form , tools , table , frame and window
help
-Tool bar put together with, create view , open , save , search , publish web , toggle flame , print , preview in browser , spelling , cut ,
copy , paste , format painter , undo , redo , web component , insert table , insert picture from file , drawing , insert hyperlink , refresh
, stop , show all and frontpage help
-Formating toobar , style , font and font size
-View bar , page , folder , reports , navigation hyperlink , tasks , normal , html ,
preview
Create web page from text
-Click file >new >page all web >emmpty web >website templates >Click Empty web and Click Ok
-put mouse arrow in page and click right button >page properties > put the name in title
-type the text as you want (enter for next column and enter+shift for same column)
Bring context from Microsoft word to web page
-put mouse arrow in page> insert > file > Click your file word
Set pattern context

-drag all of context or Crt+a> choose font > size >set the row by use align left, center , align right and justify> choose color > font color >
Save web page
-Check web page by click preview or file>t;preview
-file> save as > choose folder > iin file name browser create the name > save
Set picture to web page
- Put mouse arrow in page> insert from file or menu insert picture > from >file > choose your picture > click insert
adjust size picture
- Click at picture and handle will appear on corner of picture> drag >mouse to handle > adjust size as you wish > click outside piture
Decorate pictures by picture tool bar
- view> toolbar> click / pictures> choose picture
Replace picture with context
- click right button at picture> picture properties > general > alternative >representations> describe at text blank> click Ok > preview
Decorate by Clip arts
- put mouse arrow in page > insert > picture > clip art > search clip art> choose clip art > Click insert
Create easy table
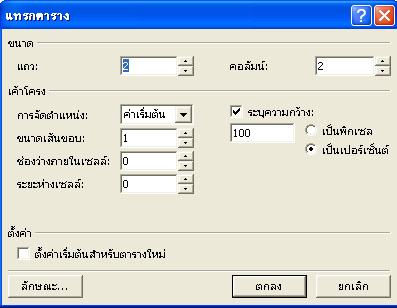
-1 insert table > drag mouse to choose row and column >release drag
-2 put mouse arrow in page>click table > insert > table > set insert as you wish
Decoration quality of table
-Click right button in table> table propperties > set as you wish
Put context and picture in table
- put mouse arrow in page table>type usual text
-put mouse arrow in page> insert picture from file > choose picture >Click insert
Create hyperlink from context
-drag text to link> insert hyper link> existing file on web page > choose file you want to link > Ok
Create hyperlink from picture
- drag picture to link> insert hyper link> existing file on web page > choose file you want to link > Ok
Create hyperlink from email
-drag text to link>Email address> type your email > click Ok
Advice how work for flame page
-file>new>page or web > page templates > flame pages > choose templates as you wish > click ok
- set flame >put arrow in flame > click right button > flame properties > choose
hyperlink in flame
-type menu in flame > choose menu >flame split fame >set as you wish > click Ok
Save page as
-click as flame>flame> save page as > set the name (if you already have name just click save page)
Using pictures to decorate the WebPages
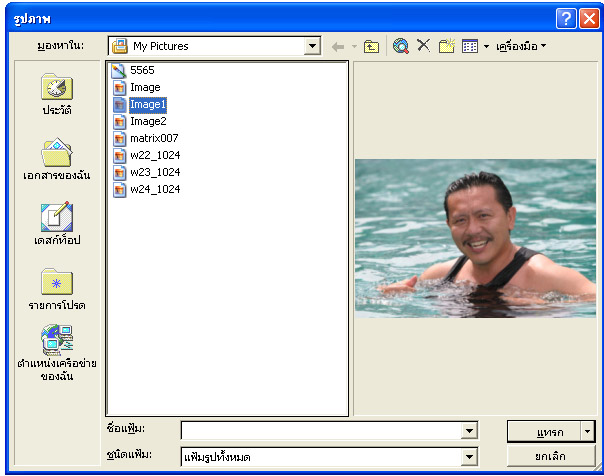
Easy way to insert pictures.
-Choose insert picture from file from tools menu or go to insert and select picture from file> Choose picture then insert
Change the size of the pictures.
-Click on the picture (it will be highlight) then drag in and out to make it smaller or bigger, shorter or longer> You can also use the
right click on the picture to set the properties of the picture.
Using Picture Toolbar.
-Select View then Toolbars and pictures> The picture toolbar will appear. Select a picture to use the toolbar> You can add text,
rotate ,or flip the picture. Put more or less contrast ,more brightness or less brightness> Crop the picture>Set to transparent or
black and white.
Change the picture to message.
-Choose the picture ,right click and select picture properties> Click general and type the message in alternative representation
text>Then preview in browser >If the browser is set to display picture, it will show picture> If it is not set to display picture> the text
will show instead.
Arrange text around the picture.
-Select toggle pane on tools bar> click on folder lists> choose .htm file> Click on format, select position>choose wrapping style
(none,left,right). Or right click for picture properties, choose the alignment.
Put Clip Art Gallery in WebPages.
Go to Insert ,select picture and click on clip art.> Choose the picture and edit it as you wish.
Designing WebPages with tables and hyperlinks.
The basic of table building.
-Select Insert table from tools bar> Drag for rows and columns> Or
-Select table from menu bar, insert then table> Set the numbers of rows and columns> Set layout/split columns.
Change the table properties.
-Right click in the table, select table properties>Float left/right or default> Boarders> set the size and color> Background> set
color or insert picture.
Create answering forms.
Start building message box.
-Create a new normal page>. Go to Insert >click form >then form in the sub menu again>the box will show up(submit/reset)>
Move the box by enter in front of it or delete it.> Type the messages(your questions)> To Insert text
box> go to Insert> form> then text box.> Click the box> right click> form field properties> name it> initial value (blank or...)> witdth
in characters> password field.
Creating drop down box and list menu.
-Type the message(your question)> Go to Insert > form> drop down box> the box will show up> Right click on the box> drop down
box properties> (name it, allow multiple selections> click add to put more choices ,specify value,initial state). To create list menu>
right click in the box> form>drop down box> put height the same number as the choices you put in>List menu will show up.
Creating options/checkbox buttons.
-Type your message(questions)> Go to Insert> form> checkbox>the box will show up> Type your message> right click in the
box> click properties to set name> initial state> value> To create option button menu> got o Insert> form> option button> Type
message> right click for form fill properties (name, value initial, state)> Options button will allow you to choose only one option>
Creating submit buttons for the form.
-Go to Insert, form, push button> Double click on the button for properties (name,value/label button type( normal,submit,reset))
Sending information from form to analyze.
-Right click in the form>form properties> where to store result> sent to> type the file name> options> choose file where the
information will be send to> include field names file format > Or send to e-mail address or send to other.
Saving and uploading websites
Correct the spelling.
-Click Navigation in Views Bar> Click tools> click spelling> choose to check spelling of entire web or selected pages> Click
start to start> the mistake will show up> double click on it to correct the mistake(change or ignore).
Organize file and file name.
-Go to Toggle Pane on the toolbars> Right click on the file to rename> change the file name> Delete the file that is not needed.
Check the works create in Task list.
-Click Tasks on Views Bar> you will see the work that is not completed or not started. Change the status of work to completed
or continue working on it>Uploading websites in your computers.
-Go to File> publish web> choose the publish destination> choose folder to upload websited> Preview.
Uploading websites to server.
-Go to File > publish web> type name and password you get from the server> click publish to upload websites to server.
Making WebPages more interesting.

1Set Background
-Right click on the page> click page properties> background.> Set colors for text, hyperlink, visited hyperlink, active hyperlink.>
Or set background picture by choosing the picture file instead. Putting sound in webpages
-Right click for page properties> general> background sound> choose sound file>
Create moving text.
-Choose text to move> go to Format menu> click on dynamic html effects> Choose on when to move(click,double click >
mouse over> page load) Apply to...> click insert web component> choose an effect> choose marquee> put the text to be moving
text set the direction and speed.
Create Roll over for messages/text.
-Choose message> Go to format> dynamic html effects> set dhtml effects(mouse over,formatting,fonts).
Movements when changing webpages.
-Go to Format> page transition> choose when to move> choose transition effect>
Creating Hover buttons.
-Choose the message or text> click Insert menu> web component> choose hover button> hover button properties will come
up> Set the text, the link> set properties.
Set webpages properties with component.
Create Hit Counter.
-Go to Insert> choose web component> click hit counter> Choose counter style, upload to server.
Create Search Page.
-Go to File> choose new> page or web>new from templates> page templates> General> choose search page> search page
will come up> put in your own messages.
Create Webboard.
-Go to File> new, page or web> choose web site templates> Choose Discussion Web Wizard in options your destination file>
Discussion web wizard window will come up> set the properties.