| Back to Homepage |
The Basic methods used in the construction of Interlaced Knotwork
For a simple demonstration of the basic principles of knot construction you will need :
a pencil, a pen, a rubber and a piece of paper (obviously!).
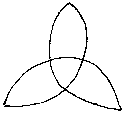
Firstly, in pencil, roughly copy this shape:
Secondly, in pen now, draw a line around the first shape, keeping your line a uniform distance from the original, pencil line, thus..
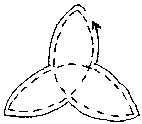
Thirdly, still in pen, draw lines around the inside of your original pencil lines, so that you have, as it were, completely encased the original pencil line...
Fourthly, rub out the original pencil line. You should be left with this shape...
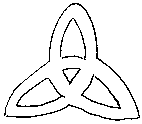
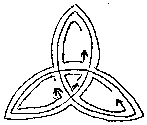
Finally, and now we come to the interesting bit, with your pencil, follow the line of the knot and when you come to the 'junctions' where lines cross , 'weave' the line by alternating over and under; ie. make the line you are following go over at the first junction, under at the second and so on, you should end up with something like this...
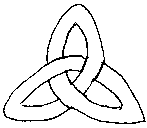
Interestingly, this principle can be extended to virtually any random sqiggle you draw as your original pencil line..
Don't bother counting the amount of junctions, if you end up with two 'overs ' or two 'unders' you must have made a mistake, either two 'overs' together or two 'unders' at an earlier stage.
The above is an outline of the basic principle of knotwork, which as you can see is closely related to the 3d arts of weaving an knitting.
More complex knots can be made by drawing your original pencil line around a box grid.
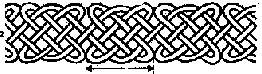
Knotwork borders can be drawn by using a line of dots to form a simple grid....
![]()
This can be used to work out the length and width of your border
The basic form of the knots is formed thus...
![]()
To make the chain a series of smaller knots incorporate gaps by missing out joins at regular intervals
![]()
Then simply outline your line knot as before...

And rub out the guide pencil line...

Then carefully 'weave' your line, always going over then under then over etc...

By varying the distance between the gaps in the line one can vary the knot, creating different patterns...
![]()
![]()
By giving your original dot grid a deeper width, by adding another line of dots, a deeper border can be designed...
![]()
You can try out your own designs, varying the distance between gaps and the amount of dots in your plan grid...
This page is meant as a brief summary of the basic principles of knot construction, hopefully, you will now be able to use these methods to create designs of your own.