
|
| how the cameras work |
| Streaming This is an Axis 2100 indoor network camera. (They have other models for outdoor use) It has a built in web server and connects directly to a network via 10/100 ethernet. Still Image The Axis 2100 is also setup to ftp a new jpg every three minutes. |
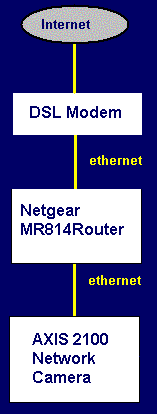
| How do I set up a network camera? Setup on a home network is pretty straightforward if you have a high speed internet connection (upload speed is what really counts) and a router for sharing it. Axis has some pages that cover this, but here is the basic rundown. 1. Turn off DHCP in your router. This makes setting up your computers a little harder, but it has two advantages. a. Guarantees the camera is always on the same IP address so you won't have to keep changing port forwarding settings (see step 2). b. Adds a little extra security if you are running a wireless lan. With DHCP turned off you will have to configure the TCP/IP settings for your PC(s) and camera manually. This isn't as hard as it sounds, especially on a small network. IP address: whatever you want on your subnet. Typically something like 192.168.0.1 used by the router 192.168.0.2 first computer or network camera 192.168.0.3 second computer or network camera and so on The router's address is the one you use to get to the router configuration from your PC. Refer to the router documentation if you are unsure. Subnet mask: typically 255.255.255.0 Default Gateway: This one can seem confusing but it isn't. This is the IP address of the router on your local network. In the example above this is 192.168.0.1 Primary or Preferred DNS server: Once again this is the address of your router. The addresses used depend on your brand of router, but the general idea should be the same for all of them. 2. Connect the camera to the router and assign it an IP address (instructions come with the camera) You should now be able to view the camera on your local network. 3. Set up port forwarding in your router to forward incoming requests on port 80 (the camera can be setup to use other ports, 80 is default) to the IP address you assigned to the camera. 4. Find out what your IP address is outside of your router. This is easy, just go to www.whatismyip.com in a browser. If you type this address into a browser from outside your lcoal network, you will get a page just like when you go to the camera from the local network. Your camera is now on the internet. The only awkward part about the setup is that you can't go to this address from inside your local network and access the camera. The camera has a different address on your side of the router. It is easiest if you can dialup with a different computer or get a friend to try it out. That covers the basics. I'll cover setting up security in the camera, dynamic vs static IP addresses, and adding the image to another regular webpage later on. |
 |