WARNING: This is an extremely dangerous device, and mishaps are absolutely unavoidable. I�m lucky to be alive and writing this. ALWAYS wear goggles and long sleeves when working with capacitors.
The railgun is without a doubt one of the most impressive devices an amateur can build. However, most amateur designs are grossly inefficient, and extremely heavy. Mine is no exception in the inefficiency regard, but it weighs next to nothing. This project began some months ago when I decided that I would really, really like to have a small railgun. But no one online seemed to be interested in designing and testing a micro-railgun, everyone was centered on how many megajoules and kiloamperes they could pump into such a device. None of the designs were suitable for a small home demonstration model. So if anyone out there wants a small, useless railgun, I�ve done the legwork for you. Dozens of hours of research of NASA files on microfische and virtually every website available on the internet, as well as weeks of labwork went into this project. I hope it does you some good. Enjoy.
Although I spent an embarassing ammount of money on this project, the end result is a surprisingly affordable device. Here�s the breakdown:
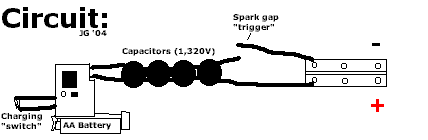
CHARGING CIRCUIT:
All it really takes for the circuit is 4 one-time use cameras (one for the charging circuit and 3 more for additional capacitors for the capacitor bank), some heavy wire (I used steel picture wire for bussbars for the capacitor bank, and all other wires were taken from a cord for a wall-powered fan-any wires smaller would either burn out or vaporize.) and a board to mount all of this stuff on.
The circuit board must be carefully removed from the camera (Capacitor leads must be shorted out immediately) and modified thusly: The charging button should be removed and either hardwired to always charge, or a switch should be soldered in it�s place. (holding down the charge button gets old fast) Then the additional capacitors should be wired in parallel to the original capacitor. ALL CAPACITORS must be thoroughly discharged before being touched. (I cut out the original cap, and taped it to 3 more, then soldered the bussbars to the spots where the cap had originally been placed.) One must be especially careful to make sure capacitor polarity is matched. Otherwise the whole device may fail/explode. Send two thick wire leads off the capacitor bank, to connect to the gun electrodes. The negative lead should be long, the positive one should be shorter. This is the charging circuit. It stores a surprisingly large dollop of high voltage, high amperage energy. This capacitor bank stores a potentially fatal current, so be extremely careful if you do decide to build such a device. Now we move on to the gun.
(The voltage here should read "350")
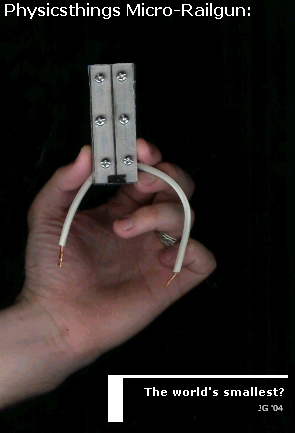
THE GUN ITSELF:
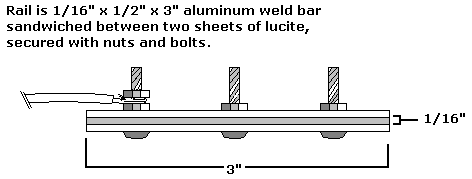
All you need are an aluminum weld bar, a sheet of lucite, and some bolts and nuts. I got all of the parts form the hardware store for $5.51. WOW!
The gun barrel is extremely simple in concept, being nothing but two aluminum bars sandwiched between two sheets of lucite, but it takes quite a lot of fine tuning to make sure it�s perfectly straight and sealed. Cut the aluminum bar into the desired lengths (3�), and place them a little less than their thickness apart (in my case, about 1/19�) in between two pieces of lucite. The small distance between the rails allows the lorentz force to develop sufficiently to fire at this low energy level (about 350v) I used high-impact lucite for the body of the barrel, not just for it�s high strength (for containing the plasma arc) but also for it�s transparency. I really, really love seeing as much of the plasma flash as I can. Bolt holes must be drilled in the lucite and the rails, so the gun can be bolted together. Once the holes are drilled, thread the bolts, and tighten the nuts down hard, but not so hard as to crack the lucite. The bolts at the rear of the barrel will be used as hookup terminals. Wrap a wire around the bolts, and tighten another nut over each terminal, to secure the wire. The positive wire should be connected to the positive wire lead coming off of the capacitor bank, and the negative wire should be long enough that it can be brought to touch the negative capacitor lead to complete the circuit and initiate firing. A switch really would be nice here, rather than this extremely dangerous and wasteful spark gap, but switches are expensive, and seem to burn out very quickly under these conditions. Now a piece of electrical tape should be placed over the rear of the gun, to make sure that any plasma trying to exit the rear of the gun thinks better of it. It shouldn�t go backward, as the lorentz force should be strong enough to sling it out the muzzle, but hey, you never know. Now on to the best part:
FIRING:
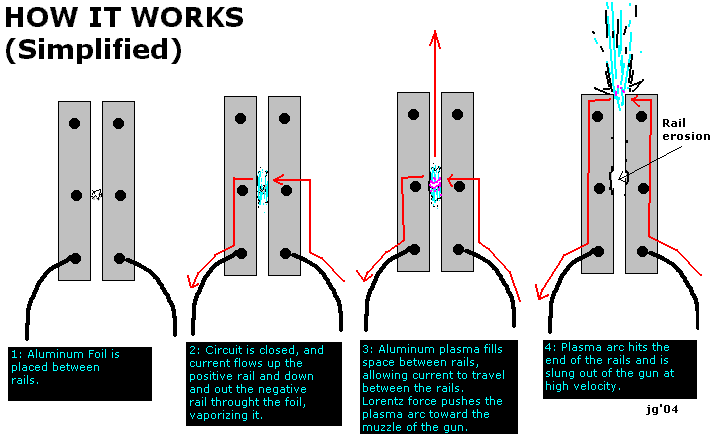
A small sliver of aluminum foil, no thicker than the rails, and no longer than an inch should be slid down the barrel with some kind of stick (I use an unrolled paper clip) til it is about half way down the barrel, and is in contact with both rails. REMEMBER: The spark gap switch MUST be OPEN when you touch the gun, or it could burn/shock/kill you. Then charge the capacitors. This may take as long as 30 seconds. When the caps are charged, back leaked power will usually light up an LED, causing it to flash. If it begins flashing too soon, you probably have a short, or a disconnected wire somewhere. If this happens, SHORT OUT ALL CAPACITORS. It may seem like they�re �empty�, but they can sometimes still discharge and hurt you. Then investigate the circuit, and correct all problems. Assuming all goes well, and the LED is flashing after about 30 seconds, you�re good to fire. Touch the stripped ends of the negative leads to complete the circuit through the gun and the foil. There will (should) be a loud report, and a burst of bright blue/white plasma from the muzzle of the gun. Fold some paper to cover the end of the gun, and fire. It goes shooting across the table, trailing plasma. Amazing.
The power is very low, and the projectile is hardly launched at hyper velocity, but as a demonstration of the lorentz force it is fairly impressive. This device is a tiny Arc-Driven (plasma-armature) railgun. Amaze your friends.
MORE ON FIRING:
When the micro rail gun fires, the plasma jet it creates is very unpredictable and tricky. One shot it may be weak and unimpressive, the next it might BANG and hurl a foot-long spay of hot plasma. I videotaped a few shots, which I hope to post on this site eventually. The gun produces a brilliant muzzle flash, and a streak of plasma, like a brilliantly glowing thread shoots across the room in a fraction of a second. The interesting thing is that when I actually fired the gun, I didn�t see the streak, just the flash. So I�ve decided to call it a �ghost�. It�s really nothing more than a rapidly accelerating piece of aluminum and/or aluminum plasma. Ah, science!
Solid Projectile tests:
The Micro-Railgun is capable of firing small graphite slugs, cut from a piece of drafting lead. Granted, they won't pierce paper, but it's a start.
 click here for MAIN PAGE