THE SPEAKERS ASSIGNMENT PROGRAM
Next double click on the installation file called �Speakers Demo.exe�. From here follow the instructions onscreen, as they are self-explanatory.
You are now ready to start using the program. Double Click on your Speakers Program and then double click on Speaker_Demo.EXE and the program will be ready to start using.
Setup Order.
To make it work properly you will first need to set it up in the following order.
STEP 1. (SET-UP.JW1) Start by going to the SET-UP menu.
STEP 2. (HALL.JW1) Next go to the Hall Database.
STEP 3. (SPEAKERS.JW1) Next go to the Speakers Database.
STEP 4. (TALKS.JW1) Your now just about ready to start entering information for the talks assigned. However this is just a demo version and only five talks are included. If you would like to use this demo version you will need to add the rest of the talks to the list. Of course you can add them at any time.
STEP 5. You are now ready to start assigning speakers.
If you are NEW TO COMPUTERS and have not used this program before GO TO THE NEXT PAGE FOR A STEP-BY-STEP INSTRUCTION
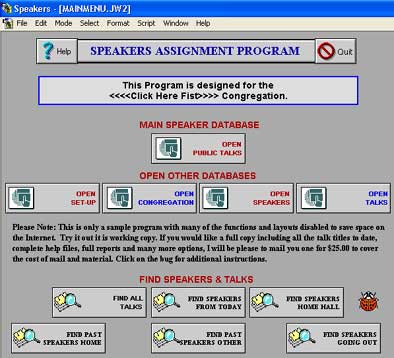
As you open up the program the first screen that you will see will be the MainMenu.jw2 DataBase. From this menu you can go to any part of the program.
If this is your First Time using the Speaker Program follow the Step-by-step instructions for best results.
PLEASE NOTE: There is no need to double click, every button works on a single click! Also the database was originally created with a window setting of 800X600, but you can change the way the program works by clicking on the size on the bottom left.
Fill in all the necessary information, including full name and address, the set-up file is used to fill in your name, address etc., on all the correspondence forms.
The Convener name would be the brother in charge of arranging for the speakers. The name or title �Convener� can be changed to read whatever you designate the name/title is for the brother in your area. As you click on the field �Convener� you will get a pop-up window with the option �Convener�, �Talk Coordinator� or �edit�. By clicking on the name �Convener� or �Talk Coordinator� or your edited name it will change that in every database. So Click on Setup and lets get started.
Please Note: In the congregation database you only fill in each congregation in your circuit or congregations that are invited to give talks in your congregations. The individual brothers giving talks will come in the next part.
It is important that you fill in all the information as that shows up in many of the reports and assignments for the brothers going out on an assignment. If you can include the Convener name on the speakers assignments list, it will be helpful for the brother going out to give a talk in case he needs direction or happens to have to cancel due to illness or other reason.
There is an invisible button on top of each name, and so by clicking on that Name/Button it will take you to the information for that congregation or Convener.
Please Note: You will also notice that the Name for Congregation is in Blue as well as First Name and Last Name. That is because they are also buttons and by clicking on them you can easily find a brother or Congregation. As you can see from the example on the left it gives you a view index pop-up window that you can click on any on the congregation names and it will take you to that congregation.
Just highlight the congregation you want and click on Paste and there you have it.
Here is where you will see some automatic things taking place. Again, there are a few sample records. Be sure to delete these records as well. For deleting instruction see STEP 2.
Please Note: I find it convenient and useful to use the TAB key on the Keyboard to move from one field to the next. So click in the first field and then use the TAB Key to go to the next fields on the page!
Start by entering the brother's name and address etc. Then when you come to the Home Congregation field you will see that field will pop-up and display a list of Congregations from the Hall Database that you have entered the names of the congregations as well as the convener's name.
Simply scroll down to the congregation that the brother is from and select that congregation either by clicking on it with the mouse or selecting the name and pressing enter/return.
It will then go to the next field that is the List Of Talks. Here you can enter the talks that a brother has as this is helpful in finding which brother has a particular talk. There are three ways to do a find; 1. Is by clicking on the find button and then using the mouse and click into the List Of Talks field and typing in a number and; 2. By clicking on the Find-In-Any-Field Button and typing in a talk number; 3. I believe to be the best way is by clicking on the List Of Talks (in blue color) button, it will give you a pop-up window, just click on the desired talk number and it will show you a list of all teh brothers that have that talk assigned to them. Just remember it will not find a talk if you did not include that information. Also as you type in the talk number, type them in by leaving a space between number or a comma after the number, as in 23 45 87 or 23, 45, 87.
Please Note: There are a number of fields that are not Modifiable. For example after entering the Congregation Name, the next fields are not modifiable. If you need to change any of the information go back to the Hall DataBase and make the changes there. The reason for not making them modifiable is because anything that you would change here would also be changed in the other DataBase and that would affect everything that you enter.
ALSO: There is field that is called Home or Visiting Speaker. That field needs to be filled in as it is used in some of the searches. As well as assigning speakers for your hall or other Congregations.
Your now just about ready to start entering information for the talks assigned. But one last thing to do, go to the Talks DataBase and see if all the current talks are included. If not add them to the list. Of course you can add them at any time.
If you find that the latest talks are not included in the data base then add them by clicking on the NEW Button and add the Talk Number and Title and that's all there is to it.
To see if all the talks are there, click on the �List View� button and you now have the choice to sort by talk number or Title just by the click of a button. If you don't see the complete list click on the �Find All� button and scroll down.
If you like at this time you can print out the complete list. If you Sort by Talk Number it will print out that way. But if you clicked on Sort name it will print out the talks in alphabetical order.
If you can't remember the title but think that you remember one or two words in the title then try clicking on the Find Button with a man searching for something. Just add a word or two and it will find all talks with that name in the title. Give it a try, click on the button and type in know God. It will find the first talk in the list �How Well Do You Know God?�
Please Note: For special talks or assembly talks that don't have a number assigned to them, please add a number as that is the only way to import them into the Speakers database.
You are now ready to start assigning speakers. So lets go to the Main Publcktlk.jw1 Database and click on Order Entry and you will see a screen as per example here.
Please Note: On Most pages you will find �?� button. These are pop-up windows that tell you what a particular button or field does and how it works. Just give it a try and click on one on the �?� Button.
Now lets get started!
There are two ways to add a new assignment to the list; 1, Click on �New Entry� button and it will give you a new assignment page and a new window will pop-up besides the Speakers ID Number.
You can either scroll down and press enter or type in the first letter of the brother's last name and it will take you to say all the brother's with the last name starting with �M�.
When you click on �New Speaker�, it will take you back to the Speakers database and now you start by entering a new brother's name and information. Once you have added the entire information click on the �Paste� button and it will copy the brother's ID number that the program has created and take you back to the Public Talks database and enter the ID Number into the appropriated place. If that is the correct name click on it and it will paste all the information for that brother you have just entered in the speaker's database.
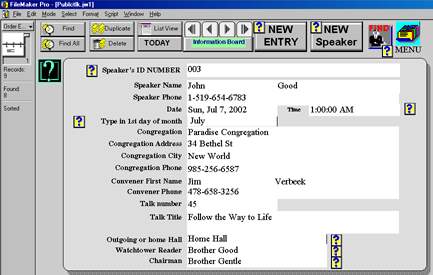
So here are the steps to take to enter the complete information.
If the window does not pop-up then simply click into that field with your mouse. You will now see the Name and Phone of the brother selected and you curser should be in the Date Field.
Type in the date in the following manner... For say July 7th 2002 type in 7/7/02 or 7-7-02 or 7 7 02. Typing July 7, 2002 will not work. After typing in the date hit TAB on your keyboard and you will be taken to the next field.
As you click on the time field or have Tabbed into it a pop-up window will show you a number of available time for your and neighboring congregation. If the correct time is not there simply correct it by clicking on the Edit field.
As soon as you selected the correct time it will take you to the next field, the �Type in 1st day of month� field. This field must be filled in as it is used to find and sort the assigned talks for each month. So as you Tab or Click into the field and a pop-up window will show you the first day of each month. Simply scroll down with the arrow key or use your mouse to click on the correct month. Now the congregation field.
As you go into the Congregation field you will again see a pop-up field with a list of the congregations name. Scroll down with the arrow key, click one the first letter of the congregation on your key board or use your mouse to click on the desired Congregation and the rest of the information will all show up.
Please Note: Some of the fields are not modifiable from here as this prevents corruption of the information entered in the other databases. So if some of the information needs to be changed say in congregation information you will need to do it in the congregation database. The same holds true with the brother's name and or phone number.
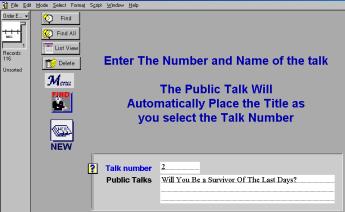
When you are done with step 8 you will now be in the Talk Number field.
As long as you have the talk number and title in the database, just type in the talk number and the title will be there by itself. If you need to add a new talk go back to Step 4 and see how to add the new talks to the list. Now that should be easy to do by now, right? Now on to the next field.
Outgoing or home Hall simply means that the brother is assigned to give a talk in either your home congregation or another congregation. The reason for this field is so that after you have entered all the information for brothers that are assigned to give talks in either your own congregation of another you can easily find that information by the click of a button.
These are easy to modify and enter, simply click into the field with your mouse and add the brother's name to the list that is assigned to be the Chairman or Watchtower reader. Once again you can add or delete a brother to the list by using the edit part of the pop-up field. Of course you will first want to delete the names in these fields. Just click on the Edit part of the pop-up field and delete the names and add some real brothers names to the list.
Now you are ready to print out the assigned talks for the information board. I have found it best to enter two months at a time as the printed out reports are set to print out for two months per 8�X11 sheet of paper. However you can do one, two or more months at the time if you wish. We will get to that in a moment. After you have entered the entire information click on the button �Information Board� this will take you to a new layout.
If for some reason you don't see all the talks you have just entered it might be that the page is set to �View as Form�. So Click on �Select and down to View as List� and there you have it you should see the complete list that you have entered. I f you still don't see the complete list go back to �Order Entry� and check to see if you have entered the correct dates as well as �First day of the month� and �Home or Visiting Speaker� as the Information board button will only select speakers assigned to your own congregation.
As soon as you click on the �Information Board� button it will take you to the next layout as you see here in the example.
Please Note: You don't have to enter the speakers or talks in order of date. All you need to do is click on the �Sort� button and it will place them in the correct date order or click on the print button and it will print in the correct order of date.
On this page you can select to print your information or preview it first to see how it will look like before you actually print it out.
My suggestion here is to simply try a few of the button. The SORT button will sort the information by date and let you see it in a preview mode before going to print. This allows you to see if there are any dates that are not showing up. If an assignment does not show up go back to the Order Entry and check the dates entered including the first day of the month date. Then see if you have clicked on Outgoing or Home Hall assignments. Make your corrections and preview it again.
Also on this page you will find a selection of calendars two months at the time. These allow you to select which two months you would like to preview and print out as well. Once again they are set up in a preview mode so that you will waste little paper. Why not click on them right now and see how they work. The other two buttons on that page will select assignments from today or a specific date range, but more on that latter.
Printing out your report for the information board.
The Host is the brother, sister or family who invites the brother and in some cases the brothers family out for a meal with them. We find that many of the visiting speakers come from a long way and we hate to send them home without something to eat first. But even if the brother is from our own congregation, what a great way to get to know and get closer to our brothers that to invite them for a meal! There is the option in Step 14 in the preview mode to add the Host to the list before you print it out, but we have not found that useful as we don't know who or when a brother will be able to have someone over for a meal.
The Speakers Program is made up of five different Databases all working together and getting information one from the other. The Main working page is Public Talks one and that is the one that most of the work is being done on. However before working on the main program you need to set up the rest of the Databases first as the Public Talks uses information form all the other Databases.
The Other Databases are in order of setup�
1. The setup database.
2. The Congregation or Hall Database.
3. The Speakers Database.
4. The Talks Database.
And six, the Help Files, only to be used when everything else fails. (LOL)
We will now go over each one of these in details. For a description on how to use each one of them please go back to the Step-By-Step instruction pages.
This DataBase is very self explanatory and easy to setup.
Usually the Convener of talk coordinator is the brother looking after assigning the public talks for your own congregation and assigning brother to go to other congregations.
So fill in all the necessary information, including full name and address, the setup file is used to fill in your name, address etc., on all the correspondence forms. This way if a brother needs to get a hold of you for whatever reason he has all the information at his fingertips.
The Convener name would be the brother in charge of arranging for the speakers. The name or title �Convener� can be changed to read whatever you designate the name/title is for the brother in your area. As you click on the field �Convener� you will get a pop-up window with the option �Convener�, �Talk Coordinator� or �edit�. By clicking on the name �Convener� or �Talk Coordinator� or your edited name it will change that in every database.
When you are finished filing in the information, click on the Button �Go to Kingdom PUBLCTLK� and then go to the next page database in the Step-by-step instructions.
The congregation, hall or Kingdom Hall Database is made up of four or five different layouts. Layout one is the main layout you will see every time you open this Database. From here you can go to the Order Entry to start adding more information, do a search for a particular congregation or go back to the Main Database. Plus from here you can also go to any other Database in the program.
Click on Order entry and you are now ready to enter additional congregation names and the Convener name for each congregation.
In the order entry you will find not only the place to add or delete congregations but also do a search on a particular congregation, see a list of all congregation and even print a list out.
If you click on the �List View� Button it will take you to a list of all the congregations and Conveners names that you have in your Database. If you do not see the complete list click on the Find All Button.
Another very useful button in most of the program and in many of the database is the �Find In Any Field� Button. That button will take you to a new layout were you can type in to find in any field, meaning that you can find someone by name, congregation, address and so on... Best way to find out what it does is to try it.
The Speakers Database is made up of several different layouts. As with the other parts of this Database the first layout is the main layout you will see every time you open this Database. From here you can go to the Order Entry to start adding more information, search for a speaker or go back to the Main Database. Plus from here you can also go to any other Database in the program. As well as a couple of buttons that will print out a list of names of the speakers that you have in this Database.
Click on Order entry and you are now ready to enter additional speakers from each congregation in your circuit.
In this Database you enter the names of the Brothers who qualify to give talks in your circuit area including their phone number and address.
Next you will come to a field �Home or Visiting Speaker�. As you will notice that field must be filled in as it works with many or the search buttons to find Speakers from your Home Congregation or Visiting speaker from another congregation.
Once you come to the filed Home Congregation you will see that the list of congregations you have entered in the Hall Database will pop-up. Just scroll down with the arrow key or use your mouse to click on the congregation name and the rest will be there from the information you already added to the Kingdom hall Database. You can also click on the Blue Name Home Congregation to give you a pop-up list of the congregations you have already included in that Database. You will find that must or all of the fields in the Congregation list are not modifiable. To make any changes go back to the Hall Database change or add congregations to the list.
If you click on the �List View� Button it will take you to a list of all the Speakers that you have in your Database. If you do not see the complete list click on the Find All Button. You will also notice that there is a Paste Button. That button will copy the Speakers ID and name to the Public talks Schedule.
On the bottom of that page will notice that there are two print buttons on that page. the one the left will print a list speakers sorted per congregation whereas the one on the right will print a complete list.
The program has been put together with many, many shortcuts usually with the use of buttons. Each button has been connected or assigned a script or function to make it easier to navigate in the program. There are buttons that will find a single field and then there are some that will find all entries in your database. The there are buttons that will print a single page as well as multiple pages. Then there are buttons that will take you from one database to the next. Many of the buttons are self-explanatory, but I will go over some here so that you will get an idea as to what some of them do.
The very first button that you should be pressing as teh program opens is the �Set-up� Button. You can either click on the word �SETUP� or the Blue line �This DataBase Designed For <<<
There are print buttons for many of the reports. On some pages you might even find more that one Print Button since each print button will print the report out in a different style. Mot sof them are self explanatory so just don't be afraid to use them, they will not blow up or make fun of you.
The Exit button, well its just what it says, you click on it and it will exit you out of the program. There is no need to save what you have done as it automatically saves every 10 minutes and when you close the program down it saves it was well. Just one work of caution, there is no undo button, once you deleted something or someone its gone and the only way to get it back is by re-entering it.
This is a repeat from Step #5 so for more information on these buttons, go to that page. The �New Entry� button and it will give you a new assignment page and a new window will pop-up besides the Speakers ID Number. If the brother's name is not already in your database then click on �New Speaker�. When you click on �New Speaker�, it will take you back to the Speakers database and now you start by entering a new brother's name and information. Once you have added the entire information click on the �Paste� button and it will copy the brother's ID number that the program has created and take you back to the Public Talks database.
Once you have entered information for the Information Board there are a few different ways to go and print out the report. One of them is the Information Board Button. It will find all the new entries from today's date on and show you a list of what you have entered. If there is an assignment that you are not ready to print out that this time, use the OMIT Button to omit that name from the list. It did not delete it and next time you press the Information Board button it will be back. You will also find the ? mark button besides many of the functions, by clicking on the ? mark button it will explain what that button or function does.
The Preview mode is used to show what it will look like before you print it, but since the buttons don't print you will also not be able to use them in the preview mode, then What? Click the lower left button and select Browse and the buttons are back..
You can exchange information with other Speakers Program files on your computer or on a network, or with files created in other applications. Importing data brings the information from another file into a Speakers Program file. You can also export Speakers Program data to a format you can open in another application.
More information.
You can import data into an existing Speakers Program file or into a new file. The file you're importing from must be in a format Speakers Program understand. Speakers Program imports data in the order it appears in the file you're importing from.
You can bring data from another application into a new Speakers file. Speakers file copies the data into a standard layout. If the information is available, (for example, DBF format), the Speakers Program creates fields that match the imported data's field definitions.
To import data into a new file:
1. In Speakers Program, choose Open from the File menu.
Speakers Program creates a text field called fx for each field in the new file. If you're importing from a format that contains the field names (like DIF), Speakers Program uses the names instead of fx.
To delete the records already imported: Choose Delete All from the Mode menu.
Some time in the future you may be upgrading the Speakers Program. After installing the new Program you will want to import all the older files in the new Program. Here is what you do.
1. Start with Set-up files. So go to the Set-up Files DataBase
1. Hall DataBase
It is important that you do it in this order since;
The Program automatically saves changes to your database file as you work. However you can set the Preferences by Clicking on Edit> Preferences, and then changing the Save during Idle to Save every 10 Minutes Etc.,
If you are using a portable computer that uses batteries, you can set a preference to save your work only at specific intervals to save battery power. You can also save a copy of your file as a backup or to create a new file with no data.
To set the program to save at specific intervals:
1. Choose Preferences from the Edit menu.
To Choose
WHY IS THIS NECESSARY AT TIMES?
You will find that as you use the program, you may add and delete names, well every time you do that it adds to the size of the program. Because even though you deleted a record it keeps the space in its memory even though you can no longer see the name and after a while the program becomes sluggish. So either save a Compressed copy or a Clone. If you save a Clone copy it will save the program only with no files, so you will need to import the files back into the program. See the previous pages on how to import records. If you save a Compressed copy the Compressed copy will not work as it is.
NOW HERE IS WHERE IT BECOMES VERY TRICKY. You now have two sets of files, the old ones and another with the same name but with the word �copy� added to it. Since the program does a lookup on the other Databases it needs the same names as before as IT IS NOT ONLY NAME SENSITIVE BUT ALSO CASE SENSITIVE. What to do? Before you do anything save a Backup copy of the complete Folder with your Speakers Program, only then try the previous instructions. Because as I have already said, there is NO UNDO with this program, once you delete something you will need to re-enter all your lost information. Next close the Speakers Program and go to Windows Explorer and delete the old files and rename the new ones Exactly as the previous files, or you will find that the program will no longer work.
WARNING: Please do not try the instructions on this page unless you are absolutely sure that you know what you are doing.
Sometime in October to December you will want to assign speakers for next year, however when you go to find them to make the report they are no longer there!
The Speakers Program uses your computer clock and date to find the assigned speakers dates. In other words when you assign brothers to come out and speak for the following year, say January and February and you click on the January-February calendar it will look at the current year and not next year.
How can we correct that?
The first way would be by clicking on the �From Today� button, however there is still a problem with that as it will not only find next years assignments it will also find the balance of the current year. Meaning that if you are working on assignments for next year in late November it will also find the rest of the current December assignments for the current year.
The best way is by clicking on the �Date range� button as that will take you to a new screen and there you can type in the exact date that you want. Just follow the onscreen instructions and you should have no problems.
Please Note: Be sure to also click on Home or speakers going out field!
The last way; make up all the assignments for the two months that you will want to assign and print out at ones and then use the �Today� Button as that will find all the assignments that you have created Today for upcoming assignments.
WOULD YOU LIKE TO HAVE THIS PAGE TRANSLATED IN ANOTHER LANGUAGE?
1. Type the web page address (the page you are on: http://www.geocities.com/photosbug/speakersinstructions.htm ) in the window of the AltaVista translation box below
 This is the express set-up for someone that is familiar with computers and somewhat familiar with this program.
There are five parts to this program and each part works together with the rest of the program. If you skip a part you might have problems getting everything to work for you.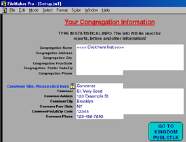 Start by going to the SET-UP menu by clicking on �set-up� or �Click here first�.
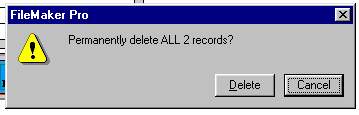
  Next go to the Hall or Open Congregations Database and then to Order Entry. You will notice that there might be a couple of record in there. They are only there to give you an idea as to how it will look like. Start by deleting these records. To delete all the records in that DataBase first click on Find All, so it selects all the records in that Database and then go to Mode and down to Delete all. A New dialogue box pop-up that will say �Permanently delete all 2? Records� click on delete and they are gone.
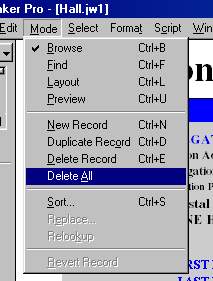
 Or you can delete one record at the time by clicking on the delete button. This button will come in handy if you need to delete a brother's name due to the brother moving out of the area or other reason. Next start by filling in all the necessary information for each congregation including the name of the convener or brother in charge of looking after talk assignments for that congregation.
If you don't know all the information at this time, you can always go back at a latter date and fill in the rest.
Or you can delete one record at the time by clicking on the delete button. This button will come in handy if you need to delete a brother's name due to the brother moving out of the area or other reason. Next start by filling in all the necessary information for each congregation including the name of the convener or brother in charge of looking after talk assignments for that congregation.
If you don't know all the information at this time, you can always go back at a latter date and fill in the rest.  In this Database you will find many buttons, but the one that you might find helpful will be the LIST button. The List button will show you a list of all the names in that Database. If you do not see a complete list click on �Find all�.
 Or 2, if the brother's name is not already in your database then click on �New Speaker�.
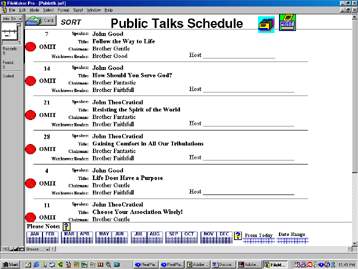
Once you are satisfied that you like what you see then you can hit the print Button. Now this will take you to a new option page as per request from some of the brother you have the option of printing the speakers name, chairman, Watchtower reader and Host or to just print part of the options. The choice is yours, just try them out and see which one you like and works for your congregation. If you would like to see another layout added to the print out list, feel free to email me with the way you would liek to see it printed and I will add it in the future.
You can import data from any field type into any compatible field except calculation, summary, and global fields.
Speakers Program can import data from a remote database server (like SQL Server) using a query document from a third-party tool. Refer to the documentation included with third-party tools.
2. In the dialog box, select the file you want to import, and then click Open.
3. In the dialog box, type a name for the new file, select a location, and then click Save.
2. Click on File.
3. Go down to Import/Export and over to Import Records�
4. Click on Import Records..
5. Go to where you have stored previous version of Set-up DataBase files stored.
6. Click or double click on Set-up.
7. Click on View by �Matching Names�� - You should now see the names of the old database and the new one matching. And a check mark between them.
8. Click on Import.
9. Click on or highlight the �Perform auto-enter option while importing and
10. Click OK. The program will now have the records from you old Speakers Program imported from Set-up to the New Set-up DataBase.
2. Speakers DataBase
3. Public Talks - in the Order Entry Layout
1. All DataBases import from Set-up
2. Hall imports from set-up first
3. Next the speakers use the Hall DataBase to look up where the speakers are from and
4. The Order Entry looks up information from all other Databases.
2. In the Preferences dialog box, click Memory.
3. Select every
4. Click Done.
1. Choose Save a Copy As from the File menu.
2. In the dialog box, for Type choose an option.
Duplicate the current file copy of current file
Remove blank space so that the file takes up less disk space compressed copy (smaller)
Save a file's layouts, scripts, and field definitions without the data. (Cloning a file changes the file's default settings to the system default settings.) clone (no records)
3. Type a name for the copy or it will leave the same name with the word COPY behind it.
4. Click Save.
Use the following instructions here!
2. Click the DOWN arrow to the right of the "Translate from..." window and select the language you would like to have the page translated into
3. Click the TRANSLATE button - there is a short wait time (a couple of minutes) before you actually see the translated page on screen.
4. To send a copy of this page by e-mail, click FILE (top left), select SEND, then select "Page as e-mail" and mail it to yourself.
308 Simcoe Street Tillsonburg ON N4G 2J6
Phone (519) 842-2569 Fax 519-842-2218
Cranberry Park Congregation
Email
[email protected]
Web Pages Fred's Photography
HOME
Downloads
Watchtower