Special Thanks to MBT and AE! Lvl 2 from MA!
Who? = Level 50+ hero
What? = A multi-level dungeon in which you kill a boss and automatically are portaled to next level.
Why? = Turn in your attuned crystal from the Chaos Edilion and get a hero star for hero�s Isle recall, Good XP at level 55+ and ability to use the forge for kingdom armor.
Where? = Chaos Plane, SE stairs, across the narrow puzzle walkway.
How? = Well, that is why you are here.
Note from the author: This is meant to be a comprehensive explanation. The quest is really not as difficult as some think, when you follow the proper steps. I suggest that after you form your team, you have everyone take 5 minutes to read this summary primer and then log back in. It will be the most important 5 minutes that you spend doing the forge. When executed correctly this quest takes 45 minutes.
STEP 1. The Forming of the Fellow - This is the only place it is possible to make a major mistake. Two things can happen that are fatal. 1) You have the wrong people 2) You enlist someone that has to leave in the middle. Simply put, this is what you need:
Sage/Healer(2)
Ranged (2)
Sorc (1)
Enchanter (1)
Damage Dealer (2)
Tanks (1)
That is the Dream Team, however I offer options in this link - Detailed Fellowship Options
STEP 2. Getting There - Chaos Plane, SE stairs, across the narrow puzzle walkway. My suggestion, don't rush it. You need to have ONE leader - He is in charge. When he says "go" you go, "stop" you stop. It is that simple. You rush, someone always gets killed. When you first get in the room with the forge on the far side, quickly head left to the first little out cropping. Don't form right at the portal drop, there is a Virindi that may hit you there.
Notes: You can recall that last portal to the room with the Forge in it, but you can't summon it. If someone does not have Portal Recall have them go to the Linvak Soul eater and un train a useless skill so that they can get PR.
STEP 3. Getting Over to the Forge - Now that you are buffed, head to the far left of the room. Kill the wisps in a nice neat row as you go (gain focus for the healers). When you make the right turn for the long part of the room; STAY TO THE RIGHT OF THE WALKWAY. The walkway has a programming glitch and if you go to the left side you will get stuck. When you get to the end of this long walkway you will take another right, then left, then right, then left, now you are looking at 2 golems and a Chaos Storm. Mezz all three. You may pull the other 2 golems, mezz them also as you are running to forge. Also! There is a glitch with the North side of the turn into the last room with the hammer. Stay away from the North side as you make the turn or you will rubberband.
STEP 4. Do Not Touch Forge - Yes an entire step on what not to do. Don't touch it, if you do, you will get a 5 minute DoT and die. So just don't touch it or hand anything to it. Most peeps that do touch it, are trying to open the force field door. Don't make this mistake.
STEP 5. Touch the Hammer to Start Quest - This time only one person has to touch it. You will all be portaled into the first level.
SPECIAL NOTE: If You die and are not rezzed, watch the life of the boss. If he is about to die, rezz yourself quickly. You will be pulled back to the next level by the game advance. If you stay dead, you will need to run back to hammer and touch it several times :-(

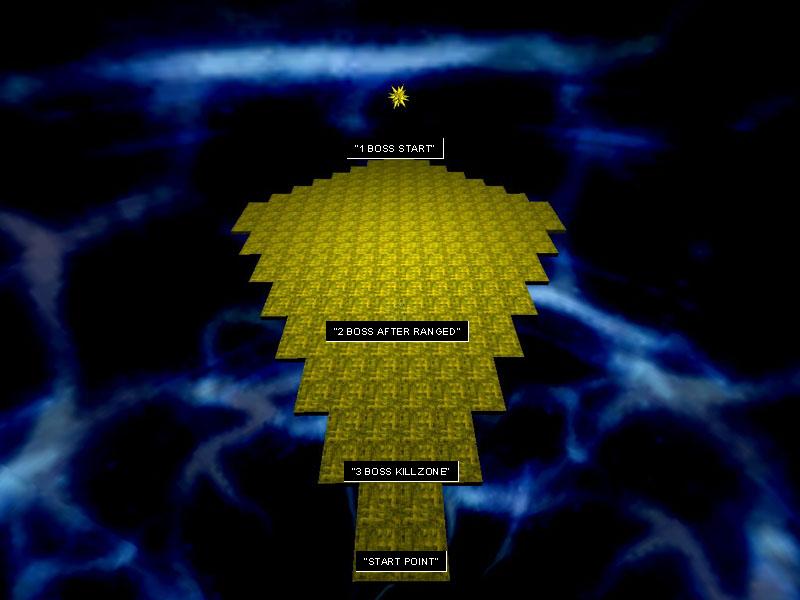
a) WARNINGS - No Jumping, Ever. The room has a false floor and invisible barriers. If you don�t know the room do not move until you see how someone else does it. Look at the figure to see the false walls and floors. You will be separated at the start. Just stay where you are and let the leader tell everyone which direction you will form in. Note I have found that all bosses can be ranged with the exception of this one. "Unfair fight" in general the way to prevent unfair fight is to let the golems hit you freely with his projectile attack.
Note: All golems have a projectile magic attack. Just ignore it. They only get one shot like every 15 sec or so.
b) Once you have formed and buffed in one spot, move to point "A". Deep breath. Melee stay put. Ranged kill all wisps.
c) Quickly kill first golem by moving across invisible floor and along the arrow. Mezz boss and then all others. You will notice that golems have troubles walking, use this to your advantage. No AoE, No turrets, and No mezzing with weps that have DoT.
d) Systematically kill all golems quickly, let Tank or main DD choose next target. Move fast enough to avoid respawn of wisps.
e) Last one to die is the boss. No tyrants at this point, save them. You will all portal when he is dead.
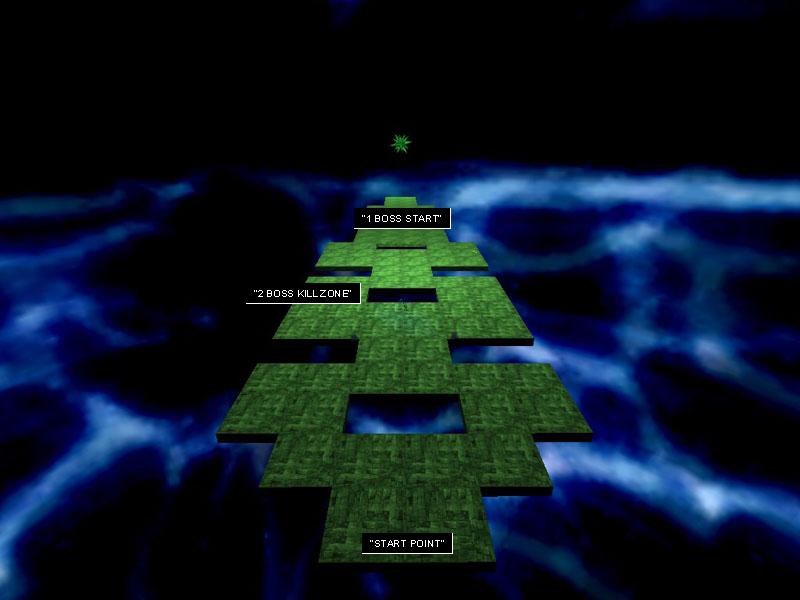
a) WARNINGS - Everyone will tell you the "best" way to do this. I am telling you the best way right now. Golems cannot run straight towards you they can only travel towards you when they are along the edges OR engaged in melee with you. There are a lot of MoBs on this level, you will be killing exactly 4 wisps and 1 boss. (See red text below)
b) Rebuff. Kill first two close wisps with ranged. Mezz the two closest golems. Kill next two wisps with ranged. If your not sure about your mezz, It may be better to kill those first two gnolms.
c) One ranged move forward and pull the boss. I am sure that everyone will follow him. :-( Tell them to move back to �start point� in all CAPS.
d) The boss will move up but not all the way. If you had 5 ranged you could kill him now, but you don't so Mezz the 3 golems that form around him. Send a single Tank to meet him. If no tank send a DD with a shield. As he is hitting you don't attack just taunt and walk backwards towards the start point. He will follow swinging at you. Everyone spot heal this poor guy. Meanwhile, the leader should be telling everyone to stay at �start point� in CAPS.
e) Unleash Hell on the Boss - When you kill it, you have completed the hardest level.
a) WARNINGS - This can be a hot drop. When you portal in be ready to start killing wisps with ranged. Also when wisps drop below the floor just forget them. They can't get back up and will float away.
b) Ranged kill wisps. After the first two wisps are dead, roll in the melee on the next wisps. Do not set a foot past the spawns of the second row of wisps. If you do, then you will argo the next wisps. It is bad enough that the boss is on his way.
c) Mezz Boss and kill the small golem after all the close wisps are dead. A clever chanter can keep the small golem mezzed, confused, and tangled while still hitting the boss with the axe orb for argo relief. If so, you can go straight for the boss... just be careful of that last line of wisps.
d) Kill Boss, get portaled, this was the next to easiest level.
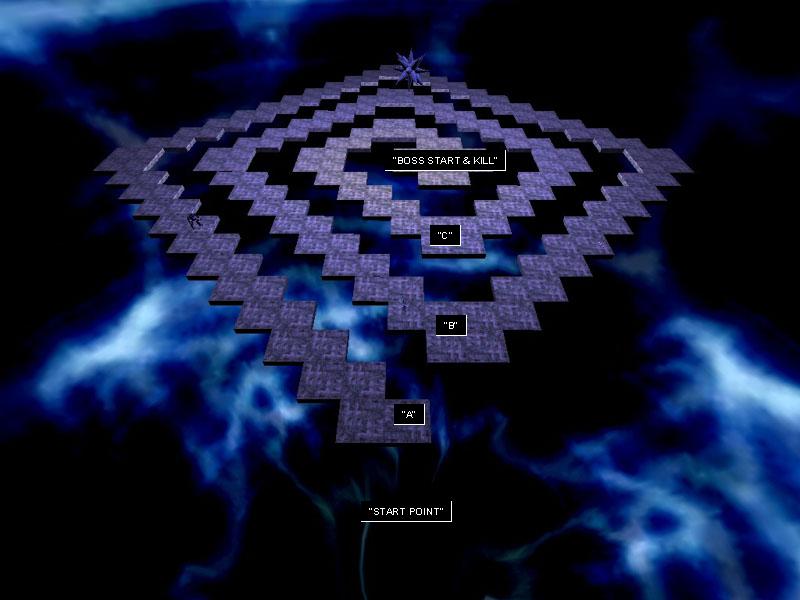
a) WARNINGS - Once again everyone �knows how to do this one�. This is simply how you do it here. Some will tell you that ranged will get unfair fight, that is not true as long as he can hit you with his missile/magic projectile. There will be jumping in this level. Make sure you compensate for any run buffs you might have. The key here is to stay tight. Nobody wanders.
b) Move to point "A". Rapid Range kill all wisps that you can reach. Don't hesitate! Go immedialy to the step below to avoid respawn.
c) Jump to Point "B" Mezz any golems that threaten you. A clever chanter can confuse them away from your area, but don't confuse the one at point "C". He has to die. Ranged must stay on the wisps.
d) Send your tanks and DD to point "C", have the golem mezzed while they jump over, Kill that golem with extreme force... there is a respawn coming on the first wisp you killed.
e) Everyone move to point "C" (don't jump to center) and have the tanks and the DD's that have a short range or AoE move to the closest point to the boss. He will move over to you also.
f) Everyone kill the boss, except Sages, also Chanter should keep mezz on any golems that get near, if a golem gets too close, this is how people get killed. You need to turn your attention on the close one so that you can use your AoE again. The leader has to make the call. This is rare, but occasionally the golem to the left of "C" can get to you. Usually because someone accidentally melee pulled him. If you take the time to kill him.. the wisp spawn can get you. Ranged first priority is on the wisps.
g) Paper Flesh is a good idea here. Also tyrants are fun when you get a straight shot at the boss. However may not be necessary.
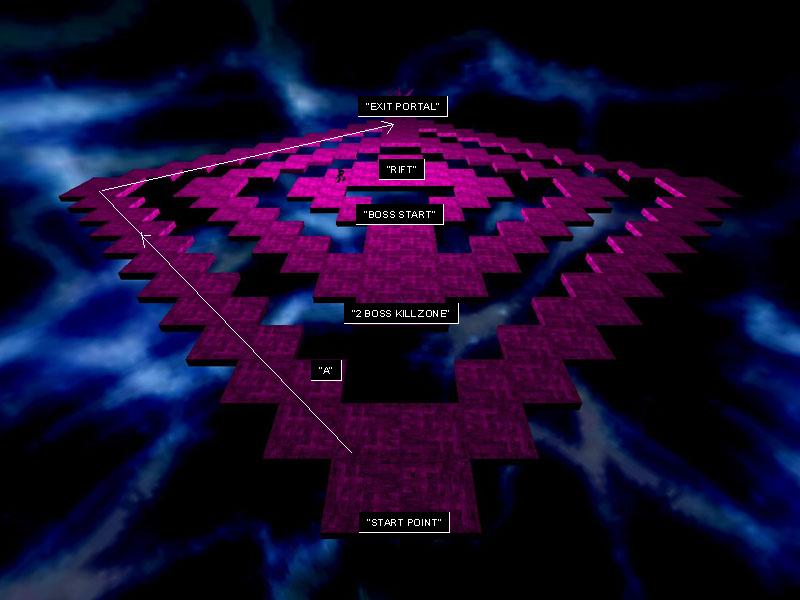
a) Last and easiest level. Move to Point "A" kill any wisps and butcher the boss with AoE damage, ranged, and magic. He will come right to you.
b) The Chaos rift will open in the middle of the floor. Send a single hi level tank or similar in there to click it.. meanwhile all others follow the arrow to get to the portal at the rear. Run like hell.. don't wait around unless you are mezzing just before stepping in the portal.
c) When you portal out don't touch the forge until after you get the xp notice.. this happens after someone touches the hammer.