And here it is, beatiful in blue!.�
You may also get to see the bike at the York show if you keep your eyes open!
| The Flying Deckchair | |||||||||||||||||||||||||||||||||||||||||||||||||||||||||||||||||||||||||||||||||||||||||||||||||||||||||||||||||||
| Or | |||||||||||||||||||||||||||||||||||||||||||||||||||||||||||||||||||||||||||||||||||||||||||||||||||||||||||||||||||
| How I built a recumbent for a lot less money than you can buy one (unless you're very lucky) | |||||||||||||||||||||||||||||||||||||||||||||||||||||||||||||||||||||||||||||||||||||||||||||||||||||||||||||||||||
| But I think you'll agree the first title is more succinct | |||||||||||||||||||||||||||||||||||||||||||||||||||||||||||||||||||||||||||||||||||||||||||||||||||||||||||||||||||
| This has become a long and rambling document. If you want to read the whole tedious story, start here. Otherwise, scroll to the bottom for the nicest picture... | |||||||||||||||||||||||||||||||||||||||||||||||||||||||||||||||||||||||||||||||||||||||||||||||||||||||||||||||||||
| Firstly, this is my first attempt at a web page, so please forgive me if the pictures are too big or it doesn't display properly on your browser. | |||||||||||||||||||||||||||||||||||||||||||||||||||||||||||||||||||||||||||||||||||||||||||||||||||||||||||||||||||
| Well, I have been cycling a long time.� I used to work in the field most of the time, and away from home a lot of the time, so most of my cycling used to be leisure.� Nowadays, I find myself driving a desk more often, and I can use a bike to get to work and back.� It's probably just as well, or I'd run to fat like so many of my colleagues... | |||||||||||||||||||||||||||||||||||||||||||||||||||||||||||||||||||||||||||||||||||||||||||||||||||||||||||||||||||
| Anyway, commuting saves the ��� and keeps me fit, but isn't it boring?� So during the early part of 2005 I began to surf the web, looking at cycling stuff and found myself drawn to recumbents.� Less boring than my trusty Galaxy, maybe some comfort benefits- maybe even faster. | |||||||||||||||||||||||||||||||||||||||||||||||||||||||||||||||||||||||||||||||||||||||||||||||||||||||||||||||||||
| And then I looked at the prices.� Difficult to justify when I already have a good bike.� What about building my own?� I found lots of links to build-it-yourself projects, most of them to be honest, looked home-made.� Cobbling together a 'bent out of bits of old bikes is OK in its way, but it wasn't what I wanted.� Then I came across Dom Bencivenga's site: www.bentechbikes.com.� | |||||||||||||||||||||||||||||||||||||||||||||||||||||||||||||||||||||||||||||||||||||||||||||||||||||||||||||||||||
| Dom supplies full plans for a short or long-wheelbase 'bent, or he will supply a set of tubes ready bent to make up a frame, or a welded-up frameset, or a complete, painted frameset.� They are designed for mesh seats, and you can have above-seat steering, as favoured by American builders, or under-seat steering, usually more popular in Europe.� | |||||||||||||||||||||||||||||||||||||||||||||||||||||||||||||||||||||||||||||||||||||||||||||||||||||||||||||||||||
| Early in 2005, I ordered a set of plans for a LWB, and read them carefully.� First, you build a set of jigs out of wood, and then use them to hold everything in place for welding or brazing together.� | |||||||||||||||||||||||||||||||||||||||||||||||||||||||||||||||||||||||||||||||||||||||||||||||||||||||||||||||||||
| Well, the long and the short of it is, I never got around to starting.� I found places to buy the steel, and thought about it, but never got to work. | |||||||||||||||||||||||||||||||||||||||||||||||||||||||||||||||||||||||||||||||||||||||||||||||||||||||||||||||||||
| Then in about June, after a good paypacket arrived, I thought, what the hell, and ordered an unpainted frameset for a SWB, with underseat steering.� (By this time, I'd thought some more about how I was going to store the bike, and read more about the relative merits of long and short wheelbase). | |||||||||||||||||||||||||||||||||||||||||||||||||||||||||||||||||||||||||||||||||||||||||||||||||||||||||||||||||||
| I agreed with Dom by e-mail that the frame would be sent off early in August.� I would be on holiday in July, giving Dom plenty of time to make up the frame (he TIG welds all the joints himself, and a fine job he does too), and making sure that I would be able to collect it when it arrived.� (If you're not around when a parcel arrives, Royal Mail Parcel Farce will either send it back, or charge you an arm and a leg to store it). | |||||||||||||||||||||||||||||||||||||||||||||||||||||||||||||||||||||||||||||||||||||||||||||||||||||||||||||||||||
| So, early in August I came home one day to find Parcel Farce's card on the doormat.� I went to collect the parcel from the nearest depot, and of course I had to pay import duty and VAT on it - but it was worth it! | |||||||||||||||||||||||||||||||||||||||||||||||||||||||||||||||||||||||||||||||||||||||||||||||||||||||||||||||||||
| Naturally, I couldn't wait to put it all together.� My plan was to prime it, to keep it from rusting, but not paint it.� Then I'd build it up and see how it went.� If it was a failure, I could sell it on Ebay at that point!� I suspected I'd want to braze on a few bits and pieces - one thing that struck me about the bikes I'd seen on Dom's website was the number of cable ties holding everything together.� I wanted a bike that looked finished, so no cable ties for me.� Anyway, I could braze on bottle cage bosses, cable guides and the like as I went along, and then, when everything was fettled, I'd strip it down and get it powder coated professionally. | |||||||||||||||||||||||||||||||||||||||||||||||||||||||||||||||||||||||||||||||||||||||||||||||||||||||||||||||||||
|
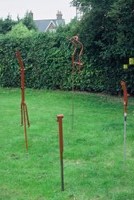
Here's a shot of a particularly intriguing garden sculpture.� Or is it a set of frame parts for a Bentech set up to be primed?� You decide.� But is it art? | ||||||||||||||||||||||||||||||||||||||||||||||||||||||||||||||||||||||||||||||||||||||||||||||||||||||||||||||||||
|
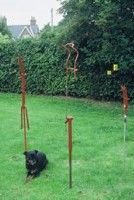
Here's Ricky.� He loves company, and can't resist getting involved, even if it means he gets primed too. | ||||||||||||||||||||||||||||||||||||||||||||||||||||||||||||||||||||||||||||||||||||||||||||||||||||||||||||||||||
| (The yellow things in the background are bird feeders made from empty Nesquick containers.� I knew you'd be curious). | |||||||||||||||||||||||||||||||||||||||||||||||||||||||||||||||||||||||||||||||||||||||||||||||||||||||||||||||||||
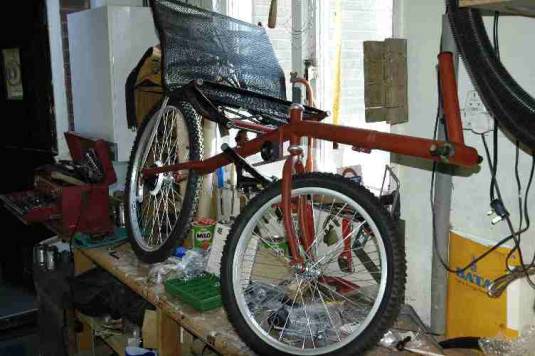
| Here are some shots of the bike as it was built up.� Most of the parts came from Ebay.� Burton Bike Bits is an Ebay shop that supplied a big package of stuff - wheels, carrier, mudguards, brake and gear levers, derailleurs, a headset and chain - all for less than the price of any one of those items from the local bike shop.� My sister in law brought them up from Burton for me. It's not top-quality stuff, but it got me started, which was all I wanted. | |||||||||||||||||||||||||||||||||||||||||||||||||||||||||||||||||||||||||||||||||||||||||||||||||||||||||||||||||||
| Headset, pedals and a chainset I bought at auction on Ebay.� So here's the first build: | |||||||||||||||||||||||||||||||||||||||||||||||||||||||||||||||||||||||||||||||||||||||||||||||||||||||||||||||||||
| �You can see what a tidy and systematic person I am in the workshop! | |||||||||||||||||||||||||||||||||||||||||||||||||||||||||||||||||||||||||||||||||||||||||||||||||||||||||||||||||||
|
|||||||||||||||||||||||||||||||||||||||||||||||||||||||||||||||||||||||||||||||||||||||||||||||||||||||||||||||||||
| To begin with, I used a loose bearing and cup bottom bracket that I had in the parts box.� There are no derailleurs or chain on yet, and no chainset, but I just wanted to be able to sit on it and see how it felt! | |||||||||||||||||||||||||||||||||||||||||||||||||||||||||||||||||||||||||||||||||||||||||||||||||||||||||||||||||||
| The wheels came with tubes and the knobbly tyres you can see, also a rather nasty screw-on six-speed freewheel. | |||||||||||||||||||||||||||||||||||||||||||||||||||||||||||||||||||||||||||||||||||||||||||||||||||||||||||||||||||
| The handlebars and stem you can see are again odd ones out of my parts box, from an old Marin mountain bike, just to get an idea of how it'd feel. | |||||||||||||||||||||||||||||||||||||||||||||||||||||||||||||||||||||||||||||||||||||||||||||||||||||||||||||||||||
| Incidentally, the only problems I had with assembling the frameset and seat were that some of the bolts Dom supplied had imperial sized hex key heads.� (I can forgive him for that, he is American, after all!) I don't have any imperial allen keys, so I had to buy some metric bolts.� Also, I couldn't get a headset to thread onto the short steerer tube he supplied for the rear headset - the thread was poorly cut.� I got the guy at York Cycleworks to sort that out - it cost me �5.� I mentioned this to Dom, and he apologised and said that he'd now bought a new thread cutter so that the problem wouldn't occur again.� What a nice man. | |||||||||||||||||||||||||||||||||||||||||||||||||||||||||||||||||||||||||||||||||||||||||||||||||||||||||||||||||||
|
|||||||||||||||||||||||||||||||||||||||||||||||||||||||||||||||||||||||||||||||||||||||||||||||||||||||||||||||||||
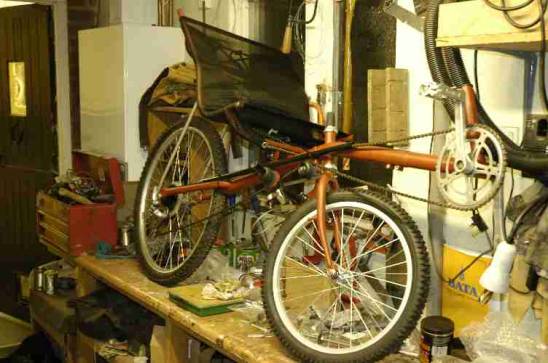
| Now the machine's nearly ride-able.� The single chainset and pedals are again out of the parts box, before I won a Ritchey triple on Ebay.� A rear derailleur is installed, but I haven't yet connected it up to the cheapie twist-grip type gear changers.� No brakes yet, either, but it's progress.� I haven't had the nerve to trim off the top of the steerer tube yet. | |||||||||||||||||||||||||||||||||||||||||||||||||||||||||||||||||||||||||||||||||||||||||||||||||||||||||||||||||||
| Don't those knobbly tyres give it a purposeful, Land-Roverish sort of look? | |||||||||||||||||||||||||||||||||||||||||||||||||||||||||||||||||||||||||||||||||||||||||||||||||||||||||||||||||||
| Now I'm afraid there's a gap in the pictures - I had to return the borrowed camera.� Anyway, I finished the build you see in the pics and began to ride the bike.� Pretty shaky at first, I can tell you!� Riding a 'bent is an acquired skill, almost like learning to ride a bike all over again, but easier. | |||||||||||||||||||||||||||||||||||||||||||||||||||||||||||||||||||||||||||||||||||||||||||||||||||||||||||||||||||
| Initially, there were silly problems like balancing the brakes so that they sprang back clear of the rims, and having the bottom bracket fixed cup unscrewing itself until the bearings started leaking out! | |||||||||||||||||||||||||||||||||||||||||||||||||||||||||||||||||||||||||||||||||||||||||||||||||||||||||||||||||||
| I managed to get hold of a Ritchey triple chainset, and splashed out on a sealed bottom bracket from Bob Trotter cycles in York.� I also got some clipless pedals from Ebay, so they all went on.� The rear derailleur was out of my parts box, the front is the rather naff one (but fully functional) from Burton Bike Bits.� | |||||||||||||||||||||||||||||||||||||||||||||||||||||||||||||||||||||||||||||||||||||||||||||||||||||||||||||||||||
| The straight handlebars just didn't work for me, so I tried the Azub-inspired design shown by Hoogie at in his website.� I had to make these up myself - I got some pipe benders (from Ebay, where else?) and welded them up with my little MIG rig.� | |||||||||||||||||||||||||||||||||||||||||||||||||||||||||||||||||||||||||||||||||||||||||||||||||||||||||||||||||||
| At this stage, the bike was working and I rode maybe fifty or sixty miles on it over a couple of weeks, including to a gig with my trombone on a trailer! | |||||||||||||||||||||||||||||||||||||||||||||||||||||||||||||||||||||||||||||||||||||||||||||||||||||||||||||||||||
| While riding one day, I lost control for a minute, then fell off because I forgot to use the brakes and forgot to unclip from the clipless pedals.�� Guess it was tempting fate to try to learn clipless and 'bent at the same time!� Anyway, the front gear lever got broken.� Andy of Burton Bike Bits said he could get a cheapie replacement pair, but it might take a while.� I bit the bullet and went and bought a pair of Shimanos from Cycle Heaven in York, together with a pair of decent tyres - I could feel the knobblies holding me back like riding through mud. | |||||||||||||||||||||||||||||||||||||||||||||||||||||||||||||||||||||||||||||||||||||||||||||||||||||||||||||||||||
| The riding told me I needed those mudguards, and a mirror.� The mudguards are those ones without stays for mountain bikes.� Not the best, and the front one is obviously not intended for a narrow 20" wheel, but it keeps me dry.� The mirror came from Cycle Heaven, but it's a flat one, so it was a mistake.� Anyway, here's the first incarnation: | |||||||||||||||||||||||||||||||||||||||||||||||||||||||||||||||||||||||||||||||||||||||||||||||||||||||||||||||||||
|
|||||||||||||||||||||||||||||||||||||||||||||||||||||||||||||||||||||||||||||||||||||||||||||||||||||||||||||||||||
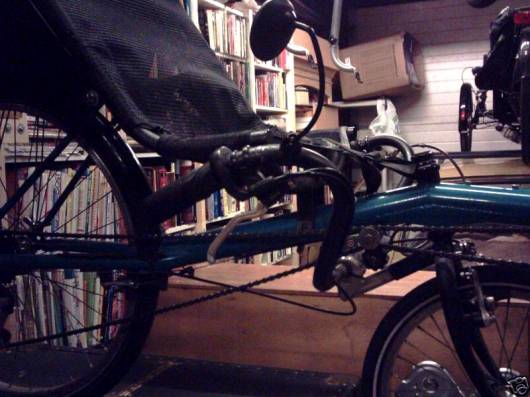
| Oh, brakes.� Those are from Red Frog Racing, via Ebay.� A new set of V brakes, Promax, with levers and cables included.� Initially, I had the brake levers and gear shifters the other way around on the handlebars, a la Azub and Hogie.� I found the brakes reluctant to spring open after use and thought it might be the tight curves in the cables, so I re-routed them this way.� Then I found out that I'd tightened the wrong screw in the levers, and that was why they were stiff, but by then I'd shortened the cable housings and it was too late to change them back! Oh well, every 'bent manufacturer on the planet except Azub seems happy to use brake levers back to front, so if it's good enough for them...! | |||||||||||||||||||||||||||||||||||||||||||||||||||||||||||||||||||||||||||||||||||||||||||||||||||||||||||||||||||
| The carrier is a cheap Blackburn knock-off from Burton Bike Bits.� I've had to bodge it a bit because the Bentech seat stays are wider apart than on a normal bike, and more vertical.� But it works well. | |||||||||||||||||||||||||||||||||||||||||||||||||||||||||||||||||||||||||||||||||||||||||||||||||||||||||||||||||||
| There were some problems with this build, which I've gradually sorted out. | |||||||||||||||||||||||||||||||||||||||||||||||||||||||||||||||||||||||||||||||||||||||||||||||||||||||||||||||||||
| One was that the chain rattled against the handlebars on bumps.� Annoying.� I partly solved this by wrapping insulting tape around the 'bars - doesn't stop the chain hitting them, but I couldn't hear it any more!� Then I looked more carefully at the Azub and at Hoogie's 'Bent and realised that on their bikes, the bottom run of the chain runs below the 'bars, not above.� Looking at my own bike, I decided that my bars were kind of clumsy, and there was rather more metal than there needed to be there.� And that mirror was next to useless.� And it'd be nice to have somewhere to put a bottle, and the mounting for a computer that you can just see in the picture could be improved! | |||||||||||||||||||||||||||||||||||||||||||||||||||||||||||||||||||||||||||||||||||||||||||||||||||||||||||||||||||
| First, the handlebars.� I went back to Hoogie's site and looked more carefully.� Here's his set-up: | |||||||||||||||||||||||||||||||||||||||||||||||||||||||||||||||||||||||||||||||||||||||||||||||||||||||||||||||||||
|
|||||||||||||||||||||||||||||||||||||||||||||||||||||||||||||||||||||||||||||||||||||||||||||||||||||||||||||||||||
| He's used a quill-to-A-head converter stem, very short, and his bars are wider than my first ones, with a shallower rise.� His drawings lack a crucial dimension - here's my version of the drawing, with the angles and all dimensions included.� (Apologies, Hoogie, if I've misquoted you!) | |||||||||||||||||||||||||||||||||||||||||||||||||||||||||||||||||||||||||||||||||||||||||||||||||||||||||||||||||||
| And here's my version in the flesh. | |||||||||||||||||||||||||||||||||||||||||||||||||||||||||||||||||||||||||||||||||||||||||||||||||||||||||||||||||||
|
|||||||||||||||||||||||||||||||||||||||||||||||||||||||||||||||||||||||||||||||||||||||||||||||||||||||||||||||||||
|
|||||||||||||||||||||||||||||||||||||||||||||||||||||||||||||||||||||||||||||||||||||||||||||||||||||||||||||||||||
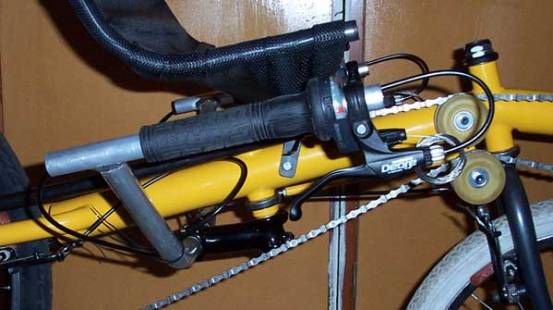
| I looked and looked for a stem with virtually no extension, and couldn't find one.� In the end, I bought a job lot of stems, mostly steel, from Ebay, and modified one.� I reduced the length by sawing off the top altogether.� I cut a longer thread down the long bolt and cut off the excess.� Then I sawed off the part that clamps around the bars, fish-mouthed the stump with a file and simply MIG-ed it back on to the shortened vertical part of the stem.� You can just see my new weld in the photo.� This gave me a stem that was short enough vertically not to poke up through the rear head set and poke me in the arse while riding, and short enough horizontally so that the bars didn't extend back too far. | |||||||||||||||||||||||||||||||||||||||||||||||||||||||||||||||||||||||||||||||||||||||||||||||||||||||||||||||||||
| My next set of handlebars had brazed rather than welded joints (a braze is neater (at least it is when I do it!), and easier to tidy up if you do make a mess).� I also added cable guides (from Ceeway) to keep control of all the spaghetti there without resorting to naff cable ties.� I think you'll agree they do a better job.� To do this, I bought a miniature oxy-acetylene kit (mini Portapak) from Weld UK. | |||||||||||||||||||||||||||||||||||||||||||||||||||||||||||||||||||||||||||||||||||||||||||||||||||||||||||||||||||
| The only bit I'm not entirely happy with is the bit of the handlebars that goes through the stem.� I used 1" tubing for the whole thing, which is a bit too narrow to clamp nicely in the stem.� So I had to make a shim from another bit of 1" tubing, cut lengthways and wrapped around the 'bars there.� It's not elegant, but it works so I suppose I should be happy. | |||||||||||||||||||||||||||||||||||||||||||||||||||||||||||||||||||||||||||||||||||||||||||||||||||||||||||||||||||
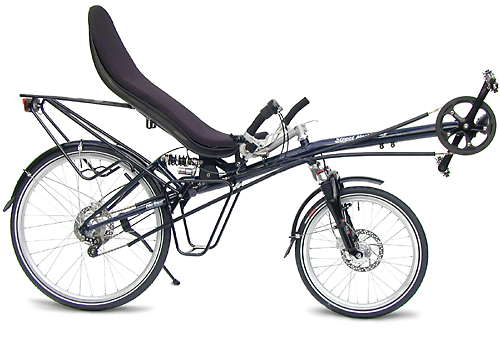
| Actually, I think Bentech's USS steering is less than optimum all round.� Bikes like the Speed Ross with direct USS seem neater, like this one: | |||||||||||||||||||||||||||||||||||||||||||||||||||||||||||||||||||||||||||||||||||||||||||||||||||||||||||||||||||
|
|||||||||||||||||||||||||||||||||||||||||||||||||||||||||||||||||||||||||||||||||||||||||||||||||||||||||||||||||||
| or this one, the highly desirable (but not succinctly named) HP Velotechnik Speedmachine GT (I want one): | |||||||||||||||||||||||||||||||||||||||||||||||||||||||||||||||||||||||||||||||||||||||||||||||||||||||||||||||||||
|
|||||||||||||||||||||||||||||||||||||||||||||||||||||||||||||||||||||||||||||||||||||||||||||||||||||||||||||||||||
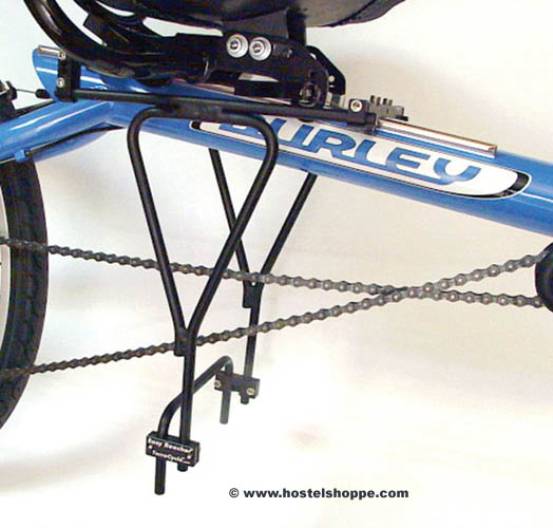
| Seem neater, are probably lighter, have fewer non-standard parts and have the additional advantage that there's no indirect steering mechanism to prevent you fitting an under-seat pannier rack like this one: | |||||||||||||||||||||||||||||||||||||||||||||||||||||||||||||||||||||||||||||||||||||||||||||||||||||||||||||||||||
|
|||||||||||||||||||||||||||||||||||||||||||||||||||||||||||||||||||||||||||||||||||||||||||||||||||||||||||||||||||
|
|||||||||||||||||||||||||||||||||||||||||||||||||||||||||||||||||||||||||||||||||||||||||||||||||||||||||||||||||||
| or this one: | |||||||||||||||||||||||||||||||||||||||||||||||||||||||||||||||||||||||||||||||||||||||||||||||||||||||||||||||||||
| But I digress. | |||||||||||||||||||||||||||||||||||||||||||||||||||||||||||||||||||||||||||||||||||||||||||||||||||||||||||||||||||
| Well, the bike stayed like this for a considerable time, was seen in York on several occasions (first time riding a 'bent in traffic is a little exciting- and those tight corners and bike traps they put on cycleways are interesting on an unfamiliar 'bent!) and carried me to work and back a lot.� | |||||||||||||||||||||||||||||||||||||||||||||||||||||||||||||||||||||||||||||||||||||||||||||||||||||||||||||||||||
| I decided around November to sort out those braze-ons. | |||||||||||||||||||||||||||||||||||||||||||||||||||||||||||||||||||||||||||||||||||||||||||||||||||||||||||||||||||
| I bought a generous set of bottle cage bosses, mudguard eyelets, cable guides and carrier bosses, and some silver "solder" and got to work.� First I practiced brazing with silver rod, to get the hang of it.� I found that you need flux, but you can apply flux only where you want the solder to flow.� If it flows elsewhere, it just forms little balls which are easily brushed off along with the flux when you're done.� But if you get the whole joint just hot enough, the silver just sucks itself into the gaps beautifully and makes a very strong joint. | |||||||||||||||||||||||||||||||||||||||||||||||||||||||||||||||||||||||||||||||||||||||||||||||||||||||||||||||||||
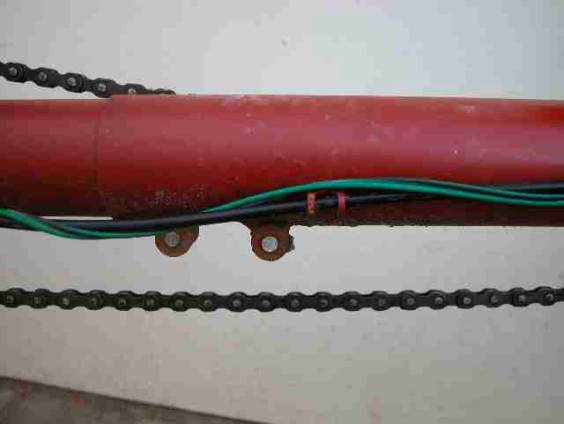
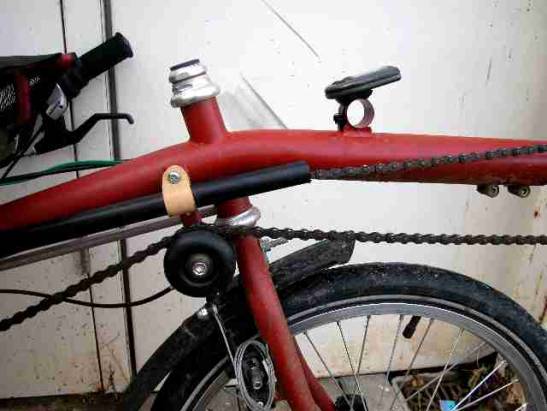
| I set to work on the bike itself and stuck on some cable guides including those on the bars that you saw above, this one for the rear derailleur cable: | |||||||||||||||||||||||||||||||||||||||||||||||||||||||||||||||||||||||||||||||||||||||||||||||||||||||||||||||||||
|
|||||||||||||||||||||||||||||||||||||||||||||||||||||||||||||||||||||||||||||||||||||||||||||||||||||||||||||||||||
|
|||||||||||||||||||||||||||||||||||||||||||||||||||||||||||||||||||||||||||||||||||||||||||||||||||||||||||||||||||
| This one for the front derailleur cable: | |||||||||||||||||||||||||||||||||||||||||||||||||||||||||||||||||||||||||||||||||||||||||||||||||||||||||||||||||||
| Bottle cage bosses on the front derailleur stem:� | |||||||||||||||||||||||||||||||||||||||||||||||||||||||||||||||||||||||||||||||||||||||||||||||||||||||||||||||||||
|
|||||||||||||||||||||||||||||||||||||||||||||||||||||||||||||||||||||||||||||||||||||||||||||||||||||||||||||||||||
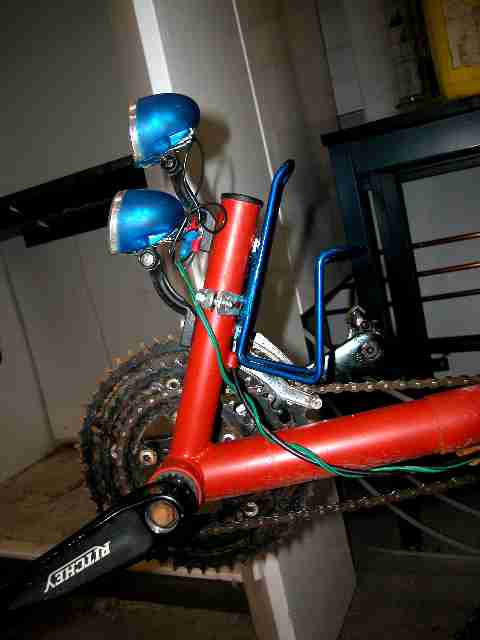
| The front lights aren't on bottle cage bosses.� The plastic mounts have a concave rear surface, designed to fit on a fork crown.� I wanted that concave surface to fit nicely against the matchingly convex surface of the stem, so rather than fit bosses, which have flat faces, so I drilled holes and brazed a nut on the inside of the tube to take the mounting bolt.� Neat, eh? | |||||||||||||||||||||||||||||||||||||||||||||||||||||||||||||||||||||||||||||||||||||||||||||||||||||||||||||||||||
| And, yes, I can reach forward for the bottle while riding.�.. | |||||||||||||||||||||||||||||||||||||||||||||||||||||||||||||||||||||||||||||||||||||||||||||||||||||||||||||||||||
| (The lights, incidentally, are the subject of a separate page, which is here.� Unless I haven't written it yet, in which case it isn't, but it will be one day). | |||||||||||||||||||||||||||||||||||||||||||||||||||||||||||||||||||||||||||||||||||||||||||||||||||||||||||||||||||
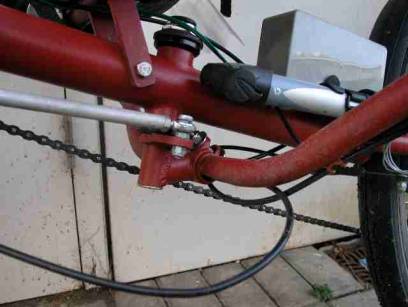
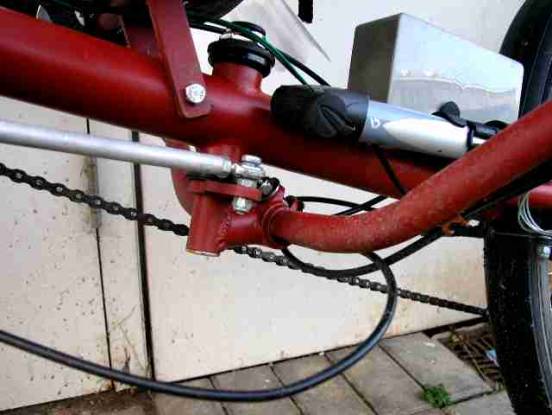
| I also made up and brazed on this computer mount. | |||||||||||||||||||||||||||||||||||||||||||||||||||||||||||||||||||||||||||||||||||||||||||||||||||||||||||||||||||
|
|||||||||||||||||||||||||||||||||||||||||||||||||||||||||||||||||||||||||||||||||||||||||||||||||||||||||||||||||||
| The short transverse tube started life as a chrome hanging rail for a wardrobe.� It was just the right diameter for mounting stuff that would normally go on handlebars, so I used a piece of offcut.� There are two little snippets of steel about 1mm thick , again offcuts from another project, which I cut roughly to shape with tin snips, filed to fit nicely against the wardrobe tube and the main boom of the bike, and then brazed it all together.� Cleaned up with a file and painted, it looks OK, doesn't it?� | |||||||||||||||||||||||||||||||||||||||||||||||||||||||||||||||||||||||||||||||||||||||||||||||||||||||||||||||||||
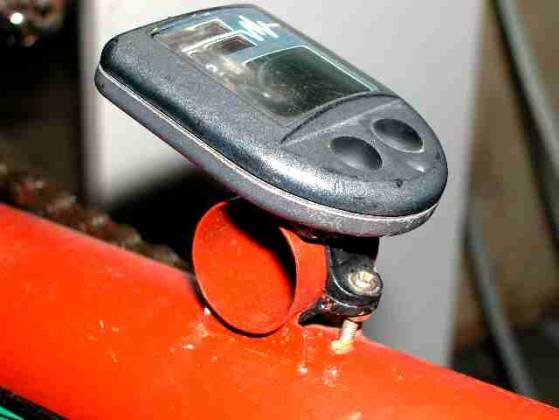
| The computer sits just ahead of the front headset, where I can reach the buttons and read the display.� I tried it behind the headset, but if you're wearing anything less than skin-tight, it disappears under your thighs there.� Looking down at it and pressing the buttons with it there also looks a little odd to passers-by! | |||||||||||||||||||||||||||||||||||||||||||||||||||||||||||||||||||||||||||||||||||||||||||||||||||||||||||||||||||
| Incidentally, the sender is on the front wheel, which is pretty much directly below the head unit here, and it works fine.� Someone at York Cycleworks told me that it wouldn't, but it does.� So there.� (Added later: I have found, though, that the sender on the 20" front wheel can't cope with speeds of more than about 25mph.� I guess that the computer's only programmed to calculate road speeds from rotation speeds up to so many rpm.� Obviously, at a given road speed, a 20" wheel's going round a lot faster than a 700mm one!� Anyway, it's disappointing to find, at the bottom of a fast hill, that it's only registered up to 25 mph, when I've probably been doing nearer 40!) | |||||||||||||||||||||||||||||||||||||||||||||||||||||||||||||||||||||||||||||||||||||||||||||||||||||||||||||||||||
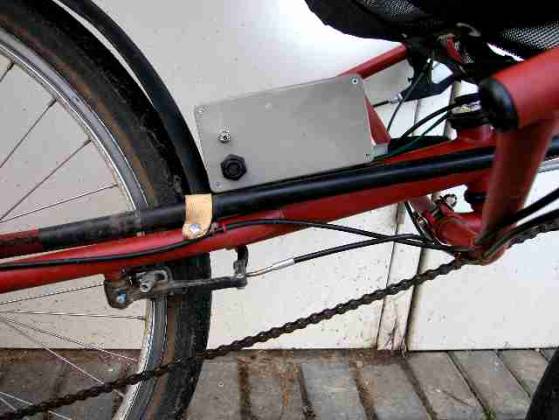
| I also added a pair of bottle cage bosses behind the seat, where they hold the battery pack for my lights (link to that article) and also the bracket for a pump: | |||||||||||||||||||||||||||||||||||||||||||||||||||||||||||||||||||||||||||||||||||||||||||||||||||||||||||||||||||
|
|||||||||||||||||||||||||||||||||||||||||||||||||||||||||||||||||||||||||||||||||||||||||||||||||||||||||||||||||||
|
|||||||||||||||||||||||||||||||||||||||||||||||||||||||||||||||||||||||||||||||||||||||||||||||||||||||||||||||||||
| The spacing of these bosses is the same as for a bottle cage, so in the summer, when I don't need lights, I could put an extra bottle cage there. | |||||||||||||||||||||||||||||||||||||||||||||||||||||||||||||||||||||||||||||||||||||||||||||||||||||||||||||||||||
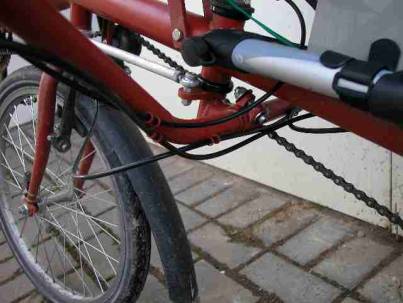
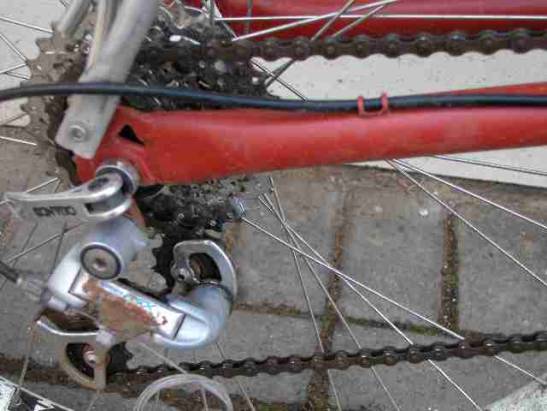
| One other problem I solved this time around is the chain tube.� Dom supplies some cable ties to mount it with, but I found that the chain tube gradually slides forwards through them as you ride, pulled by the chain.� You have to keep pulling it back every so often.� Also, the front cable tie is necessarily twisted, which puts a strain on it.� If you really heave on the pedals, for instance as you pull away at a junction in traffic, if the cable tie's a bit tired, it snaps, and your chain tube flops around just when you need flopping around least. | |||||||||||||||||||||||||||||||||||||||||||||||||||||||||||||||||||||||||||||||||||||||||||||||||||||||||||||||||||
| I made rubber mounts for the chain tube out of Pirelli upholstery webbing, and secured them with bolts through and into bottle cage bosses, one in the chainstay and one in the bit of racking stuff that also holds the chain idler.� You can see the rear one in the left-hand pic above, (together with another cable guide for the rear derailleur) and here's the other: | |||||||||||||||||||||||||||||||||||||||||||||||||||||||||||||||||||||||||||||||||||||||||||||||||||||||||||||||||||
|
|||||||||||||||||||||||||||||||||||||||||||||||||||||||||||||||||||||||||||||||||||||||||||||||||||||||||||||||||||
| To be honest, the chain tube still slips forward, but much more slowly, probably because the rubber's grippiness grips the smooth plastic better than more slippery nylon.� I need to shorten the rubber straps slightly and then it'd be fixed completely.� Black rubber would be less noticeable, too. | |||||||||||||||||||||||||||||||||||||||||||||||||||||||||||||||||||||||||||||||||||||||||||||||||||||||||||||||||||
| So you can see from the pictures that the bike's built back up and running now. | |||||||||||||||||||||||||||||||||||||||||||||||||||||||||||||||||||||||||||||||||||||||||||||||||||||||||||||||||||
| More recently, I made some further changes.� I mentioned that the screw-on freewheel I got from Burton was nasty.� Well, it was: it was noisy, making a really irritating clunk at every turn.� I also realise that screw-ons are on their way out, and that the hubs in the wheels Burton BBs supplied were a bit naff, so I decided to replace the rear wheel.� I found a mountain bike wheel on Ebay which had a Shimano cassette hub (also able to take a brake disc), and was only a few miles away in Beverley, and won it.� The rim's a bit wider than I'd like, but together with a 7-speed, wide-range SRAM cassette from Wiggle, the wheel fixed the clunking, gave me a much better range of gears, and allowed me to use all 7 stops on the right-hand gear shifter, rather than having an annoyingly redundant one! | |||||||||||||||||||||||||||||||||||||||||||||||||||||||||||||||||||||||||||||||||||||||||||||||||||||||||||||||||||
| I replaced the mirror with a Blackburn one, which has a convex lens.� Much better, although it still gives me a good view of my own left shoulder as well as the road behind. | |||||||||||||||||||||||||||||||||||||||||||||||||||||||||||||||||||||||||||||||||||||||||||||||||||||||||||||||||||
| The other recent change is to fiddle with the seat lacing.� Dom supplies a length of bungey cord to lace it up with.� I found that this tends to make all the seat fabric concertina together, leaving the ends of the seat tubes poking free at the front and at the top, and making the seat rather lumpy.� I figured this was because as well as pulling the seat fabric taut across the width of the seat frame, it was also pulling it together fore-and-aftwards.� If there were a series of separate straps, rather than one long lacing, this might not happen. | |||||||||||||||||||||||||||||||||||||||||||||||||||||||||||||||||||||||||||||||||||||||||||||||||||||||||||||||||||
| So I made a series of separate straps:� (#Gasp# - he sews as well as welding and brazing!..� Yes folks I'm truly a New Man-and I can't do any of them really well.) | |||||||||||||||||||||||||||||||||||||||||||||||||||||||||||||||||||||||||||||||||||||||||||||||||||||||||||||||||||
|
|||||||||||||||||||||||||||||||||||||||||||||||||||||||||||||||||||||||||||||||||||||||||||||||||||||||||||||||||||
| While this has fixed the concertina-ing problem, it's introduced a new one.� There's now next to no "spring" in the seat, so you feel the bumps more, and moreover, the straps Dom's sewn into the seat mesh can now clearly be felt.� One sits on the straps, rather than being supported by the whole mesh.� And where the lumbar strap crosses my spine, I've got a bruise.� | |||||||||||||||||||||||||||||||||||||||||||||||||||||||||||||||||||||||||||||||||||||||||||||||||||||||||||||||||||
| What else? | |||||||||||||||||||||||||||||||||||||||||||||||||||||||||||||||||||||||||||||||||||||||||||||||||||||||||||||||||||
| The wheels are pretty lousy still- the Halo rear one has actually got a wobble. | |||||||||||||||||||||||||||||||||||||||||||||||||||||||||||||||||||||||||||||||||||||||||||||||||||||||||||||||||||
| The mudguards are less than ideal, so some stiffer ones with stays would be good.� The difficulty is buying one front and one rear in two different sizes.� I think I can get help with this from Azub or one of the UK's recumbent specialist retailers... | |||||||||||||||||||||||||||||||||||||||||||||||||||||||||||||||||||||||||||||||||||||||||||||||||||||||||||||||||||
| A fairing.� As someone on Cycling Plus Forum said the other day, clipless pedals are basically chunks of aluminium clamped more or less directly to your feet, and on a cold day, they're being propelled through a blast freezer.� I also suffer from achy knees on cold days.� A fairing might help solve these problems, and it might even help me go faster.� I don't really encounter hills on my daily commute, but headwinds - tell me about 'em!� There's one stretch across a particularly bleak bit of farmland where the wind always blows in your face and makes your legs turn into wet toilet paper.� (And the strange thing is it does this going home as well as going to work.� How does it know??!) | |||||||||||||||||||||||||||||||||||||||||||||||||||||||||||||||||||||||||||||||||||||||||||||||||||||||||||||||||||
| Oh yes, and paint - it needs painting.� It won't be long now before I strip everything off the frame again and send it off for powder coating.� I'm going for blue, like the bottle cage and lights, and matching my trailer, but with black seat frame and handlebars. | |||||||||||||||||||||||||||||||||||||||||||||||||||||||||||||||||||||||||||||||||||||||||||||||||||||||||||||||||||
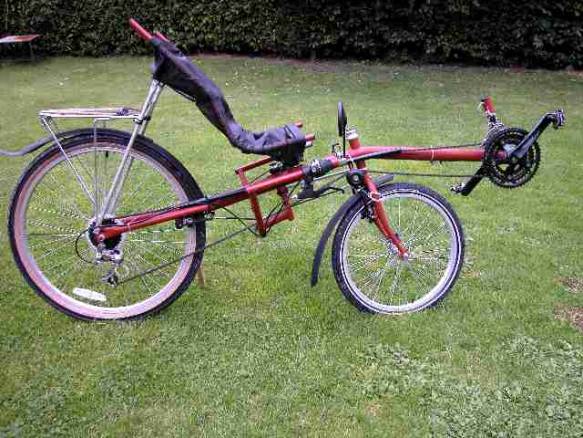
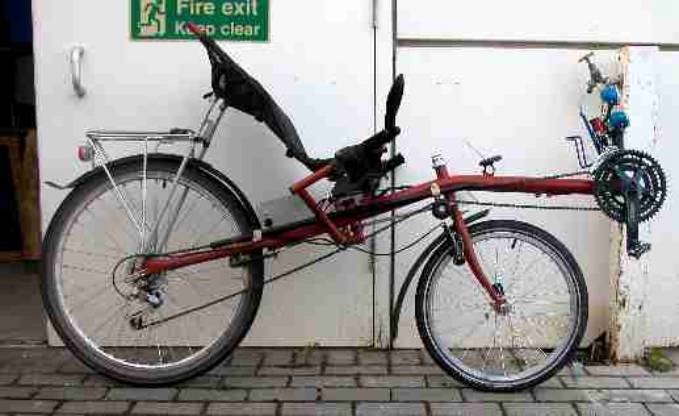
| And here it is as of now: Ladies and Gentlemen, I give you:. | |||||||||||||||||||||||||||||||||||||||||||||||||||||||||||||||||||||||||||||||||||||||||||||||||||||||||||||||||||
| The Flying Deckchair! | |||||||||||||||||||||||||||||||||||||||||||||||||||||||||||||||||||||||||||||||||||||||||||||||||||||||||||||||||||
|
|||||||||||||||||||||||||||||||||||||||||||||||||||||||||||||||||||||||||||||||||||||||||||||||||||||||||||||||||||
| (- and the outside tap at the workshop at work) | |||||||||||||||||||||||||||||||||||||||||||||||||||||||||||||||||||||||||||||||||||||||||||||||||||||||||||||||||||
| Here's another update: | |||||||||||||||||||||||||||||||||||||||||||||||||||||||||||||||||||||||||||||||||||||||||||||||||||||||||||||||||||
| I decided the seat frame was too wide.� It's probably right for bulky Dutchmen or Americans, but it was much wider than my slim frame needed.� I found some steel tubing which was a nice fit inside the seat frame tubing.� I cut about an inch and a half out of each side of the support tubes of the seat frame, and grafted them back together by making a sleeve joint with the tubing I'd found and brazing it all up.� Then I had to get the mesh sling made narrower too, but it's all a success.� I can tuck my elbows in better now, and I don't see so much of the right one in the mirror! Doesn't look so much like a deckchair on wheels, now though, so I might have to re-think the name.... | |||||||||||||||||||||||||||||||||||||||||||||||||||||||||||||||||||||||||||||||||||||||||||||||||||||||||||||||||||
| Using the bungey elastic lacing, it still slips down and up the frame tubes.� I've solved this by sewing little webbing pouches on the end of the sling that fit over the frame tubes.� This keeps the seat sling nice and tight and tidy-looking. | |||||||||||||||||||||||||||||||||||||||||||||||||||||||||||||||||||||||||||||||||||||||||||||||||||||||||||||||||||
| I bought from Azub a much better pair of mudguards, with stays, which I've now fitted.� Altogether neater than the black plastic jobs.� Also from Azub, a fairing.� Now this is a bit radical, even for a recumbent! | |||||||||||||||||||||||||||||||||||||||||||||||||||||||||||||||||||||||||||||||||||||||||||||||||||||||||||||||||||
| Azub don't say this on their web site, but the fairing comes with a nice nylon bag to keep it clean and unscratched when it's not on the bike.� Even better, the bag has straps which enable you to roll the fairing up inside the bag, so it doesn't take up much space.� Cunning!� The support struts are nicely engineered in alloy tube, with quick release adjustments.� The fairing is made of a soft sort of Perspex-y stuff which does roll up, but becomes quite stiff when fitted onto the struts with the Velcro they supply.� It all fits together much more rigidly and effectively than the description suggests.� The only disappointment is how the struts attach to the bike itself: jubilee clips.� | |||||||||||||||||||||||||||||||||||||||||||||||||||||||||||||||||||||||||||||||||||||||||||||||||||||||||||||||||||
| I was hoping to be able to braze on bottle bosses or whatever so that I could attach the fairing in a really neat and easy-to-remove-when-not-required way, but the design of the struts makes that difficult.� And to be fair, Azub supplied good quality jubilee clips with some heat-shrink tubing around them so that they don't scratch.� And they're light and easily replaceable, and they do the job very effectively.� They should be entirely satisfactory, and yet- and yet- they're somehow unsatisfyingly- undefinably- bodge-ish. | |||||||||||||||||||||||||||||||||||||||||||||||||||||||||||||||||||||||||||||||||||||||||||||||||||||||||||||||||||
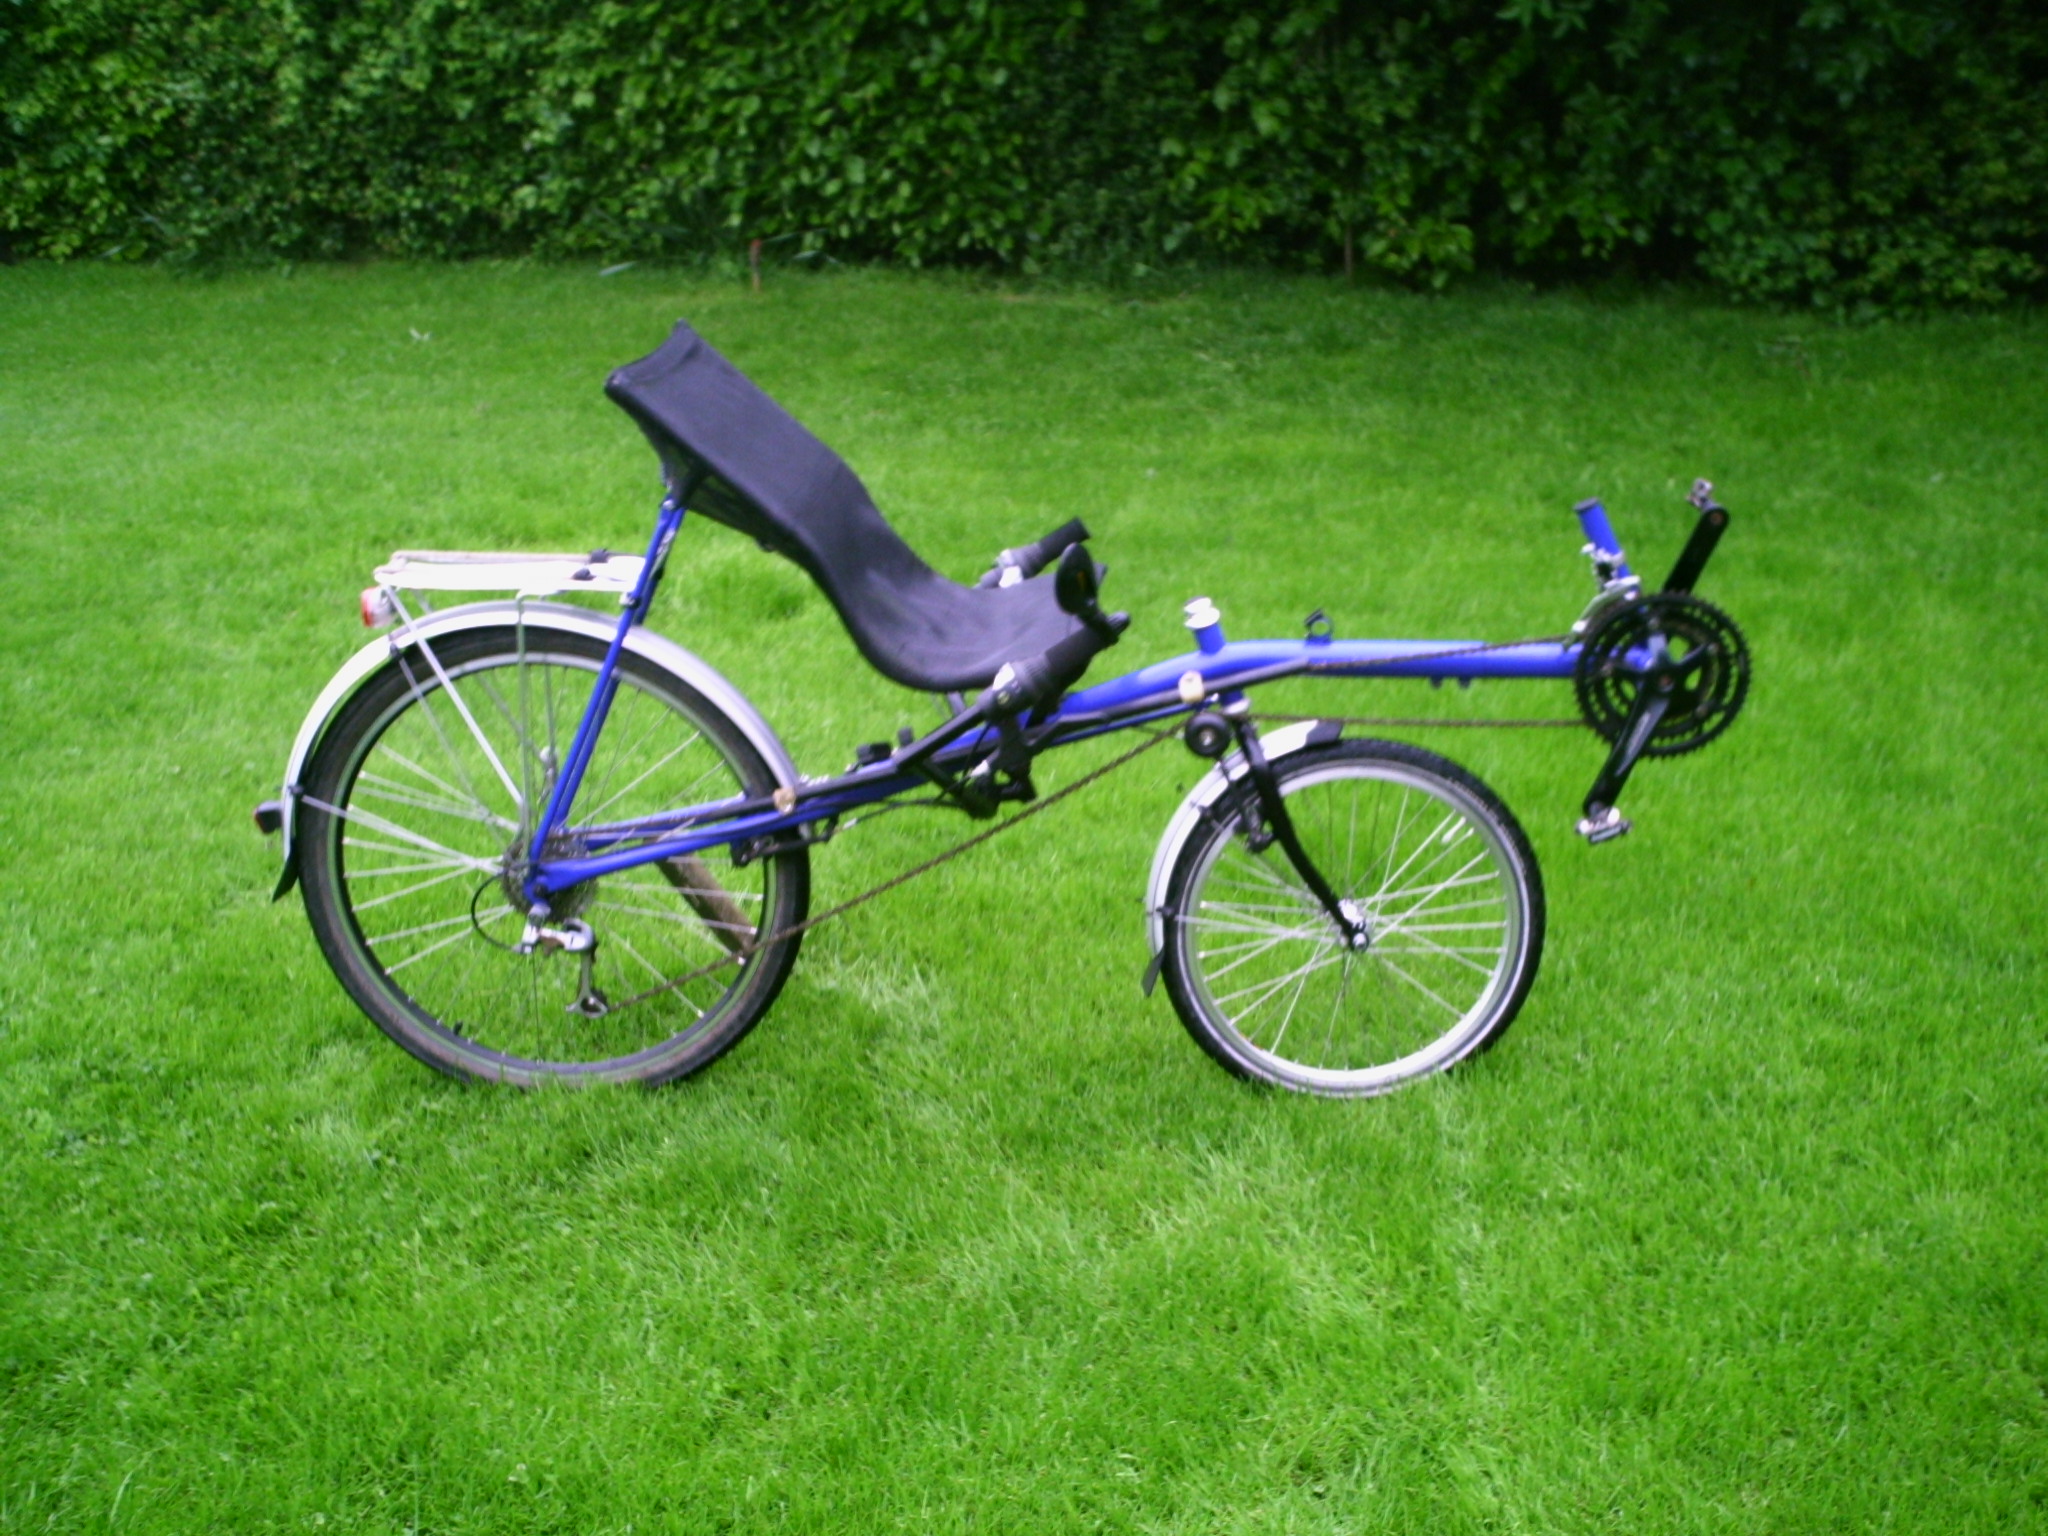
| I recently stripped the bike down - again! - to have it powder coated.� While stripped, I added one more cable guide.� I had Cycle Heaven build me some nice wheels on the Shimano hub that the Halo rim came with, and a 105 hub I got on Ebay And here it is, beatiful in blue!.� |
|||||||||||||||||||||||||||||||||||||||||||||||||||||||||||||||||||||||||||||||||||||||||||||||||||||||||||||||||||
|
|||||||||||||||||||||||||||||||||||||||||||||||||||||||||||||||||||||||||||||||||||||||||||||||||||||||||||||||||||
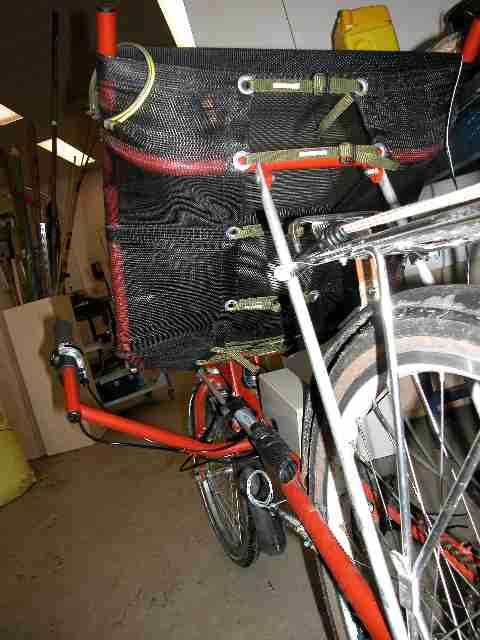
| My wife and I are thinking of doing LE-JOG this summer.� I may get to use the 'bent for the trip! You may also get to see the bike at the York show if you keep your eyes open! |
|||||||||||||||||||||||||||||||||||||||||||||||||||||||||||||||||||||||||||||||||||||||||||||||||||||||||||||||||||