
|
|
|

|
WinAmp Skins: For anyone, who doesn't know yet: You can customize the appearance of the WinAmp MP3 player as well as many other programs with 'skins'. These skins can be downloaded on the web or you can make them yourself. That's not very difficult, but it takes a lot of time and creativity to make a cool skin... |
|
My skins: Denise Richards This must be my best skin so far. Well, have a look at the screenshot, need I say more? No need to say how great an actress Denise is, you should know that. Now download... 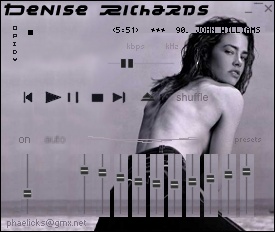
Download it here! For how to install WinAmp skins, see further down. You better activate WinAmps equalizer with this skin. Playlist and Minibrowser match the skin as well. For more information on the skin, read the readme.txt file in the archive. |
|
Neve Campbell My first skin is this nice b/w Neve Campbell skin. Well, it had to be worthy for one of the greatest + prettiest actresses, check it out and I think you'll agree with all the people, who wrote me it was cool :o). 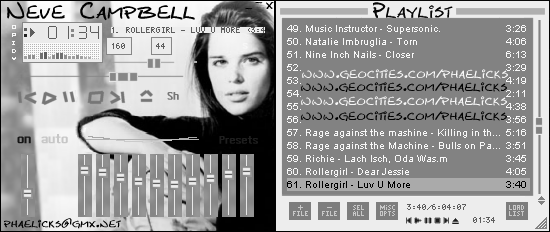
Download it here! For how to install WinAmp skins, see further down. You better activate WinAmps equalizer with this skin. For more information on my favourite actress go here: |
|
Installing WinAmp skins:
If you have one of the newer versions of WinAmp, installing skins is very easy: 1. Take the zipped skin file (e.g. nevefelix.zip) you downloaded and copy it in the 'skin' directory inside your WinAmp directory. For most users this should be C:\Program File\WinAmp\skins 2. Start Winzip, press Alt+S and select the skin. With older versions, you have to create a subdirectory in WinAmp's 'skin' directory, the directory name you choose will be the skins name in WinAmp. Then unzip the zipped file you downloaded into this directory (all files). You need a tool like WinZip to do this. Then press Alt+S and select the skin. Get a new version of WinAmp: www.winamp.com Get Winzip: www.winzip.com |
|
Making WinAmp skins:
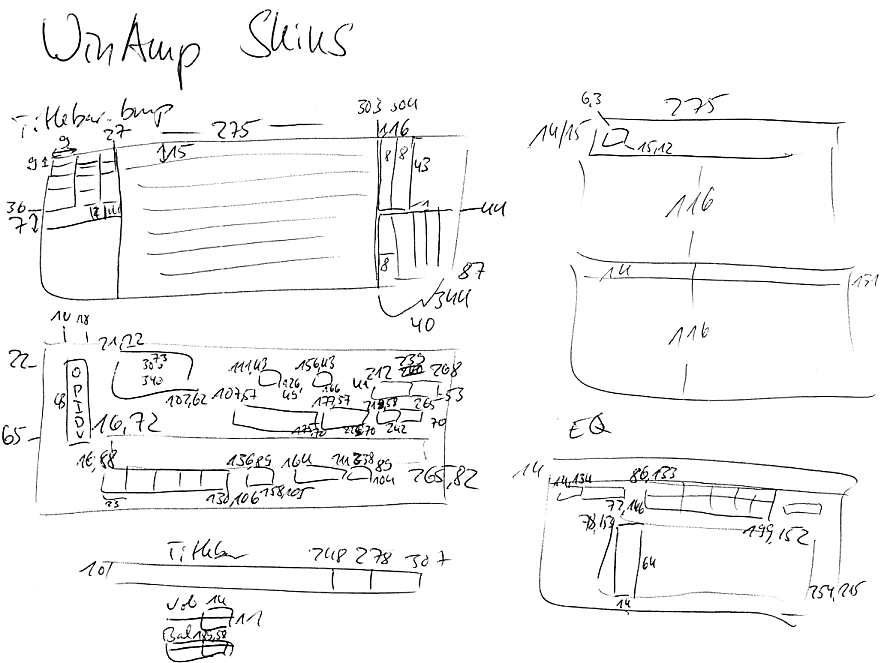
Making your own skins isn't difficult, if you know some stuff about computers and graphics. It just takes a lot of time and creativity to make a good one. There are some programs designed to help you. Some of them might be good, I'll give you a review as soon as I have tried any. But unfortunately you can find many very bad skins on the web, that have been made with those programs by simply selecting a background picture and putting the standart buttons and control elements in front. Don't do that! Nobody likes those skins. How to do it: Unzip a skin file into a subdirectory of WinAmp's skin directory, as if you had an old version of WinAmp (see above). You will find a few bmp graphics files (among other files) which you should take a closer look at. Open them in a graphics program like Paintshop Pro or Photoshop (or MS Paint...) and you will find some familiar pictures. It's a good idea to get the skin of the original WinAmp look, here and look at that one. There are also some cursor files in there, if you really want to change them as well... The graphic files should be more or less self explaining. The small symbols in titlebar.bmp might be a problem. I found a page that explained them all once, but I don't remember where, sorry. There are also 3 text files in the original skin: pledit.txt defines font and colors for the Playlist region.txt gives you the possibility to make part of winamp transparent viscolor.txt defines the colors for the graphic analyzer display All of the files are optional, change as many as you like and delete the rest. www.winamp.com used to have a short tutorial, but it doesn't seem to be on the server any more. This is my copy of it, if you care to look at it as well. Finding out the exact pixel positions in the different bmp files is one of the less fun tasks in skinning, so I scanned my notes which might be able to help you. It's in a gif file, but you best print it out and use when working on your skin. I can't give you any warranty that its all correct though. Have fun skinning! |
|
Felix' Website |