Pierre's Planes: Bearcat
|
Specifications:
|
|
Specifications:
|
Building:
The design is loosely based on Paul Bradley's T-28 construction article on eZone. I used plans I found on the net for a glow foam and balsa model, printed it full size, and cut it up to make templates for foam and balsa cutting.
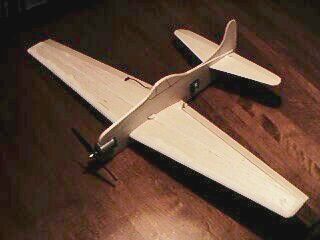
Wing: two layers of 3/16 foamboard, with the trailing edges sanded down to half thickness, on the inside. 1/4" wide balsa spar, 3/16" thick at the root down to 0" at the tips, 1" dihedral at both tips with 1/16" plywood brace. I glued the spar to the bottom foamboard with 3M77, at about 1/3 of the chord, added a flat 1/16" x 1/4" leading edge. A single rib was put at the root, basically to fill the cavity which would have been located within the fuse. Let the whole thing set to try to keep the bottom relatively flat. The top side foamboard was put on in two pieces, bent over the spar. Masking tape used to maintain the curve while the glue set. Sanded the edges, then added 1/16" strip at the trailing edge. Sheeted the whole thing with 1/32" balsa, added a 1/4" tri-stock at the leading edge. Aileron stock is 1/4" by 1". It's a crude airfoil, but it ended up semi-symmetrical, fairly close to the profile in the plans. I then put a servo wheel in the middle of the wing, secured to a 1/4" dowel inserted in the wing (similar to the T-28 article). It ended a bit too heavy at almost 3.5 oz, but it's very solid. I figured the wing is about 160 sq.in. A hot wire cut foam wing would have been easier and maybe lighter to build.
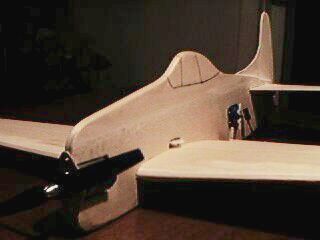
Fuse: 3/16" foamboard core, sheeted with 1/16" balsa with 3M77. Before putting on the sheeting, I put some 3/16" x 1/4" pine strips next to the motor opening, to secure the motor mount to it. I also replaced the bottom part of the fuse (~1/2" wide or so) from the nose to the leading edge with 3/16" thick balsa to provide more strength to the nose. After sheeting, set on a flat surface, and put a pile of books over it overnight. The next day, I use a drum sander to clean the edges, and apply 1/16" all around the edges. The cockpit was a bit tricky due to its curvature. I took a strip of 1/16" balsa, wetted it, put it in the microwave for 20 seconds, and it become very flexible. The 'edging' was put on with white glue and secured in place with masking tape. Slots for the 3/32" thick tail feather were cut. The tail was pre-assembled by gluing the stabs together first, then fitted into position in the fuse. The motor mount is 1/16" ply, which I generously coated with CA to increase its strength. The bare fuse ended up at 1.5 oz. Servo cutouts were made about half way between the trailing edge and the tail feathers.
I ended up with an almost finished bare airframe at 5 oz. I'm finishing it with Minwax water based polycrylic varnish, and blue spray paint. I'm finding the tail feathers a bit 'weak', so I covered one side with silkspan to reinforce them. The real problem is that the polycrylic varnish takes a long time to cure and harden. So I'm hoping to be under 15 oz with 7*600AE cells. Markings will be most likely just be white paper glued on with 3M77. The 7*800AR would add about another 3 oz, which may be acceptable, but I would try it first with the 600AE.
Waiting for the varnish to cure, so I can put the final color coat on. The cockpit will be done with 'chromed' self adhesive sticky trim.
Flying:
We're talking about creating a local class for e-combat, so this is a potential candidate for this type of event.
Pierre Audette
pfaudet (a) videotron.ca
11/07/2001