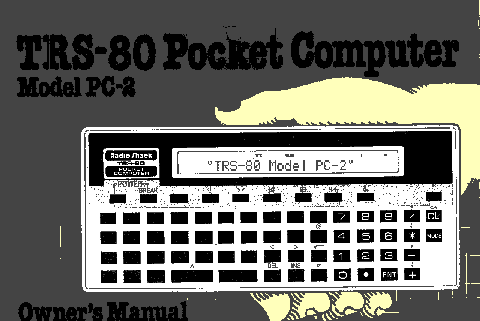
|
A Special Note to Our Customers...To make the TRS-80 PC-2 available to you as quickly as possible, we're providing this Owner's Manual which will explain how to use the PC-2. Throughout this manual, we've made reference to the book "TRS-80 PC-2 Programming Guide" (optional/extra). This manual, which should be available in the Summer of 1982, will be a comprehensive PC-2 BASIC Programming Manual. In the meantime, many of your programming questions can be answered by referring to another Radio Shack book called "Problem Solving on the TRS-80 Pocket Computer" (Catalog number 62-2312). Thank you, |
Contents | |
| Customer Information | 3 |
| Welcome to the World of Pocket Computing! | 4 |
| 1/Description of the Pocket Computer Keyboard Display Rear Panel | 5 |
| 2/Setting Up the Pocket Computer Starting-Up Battery Installation External Power Supply | 13 |
| 3/Using the Pocket Computer Using the Keyboard The PC-2 As A Calculator PC-2 BASIC | 19 |
| 4/Care and Maintenance | 87 |
| 5/Specifications | 89 |
| Appendix A/Language Reference Summary | 91 |
| Appendix B/Error Codes | 103 |
Customer Information | |
| 3 | |
1/Description of the Pocket ComputerBefore using the PC-2, it's important that you become familiar with it. Carefully read the following section.
Figure 1. PC-2 (Front View) |
| 5 |
Figure 2. Sample PC-2 Display | ||
| 1 | BUSY | Program Execution Indicator. This Indicator is on during program execution. When program execution is complete, the Indicator goes off. The PC-2 will not turn off (manually by pressing OFF or automatically after seven minutes) when the BUSY Indicator is on. |
| 2 | SHIFT | Shift Key Indicator. This Indicator is on whenever |
| 3 | SMALL | Lowercase Option Indicator. This Indicator is on whenever the Computer is in Lowercase Option Mode (the Computer can display either upper- or lowercase letters). Press |
| 4 | Angular Measurement Indicator. This Indicator will display the current unit of angle for the input of trigonometric functions: DEG for "degrees." (To compute in degrees, type DEGREE | |
| 9 | ||

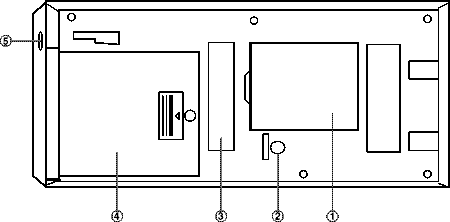
Figure 3. PC-2 (Rear Panel) | |
| 1 | RAM/ROM Module Slot. Insert RAM or ROM Modules into this slot. See your RAM/ROM Module user's guide for specific details. |
| 2 | ALL RESET Button. If the PC-2 ever "hangs up," use a ball-point pen to press this button while pressing |
| 11 | |
RUN ModeOnce programs have been entered into the Computer's memory, you can run (execute) them in RUN Mode. To enter the RUN Mode, press There are, however, a few ways to begin a program without typing RUN. For instance, you might want to assign the RUN command to a Function Key. Try When F1: is displayed, type RUN Hint: Assign RUN @ to Another way to RUN a program is to assign Definable key labels to certain line numbers within a program. (See Definable Keys for more details.) Then, when you want to RUN a specific program, simply press The PC-2 can also be used as a calculator (make that a super calculator! when it is in RUN Mode. |
| 23 |
|
When you exit the RESERVE Mode (for example, to go to RUN mode), simply press Another method lets you check the contents stored in each key one-at-a-time. Just go into a Reserve Mode (I/II/III) and press a Function Key (such as Definable KeysDefinable Keys let you use the alpha-keys (and a couple of others) for purposes other than their obvious intent (e.g., to display letters). There are two types of Definable Keys the PC-2 recognizes:
|
| 28 |
Note that Definable Keys are divided according to rows. The top row of alpha-keys have permanently assigned program statements; the bottom two rows of alpha-keys (and the equals key and spacebar) are used for labelling program line numbers. For instance, you'll probably use the PRINT statement several times in a single program. Instead of typing it over and over, just press |
||||||||||||||||||||
| 30 | ||||||||||||||||||||
|
The Command Instruction Defined Keys may be specified in any of the Operation Modes (RUN, PRO, or RESERVE). If you are using the Computer by itself (e.g., the Computer is not connected to the Printer/Cassette Interface) and you press The second set of Definable Keys allows you to begin program execution at a maximum of 18 different program line numbers. The first step is to "label" a program by specifying one of the allowable keys in the first line of the program.
|
| 31 |
100 "A" WAIT 5:REM This Program counts to 10. Hint: When you come to line 120 in this example, type: 120 120 PRINT X_ When you're ready to run the program, set the Computer in RUN mode (press You might then want to begin another program at line 200 and label it as "B". When you want to run it, press Function KeysThe keys |
| 32 |
|
Function Keys can be assigned when the PC-2 is in the RESERVE Operation Mode. For instructions on assigning values to keys Reserve Mode ChangeAn additional Function Key feature is that the PC-2 really has 18 Function keys, not just six. Press the For details on using Recall Function Key AssignmentsThe Recall Key ( For instance, lets say you are writing a program line (in PROgram Mode) and need to use a value assigned to a Function Key. The problem is you've forgotten what values were assigned to what key. You can press |
| 33 |
|
To recall the menu you created for a specific Reserve Mode (see RESERVE Mode), press Display the First/Next Higher Program LineAnytime the Computer is in the PROgram mode, you can press If you are writing or editing a program, pressing Holding Hint: If you have a long program and want to look at a specific program line without scrolling through the entire program, type: LIST line number When you press For example, in the RUN Mode, press |
| 34 |
|
For instance, if you stop program execution (in RUN Mode) by pressing BREAK, the Display will indicate the program line in which the "break" occurred. Press Whenever the PC-2 encounters an error in a program line, an error message (which indicates which error and which program line) will be displayed. Press If you ever need to "single-step" through a program, press BREAK after the program has begun execution, then press Display the Last/Next Lower Program LineWhenever the PC-2 is in the PROgram Mode, you can press |
| 35 |
|
If the current line is in the middle of a program, pressing Holding When you press Another difference is that (in the RUN Mode), pressing Backspace Cursor/Delete CharacterAny time you are writing or editing a program line, you can move the Cursor to the left by pressing When the Cursor is in the "current" position while typing characters which appear on the Display, it appears as an underline (_). Pressing |
| 36 |
|
Holding down The Cursor can be backspaced in any of the Operation Modes. Pressing This function will erase whatever character (or space) the Cursor is "on top of" although the change will not be "saved" until you press A typical use of
|
| 37 |
|
If you press Note that you can only delete one character at a time. If you want to erase two characters that are next to each other, you will have to position the Cursor and press When Forward Space/Insert CharactersWhen you need to move the Cursor "forward" (to the right) without erasing characters, press If you hold If you press |
| 38 |
|
For instance:
You must press Using the PC-2's CalculatorWhenever it is in the RUN Mode, the PC-2 can also be used as a powerful scientific calculator with 10 digit precision and memory capabilities. Furthermore, you can combine calculator and programming instructions. Note that no more than 80 characters (79 plus |
| 39 |
|
Table 3 describes the mathematical functions the PC-2 recognizes when you're using it as a calculator.
|
||||||||||||||||||||||||||||||||
| 40 | ||||||||||||||||||||||||||||||||
|
For a complete description of these functions, see a PC-2 programming guide. Table 4 lists the priority of operations the PC-2 uses.
In the following example (assume you're in DEG mode): |
|||||||||||
| 41 |
Arithmetic Calculations. You can perform all standard arithmetic functions (addition, subtraction, division, multiplication, and exponentiation) with the PC-2 while it is in the RUN Mode. To perform arithmetic operations, simply enter the numbers and operators (+, -, *, etc.) and press |
| 42 |
|
If you want to see the original expression after you've pressed For example, if you want to know what 10 multiplied by 10 is without having to write a program, press For example: As soon as you press The Computer will remember the result too. That is, if you want to multiply the result by p (or any other number), you don't have to clear the Display and type the result (100) in again. Just type the multiplication sign ( Raising to a Power To raise a number to a power, type the number (or numeric expression) you wish to exponentiate, press |
| 43 |
|
Scientific Notation. Scientific notation is available simply by using the Trigonometric Functions. The PC-2 allows you to use the trigonometric functions listed in Table 3 whenever it is in RUN Mode. Functions are entered in the same order as you would write them on paper. This is different from a calculator which requires the argument first, then the function. To find the arctangent of 7/3, type: If you are in Degree Mode, the result will be displayed in degrees; if you are in Radian Mode, the result will be in radians. |
| 44 |
|
To set the PC-2 to the appropriate Angle Calculation Mode:
Calculator Memory. Like a calculator, the PC-2 can store numbers in memory locations when it is being used as a calculator. Unlike a calculator, the PC-2 has 52 fixed memory variables (A–Z for numerics and A$–Z$ for characters). You can also assign many other variables such as A1 or NM$. However, these variables will be stored in the shared memory area normally used for programs. There are two ways to assign values to a variable:
If you use the alphanumeric label, there are a few alpha-combinations that the PC-2 has reserved for its own use and you cannot use: |
| 45 |
|
Each variable may be used in the calculator mode as well as in a program. For example: This assigns the value of 7 to a variable named A and the value of 13 to a variable named B. You can then use these variables in an equation such as: If you use the array format (@(n)) where n is a numeric expression between 1 and 26 which specifies a variable storage location. A is the first memory storage location (1) and Z is the last (26). For example, type: |
| 46 |
|
The value you assign to variables will be retained until:
Recalling Values. Any time you need to recall a value assigned to a specific variable (A–Z), just type the variable (A, for instance) and press Another way to recall a value is to specify the memory storage location, using the @ sign. For instance, type: Recalling Equations. Once you've calculated the result, you may need to recall the original expression. To recall an expression (when the result is still displayed), press
To re-display the result, press If the Computer is turned off, it will remember the values assigned to the variables but you will not be able to recall the expression itself. |
| 47 |
|
For example, type Successive (Chained) Calculations. In some instances, you may want to perform several calculations — one after another — without having to press When you press Editing Equations. When you're using the PC-2 as a calculator, you can change (edit) equations. This means you can insert new characters and delete or change existing ones. For specific details on editing, see Hexadecimal-to-Decimal Conversions. To find the decimal value of hexadecimal numbers, type the hex value (preceded by &) and press |
| 48 |
|
Press Combining Programming and Calculator Mode. Any values assigned to variables in the RUN Mode can be used by the PC-2 when it is in the PROgramming Mode. Press Then return to RUN Mode and assign values to the variables: |
| 49 |
|
Next type: Pocket Computer BASICThe PC-2 recognizes almost all standard BASIC commands and statements as well as several non-standard BASIC keywords. This section will describe those non-standard BASIC commands and statements (i.e., those commands recognized by the PC-2 but not by most other computers that use the BASIC Language). If you're familiar with standard BASIC, you should be able to begin programming after reading this section. This section will not describe the BASIC commands used with the Printer/Cassette Interface or with any other PC-2 peripheral. For a discussion of those commands and statements, see your optional device's owner's manual and a PC-2 programming guide. For a complete list (including syntax, example, and abbreviations) of the BASIC commands the PC-2 uses, see Appendix A. |
| 50 |
|
Note that most commands and statements can be abbreviated. For example, instead of typing GOTO, simply type G. followed by a line number. Keywords identified with an asterisk (*) will be described in this section. For details on all keywords listed, see Appendix A, a PC-2 programming guide or a BASIC language reference manual (such as 'Problem Solving on the PC-1', Catalog Number 62-2313). Note that most PC-2 BASIC Keywords can be abbreviated. When abbreviating keywords, you must at least specify the part of the word which makes it unique from all other keywords — and then add a period. For instance, GCURSOR can be abbreviated to GC., GCU., GCURS., and GCURSO. You cannot use just G. since GPRINT also starts with this letter (abbreviate to GP.). The following Tables list a few of the abbreviations you may use with the PC-2.
Table 5 |
||||||||||||||||||||||||||||
| 51 | ||||||||||||||||||||||||||||
Table 6 |
||||||||||||||||||||||||||||||||||||||||||||||||||||||||||||||||||||||||||||||||||||||||||||
| 52 | ||||||||||||||||||||||||||||||||||||||||||||||||||||||||||||||||||||||||||||||||||||||||||||
Table 7 |
||||||||||||||||||||||||||||||||||||||||||||||||||||||||||||||||||||||||||||||||
| 53 | ||||||||||||||||||||||||||||||||||||||||||||||||||||||||||||||||||||||||||||||||
|
[This page now blank due to reorganising tables onto single pages.] |
| 54 |
AREADAssign Display Contents to a VariableAREAD name name is numeric or character variable Abbreviations: A. AREA. When a definable key (see This allows you to input (assign) values to variables without having to use the INPUT statement. The reading of the value is performed by AREAD. The AREAD statement must directly follow (in the same line) the definable key label. When you are ready to RUN a program that uses AREAD, simply enter the RUN Mode, type the information you wish to enter, and press the key combination of the definable key label. Example 10: "A" AREAD N$ |
| 55 |
|
To run this program, enter the RUN Mode and, when the Ready prompt appears, type: YOUR NAME IS Jonathan 10: "Z" AREAD YEAR :REM YEAR is the yearly total When you enter the RUN Mode and the Ready prompt is displayed, type a number which represents the total for the year. Then press MONTHLY AVERAGE = 100 |
| 56 |
ARUNAutomatic Program Execution on Start-UpARUN Abbreviations: ARU. When ARUN is the first program statement in the first program line, the PC-2 will automatically execute (RUN) the program when you turn the Computer's power on. However, the following conditions must be met:
|
| 57 |
|
Example 10: ARUN Press |
| 58 |
BEEPTurn Tone ON/OFFBEEP switch switch is ON or OFF. This statement turns the BEEP tone ON or OFF. Example BEEP OFF To turn BEEP back on, type: BEEP ON |
| 59 |
BEEPSound ToneBEEP number, frequency, duration number is a numeric expression between 0-65535 and specifies the number of times the beep occurs. frequency is a numeric expression between 0-255 and specifies the frequency of the beep. frequency is optional; if omitted, 8 is used. duration is a numeric expression between 0-65279 and specifies the length of each beep. duration is optional; if omitted, 160 is used. Abbreviations: B. The PC-2 can produce sounds with the BEEP statement. You must specify the number of beeps. You can also specify the frequency and duration (e.g., the length of each beep). The frequency can range from 7kHz (0) to 230Hz (255). This means that each unit of measurement between 0-255 is equal to about 26.5Hz. When you do not specify frequency, the PC-2 uses 8 (approximately 4 kHz.) |
| 60 |
|
Example 10: WAIT 75 10: WAIT 50 10: WAIT 25 CALLExecute a Machine-Language RoutineCALL address, variable address is a numeric expression between 0-65535 and specifies the entry address of a machine-language program. variable is a numeric variable which has previously been defined. variable is optional; if omitted, the machine-language subroutine located at address will be executed without regard to any variables. This function will execute a machine-language routine which has been loaded into memory at a specified address. |
| 61 |
|
After execution of the called program is complete, it can RETurn to the BASIC program. If you include the optional variable, the X register will be pointing at the location where the variable is stored. If variable is undefined before you use CALL, an ERROR 7 will occur. Note that machine-language programs can only be stored in the Primary memory buffer (see POKE# and PEEK# for more details on Primary and Alternate memory buffers). Example 10: WAIT 0 |
| 62 |
CURSORPosition CursorCURSOR position position is a numeric expression between 0-25 and specifies one of the 26 character positions available on the Display. position is optional; if omitted, 0 is used. Abbreviations: CU. CUR. CURS. The CURSOR statement positions the Cursor at one of the 26 character positions on the Display. The normal use of CURSOR is to position the Cursor before printing some information on the Display. This allows you to specify where data will appear on the Display. Using a position less than 0 or greater than 25 will result in ERROR 19. |
| 63 |
|
Example 10: WAIT 25 When this program is executed, the numbers will move across the display from left to right. GCURSORSelects Graphic Display Start PositionGCURSOR position position is a numeric expression between 0-155 and specifies the dot column on the Display where printing will begin. Abbreviations: GC. GCU. GCUR. GCURS. |
| 64 |
|
GCURSOR will allow you to specify the exact column on the PC-2 Display where printing will start. GCURSOR is like CURSOR but more precise. That is, CURSOR divides the Display into 26 columns; GCURSOR divides the Display into 156 columns. GCURSOR is most often used with GPRINT. For details on using GCURSOR with GPRINT, see GPRINT later in this manual. Example 10: WAIT 25 In this example, the letter A is printed at the 51st dot position on the Display. After a short "wait", the answer to the expression 26/3 (8.666666667) is printed, starting at the 81st dot position. Change line 40 to: (Note: You could achieve much the same result if you changed line 40 to: |
| 65 |
GPRINTSet Graphic DotsGPRINT pattern delimiter pattern delimiter... pattern is either a numeric expression between 0-127 decimal or a hexadecimal string which specifies a combination of addressable dots on the Display. delimiter is either a comma or semi-colon. If a comma is used, a blank column will be left between patterns; if a semi-colon is used, columns will be printed next to each other. Abbreviations: GP. GPR. GPRI. Note: the PC-2 will recognize pattern numbers up to 255. However, since the high bit isn't displayed, numbers greater than 127 will produce the same result as 0-127. GPRINT provides direct, programmable control over all of the dots in the Display. The PC-2 Display is made up of 156 dots across (columns on the X-axis) and 7 dots down (rows on the Y-axis) for a total of 1092 addressable dots. |
| 66 |
|
GPRINT can set or reset any dot (or patten of dots) within the columns on the Display. For example, GPRINT 0 will turn all dots in a column off; GPRINT 127 (or GPRINT "7F") will turn all dots in a column on. To specify which column, use GCURSOR. Then use GPRINT to turn any combination of dots in that column on or off. For instance, (in the RUN Mode) type: GCURSOR 75 This will tell the PC-2 to use column 75. Then type: GPRINT 127 and a solid line will appear near the center of the Display. Press GCURSOR 155 and again type: GPRINT 127 This time the solid line will appear at the right side of the Display. In both instances, the line pattern (all dots turned on) is the same but the lines are displayed in different positions. |
| 67 |
|
If you use decimal numbers, you must specify the dots in terms of the rows they occupy as described in Table 8.
To turn on the Row 16 dot in a column (column 100, for instance), simply type (in RUN Mode): GCURSOR 100 GPRINT 16 and the fifth dot from the top of the Display in column 100 will be turned on. |
|||||||||||||||||||||||||||
| 68 | |||||||||||||||||||||||||||
|
If you wish to turn on the dots in Rows 1 and 2, simply add the Row numbers together (1+2=3) and specify the sum. For example: GCURSOR 100 GPRINT 3 and the first two dots in Column 100 will light up. In the same sense, if you need to turn all dots in a single column on (to form a solid line), add the row numbers together (1+2+4+8+16+32+64=127) and specify the sum. GCURSOR 100 GPRINT 127 and a solid vertical line will be displayed. |
| 69 |
|
For example, to form a box with a line through it like the one in Figure 5: First (in the RUN Mode) specify the Column you want the first dot to be displayed in — Column 140 for instance. Remember, the PC-2 will automatically turn on the dots in the next column (Column 141) if you separate Row numbers with semi-colons (;). If you separate Row numbers with commas (,), the PC-2 will leave a blank column. Next enter the GPRINT statement and specify the sum of the Row numbers for the first Column numbers dot (127), the sum of the Row numbers for the next Column (73), the sum of the Row numbers for the next Column (73), etc. For instance: GCURSOR 140 GPRINT 127;73;73;73;73;73;127 Any pattern can be generated by specifying a Column or the sum of several Rows. |
| 70 |
|
If you use hexadecimal numbers to specify dots or combinations of dots, you must think of the Columns as being arranged as in Table 9:
In this arrangement, the seven rows are divided into a lower group of three rows and an upper group of four rows. Each group is numbered, from top to bottom, by powers of two. It is therefore possible to represent all the patterns of a group by a single hexadecimal number. Because the lower group has only three rows, the range of allowable digits for this group will be from 1–7. |
|||||||||||||||||||||||||||
| 71 | |||||||||||||||||||||||||||
|
Of the two hexadecimal digits required, the first digit will represent the lower group and the second digit will represent the upper group. Note that the lower group (1–4) must be specified before the upper group (1–8). To use hexadecimal numbers with GPRINT, you must enclose the numbers in quotes to create a string ("7F") or preface the numbers by the & sign (for instance, &7F). Table 10 describes the different patterns that GPRINT can generate when hexadecimal numbers are used: |
| 72 |
|
|||||||||||||||||||||||||||||||||||||||||||||||||||||||||||||||||||||||||||||||||||||||||||||||||||||||||
| 73 | |||||||||||||||||||||||||||||||||||||||||||||||||||||||||||||||||||||||||||||||||||||||||||||||||||||||||
|
To create a box (like the one that was used in the previous example) but with hexadecimal numbers, type (in the RUN Mode): GCURSOR 140 GPRINT "7F49494949497F" and the box will be created. If you specify a single-digit Hex number, it must be preceded by a zero (e.g., 0A is legal; A is illegal). Another way to accomplish the same thing is to use the hexadecimal preface &. For instance: GCURSOR 140 GPRINT &7F;&49;&49;&49;&49;&49;&7F and the box will again be created. Example 10: WAIT 25 |
| 74 |
|
To generate the same symbol but with hex numbers, type: 10: WAIT 25 LOCK/UNLOCKLocks/Unlocks Current Operation ModeLOCK UNLOCK This statement "locks" the PC-2 into the current Operation Mode (RUN, PROgram, or RESERVE). After LOCK On initial start-up, the PC-2 is not locked into any mode. If you lock the current mode and turn the Computer off, LOCK will still be in effect when you turn the PC-2 back on. To unlock the Computer, allowing you to change modes, type: UNLOCK Whenever you type NEW0 |
| 75 |
|
Example LOCK To unlock the PC-2 so you can change modes, type: UNLOCK PAUSEPrint Message and Continue ExecutionPAUSE Abbreviations: PA. PAU. PAUS. PAUSE is a semi-automatic form of the PRINT statement. It holds whatever is on the Display for approximately one second and then goes on to the next program step. PAUSE does not require a WAIT statement; PRINT does or you will have to press |
| 76 |
|
PAUSE has a fixed delay value; PRINT has a variable delay (see WAIT). Example 10: FOR X=1 TO 10 PEEK#Returns Contents of address in Alternate BufferPEEK# address address is a numeric expression between 0-65535 and specifies a location in memory. Abbreviations: PE. PEE. PEEK# is the same as PEEK but returns the value of the specified address in the alternate memory buffer. |
| 77 |
|
The PC-2 has two memory buffers — a Primary buffer for program and data storage and an Alternate buffer for data storage only. PEEK# returns (in decimal form) the value stored at the specified byte address of the Alternate buffer. The values returned represent an ASCII code. PEEK# may be used to retrieve information stored with a POKE# statement. PEEK# and POKE# allows you to set up very compact, byte oriented storage systems. Example A=PEEK# 32034 POINTTest DisplayPOINT position position is a numeric expression between 0-155 and specifies one of the 156 columns on the Display. Abbreviations: POI. |
| 78 |
|
POINT will return a number between 0-255. If 0 is returned, there are not any dots turned on in the specified column. If 255 (or 127) is returned, all of the dots in the specified column are turned on. 255 will be returned if you specified GPRINT 255 or FF and 127 will be returned if you specified GPRINT 127 or 7F. The number the PC-2 returns will identify the dot pattern specified with GPRINT. For instance, if your program uses GCURSOR 100 and you specified GPRINT 8, the PC-2 will return the value of 8 when you enter POINT 100. For details on specifying dot patterns, see GPRINT. Example 10: WAIT 50[This program appears to be faulty. In particular, line 40 seems to be redundant. However it is as printed in the manual.] |
| 79 |
POKEPut Value Into Primary Buffer LocationPOKE address, value, value.... address is a numeric expression between 0-65535 decimal and specifies a memory location in the Primary memory buffer. value is a numeric expression between 0-255 decimal and specifies the ASCII value you wish to put into address. value may be repeated. POKE allows you to put values into specified memory locations. The PC-2 uses POKE just like other TRS-80's except you can use multiple values after a single address. For details on using poke, see a BASIC Language Reference Manual. For an example that uses POKE, see CALL earlier in this manual. |
| 80 |
POKE#Put Value Into Alternate Buffer LocationPOKE# address, value address is a numeric expression between 0-65535 decimal and specifies a memory location in the Alternate memory buffer. value is a numeric expression between 0-255 decimal and specifies the ASCII value you wish to put into address. Abbreviations: PO. POK. POKE# is the same as POKE but POKE# puts a value into the Alternate memory buffer. The PC-2 has two memory buffers — a Primary buffer for program and data storage and an Alternate buffer for data storage only. POKE# requires a byte address (in decimal or hexadecimal form) and a value (also in decimal or hexadecimal form). POKE# may be used in any of the Operation Modes. |
| 81 |
|
Example POKE# &23FA,20 will store 20 in hexadecimal address 23FA. For a more detailed example of POKE#, see CALL. STATUSCheck Memory StatusSTATUS number number is a numeric expression between 0-255 0 returns the number of free bytes. 1 returns the number of bytes in use. 2 returns the "address + 1" of the location where the current program ends. 3 returns the "address" of the memory location where the current variables are stored. 4–255 returns the line number which was executed immediately before the program was halted. Abbreviations: STA. STAT. The STATUS statement lets you check the current status of the PC-2. STATUS can be executed from any Operation Mode (RUN, PROgram, RESERVE). |
| 82 |
|
STATUS is useful when you need to know how much memory the PC-2 has left for programming or how much memory you are using at any time. Example STATUS 0 will display the number of free bytes. STATUS 1 will display the number of bytes in use. STATUS 2 will display the memory address where the current program ends. Note that this address is actually one greater than the actual address where the program ends. STATUS 3 will display the memory address where variables are stored. Note that this address is actually one location less than the actual address where variables are stored. STATUS 4 will display the program line number when program execution was halted. |
| 83 |
TIMESet/Display Current TimeTIME = month day hour . minutes seconds month is a number between 1–12 which specifies the month of the year. day is a two-digit number between 01–31 which specifies the day of the month. hour is a two-digit number between 00–23 which specifies the hour of the day. . is a decimal point. minutes is a two-digit number between 00–59 and specifies the minutes of the hour. seconds is a two-digit number between 00–59 and specifies the seconds of the minutes. Abbreviations: TI. TIME lets you specify (set) the time or display the current time. Note that the time is set according to the 24-hour clock. That is, 1:00 P.M. would be specified as 13:00 hours. If you do not set the time the first time you turn the Computer on, the PC-2's internal clock uses TIME = 000000.00. Whenever you request the time after that, the Computer will display how many days, hours, minutes, and seconds it has been since you first turned the Computer on. The PC-2's clock does not stop counting when the Computer is turned off. |
| 84 |
|
Example TIME=072811.3001 To display the current time, type; TIME and the PC-2 will display the time. For example: 91214.2424 for September 12, 2:24:21 P.M. WAITSpecify Duration of PRINTWAIT delay delay is a numeric expression between 0-65535 and specifies the length of time the PRINT statement will be displayed. delay is optional; if omitted, you must press Abbreviations: W. WA. |
| 85 |
|
A WAIT statement should always precede a PRINT statement in your program. The length of time WAIT holds whatever you told the PC-2 to print depends on the number you specify.
Example 10: FOR X=1 TO 100 |
| 86 |
4/Care and MaintenanceYour PC-2 should provide you with years of trouble-free service. However, if you ever have problems with the Computer, check the symptom/cure table below. After that, if you still can't remedy the problem, contact your nearest Radio Shack store or computer center.
|
||||||||||||||
| 87 |
5/Specifications
|
|||||||||||||||
| 89 |
|
||||||||||||
| 90 |
Appendix A/PC-2 Language Reference SummaryArgument ranges are indicated by special letters:
|
||||||||||||
| 91 |
|
||||||||||||||||
| 92 |
|
||||||||||||||||||
| 93 |
|
||||||||||||||||
| 94 |
|
||||||||||||||||
| 95 |
|
||||||||||||||||
| 96 |
|
||||||||||||||||
| 97 |
|
||||||||||||||||
| 98 |
|
||||||||||||||||||||||
| 99 | ||||||||||||||||||||||
|
||||||||||||||||
| 100 |
|
||||||||||||||
| 101 |
|
||||||||||||||
| 102 |
Appendix B/PC-2 Error Codes
|
||||||||||||||||||||||||||||||||||
| 103 |
|
||||||||||||||||||||||||||||||||||||||||
| 104 |
|
RADIO SHACK, A DIVISION OF TANDY CORPORATION TANDY CORPORATION
PRINTED IN JAPAN |