AMATEUR ASTRONOMY
Astrophotography for Amateurs
1) GET STARTED: PHOTO ON TRIPOD
Before even starting with photography with a telescope, I recommend to
practice photography using a simple tripod. There are many things to do with a
simple tripod:
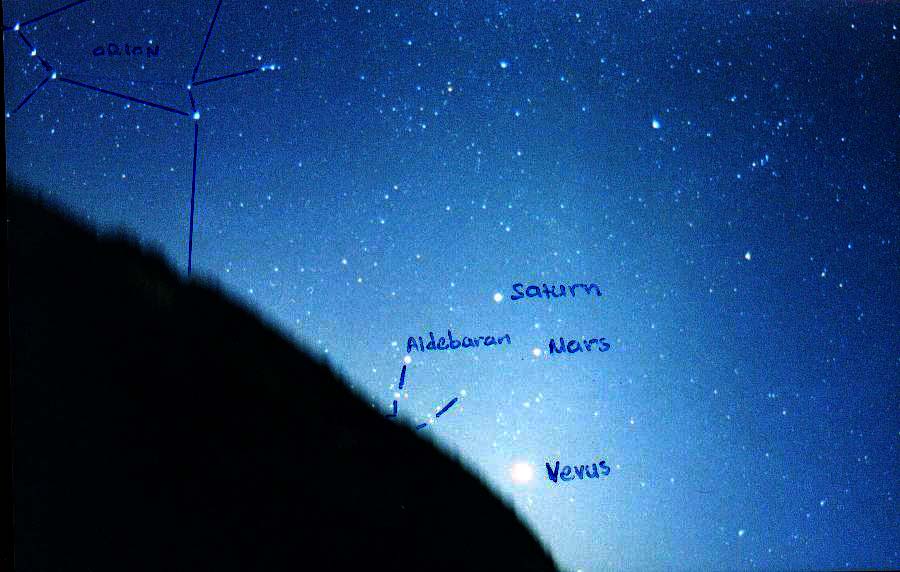
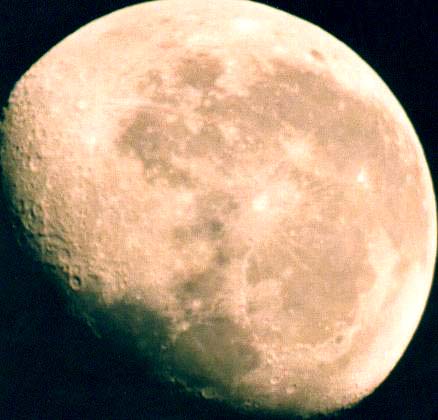
Moon and Planets at dawn or dusk:
choose a nice foreground landscape (trees, mountains...). Evening
just after the New Moon are very nice for that. Full Moon set above
cities are very nice too. I usualy
use a 100-400ASA slide film.
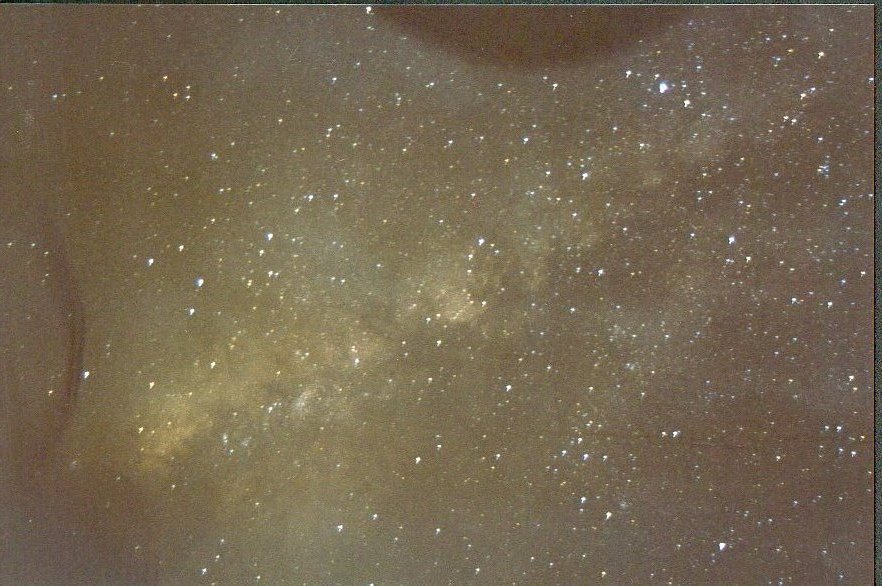
Constellations: Using a fast film
(I like the Kodak Ektar 1000) and short exposures
(30"-45" for a 50mm lens), one can record a lot of details on
constellations. I got some nice results on the Milky way,
especialy around Sagittarius. Those pictures are also
a perfect test for the photo shop: is the sky coming black from their lab?
Star trails: Long exposure will
record star movement over the sky. Combined with a nice foreground, you can get
some pretty nice results. I like to use a flash light or a Flash to show some
trees or my telescope on the pictures. And if get lucky, you may record a
shooting star! I usualy use a 400ASA film for those
pictures, except when I want to do a very long rotation around the north pole
for which I use a 100ASA film.
Other: There are several other pictures
to take with a tripod: bright comet, aurora, eclipses (lunar or solar)...
To do astrophotography on a
tripod, you need a very minimal material:
A camera: If possible, use a one
that doesn't run off battery for long exposure. Some exposures like star trails
need very long exposures, and a camera that runs off battery will die during
the night, usualy in the middle of an exposure! There
were several discussions on what is the best camera for astrophotography. If
you want to invest at this point on a camera, I strongly recommend an
A lens: At this point, a short
focal is recommended (35mm-50mm). More open is the lens, better it is (f-ratio
around 1.5).
A cable-release: It allows to keep the camera open during the exposure. One can find it
in any photo shop. Choose one that has an automatic lock system,
it is easier than the one with a screw.
A tripod: choose a light one, that you can take with you during your observing trip,
hiking...
I am still doing those kind of pictures. I really enjoy the search of the perfect
foreground, the perfect composition. And nothing can be more enjoyable than
taking the crescent moon in the morning after a long observing (or
photographing!) night...
2)
TRACKING?
Tracking is essential to do long exposure on the sky and having round
stars. With tracking, you can use slower film with less grain, or use longer
focal to show more details on the sky.
A very simple way to track is to
use three pieces of wood and a screw! It is both cheap and fun to build, and
you can have very nice results.
If you have a simple telescope,
you can fix your camera on top of it (piggy backed). I built a camera stand for
my old 4.5" using a piece of wood and some rope (I also replaced those
flexible cable with electronic buttons that created much less vibration)! You
can buy a piggy back, which is very expensive for what it is but it works fine.
You can also buy a rotative head for fixing your
camera from a local photo shop or from Orion for example; it will help
orienting the camera to get the field of view you want.
A lot of people with an
equatorial telescope are wondering how to start in deep sky photography. I really
think that the best is to do piggy back. You will need an equatorial mount for
long exposures, as Alt-Az mount will have field
rotation.
With short focal lengths
(50-150mm), you won't need a very good polar alignment. If you want to do long
exposure (1hr for example) or use a long focal lens (200mm-500mm), you will
certainly need a good polar alignement.
I personaly
use the drift method to align my telescope (a SCT
8"). It takes approximatly 30' for a good alignement for a 500mm focal lens. First, level your tripod
and orientate it to Polaris (not necessary, it just helps). If you have a Polar
alignement circle, it can also help to use them.
Look at a star near the Equator,
South. Track the star in RA only, and look if the star goes up or down in your
eyepiece (supposing your are looking straight). Rotate
the base of your telescope to adjust it until the star is not moving anymore.
Then, move to a star at East
(West works also). Do the same, but adjust the latitude this time (the angle
between your telescope axe and the horizon plan). By switching several times
from South to East (West), you should be able to adjust your polar alignement quite quickly. Of course, the first time you
will spend a lot of time; take notes of what you are doing, and it will be much
quicker after.
To practice polar alignement is very important if you want to move to prime
focus deepsky photography. That's why I always
recommend to start with piggy back first: it is much
easier to do!
Piggy Back photography offers a
wide range of new projects:
Constellation: you will get much
more details than exposures on tripod, and you can use finer grain films. And why not your own photographic atlas? Great as finding
chart later!
Milky way:
why not a mosaic of the milky way? In two hours, I did the milky
way in August using a 50mm lens and Ektar 1000
film, 3 minutes each pictures. Great results!
Comet or asteroids: bright one are easily accessible with a 50mm-150mm focale
lens. 10-20 minutes with Ektar 1000 and a 135mm
(F/2.4) gives nice results.
Movement of planets over the sky:
show how a planet retrograds over a constellation.
Shooting stars: Add a friend at
several miles from you, and you can calculate the position of the meteors; Add
a rotational screen front of your lens and you can calculate the speed!
3)
PRIME FOCUS
Prime focus is certainly a goal for a lot of people: be able to record
faint objects, show spiral arms in galaxies, record
the central star of a planetary nebula... But there are certainly a lot of
traps not to fall in!
First of all, material is very
important for deep sky astrophotography:
Telescope: Large aperture is a
plus, especialy if you have a fix observatory. If you
need a portable solution like me, SCT have great
advantages. I personaly choosed Celestron Ultima 8, which is very good for astrophotography, at least
a good price/performance ratio. If you have a location where you like to
observe, it is nice to build a fixed tripod. Then, you will just have to come
and install your telescope, the polar alignement will be almost already done. Of course, your
telescope should have a drive corrector to track on RA and allow correction. A
DEC motor is also useful, even if one can still take pictures with the Ultima 8 without DEC motor; it just makes life easier.
PEC: Periodic Error Correction is a great invention. You
spend some time (usualy ten minutes) to setup the PEC, but guiding is much easier after.
Reducer/Corrector: A short
f-ratio is nice for deepsky astrophotography, it
allows shorter exposures. For SCT, there are reducer that also correct the field of view. It allows also to have a full image on the film. I heard that one can stack
reducer/corrector but I never tried. Even if it is optional, I strongly
recommend this accessory. Celestron has a very nice
one for SCTs.
Off-Axis Guider: Guiding is
critical for nice round star on long exposures. Lumicon
has an excellent one, I use the Orion Ultra Guider which is nice too.
Finding a guiding star is not
always easy. Usualy, I use a low power eyepiece to
find the star, then switch to a higher reticuled eyepiece. A 9mm is nice for a SCT
8" f/10 or f/6.3; a 12.5mm eyepiece is not enough power. If I can't find a
guiding star, I just change target!
Front Cover: I usualy use a plain carton. I cover the telescope with it,
then open the camera and wait for the vibration beeing
stabilized, then I remove the cover. Most of the time,
the guiding star is still centered. Very useful... And while you have the carton, save a piece
to make a dew protector!
Deep Sky filter: If you live in
light polluted area, a Deep Sky filter can help you to limit the sky fog
effect. It is an optional accessories; but after
several pictures taken, it will become necessary.
We already talked about polar alignement. Of course, alignement
for prime focus is much more important than for piggy back; I usualy spend two hours to do it, and I can do up to 60'
exposures without field rotation. During summer Star Parties, I like to walk
around while the night is coming talking with other people on what they are
planning. Two hours can pass very quickly...
Focusing is also very important
for prime focus astrophotography. Do not expect to do proper focus just by
looking through the camera, it is not precise. I always use a razor edge to cut
a star beam (well, also my finger sometimes, so becareful).
Principle of this 'foucault' method is easy. Point the telescope to a star,
and do an approximative focusing through the camera. Then,
open the camera body (without a film!), and open the shutter in Bexposure. You should see the star pattern, as a donut
shape through a SCT telescope. Take a razor blade,
and tape it on the camera, exactly where the film should be.
By moving the telescope (I usualy tape the razor blade in order to be able to cut the
beam just by moving in DEC), the razor edge will cut the star beam. If the
razor is out of focus, the star pattern will disapear
slowly from one side or the other depending if your are inside or outside of
focus. At the focus point, the star pattern disapears
suddendly, and it is hard to tell from which side.
This is an easy method, and it
takes around 5'-10' to do it. It is very precise, and pictures will gain in
sharpness.
Choosing a film for deepsky astrophotography is not easy. There are hundreds of
articles on this subject, and it is changing all the time as new film are coming out.
Basicaly, Hyper film are the best; I used a few times TP2415
Hyper and Ektar 1000 Hyper, and I got the best
results. Lumicon sell Hyper
films, it is a good alternative if you don't have your own Hyper system.
Otherwise, Ektar
1000 is a nice film for bright objects. I heard about Kodachrome
1600P, but never had a chance to try it. TMAX 3200 is
a very good Black & White film to practice the technic,
including the photo lab technic. I would use those film to try and improve the technic,
and then buy Hyper film for better results.
Now, the most difficult may be to
find the object and to center it! Long hours
practicing visual observation will certainly help. I am a Star Hopping fan, I
enjoy following star patterns in my finderscope...
and having the object right in the middle! Several computer program can help to
create perfect charts for the search; I use Guide CD-ROM or Megastar. The SKY,
a little bit expensive, looks nice too. Of course, digital circles can also
help.
I spent several hours to
calibrate my telescope. I draw pictures to show where the camera field of view
was in the finder depending on the camera orientation. And I calibrated my
finder with Guide charts too. Now, I am able to imagine the object position
inside the finderscope (especialy
when there is a group of galaxies and you want all of them in the field).
Also, I know where is the guiding eyepiece field. Sometimes, I use a low power
eyepiece and try to locate the object within the guiding field (through the
prism in the off-axis guider). It works pretty well for 12-13 magnitude
galaxies. then, I just move the telescope to center the object, and try to find a guiding star.
There are hundreds of projects to
do with prime focus astrophotography, beyond the simple art of photographying what you see. Let go your imagination!
4)
STORING
Astrophotography overall is fun, and it is not so hard to do. Buy a good
book, try easy shots first, then move to piggy back and prime focus. You will
get nice results very quickly and you will have to store them.
First, always note what you are
taking (subject, film, lens, fratio, camera,
exposure, date/time). I used to take notes on paper,
but I always lost them! Now, I have one record-book for all my visual
observations as well as my astrophotos; it works
great.
Then, protect your films; I use
binders with film protector sheets, sorted by Date/Time.
I started to move to Photo CD
(Kodak) format; it is way too expensive, but it helps to keep all my best
pictures, and to process them using a computer. The only problem: you can't
record them after processing, except if you have GB of disc!
Last but not least, it is always
nice to have an album with your best pictures. I use to sort them my Date/Time, it is easier and less maintenance. But a sort by
subject would be better.
And if you take nice pictures,
scan them and post them on the net!
The above
article has written by Olivier THIZY
[email protected]
Planets
:
Heraklion

the milkyway
the moon
Amateur astronomy links:
http://www.greek-astronomy.com
http://www.geocities.com/astrosky2000/Stars.html
http://www.astronomy.net/astroguide/publisher
http://home.austin.rr.com/tie/informed.html
http://seds.lpl.arizona.edu/nineplanets/nineplanets/intro.html