
How2... Broadcast internet radio via the PeerCast network PeerCast & Multiple Ogg Vorbis setup (Oddcast v2) |
|
How can I broadcast multiple Ogg Vorbis streams with Oddcast DSP??? You will need: 1) PeerCast Client 2) WinAmp v291 3) Oddcast DSP (WinAmp Plugin) 4) Multiple DSP stacker (WinAmp Plugin) How do I install the Client??? Download the PeerCast Client Then Click 'OPEN' and PeerCast will self install to your chosen folder on your PC. When asked 'Do you want to start PeerCast now?' click ' How do I install WinAmp??? Download WinAmp and install to a folder in your Program Files There is a wizard to take you through the simple install proceedure. Make a note of the folder where you put WinAmp as next on step you will need to install the plugins (oddcast & DSP stacker) in the same folder. How do I install the associated WinAmp plugins??? Download Oddcast DSP & Multiple DSP stacker Install them both in your WinAmp Plugins folder The Set Up Making multiple Oddcast DSP's Now that you have WinAmp, Oddcast DSP & the DSP Stacker successfully installed on your computer you are almost there. Go to your WinAmp Folder in Program files. 
And open it. Then open the Plugins Folder 
Now look for the dsp_oddcast.dll 
make a copy of the file and rename the copy and the original. 

Open up your WinAmp 
and on the keyboard press Ctrl & P to bring up the WinAmp Preferences window. In the LEFT pane click on DSP/Effects and you will see a list of the plugins available. 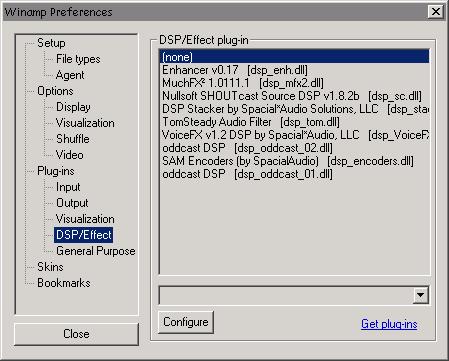
You should see two copies of oddcast DSP [dsp-odcast._01.dll] & [dsp-odcast._02.dll] and a copy of DSP Stacker by Special Audio,LLC [dsp stacker.dll] in the list. Double click on DSP Stacker by Special Audio,LLC [dsp stacker.dll] and a small  Icon will appear in the Task Bar Down by the clock. Icon will appear in the Task Bar Down by the clock.
Click on this Icon to launch the DSP stacker. 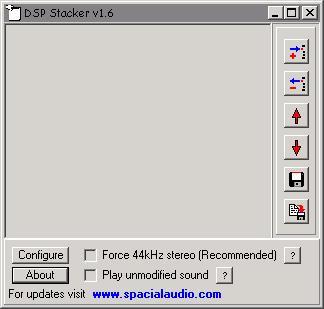
Click on the ADD button in the stack in the right 
This will open your DSP plugins list. 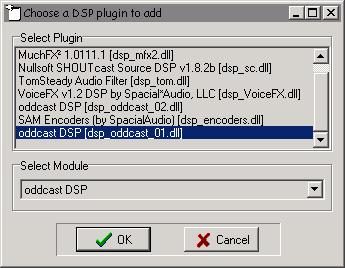
Select the plugind you want to use (both oddcast plugs) and they will appear in the main window of the stacker. 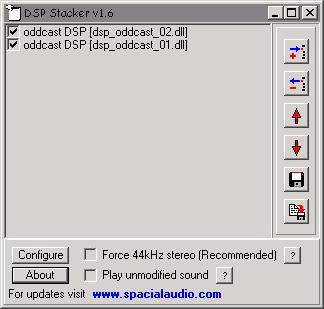
Next you need to make sure the force 44khz Stereo (recommended) box is checked. 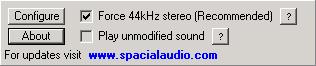
This will ensure all files will play correctly and not sound like Alvin & The Chipmonks if they are wrongly encoded. Always make sure this box is checked before a broadcast Now thats done whats next??? Now you have all the right plugins in the right place's you only meed to configure the two Oddcast DSP's and then create a couple of relays to PeerCast and you will be up and running before you know it. First though we need to set up the PeerCast Client. This is quite simple and only requires some basic information to achieve. Go to the 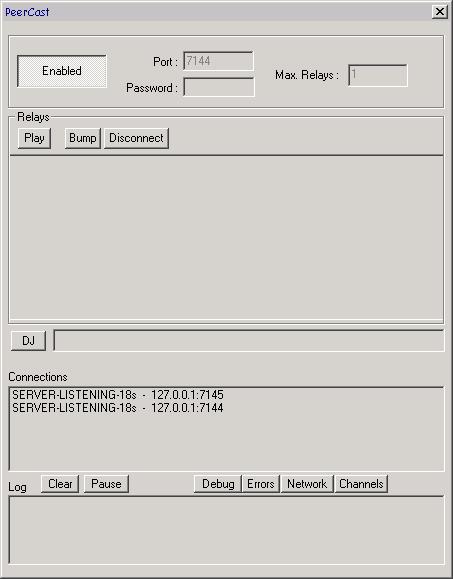
In the GUI window click on the Enabled button to fill in the port number (usualy 7144), your password (this password needs to be the same as in the Oddcast DSP configuration) Then click on the Disabled Button. This is all you need to do in the GUI for now. That was easy want it? If you dont know your IP Address Here it is... The configuration of Oddcast v2 is quite simple. 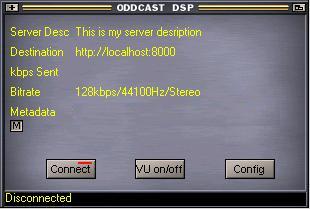
On the Oddcast DSP click on the Config button. This will open the configuration window. 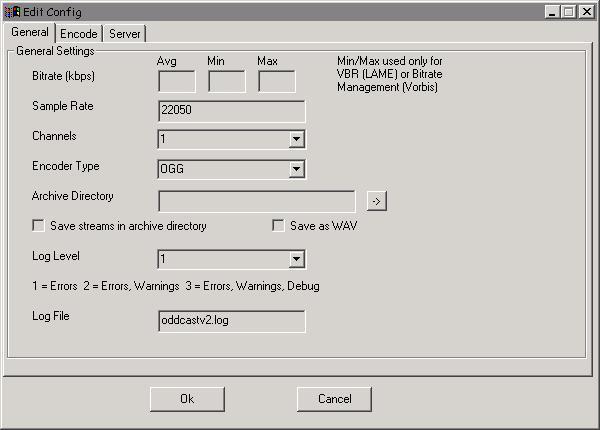
In the first config window you need to set... Bitrate: The options are 44100, 22050 or 11025 Choose 22050 Channels: Its either 1 (Mono) or 2 (Stereo) Choose 1 Encoder Type: Choose Ogg The chosen settings along with the Quality setting in the next window will determine your output Bitrate and Sample rate of your stream as well as the audio quality. If you choose the suggested settings you will achieve a stream of 24k at 22Khz in Mono See the list below for more setting and there achieved output quality. Archive Directory: You can save your stream to file and here is where you select the directory to save the file to. Save Stream: Check this if you want to save your stream to file in the selected directory. Save as Wav: Savet the stream file as a Wav file. Log level: Select the level of Log reporting you get from Oddcast DSP. Log File: This is the name of the Log file. Now click the Encode Tab and then OggVorbis Tab. 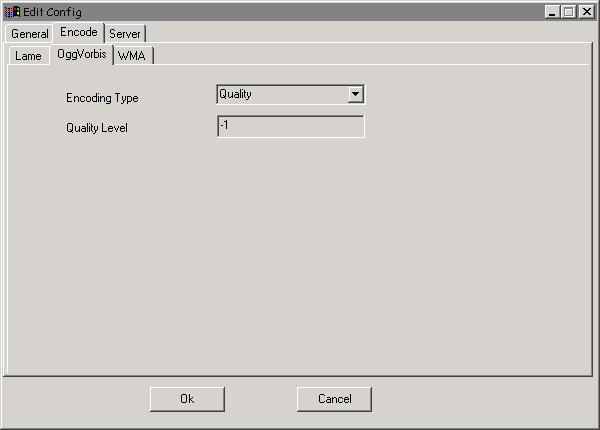
Here we need to set... Encoding Type: Choose Quality Quality Level: Options are -1 through 10 Choose -1 Once this is done click on the Server Tab and open the final config window. 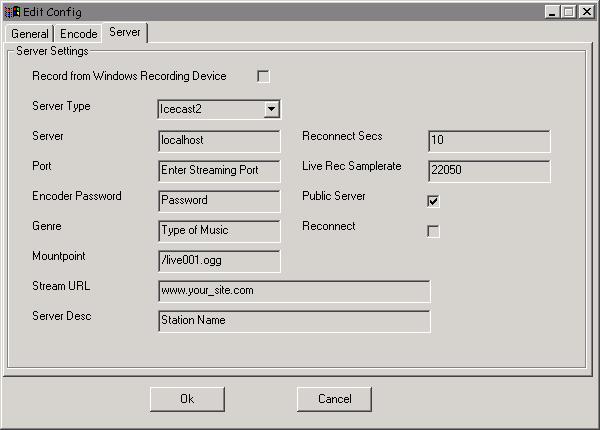
Here we just need to set the Server Options. Record From Windows Recording device: This will broadcast any audible sounds on your PC whatever they are. Wheather its a CD in your CD Rom drive a playlist loaded into your Media Player or any audio device pluged into the LineIn socket of your sound card including a Mic. (see How2... Voice Switch for details) This also included PC peeps & Clicks, IM Alerts and any other sound your PC might make while you are broadcasting. Server Type: For Ogg Vorbis choose Icecast2 Server: Enter Localhost Port: This must match with the Password in PeerCast client (7144) Encoder Password: Needs to match Password in PeerCast client. Genre: Type of music your station will play. Mount Point: This can be /anything.ogg It distinguishes between multiple instances of Oddcast being run on the same PC. If you were running 2 odcast DSP's you might pick /live001.ogg & /live002.ogg Stream URL: Your Stations webpage address. Server Description: Station Name Reconnect Secs: A reconnect setting incremented in seconds. Leave at 10. Live Record Sample Rate: If you use Live record set this to the sane value as your Sample rate in the first config window. Public Server: If you want to be listed in the YP its best to check this option. Reconnect: Best to check this as it will then try to auto reconnect if you have a break in the broadcast. ...And thats all the configuration dealt with. Some lower rate settings to allow for Dial up listeners Quality of: -1 at sample rate of 22050 & a mono setting will give you a 16k stream output. Quality of: 0 at sample rate of 22050 & a mono setting will give you a 24k stream output. Quality of: -1 at sample rate of 22050 & a stereo setting will give you a 30k stream output. Either of these setting will allow anyone with a 56k modem to listen to your stream. Some higher rate settimgs to allow for Cable/Braodband listeners Quality of: -1 at a sample rate of 44100 & a stereo setting will give you a 45k stream. Quality of: 0 at a sample rate of 44100 & a stereo setting will give you a 64k stream. Quality of: 1 at a sample rate of 44100 & a stereo setting will give you a 80k stream. These three examples would only be recieved by users with cable connections. As you can see, playing with the 3 settings Quality, Sample rate and Mono/Stereo will allow for a multitude of diffrent output rates. Remember though thet Dial up modems will not be able to comnnect at a rate higher than 40k so a lower rate means more potential listeners and with Oddcast the quality of the audio will far exceed any mp3 streanm at the same rates. Once you are happy with all your configuration settings you can then Press OK If you are running two streams you have the oppertunity to stream a Hi and a Lo stream one for Dialups at say 24k and one for Cable connections at say 64k. Higher bitrates in Ogg are hardly worth bothering with as 64k will get you a 96-120k quality output, also higher bitrate streams are harder to connect through the network and wount be so easily accessed by listeners. So its good to keep the bitrate to no higher than 64k. you will also save on some upload bandwidth you might want to use for another stream to another network. Its not uncommon for Casters to have 2 or 3 diffrent streams going out to diffrent networks. Now we only need to enter the relay information into the Broadcast page of the PeerCast Admin section and were almost ready to go. 
Enter the Station details in the appropriate fields, its all quite self explanitry and once you have done this press Create Relay Do this for both your relay streams Now all you need to do is to load up some files in your WinAmp player, press Connect on the DSP and Play on WinAmp and you should be streaming your station to the PeerCast network. Go back and look in your GUI and in the left pane you should see your station name followed by 'BROADCAST' sometimes you will need to stop and re start Oddcast for it to connect to the network properly. Is it realy that easy??? YES 
But what if I still cant connect??? The four main areas that cause the most initial problems for new casters are: Firewall's/Routers: You will need to allow PeerCast to have access via port 7144. Password: They must match in the PeerCast client and the in DSP. Ports: They must match in the PeerCast client and the in DSP. IP number Its so easy to miss type them. If you have trouible initialy, you should double check all four and then try again. If you should have any other problems with your Broadcast setup you can get Tech support at PeerCast.Org where you will find some online tutorials and a Forum where you can get first hand help and advice from other users of the system on all matters to do with PeerCast and associated third party tools. For Winamp Information, Plugins, Skins or Support visit - WinAmp.Com For Oddcast Information or Support visit - Oddstock.Org For information and Support for the DSP Stacker visit Special Audio There you will find Forums, A knowledge base and email support links. All the software that we recomend using and linked to here is all freeware and is certified free from all spy/ad/malaware and all other malicious codes and tracker devices. |