Is Your Solo 210 c.c. Engine Running
Rough?
How to
remove carbon from your engine.
|
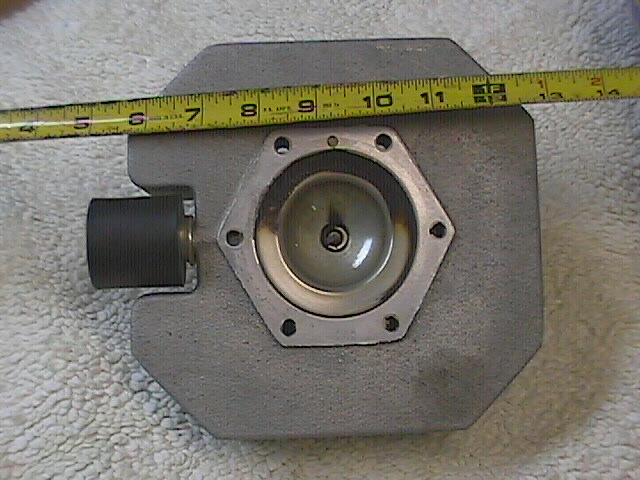
Is your Solo 210 c.c. engine
running rough? Is your paramotor difficult to start or burning more
fuel than normal? Is the cylinder head temperature gauge approaching
the "red zone?" There is a good chance that your Solo 210 c.c.
engine has significant carbon build-up on the cylinder head, top of
the piston, and decompression hole. As you can see from the photo on
the right, there is mild carbon build-up on the cylinder head. The
discoloration is on the exhaust side of the cylinder. The cylinder
head shown in the photo on the right is from a Fresh Breeze or SD
210 c.c. The measuring tape is used as a reference in comparison to
other cylinder heads. |
 |
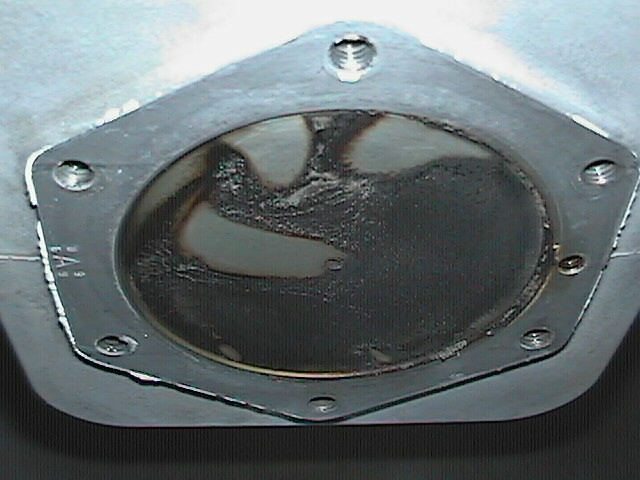 |
Both the Fresh Breeze and SD use
an oversize cylinder head to increase power and provide additional
cooling. The photo on the left is the Solo 210 c.c. piston resting
at top dead center. This Solo 210 c.c. had approximately 10 hours of
run time since its last cleaning. The owner is currently using
Castrol TTS synthetic oil at 2% or 50:1 mixture. The engine has
approximately 50 hours of total run time and the owner is meticulous
about de-carbonizing the piston, cylinder head, and decompression
hole. There are several recommended methods of removing the carbon
from the piston top and cylinder
head. |
While wearing eye protection, you
can use 600 grit sandpaper with carburetor cleaner or a pre-1960
copper penny. The copper is softer than aluminum and therefore, much
effort is required to scratch the piston top and cylinder head.
However, caution and care is advised nonetheless. There is a
cellulose based spray called Marine Tune UP available at marine boat
shops that will also remove/dissolve the carbon. Again, please wear
eye protection.
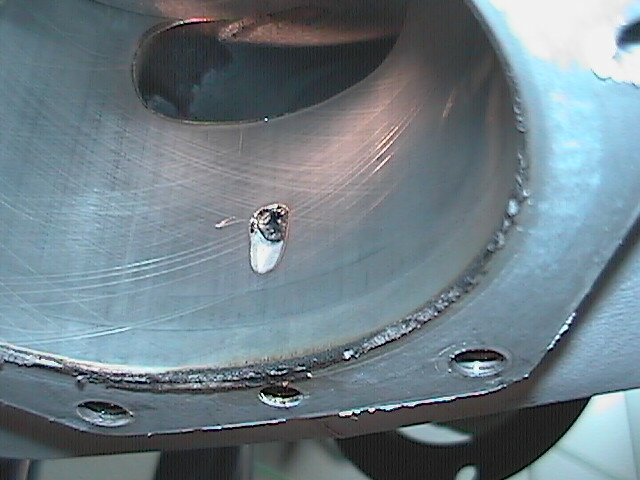
As you can see on the right, the
decompression hole is nearly clogged and made it difficult to start
this paramotor. Yes, for those keen paramotor eyes, there is a small
scratch on the left side of the decompression hole. It does not
affect performance, but is worth
noting. |
 |
 |
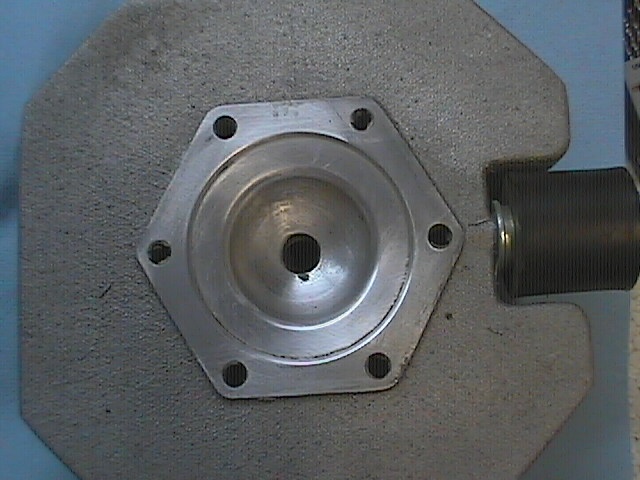
As you can clearly see, the
carbon has been completely removed from the decompression hole. A
clean decompression hole will allow for much easier starting. The
owner of this Solo 210 c.c. used a small drill bit and carburetor
cleaner to remove the carbon build up. You will also note that
directly below the decompression hole is a small hexagon screw hole.
Removing this screw will allow vertical access to the entire
decompression hole. The decompression hole is drilled at
approximately a 45-degree angle through the cylinder wall to the
exhaust port. Although not necessary, removing the exhaust pipe will
allow additional access to the decompression hole. |
|
The de-carbonized cylinder head looks
like the one on the right. There is, however, one small spec located
on the bottom side of the spark plug hole. Yes, that spec was
removed prior to re-assembly. The Fresh Breeze and SD paramotors do
not use a cylinder head to cylinder gasket; however, a silicone
compound 1211 was used to prevent air leaks prior to re-assembly. It
is advised that whenever you re-assemble an engine for
de-carbonization or replacing a piston and rings, an air leak test
should be performed to detect any air leaks. After removing the
carbon, the engine will idle and run more smoothly, get better fuel
mileage, and perhaps, run cooler. For more information please
contact NAPPG.org. We hope you find this information
helpful. |
|
Decompression Hole Clean Procedure
The decompression hole produces a pressure bypass in the cylinder
during engine start. The reduced pressure allows less pilot effort when
pulling the rope starter. Something like removing the spark plug and
pulling it through, but not that good of course. I find I need to clean my
decompression hole ever 30 hours Here is the step-by-step procedure for
cleaning out the decompression hole. It is very easy. And takes about 20
minutes.
1) Place motor flat on a bench – frame side down.
2) If you have a motor mount attached to the head, remove the screw
that holds the rubber mount to the frame.
3) Remove the spark plug wire.
4) Remove Head Bolts – The factory tightens the bolts very tightly. I
had to use a penetrant to loosen the bolts and even then I managed to
strip the head on one. It was really on there. It was simple enough to
drill out the bolt head and the cylinder head came right off. The bolt
washer wasn't even damaged. With the head off, I removed the remains of
the bolt with a pair of vice grips – and it took a lot of force. Little
wonder the head of the bolt striped.
5) With the head removed (you may need to use a rubber hammer to gently
tap the head – but probably not on a low time motor). You will notice a
small hole on the surface of the cylinder that meets the head. It has an
allen screw up inside the hole. Remove the Allen Screw. Use a .26mm allen
wrench to remove.
6) Draw the piston up into the cylinder as far as it will go. Wipe down
cylinder wall to remove oil residue.
7) Put paper towel or cloth into cylinder wall exhaust port to restrain
carbon dust as much as possible
8) You will see the decompression hole on the exhaust side of the
cylinder wall. It is a teardrop shape and is probably covered with carbon.
Carefully chip off the carbon deposits from the teardrop opening. Then
gently use a 3 mm (or 9/64th) drill bit by hand at a 45- degree angle. Run
in and out while turning the bit by hand.
9) Do the same in the hole where you removed the allen screw.
10) Use a 4 mm drill bit (or 5/32nd) by hand to finish the routing /
cleaning of both holes.
11) Vacuum out dust (or compressed air to blow clean.)
12) Replace Allen Screw!!!!! I hear from reliable sources that this
step is easy to forget.
13) This is a great time to remove carbon build up from the head and
piston, and inspect the condition of the piston and cylinder wall. 3-M
makes a tool to easily remove the carbon. It is a yellow plastic device
that attaches to a drill. It does not damage the aluminum. Let me know if
you need one and I'll give you the part number.
14) Lightly oil cylinder wall with your favorite brand of 2- stroke oil
– what you mix with your gas. Work piston to spread the oil evenly and
wipe off excess oil.
15) Apply a very, very thin – but even – coat of sealant to the
head. Make sure it is good for the temp range – At least 500 F. I use
Ultra Gray good to 650 f. (My CHT -Cylinder head temp gauge - shows
operating temps of 320 F to 420 F. My EGT – Exhaust Gas Temp gauge -
shows 1150 – 1230 F in cruise). (My unit did not have a seal or gasket
on the head.)
16) Replace head and bolts – Torque bolts to 80 inch pounds!!!! - Not
foot-pounds!!!! Make sure your using an inch pound wrench or you may be
able to convert to foot-pounds.
17) Return torque wrench to 0 to protect spring tension.
18) Reattach the motor mount and spark plug wire.
19) Go Fly! You'll notice how easy the motor starts.