 |
| The Mods Page |
| My latest upgrades for your viewing pleasure... |
|
 |
 |
 |
 |
 |
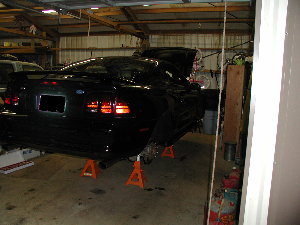
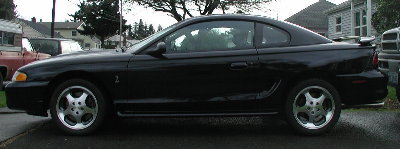
| Here's one from after the suspension upgrades. It sits nice and level and looks awesome! |
 |
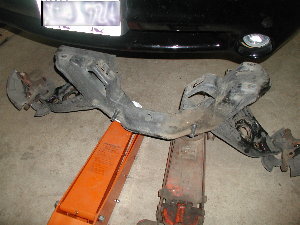
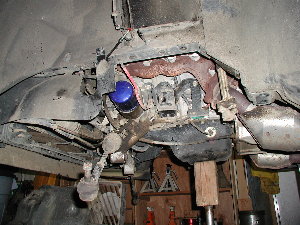
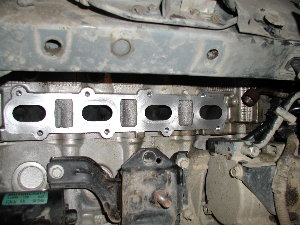
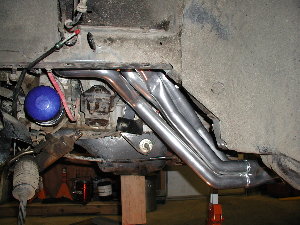
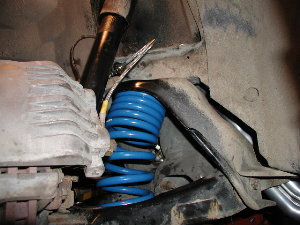
| Here's my post on Stangnet that describes my first modifications... A (not so) brief description of my weekend I went into these upgrades thinking that I could pull everything off in one long day. After going through my collection of tips, write ups and the Chiltons manual, I decided to take an extra day to get everything put in. I was figuring that I would get a good jump on it starting Friday and then finish everything up late Saturday night/early Sunday morning. Everything would be done and I would be ready to roll for our 8:00 meet - riiiiight. Although everything went well, there were a couple of hiccups along the way, the first one starting Friday morning when I took the car to the dyno. The guys up at ARS are great to work with and I would highly recommend their dyno (Dynojet for those who are interested), however, they had just had some work done on it and there was a problem with one of the cables. It took way longer than expected to troubleshoot and in the end, I only have a partial look at the "before" picture regarding horsepower. I will be taking it back up there for another run on the dyno to see where I'm at now, but I was hoping to have a good before/after comparison Friday afternoon/night found me pulling everything apart on the front end. I removed the K-member in order to install the headers and since I was doing the springs and s/s braided brake lines at the same time, I figured that this was the easiest way to go. It's not a tough job, just make sure to have the appropriate tools to get the job done. The first time that I pulled the K-member (did you note that I said the FIRST time?), it took a while as I had to figure out just what to pull, how to support the engine, getting my tools in order, etc. but in reality it can be done within a couple of hours. After that, I breezed through taking off the old exhaust components that were being replaced and actually got the drivers side header started with two bolts holding it in. At that point it was about 3:00 a.m. Saturday morning - time for some rest. I was back at it Saturday at about noon (got up a little late, had to run for parts, coffee, etc.) when I hit the first issue. Stage 8 makes locking header bolts that are awesome - once they're installed. Until you get them installed, you will curse their very name, throw wrenches, alienate family and friends and be a generally unhappy person. With the little bit of room that you have to work with on the motor, you have to have flexible fingers and a ton of patience to get these bad boys on. I would recommend finger yoga and decaf coffee along with some soothing music to calm the nerves. Speed metal would probably not be a good thing while you're trying to install header bolts. I'd also recommend using a couple of the original header studs to get the headers 'hanging' up to the manifold. Late Saturday evening found me wrapping up the header installation and re-installing the K-member. I was stoked figuring that I had about 4 hours of work left and then a quick clean up of the shop. I turned around to grab a tool when I noticed something sitting there that shouldn't be - my dipstick. Uh oh. Impatiently I tried to get that bastard back in but there was no way. I spent over an hour trying to get that dipstick tube back in but realized that it just wasn't gonna happen. What now? Drop the K-member again! This time it took me less than 45 minutes and, since I'd pissed off all of my help (not really, but I was pretty upset with myself) I dropped the K all by myself. Too late to work...must get rest...no coffee shops open at 2:00 a.m. Sunday morning. Sunday morning was spent figuring out what to do about the dipstick. Several more attempts (and a helluva lot of explicatives) only netted scratches in my valve cover on the drivers side. As I was beginning to wonder if I had done the right thing by installing long tubes, I had an epiphany - why not use some braided s/s tubing with hose clamps? There's not a lot of oil pressure at the dipstick and, with correct placement, there should be no heat concerns. I was all over it - the guys at Baxters set me up with the right stuff and I was on my way back to the shop with parts in hand. When it was all said and done, I spent an additional 45 minutes getting everything fitted and I was back in business. By this time it was mid Sunday afternoon and I knew that I had a long road ahead of me - my whole front end was still disassembled and I hadn't even thought of the rears yet. Time to kick it into high gear. I started with the MM aluminum rack bushings. Figuring that I'd need to measure the fit from the K-member to the rack and pinion, I decided to remove the rack and pinion from the car. Fluid was dripping faster than Tanya Harding can throw hubcaps at her boyfriend. I capped off the ends and then went to work on the aluminum bushing fittings. It was then that I realized that I didn't need to remove the rack and pinion. I then went to work on re-installing the K member along with the rack and pinion. This went very well and I was really getting stoked - it was almost time to start the car...I thought about it for all of a couple of minutes and decided that yes, I would start it up with the headers uncapped. The car roared to life and I'm sure that the surrounding neighbors were wakened as it sounded awesome. I gave it a quick wrap on the throttle and had to grab a shop towel quick...the big @$$ed smile quickly faded when I heard a strange noise coming from the engine compartment. I shut it down quickly and went to work on getting the rest of the exhaust hooked up before trying to further diagnose the problem. That went quickly and I again started the car. This time I was able to track down the noise - my power steering unit was soundin' bad. Dejected, I decided to call it a night. Damn, looks like I won't be making it to work on Monday... Monday morning found me writing emails to work saying that I wouldn't be in and then I was on the phone to the local Ford dealers. Seems that I got air in the lines and that it was easy to take care of. Got that squared away and then started on the suspension. Front springs went in with no problems as did the rest of the suspension goodies ( c/c plates, tie rod ends, swaybar bushings, etc.) The front end was back together in about a total of 4 hours. Next, the back. These were too easy for words. 3 bolts and then just drop the spring. That's it. Total time for the back springs was under 2 hours. Now the only thing left was to take the car off of the jackstands and go for a ride. Since I had the car up almost 30", I needed to "scissor" it down. First the front - take it halfway down and then do the back. Go back to the fronts after the back is lowered down all the way. Well, everything was great until I tried to get the front jack out. Seems that the car was a little lower than I anticipated. The jack wouldn't go all the way down without hitting the front facia. I took a jack from the side and raised it up until the front jack came free and then lowered it back down. I swear that I had less than an inch of clearance from the bottom of the car to the jack on the side. For the first time I was able to look at my car in its new configuration. I stepped back, looked and got this huge smile on my face. High fives happened. Comments like "schweet", "right on" "that was a helluva lotta work" were uttered. We wept (not really). The car looked incredible. Was it all worth it? Two words can sum it up - Hell yeah. The increase in torque and horsepower in the 2500 - 4000 range is nothing short of incredible. The sound is definitely better - a little more rumble in the lower end and as you open it up it just keeps getting better and better. It handles like it's on rails - I realize that I need to get the front end aligned but I was pleasantly surprised at how well it tracks with absolutely no adjustments whatsoever. __________________ 1996 Cobra #6942 Suspension: H&R Super Sport springs, Bilstein Sport struts & shocks (coming soon...), MM caster/camber plates, MM aluminum rack bushings Exhaust: BBK long tube headers, BBK catted H-pipe Drivetrain: Hurst Billet Plus shifter Last edited by pcinpdx on 03-12-02 at 06:55 PM |
| Mods: * BBK Long tube headers/Catted H-pipe * H&R Super Sport Springs * Stage 8 locking header bolts * MM C/C plates * MM aluminum rack bushings * Goodridge S/S braided brake lines * On order: Bilstein Sport struts/shocks |
 |

|