Interior
Trim Colours
Griff Glovebox Catch
Dashboard Removal - Griffith
Dashboard Removal - Chimaera
up to contents
Trim Colours
Internet Mailing List May 98
A quick question for those people on the list with Magnolia upholstery. Did you have the dash in Magnolia? If you did, do you get
reflections on the inside of the windscreen? Advice would be welcome.
Richard Thorpe
Internet Mailing List May 98
I've got a Biscuit interior (a sort of light tan). Driving home this evening through Sussex lanes the reflections were REALLY annoying. If you're heading towards a black tunnel of foliage with the sun in your eyes the last thing you want is something like a net curtain flashing on and off in front of you, but I guess that's my fault for living where you're going in and out of woods every half minute.
On 'normal' open roads, the reflection's there but I think your brain filters it out after a while and you don't notice it. I wouldn't get another light dash if I planned to drive a lot in these parts.
Peter Beech
Internet Mailing List May 98
My S2 has a Magnolia dash front with Mulberry (wine coloured) top. The reflections are only noticed at night with the instrument lights
on full: I normally turn them down to half and the reflections disappear. All in all, the reflections are not significant as to become annoying
and I would definitely recommend this type of colour scheme.
Lyndon
top
Griff Glovebox Catch
Letter Sep 96
. . . The glovebox catch has been a sore point [on the Griffith].
Basically the female part of the catch, which should reside
in the dashboard, doesn't locate properly - slopping around in
too large a hole and either misaligning itself or falling out
completely. My solution was to knock up the following small adaptor
plate from a piece of scrap plastic (perspex?).

The real knack was fitting it - I did it by clipping the catch
to the plate then clipping this to the male part of the catch
on the glove box lid, covering the whole thing with glue and gently
closing the lid. Once the glue had set I opened it up, pilot drilled
through the holes and secured with small self taping screws .
. .
Simon Cockle
top
Dashboard Removal - Griffith
Jan 98
Not sure about the dashboard top, but one of the Fernhurst mechanics told me that to remove the dashboard you should.
1. Remove radio and cage.
2. Remove left hand most air vent, and undo and remove wing-nut that is above grill opening.
3. Undo two cross head screws above steering column at bottom of dash. You may need to drop steering column to do this.
4. It should now come out.
Haven't tried it (yet).
Mike Jennings
Internet Mailing List Feb 98
I have a 1992 4.3 Griff that is in the middle of a "reworking".
Currently the dash, instruments, switches etc. (including the large GRP sculpture) are scattered about the house,
therefore I know how to take the dash out.
To remove the dash (from the factory):
1. remove steering wheel
2. remove 2 screws below speedo/tacho
3. remove radio
4. remove radio cage (the bit that normally stays in the dash)
5. insert small hand into gap where radio was
6. undo wing nut on back of dash located to the left of hazard switch (if the left end of your dash flaps about then
this wing nut is probably loose or missing)
7. liberally grease leather to avoid scratching with dash panel (I use margarine for this)
8. gently ease out panel (radio end first) be careful not to bend panel too much as "walnut" may crack (�328 from TVR)
9. label and disconnect wiring
10. disconnect vent plumbing
The GRP shell is held in place by 10mm bolts that are now visible (the only tricky ones are behind the glove box)
To take off the transmission tunnel "T" piece you must raise up the car, crawl underneath, insert above-mentioned
small hand around gearbox to slacken off the handbrake locating bolts. The easy bit is undoing the bolts that are sited
behind each seat that hold the top of the "T" to the body shell. Then simply lift off. . .
Clive Reed
Internet Mailing List Feb 98
'. . . be careful not to bend panel too much as "walnut" may crack (�328 from TVR) . . .'
Only �205.00 from Wedge Automotive.
Sorry everyone I just had to get that in.
Richard Thorpe
(Wedge Automotive)
top
Dashboard Removal - Chimaera
The top panel of the dash is held in by three 10mm nuts: two
on the passenger side and one on the driver's side. To access
the passenger side nuts, first take out the two cross-head screws
at the front of the pocket that holds the owner's handbook. The
panel carrying the pocket will then hinge down like a trap door.
Both nuts are on the centre line of the trap opening. First
nut: reach up into the trap opening in the direction of the seat
and you will find a vertical stud that goes through the upper
part of the roll section on which the top panel rests. Second
nut: reach up in the direction of the windscreen and you will
find a horizontal stud that goes through the roll section below
the windscreen.
You can reach most things behind the dash (just about) by lifting
the passenger end of the panel. If you do need to take it right
off you can get to the driver's side nut by groping behind the
box that holds the fresh air vent. It secures a horizontal stud
that goes through the fascia panel of the dash roughly level with
the bottom of the rev counter. You will need to remove the fresh
air pipe first (it just pulls out but may need some encouragement
from the front after removing the air vent itself). If you manage
to remove the nut you will probably find it very difficult to
ease the dash panel far enough forward to get the stud out of
the hole, so it's not something to do unless you really have to.
Jan 99
Peter,
Hope you don't mind me running this by you?
You say there 3 10mm nuts to undo to remove the dash on a Chimaera.
Two behind the flap on the passanger side and one in the drivers air vent.
I have found 1 on the passangers side and 1 on the drivers side.
1. Reach straight up in to the flapped hole and it's on a vertical flat bit of GRP
facing the front of the car. This comes out and the top section now has some movement.
2. The second one on the passenger side I can't find. There are other bolts, larger
than 10mm I think but they all have rounded of bolts on them so you can't get a
spanner on them.
3. The 3rd bolt in the drivers air vent is no problem I've got that one out.
What exactly will come out. Is it just the top part of the dash allowing you to reach
down behind the "wood" section with the instruments in.
Nick Hatch
Jan 99
Nick,
I now have a Griff so I can't pop out to the garage and remind myself where that Chimaera
dashboard nut is. This is therefore from memory. The diagram below is a section through the dashboard
along centreline of the passenger seat.
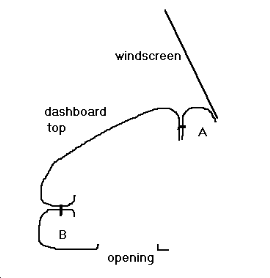 The bolt marked A is the one you've already found, that holds the dashboard top against the
vertical face of the roll section at the base of the windscreen.
The one marked B holds the dashboard top down against the top of the roll section
that runs across the car at radio-panel level. To get to it it you'll need to get your arm up
through the opening and then reach back as if you're trying to grab your own belt buckle, if
you see what I mean. Not the easiest thing to find and a swine to get a spanner on.
Once both bolts are off, you should be able to lift the lower edge of the dash and pull the top
edge towards you until the studs come out of the holes. You should then be able to wriggle the whole top
off, leaving the vertical "wood" panel in place.
My instructions didn't look nearly as helpful on re-reading them as when I first wrote them, for which I
apologise. If there's anything you think I should add to make things clearer, please let me know.
Best of luck with it.
The bolt marked A is the one you've already found, that holds the dashboard top against the
vertical face of the roll section at the base of the windscreen.
The one marked B holds the dashboard top down against the top of the roll section
that runs across the car at radio-panel level. To get to it it you'll need to get your arm up
through the opening and then reach back as if you're trying to grab your own belt buckle, if
you see what I mean. Not the easiest thing to find and a swine to get a spanner on.
Once both bolts are off, you should be able to lift the lower edge of the dash and pull the top
edge towards you until the studs come out of the holes. You should then be able to wriggle the whole top
off, leaving the vertical "wood" panel in place.
My instructions didn't look nearly as helpful on re-reading them as when I first wrote them, for which I
apologise. If there's anything you think I should add to make things clearer, please let me know.
Best of luck with it.
Peter
top