Doors
Doors Won't Lock?
Adjusting Door Opening Cables
Road Dirt in Catches
Draughty Windows
Adjusting Glass Height
Slow Windows
Removing Chimaera Door Trim
Door Alignment and Closure
Removing and Adjusting Mirror Glass
Mirror Adjustment Relays
Mirror Switch Wiring Connections
How the Heated Mirrors Work
up to contents
Sprint Jun96
. . . Check that the tiny rubber pads on the bottom inside of
the doors are still intact. Your dealer may have an irritating
habit of steam cleaning them away. If missing, the door switches
won't be pushed in far enough, the doors won't lock and the interior
knob will not turn to open the offending door from the inside.
Solution: cut 5mm off a BIC biro cap and place it over the door
switch underneath the sill. Longer term you may wish to glue a
new pad in place . . .
Chris Morgan & Judy Williams
top
Sprint Jun96
. . . If there is no pressure when turning the interior knob then
the cables have stretched. To resolve, loosen the door seal behind
the seat of the affected side. Lift the triangle of trim which
should be secured by Velcro (you're in trouble if it isn't). Beneath
you should see something that resembles a Terminator's arm assembly.
Twisting the release knob should indicate which cable requires
tightening. Simply slacken the screw of the tensioner, pull the
cable through, refasten and replace the trim and door seal. I
understand a thicker cable is now fitted to avoid this problem
Chris Morgan & Judy Williams
top
Road Dirt in Catches
Aug 96
Some problems in getting the doors to close are caused by road
grit entering along the lower edge of the doors and getting lodged
in the catch mechanism. I notice that 1996 Chimaeras have an extra
rubber sealing strip along the base of each door to keep the muck
out. I think it's self-adhesive so very easy to fit.
top
Draughty Windows
Oct 96
If your door glass doesn't quite meet the rubber trim on the targa
top and everything else seems to be properly adjusted, try threading
some windscreen washer tubing through the O section of the trim.
This will often plump the trim up enough to close the gap.
top
Adjusting Glass Height
Sep 96
There is an adjusting screw for the door glass height about half
an inch below the top of the door on the interior side of the
glass and about halfway between the 'quarterlight' post and the
back edge of the door. Unscrewing three or four turns raises the
glass about 3mm. There is a limit to how high the glass can go,
since it rises at an angle and eventually hits the buffer at the
back of the door.
top
Slow Windows
Apr 97
If a window rises very slowly, it may be that the glass has jumped
out of the rubber in the guide channel. It doesn't come out completely,
but gets pinched between the outside of the rubber moulding and
the metal of the guide itself. The solution is to take off the
door trim as described below, then remove the 14mm nut at the
top of the rear channel (inside the door near the rubber buffer
at the back) and the two 10mm nuts (box spanner job) at the bottom
of it. With the window up, the channel can then be slid down off
the glass and put back where it's supposed to be. Putting a packing
washer behind the top stud to bring the channel forward a bit
ought to stop it happening again.
top
Removing Chimaera Door Trim
Sep 96
The Chimaera door trim is in two parts: a carpetted panel and
a leather or vinyl surround. To take the surround off, first remove
the ashtray and the speaker. The speaker mesh can be prised off
with a penknife and the speaker is held in with three self-tapping
screws. Take out the self tapper at the back of the ashtray recess.
Next remove three 10mm nuts and washers inside the door cavity.
These are attached to studs in the back of the surround panel,
on the centre-line of the speaker hole. There is one forward of
the speaker and the other two are aft of it, roughly in line with
the fronts of the two pockets in the surround. The rearmost one
will be quite difficult to reach and you have every chance of
getting your elbow wedged in the speaker hole. If the door has
a reflector on the trim, I think there is a self-tapper under
this as well. The surround can now be tilted out at the base and
lifted free of the door.
The carpetted panel is held in with six self tappers buried in
the carpet pile. The only help I can offer in finding them is
to say that most of mine were very close to the edges of the panel:
one at the top/back of the door, one each side of the ashtray
hole and the other three along the bottom.
Refitting is, as they say, the reverse of removal, apart from
not being able to find any of the screw holes in the carpet.
If you've been at the driver's side door and had to unplug the
electric mirror switch, you may now want to look at
Mirror Switch Wiring Connections!
Door Alignment and Closure
Sep 96
The drop of the doors can be adjusted by slackening the hinge bolts behind the footwell carpet. The hinges are also shimmed
for lateral fit, but I am told this is very tricky to get right. Door closure can be adjusted by slackening the two screws on the
striker plate on the door and by adding/removing shims behind the plate. It is sometimes necessary to grind some metal off the
striker itself to get a good shut. As with most open-topped GRP cars, there is a small amount of movement between the body and
the chassis which can affect the fit of the doors over time, so periodic adjustments may be necessary.
Internet Mailing List Aug 98
After recent advice on the Griff Dropped Door syndrome and Door Panel removal, decided to take a look inside for myself.
Found that the bottom vertical hinge pin had rotated loose and enabled the door to be lifted up and down a few mm. So:
Door panel off (15 mins), tighten bolt with socket and extension with supporting knee under door (5 mins),
door panel back on (15 mins)
Seems like time well spent in my case and saved another trip to the dealer, so for any other suffering DIYers out there, give it a knock.
Mac Berrington
Internet Mailing List Aug 98
I have recently reseated the [Chimaera] internal knob, because it had worked loose.
Now, the internal door knob needs nothing to open the passenger door,
compared to the driver side (1/8 turn to the right). The previous car was
owner by someone who never had passengers so the door/seat was little used,
which might mean it has always been slightly out. Should I just lubricate
the door mechanism? There appears to be nowhere that the door is rubbing on
the internal frame. Any other thoughts?
About three months ago, I got my garage to put the passenger door flush with the body work.
However, since that time the door has become slightly tempermental to
close, i.e., the mechanism would not catch, even when closed from outside
the car (probably 20% failure to close). This is got worse (70% failure to
close). I wonder if the wire is actually too tight on the passenger side?
Simon Smollett
Internet Mailing List Aug 98
Check that the lock mechanisms in the door and pillar are not loose. The
screws can come undone. Tighten up with a bit of Loctite. Apart from
that, take the passenger side velcro cover off and see if the cable side
needs any adjustment. It too might have stretched.
Steve Heath
Internet Mailing List Aug 98
If the activating cable is tight it might not be allowing the catch to go "over centre "
fully. I would try loosening it a bit to see if that helps.
I have had a similar problem a couple of times with my Griffith, when it
happens you can't shut the door, the catch doesn't grab the little arm
on the door and the door just bounces open. Both times that it has
happened I have just waggled all the bits inside the inner wing and it
works OK again - not very scientific!
Mike Jennings
top
Removing and Adjusting Mirror Glass
Mar 97
The wing mirror glasses are stuck onto a plastic frame with double-sided
foam tape. Sometimes a weak adhesive has allowed the glass to
creep down until it is rubbing on the base of the mirror body.
To restore it to the original postion (or replace a broken glass),
you need to move a little tab on the mirror frame to rotate a
plastic ring which engages in a circular channel on the gimbal
that supports the mirror.
Got that? Here's what to do. Adjust the mirror so that it is elevated
as far as possible, ie. to create the maximum gap at the bottom
of the glass. Now peer in there with a torch and you will see
a small black plastic tab roughly halfway along the glass. You
have to push the tab across to the left (it's left on both mirrors
and it needs to move about 5mm) and the glass will then come loose.
The electric heating wires should stop it crashing to the floor
if you don't manage to catch it. UHU Power-Stic seems to be pretty
good for sticking the old tape back.
top
Mirror Adjustment Relays
Internet Mailing List Feb 97
The relays for the mirror adjustment sub-system are not mounted
on the relay and fuse panel, but 'float' in the wiring loom and
are located in the battery compartment area.
Dave Peck
top
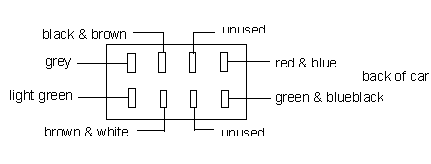
Mirror Switch Wiring Connections
Apr 97
The rocker switch that controls which mirror the little joystick
is working on has a lot of spade connectors on the back, and they
need to come off to remove the driver's door trim. Looking at
the switch from inside the car with the door panel upside down
and the pretty side away from you, this is where mine went back
on. Yours may be the same, who knows?
top
How the Heated Mirrors Work
Internet Mailing List Apr 97
Apparently, the heated mirrors come on for a few minutes after
you start the car, but if you open a door, they turn off! As
I usually put my belongings in the boot before I drive off, I
was starting the engine with the door open, then opening the boot,
then getting in the car and closing the door, with the result
that the mirror heaters were not coming on. Quite what the logic
behind this is, I don't know.
Chris Warne
top