Background on Pro Tools
Digidesign’s Pro Tools software and hardware is the recording industry’s standard medium. With a Pro Tools system, you are able to record and entire CD project from start to finish and create the final mix. Since all Audio is converted to a digital signal, you are given full control over your sounds with a host of tools in an easy to use graphical interface. The possibilities are endless, as this system is a hard-disk based recording medium.
Tape Recording is a linear medium. With tape recording, you need to rewind or fast forward the tape to listen to a specific audio spot. And to re-arrange an audio file or a CD project, you either have to re-record everything over or tape-splice. Hard-Disk recording is a non-linear system (random-access). At any point, you are able to listen to any chosen spot immediately without the hassle of rewinding or fast forwarding. Another advantage is that you are able to easily rearrange or repeat parts of a recording easily by making the hard disk read parts of the recording in a different order, and without destroying the original audio.
One of the
most important advantages to the Pro Tools system is that everything can be
done in real time. This is due mainly because of the Digidesign Audio Engine (DAE).
The DAE is a real-time operating system for all of the Pro Tools digital
recording systems. In the same way that a computer requires an operating system
to provide the foundation for its running programs, DAE provides much of the
hard disk recording, digital signal processing, mix automation, and
The Pro Tools Windows
Within Pro Tools, there are two ways
to view your project: The Mix Window and the Edit window. Also, not unusual to
any recording program, there is a transport window.
The Mix Window (See
Appendix A):
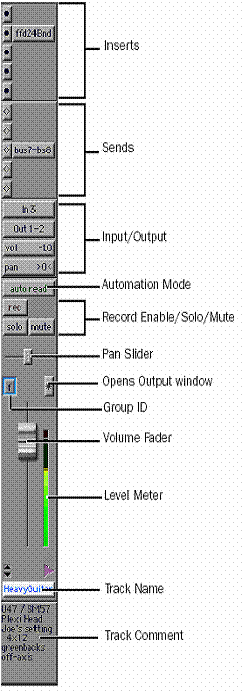
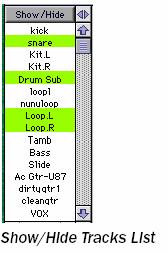
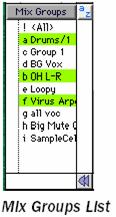
Tracks in the Mix window appear as mixer modules. Within these modules, you have your controls for inserts, sends, input/output assignments, volume, panning (if in Stereo mode), and solo/mute. Within your mix window, you also have a ‘Show/Hide Tracks’ window which contains a list of all your tracks in the current session. By selecting or de-selecting the track in the window, you effectively show or hide the track’s mixer module on the screen. Below the ‘Show/Hide Tracks’ window is your Mix group window. This window has a list of all the groups that you have set, which, when enabled will link the tracks together and move them together.
Finally you
have your “mixer modules”. These modules are your audio track, or also referred
to as the channel strip. Being either audio or
The next window houses your ‘Sends’ options. Within this window, you are able to send the signal to five other locations, one example being an auxiliary track. The next section contains your ‘Input/Output’ selections. This is where you select the source for the track’s signal, either being a hardware channel from which you can directly plug an instrument or a microphone (for ex: the Digi001) or receiving the wave file from another track, as in the example given about the auxiliary track. Underneath the input selector is your output selector. This is where you choose to send the final signal for the final mix. Below the output selector are your volume and panning indicators, which are controlled by the volume fader and the pan slider further down the channel strip. The automation Mode window allows you to choose five different automation options. They are as follows:
· auto off: disables any automation
·
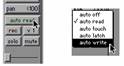 auto read: it will follow any
automation already set
auto read: it will follow any
automation already set
· auto touch: it will record automation whenever you touch the volume fader
· auto latch: it will hold the current volume position once you let go
· auto write: destroys any previous automation information and re-writes
Finally you have your record enable, solo, and mute button which are standard buttons in any recording software. Below the pan slider is your group ID, where you are able to assign the track to a specific group.
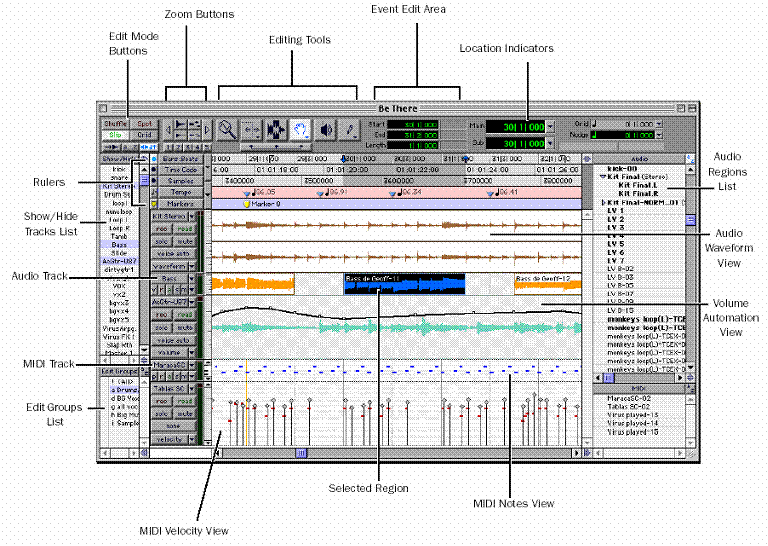
The Edit Window (See
Appendix B):
 The Edit window shows your audio in
a time-line display, allowing for easy editing and arrangement. As in the Mix
window, each track has the record enable, solo, and mute controls. Also in the
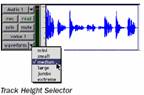
same window, there is a track height selector (see picture), which changes how
large the audio waveform appears (mini, small, medium, large, jumbo,
extreme). Beside the height selector is
the Track Display Format Selector, which displays different types of
information. Instead of just displaying the audio waveform, you can display
different types of data: Blocks, Waveform, Volume, Pan, and Mute information.
The Edit window shows your audio in
a time-line display, allowing for easy editing and arrangement. As in the Mix
window, each track has the record enable, solo, and mute controls. Also in the
same window, there is a track height selector (see picture), which changes how
large the audio waveform appears (mini, small, medium, large, jumbo,
extreme). Beside the height selector is
the Track Display Format Selector, which displays different types of
information. Instead of just displaying the audio waveform, you can display
different types of data: Blocks, Waveform, Volume, Pan, and Mute information.
At the top left side of the Edit Window you have five different types of edit modes. They are as follow:
· shuffle: restricts placement of regions so that they snap to each other
· spot: lets you enter a precise start, end, or length for the event
· slip: allows regions and notes to be moved freely
· grid: constrains edits to the current grid value
· linked selections: links edit and time-line selections
To the right of the Edit Mode Buttons you have your zoom buttons, which do just as they suggest. You are able to change the way you view the waveform or audio information but zooming in, zooming out and expanding and contracting.
Next you have the editing tools. The section contains seven functions which are as follow:
· zoomer: click and drag to zoom in to area selected
·
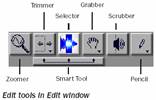 trimmer: resizes regions or
· selector: click and drag to select a length of wave file to edit
· time grabber: grab the entire wave file to move along the time line
· scrubber: click and drag either left or right to hear the waveform
·
pencil: used to insert
· Smart tools: when selected, you can instantly access the selector, grabber, and trimmer and also perform fades and cross-fades
The Event Edit Area shows
At the right side in the Edit Window is the ‘Audio Regions’ List. This is a list of every single audio region (wave file) that has been recorded, imported, or created by editing. With this window, absolutely anything you have done to any existing wave files can be restored back to the original simply by clicking and dragging one of the audio files back onto the timeline.
The Transport Window:
 As stated before, the Transport
Window is not unusual to any recording programs. The Pro Tools Transport Window
can be set to show basic transport controls, counters, and
As stated before, the Transport
Window is not unusual to any recording programs. The Pro Tools Transport Window
can be set to show basic transport controls, counters, and
Recording with Pro Tools
When creating a new session to record with Pro Tools, you are able to choose the quality of your recording. Since everything is recorded in either .wav format or SoundDesigner II format, you are able to choose the bit-depth (either 16-bit or 24-bit). Pro Tools also allows you to set the calibration modes so that the audio levels of the signal being recorded do not ‘digitally clip’. On many analog tape decks, clipping adds perceived warmth to the sound because of the tape compression. However, in digital recording, clipping causes digital distortion and is quite the opposite of ‘warm’.
Recording with Pro Tools is as simple as recording with any tape-based system that requires a mixer. Once a track is created, the input signal is set to the correct hardware that the instrument or microphone is being plugged into. Once the line levels are set, you hit the record button and play and you are set. Much like any other multi-track recording system, you are able to record numerous tracks side-by-side and listen to them while recording. And with the host of RTAS plug-ins that are available to use, you are able to hear your signal being processed in real-time as you play it.
With the music industry being as large as it is today, audio engineers are going to want the best available software that they can get their hands on. With complete systems ranging from $500.00 to anywhere you can imagine, Pro Tools is able to adapt to anybody’s needs regardless if they record in a multi-million dollar studio or in their bathroom.
Appendix A: Mix Window
Appendix B: Edit Window