Constructing a Plywood Incubator
URL: http://www.msstate.edu/dept/poultry/plywood.htm
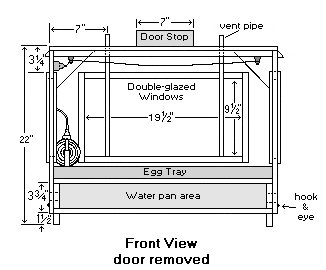
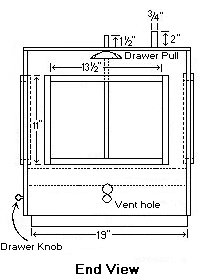
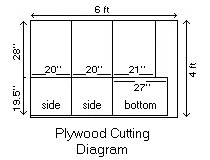
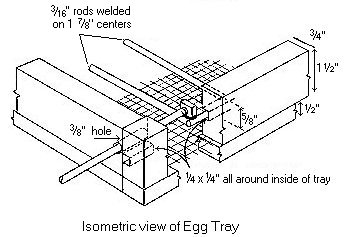
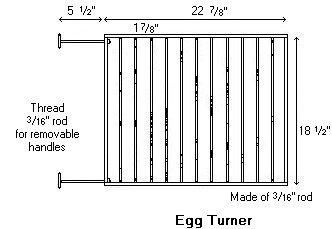
The following illustrations are designed to guide the reader through the construction of a small plywood and glass incubator that will accomodate about 100 chicken eggs. Basic woodworking tools are required required for construction. Gather all equipment and supplies listed below together before starting construction. The diagrams shown will guide the construction of the unit. Printed diagrams are shown in MCES Publication 1150, Avian Embryo that is available through your local County Agent Office.
 |
|
|
1 pc 5 pcs 1 pc 1 pc 1 pc 1 pc 1 pc 1 pc 4 pcs 4 pcs 2 2 2 1 pc 1 pc 2 1 1 2' 1 10 1 pr 1 1 pc 1 pc |
1/2"x4'x6' A-C Exterior Plywood 3/8"x3/4"x8' Pine 3/4"x1½"x13' Pine 3/4"x3¼"x4' Pine 1/2"x3/4"x8' Pine 1/2"x18"x27" rigid insulation board 18"x27" heavy duty aluminum foil 1/2"x30" semi-rigid plastic pipe 10"x20" single strength window glass 10"x14" single strength window glass 1½" roundwooden drawer pulls metal drawer pulls (cup type) 2" hooks with eyes 8' felt weatherstripping 1/4"x1/2" 20"x27" - ¼" hardware cloth vent covers - sheet metal incubator electrification kit * attachment plug No. 18-2 flexible service cord duplex outlet for surface mounting small porcelain knobs for heating element 4"x1" flat hinges water pan - minimum 360 sq. in. 1/8"x16 1/2' steel rod 3/16"x8' steel rod Assorted nails and screws Waterproof wood glue |
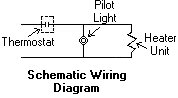
| *electrification kit composed of wafer thermostat with duplex outlet, pilot light, service cord, and 160-watt flexible glass-covered heating element. | |
 |
 |
 |
 |
 |
 |
 |
 |
 |
 |