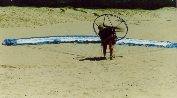
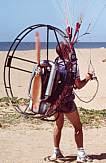
1.A good ‘horse shoe ‘ lay out.
Forward Take off
1.A good ‘horse shoe ‘ lay out.
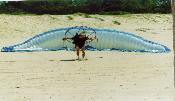
2.Note the inflation from the centre. Power may be
added to assist pullup
 3.As the canopy inflates, check the lines & canopy.
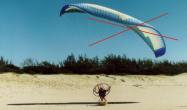
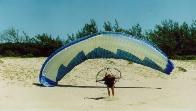
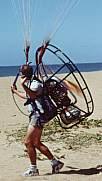
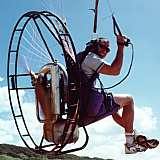
4.The pilot has let the canopy overfly him and it has
front tucked. Keep moving forward or apply breaks
Backward Take off
 1. Pull up in back start position. Pilot
could be holding front risers to assist in Pull up
1. Pull up in back start position. Pilot
could be holding front risers to assist in Pull up
Now that you are clipped right riser into right carabineer and
left into left, you will be facing into the wind. This is the position one
would use for a forward start, usually undertaken when little or no wind
is present. When wind is present a BACKWARDS start is preferred as one may
watch the glider as it inflates. It may also be inflated and dropped back
to ground a number of times until a controlled inflation may be
undertaken.
 2. Pilot stabalises canopy then gets ready
to turn around for take-off.
2. Pilot stabalises canopy then gets ready
to turn around for take-off.
For a reverse pull up, clip in front
ways as described. Now turn around to face the glider while at the same
time ducking under the respective riser. The risers will now be crossed,
in other words what was the right riser when facing forwards is still on
your right side, but seems to go to the left side of the glider (remember
what seems to be the left side of the glider now is actually the right
side. It is only on the left because you have turned around and faced the
wing, and while doing so have crossed the risers).
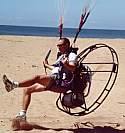
 3. Pilot accelerates forward while
standing up straight.
3. Pilot accelerates forward while
standing up straight.
Once the wing is
inflated above you, and you turn back around, the risers will uncross and
one will be back facing forwards again . . Now you are facing the glider
there are many ways of pulling the wing up. I find the following easier.
With one hand I grasp both A risers which when pulled will pull on the
leading edge and allow the wind to enter the cells. Keep pulling and
glider will inflate above one's head. One needs to be able to steer the
glider as it inflates. This is done with the spare hand using the
respective toggle. If the glider is pulling right counter steer with the
left hand on the left toggle. (while in the back start position take the
toggle that is on your right side to be held in your right hand and visa
versa.) While pulling up the glider on the A lines and risers, (which are
held together) there is a constant interchange between which hand is
pulling on the risers and which is steering.
 4. Keep accelerating until the force of the engine enables one to
become airborne.
4. Keep accelerating until the force of the engine enables one to
become airborne.
Never jump into the seat.
Should you need to
swap, change both risers to the opposite hand and steer on the respective
side with that toggle. This must be done early before the wing has dropped
too much, else it is difficult to rectify. Once above your head the risers
may be released, bearing in mind you may have to go back to them should
the wing start to fall back again. Once the wing is above your head it may
have a tendency to fly forward and over fly you. If this is allowed the
front will collapse and the glider will de elate. To prevent this both
toggles are pulled down and the wing will stop flying forward. Take care
doing this in the air as it may stall and you will be back on the ground
sooner that you think ! Now you can inflate the wing and control it above
your head, one needs to turn around and take off against the wind.
(remember while you were pulling up the wing you had your back to the
wind).
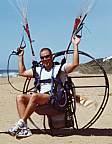 5. Seat yourself by either a
foot stirrup or by holding both toggles with one hand and pushing yourself
with the other.
5. Seat yourself by either a
foot stirrup or by holding both toggles with one hand and pushing yourself
with the other.
Once the wing is
stable above your head and not overflying you or dipping to one side,
simply let the toggles go, spinning around the correct way. If you turn
the wrong way you will find there is a double twist in the risers. As soon
as you have turned round and are facing into the wind, the toggles are
taken hold of again(left in left hand and visa versa) one might find you
have to apply some toggle pressure to prevent the wing from over flying
you again. Alternatively move forward to keep the wing above your head and
control the wing again. Should you find the wing pulling for example to
the right, you will realize you have to counter steer to the left. Tip-
remember to move under the problem side simultaneously. If there is little
wind over the wind (wind blowing towards you), you will find you will have
to move forward at the same time, while moving under the problem side. If
not it will simply deflate due to lack of airflow over the top and hence
no lift to keep the wing inflated. (By moving forward you are creating an
airflow over the wing and hence generating lift).
6. Here is a brief description of a
forward start. Clip in as described i.e.
 facing forwards in the direction of take off, into the wind, left
riser into left carabeener . Make sure the pre flight checks are complete
and all risers free from the ones behind etc. Start with you hands by your
knees, under all the risers. Move them forward between the risers and your
legs, while picking up the toggles and un-clipping them on the way. All
the risers now will be hanging over your for arms. Reach back over them
and take hold of the front risers in the respective hands. (You may also
wish to refer to our promotional video where both starts are clearly
shown) Remember pulling on the front risers will inflate the leading edge
and facilitate inflation. While staying in this position drop you arms
back and down. (almost as if someone is trying to bring your straight arms
together behind your back while your PALMS ARE FACING FORWARD). Take a
step backwards and when ready run forward letting your arms come up over
your head as the glider inflates. Keep hold of the front risers with your
arms straight until the glider is above your head. Before take off, LET
THE FRONT RISERS GO.
facing forwards in the direction of take off, into the wind, left
riser into left carabeener . Make sure the pre flight checks are complete
and all risers free from the ones behind etc. Start with you hands by your
knees, under all the risers. Move them forward between the risers and your
legs, while picking up the toggles and un-clipping them on the way. All
the risers now will be hanging over your for arms. Reach back over them
and take hold of the front risers in the respective hands. (You may also
wish to refer to our promotional video where both starts are clearly
shown) Remember pulling on the front risers will inflate the leading edge
and facilitate inflation. While staying in this position drop you arms
back and down. (almost as if someone is trying to bring your straight arms
together behind your back while your PALMS ARE FACING FORWARD). Take a
step backwards and when ready run forward letting your arms come up over
your head as the glider inflates. Keep hold of the front risers with your
arms straight until the glider is above your head. Before take off, LET
THE FRONT RISERS GO.
7.This is simply to prevent unnecessary pressure on the front risers which may create a front tuck (the leading edge of the glider tucking over and deflating) With a forward start, while flying with power taking a step backwards and applying power to help the forward run certainly benefits the inflation process. Just remember the glider will inflate quickly and if it has the tendency with either forward or back start, remember to apply toggle pressure with both to prevent it over flying. Alternatively keep moving forward to stay in front of the forward moving wing .
8.Both front and back starts become slightly more acquired when a motor is present. (however ground work is your key to successful paramotor flying. Do it with the engine off and get use to walking around with the engine running while not connected to the glider. this will enable you to experience the turning effects associated with motorized paragliding, while at the same time getting use to the noise and thrust behind). I usually strap the accelerator onto my hand and adjusting it to provide easy access to the lever and kill switch. The toggles are then taken up in what is left of the free fingers . Remember placing your hand over the carburetta will flood the engine and stop the engine should the kill mechanism break. This is one of the main reasons I very seldom use one. A second cut out switch mounted on the frame is also a good idea.