|
Paramotor
Maintenance Part 2 |
 |
如何維護你的動力傘機
2|
Paramotor
Maintenance Part 2 |
|
No electrical cables should be fastened directly to any parts of the engine or engine frame without protection. I have personally witnessed an engine failure that one of my friends experienced, due to a short circuit caused by a frayed wire. His unit had only twelve hours of tach time. Being an excellent pilot, he landed safely in a cornfield. All electrical cables should be protected at least with insulating tape wherever they touch any parts of the engine or frame. They should be securely fastened with cable ties allowing a little slack between the two ties.
To achieve the strongest spark at the lowest possible RPM (especially when starting the engine) the clearance between the ignition coil iron core and the magnet (flywheel) must be kept according to the engine specifications. Usually, the coil is held in place by two bolts, which if not fastened properly, may enable a gap change. To prevent this from happening, I always use a medium Lock-tite compound on the threads of the bolts when setting the gap. On the Solo 210 engine the gap is 0.2 mm on both sides of the U shaped coil iron core.
Electric starters, batteries and starter solenoids should be kept clean, along with their terminals and connections. Some electric starters are fastened with only two bolts. Once my starter broke off and fell in the rotating propeller while I was running the engine on the ground. After this happened, I double secured it to avoid further surprises.
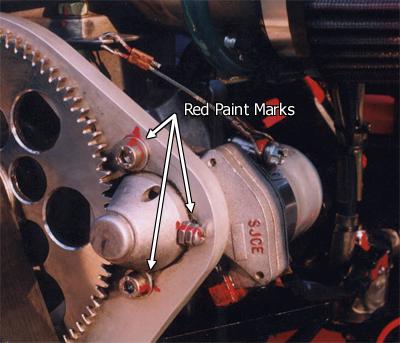 Picture 5: Double secured electric starter (see arrows). Note: All fasteners are marked with red paint for an easy pre-flight check. |
(See picture 5 above) In this picture the third bolt screwed into the bendix head is visible. It will prevent the starter from sliding out in case the two securing bolts are sheared. The cable will also prevent the starter from hitting the prop if the first measure fails.
On some older models, it happens that even with a fully charged battery, good electrical connections and perfect starter condition, the engine can not be started. The starter will turn to slowly and eventually die. This symptom points to a faulty starter solenoid. In order to keep the weight as low as possible the paramotor starter solenoids or relays are miniaturized. It should be remembered that when depressing the starter button, there is very little resistance in the circuit. In fact, it is almost a short circuit. Having little resistance, the starter will draw a lot of current from the battery and have enough power to turn the engine. The starter solenoid is nothing else but an electromagnetically actuated switch. Every time the circuit is closed, it sparks inside. In time the spark will oxidize the connectors which being covered with oxide will spark and beat up even more. Having an increased resistance, a burned starter solenoid will allow a smaller current to flow to the starter. The result: the starter turns slowly, if at all. In order to prevent this from happening, I replaced the original burned solenoid with a slightly bigger one used in a small Mercury boat engine. This solved the problem for good. Of course, if one does not want to bother with this improvement, there is and easier alternative: Pull the starter rope hard or buy a new relay!
Some paramotors are equipped with a sealed lead acid 4 Ah motorcycle battery, heavier than the Ni-Cd ones, but more reliable. In these lead batteries, the connections are accomplished with screws, which in time become loose due to vibration. The connections should be inspected periodically and the terminals covered with graphite grease to prevent corrosion. In any battery, the positive terminal is most prone to corrosion. The reason is very simple: the positive terminal is positively charged because it loses electrons and any electron loss means oxidation.
In my concept, there are two types of structural failures: instant failures and "Dormant failures"!
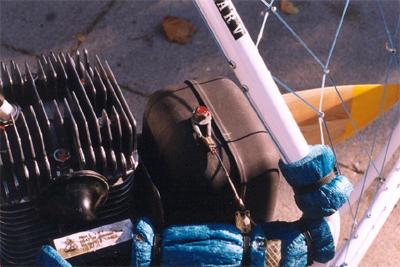
1. A sudden force that acts upon a surface or a structure mainly causes instant failures. This type of failure occurs suddenly during an impact (hard landing) or when a foreign object falls in the path of a moving part, usually a rotating propeller, pulley or drive belt. In some instances, these objects can be even broken engine parts or objects from the ground sucked into the prop. I already mentioned about my starter that broke off. Another time, a faulty K&N type air filter broke loose and damaged my prop. To prevent this from happening again, I secured my air filter with a cable. (See picture 6 below)
 Picture 6: K&N type air filter with increased surface, protected with cable. Note: A cable tie can serve for easy priming on a Walbro carburetor if the fuel line has a priming bulb. Also note the electrical cable protection. |
2. "Dormant" failures are caused by fatigue and they do not happen suddenly. They follow a longer and invisible process. First, tiny microscopic fissures appear in the given part. Later, they develop into bigger cracks and when the force that acts on it surpasses the resistance of the material, the part brakes. Some metals and alloys are more malleable than others are, but there is always a limit! Metal fatigue is a very serious problem in general and of course, it happens in paramotors as well.
Very often, during a routine pre-flight check, dormant failures pass unnoticed. Left alone, they will pose a potential danger. A major inspection of the whole paramotor must be performed from time to time, and more often on older units.
Every single bolt, nut, rivet and other type of fastener must be inspected and correctly torqued if that is the case. Depending how often they are removed, the nuts that have no nylon inserts should be installed using a low, medium or high strength Lock-tite compound and correctly torqued. In order to save time while doing a pre-flight, it is a good thing to mark all these items with red paint, so a quick but systematic visual inspection will tell us if the given item moved or became loose.
Rigidly mounted mufflers, mainly on two stroke single cylinder engines that generate a lot of vibrations, are prone to structural failures. This is very true with the SOLO 210 engines. A cracked muffler or mount, calls for trouble in flight or on the ground. The muffler must be often checked for cracks, especially by the exhaust manifold which is the weakest point. If we find any cracks around the welding, the muffler must be discarded and replaced. We should not try to repair it. Using the wrong temperature and compound will even worsen the situation. I additionally secured my Solo muffler with a cable. (See picture 7 below)
 Picture 7: Additionally secured 210 muffler |
I have seen a good friend of mine breaking prop after prop when applying full power on take-off. After a very long and careful inspection, we found a broken tube in the engine frame which, pushed by the thrust at full power, allowed the prop to move too far and hit the cage. An engine frame must be checked often but especially after a hard landing and only after the harness and propeller cage have been removed. As stated above, hard landings as well as big vibrations or other abuse can lead to cracked engine frames.
The same rules apply to the propeller cages. A good indication that something is wrong, is the clearance between the prop and the cage. This clearance should be even, all the way around. If it is not, a bent cage, a bent engine frame or a faulty silent block must be suspected. In addition, after a hard landing the cage may bend. Please note that at full power as stated earlier, the plane of rotation of the prop will change because of the thrust and torque reaction. Therefore, a smaller clearance on one side does not always mean that the prop will not hit the cage or the netting at full power.
Warning: some manufacturers allow a very small propeller clearance of one or two inches and in case of a hard landing, just a slightly bent cage may cause prop and cage damage during the next take-off.
I strongly suggest that after purchasing a new paramotor, the pilot should measure the prop clearance and keep the measurement for further reference. If the clearance changes, there is a reason!
Some cages can be easily repaired. Others can not. It is always safer to replace a cage than to bend it back. Saving money in this sport is NOT an option. If we have a bent cage, we should ask our dealer for advice.
Not very many manufacturers use protection or cushioning devices on the bottom of their cages. It breaks my heart when I see beautiful and expensive paramotors warmed up on concrete, gravel or dirt. They "dance" around damaging the stands. If one checks his stand after a few tach-hours, the above statement will make sense!
On my FLY 115/4 unit, I covered the stands with vinyl protectors made from a larger transparent tube, split lengthwise. The paramotor has an excellent grip on the ground, does not jump or move around when it is warmed up. (See picture 8 below)
 Picture 8: Protected cage base with vinyl tubing |
We should not forget that any paramotor, having the prop in the back, is a pusher! It acts like a giant vacuum cleaner and will swallow any light objects. Before starting the engine, one should make sure that no GPS, radio, vario or other objects are on the seat. My good friend, the one with the broken engine frame, lost his GPS, which was placed on the seat, while warming the engine; the propeller ground the beautiful and new GARMIN up. A GPS and a prop were lost all at the same time! In addition, while starting the engine, ALL the belts should be buckled. On my unit, the special additional shoulder straps, if left loose, can easily reach back into the propeller.
If we fly out from beaches, lake shores or desert, great attention must be paid to sand. If the straps are not buckled and the paramotor is on the ground, the sand will most certainly get inside the buckles.
If it does, it may block them and even if they can be snapped into place, they may become undone. We should always double-check the buckles before any take-off. If there is sand inside, it can be blown out with compressed air or carburetor cleaner. Other agents like WD 40 are not recommended since they will leave a greasy residue that will further trap the sand.
In this article, I tried to cover the most common failures and how to prevent them. Depending on the unit type, there may be other parts or components that were not discussed above. Using common sense, each individual pilot should adopt the most suitable way to pre-flight and periodically inspect his particular paramotor.
All the above-described improvements performed on my unit added 6 lbs. to its weigh but it is safer and feels more reliable.. We should always have in mind that a good maintenance of our wonderful and "personal flying machines" will increase safety, comfort and peace of mind. Remember that prevention is better than cure!
Have a safe flight! See you up there.
Alex Varv is an experienced Powered Paraglider Pilot that wishes to pass on to other pilots his knowledge of flying and maintaining their powered paragliders. If you have any questions concerning this article, Alex can be reached by phone at (708) 788-3819 (Central Time US & Canada) or email at [email protected]
This article was originally published in the July 2000 issue of Aero Connections Magazine. It was posted here with permission from the author, Alex Varv, and Aero Connections Magazine.