|
Paramotor
Maintenance Part 1 |
 |
如何維護你的動力傘機 1
|
Paramotor
Maintenance Part 1 |
|
Contrary to the belief that because of their simplicity of construction paramotors are very safe "flying machines", they are as safe as they are maintained. The apparent simplicity of a modem paramotor is a little more complicated than it seems.
In order to increase the thrust to weight ratio, paramotors are carefully designed and constructed. For these reasons they do not have any back-up systems. Paramotors are mainly single engine, single cylinder constructions. All have only one ignition circuit. If the above items fail for some reason, the engine will most certainly stop.
Depending on the manufacturer, the design and construction vary from unit to unit. It is not the purpose of this article to point out the differences. It should be sufficient to say, that in general, the longer the manufacturer has been around, the more sophisticated the machines are. The leading brand designs are constantly improved to achieve a better compromise between performance, safety and weight. No matter how evolved these constructions are, if not maintained properly, they will fail. Next, we shall discuss the most common types of failures and useful improvements that may prevent these failures from happening.
Prior to each flight, the engine should be inspected as follows:
Rotating the propeller check the compression. At the TDC (top dead center) of the piston, a significant resistance should be felt. At home, using a compression gauge, a very precise reading can be achieved. Excessive piston rod bearing play can be detected. If we turn the propeller in both directions with a sudden movement; very little play is normal. For more accurate testing, check the manufacturer's specifications.
Check the engine shaft play by moving the shaft with the smaller pulley up and down and in and out. (This should be done with reduction belt tension totally released.) No play should be felt.
Rotating the propeller, listen to any unusual noises in the engine, like metal to metal grinding or knocks. From my experience, this kind o noise is mainly caused by a lack of gap or too small of a gap between the ignition coil and the flywheel (magnet). If there is no gap the engine will not start at all because no spark will be generated. Sometimes the grinding noise is caused by too small of a gap in which paramagnetic metal shavings attracted by the magnet or other foreign particles are trapped in the clearance. These particles should be removed immediately. (More about ignition later)
A carefully performed inspection around the cylinder head will reveal any leaks. A leaky cylinder gasket is dangerous because it can be "blown" anytime. The engine will lose compression, thus power or may quit all together.
We should point out that in the newer SOLO 210 engines, the cylinder head is fastened with six bolts with very fine thread. After removing the head (for cleaning or other purposes), upon reinstallation, the fine thread in the aluminum cylinder wall can fail, if the bolts are just slightly overtorqued. It happened to me after only 15 hours of tach time. In order to prevent this from happening again, I installed six studs with a 3/8 - 16 thread and nuts (see picture 1). Now my cylinder head can be safely removed and reinstalled. Before reinstalling, I use very small amounts of antiseize compound on the gasket. I have never had a leaky gasket after using this method. Furthermore, in the field, using the antiseize compound I reinstall the old gasket, if not damaged, with excellent results.
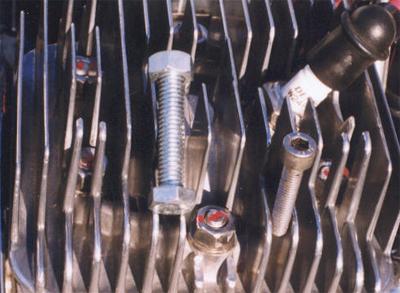 Picture 1: Improved cylinder head mounting with studs and nuts. Left: the bolt used for studs. Right: Original screw bolt. |
First, we may want to check the correct reduction belt tension. If the belt is too loose, engine overreving can occur because the belt will slip. If the belt is too tight, it will overstress the reduction drive and cause premature bearing wear. Some of these bearings might show play after 50-60 hours of usage.
The reduction pulley bearing must be checked for play as follows: Holding each tip of the propeller, apply 10 - 12 lbs. of sudden pressure perpendicular to the plane of rotation. In other words, push one tip forward while moving the other tip backwards. If any knocking or play is felt, you have a faulty bearing.
Please do not get confused here: since the engine is attached to the engine frame with rubber mounts, when pushed, the propeller and engine will move, but this movement is elastic. The bearing play will be heard/ felt as a knock or non-elastic movement before the prop and engine will have moved elastically, compressing the silent blocks.
A faulty (loose) bearing must be replaced immediately. Otherwise, even if it does not fall apart, it may heat up, lock and damage the reduction shaft. Having a three-blade propeller, we push only two blades but since the pressure is not symmetrical, the bearing play will be more difficult to detect. A four-blade prop should be treated as if it were a two blade. I do not recommend changing the bearings at home, unless the person has some experience and the right tools. Some brands of paramotors employ weak reduction drives which in time, or if too stressed, may break and cause severe prop and cage damage. Therefore, all reduction drives including their mount plates must be checked periodically.
Certain manufactures recommend changing the engine rubber mounts every 50-80 hours or after one year of motionless state.
Because of the engine vibrations, compression by the propeller, torque effect, atmospheric conditions, excessive heat, solvents and other factors, the rubber will age. The aging is a physical-chemical process in which the rubber oxidizes, cracks and weakens.
The role of the engine mounts is not only to dampen the engine and propeller vibrations but also to support the weight of the engine, withstand the thrust and torque effect. Due to aging, the cushioning properties of the rubber will diminish. Depending on size and material, an old and weak engine mount when compressed by the thrust against the engine frame, may move too far. The prop and engine will also move deeper into the cone of the cage and if there is too little clearance, the rotating propeller may hit the cage or netting. This occurred to one of my friends and it usually happens at full power on take-off.
On my paramotor, FLY POWER 115, I installed two additional mounts that are very easy to make. They were mounted on the engine base plate and prevent this kind of accident. (See picture 2)
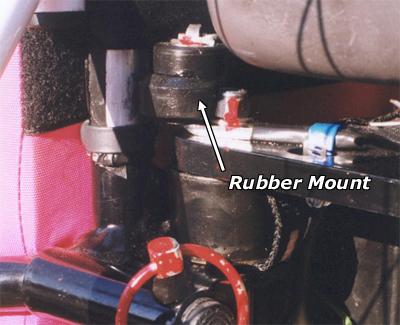 Picture 2: Additional rubber mounts were installed on top of the engine mount plate for increased safety. |
Another tip which is a good way to retard the aging process, is to protect the rubber mounts with Armorall or a similar agent.
Before installation, all propellers should have their balance checked. A very good balancer will show that even new propellers available on the market may not be precisely balanced. An unbalanced propeller calls for trouble because it generates excessive vibrations.
Before starting the engine, the prop should be inspected for dents and cracks even if it is a composite construction. The propeller should be regularly cleaned and even waxed for better protection and performance. Yes! A clean prop will perform better than a dirty one. Remember that the tips turn at almost a supersonic speed! At such a high speed any imperfections of the airfoil will cause a turbulent airflow thus diminish the lift/thrust.
Also, avoid running the engine on dry sand, gravel or even tall grass! A wooden propeller should be stored in a horizontal position because it may absorb moisture unevenly and become unbalanced!
A pre-flight check should include the fuel system as well. A fuel leak can cause lean mixture, fuel starvation, engine failure (vapor lock) and even a fire.
Here are the items that I always inspect:
The fuel tank is secure, does not leak, the vent is open and the fuel lines are properly connected. For all connections I use small hose clamps with screws instead of cable ties.
The fuel lines do not show any signs of scratches or wear caused by rubbing against other parts. The lines should be changed once a year or when they stiffen. I always buy the most expensive polyurethane lines available, cheap lines (polyethylene) will deteriorate much sooner.
Routing the fuel lines is very essential. They should not be installed in such a way that they will rub against any engine part such as: muffler, exhaust pipes, engine frame etc. To minimize the risk of puncturing, I protect the fuel lines with fuel lines split length ways and fasten them to the carrier line with cable ties. Then, the protected line is tied to the frame or other parts of the engine. (See picture 3)
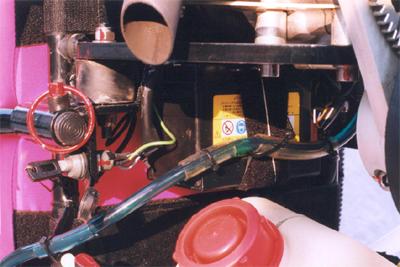 Picture 3: Fuel line routing and protection |
Check the carburetor for leaks while warming up the engine.
If fuel filters are used, they should be as small as possible but big enough not to restrict the fuel flow. Great care must be taken so they are completely filled with fuel. Any air pockets can cause a lean mixture or engine hesitation at high power settings. They should be always installed in a vertical position to eliminate all the air.
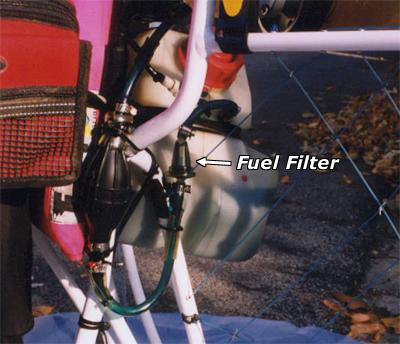 Picture 4: Small conical fuel filter installed in vertical position will not cause vapor lock. |
Bigger fuel filters will be more difficult to fill completely and may cause the above-described symptoms. If they are higher than the fuel tank, after the engine is stopped, the increased weight of the fuel inside the big filter can siphon the fuel back into the tank, making a restart very difficult. If bigger filters are used, it is a good idea to install a check valve under them to prevent the siphoning action. As we see, things may get complicated, therefore, I recommend a smaller filter of a conical shape and with the cone mounted in a vertical position. (See picture 4) Some fuel tanks have an internal factory provided filter and therefore no improvements are needed.
Have a safe flight!
Alex Varv is an experienced Powered Paraglider Pilot that wishes to pass on to other pilots his knowledge of flying and maintaining their powered paragliders. If you have any questions concerning this article, Alex can be reached by phone at (708) 788-3819 (Central Time US & Canada) or email at [email protected]
This article was originally published in the June 2000 issue of Aero Connections Magazine. It was posted here with permission from the author, Alex Varv, and Aero Connections Magazine.
原文網頁參考 http://www.poweredparaglider.us/paramotor_maintenance.html