|
Tip
from AMT
|
Bike
Setup : Suspension
|
The following is an article from Australian Motorcycle Trader, originally
in six parts, brought together here for minimum hassle.
Suspension - The Black Art
Welcome to part one of a six-part series on suspension
set-up, written by Steve Brouggy of the Australian Superbike School, and
published a couple of times over the years by Australian Motorcycle Trader.
All six articles are on this site and you'll find this to be the best set-up
guide around.
One of the most commonly asked about subjects at the
Superbike School is suspension. As with anything to do with riding motorcycles,
there are usually simple explanations for everything that happens, making
it a matter of just taking the time to analyse each individual action and
the resulting consequence. To assist in making this process possible in
the 'black art' of suspension, I have enlisted the services of Melbourne
based guru Rod Sharp (Rod Sharp Cycleworks and technician / advisor with
Team Ansett Air Freight Suzuki's superbike team).
Firstly let's discuss what suspension actually does.
Simply put, the suspensions job is to keep the wheels on the ground. (Giving
you a nice comfortable ride is very much a secondary consideration!) This
means that how the suspension works will directly affect arguably the most
important concern when riding a motorcycle - traction.
We have already discussed how the way you ride can
affect the suspensions operation, simply by holding on too tightly and
putting too much input into the bike, you are not allowing the suspension
to complete it's task. The end result of not allowing the suspension to
fulfil it's role, is that traction is affected, and the bike will tend
to run wide. It will also amplify any bumps or deviations in road surface
by transferring the force back and forth between your body and the bike.
(For more detailed information on this, either see "Keith's Corner" at
the California Superbike School web site - www.superbikeschool.com - or
read chapters 7 to 11 in "A Twist of the Wrist II" by Keith Code.)
No amount of changes to the bike will overcome the
problems associated with the rider doing something to the motorcycle which
interferes with the way the suspension is supposed to work. So, riding
problems aside, how does it all work?
There are several components to the suspension system
of any motorcycle. Each one has a specific role and design parameters,
and each will be effected in some degree by adjustments to the other components.
There are two major operations of any set of forks or shock absorber. They
are; Springing; and Damping.
The spring has two variables in it's operation, one
is pre-load, the other is the spring rate. Preload is adjusted by changing
the fitted length of the spring thereby changing the amount of initial
force needed to begin movement of the spring. Changing the preload also
affects a very important part of the basic set up which is 'static sag'
(we'll talk a little more about that in the next issue). The spring rate
on the other hand can only be adjusted by changing the spring. It determines
the amount of force needed to keep the spring moving which can be lesser
or greater depending on the amount of coils and the thickness of material
used for the spring.
The damping's job is simply to control the springs'
speed of movement. There are two basic areas of this; the first is compression
damping, which deals with the rate at which the forks or shock can compress
or dive; and the rebound damping which deals with the rate at which the
suspension can extend or raise.
Without damping to control the spring, it would be
free to continue moving the force backwards and forwards along it's available
travel, which would be substantially more than you want on a motorcycle.
(If you have ever jumped up and down on a pogo stick, you'll know what
a spring feels like without any damping!)
So, this means you have four totally different ways
in which to change your suspension. When you consider that most modern
sport motorcycles have around 12 or more damping adjustments, 12 or more
rebound adjustments, 'endless' preload front and rear, along with a plethora
of different rate replacement springs available, you now have literally
thousands of possible combinations! Add to this the fact that the front
needs to be balanced with the rear, and it's no wonder most riders are
confused about what to do with the suspension!
Over the next few issues we'll break down basic bike
set-up and give you at least a starting point for you and your motorcycle.
Good luck with your riding.
#2; Setting the sag
As mentioned in part one, setting the static sag of
the motorcycle is the starting point to getting your bike in the realm
of using the suspension correctly. As you set the sag you will uncover
some basic flaws in your settings that can be arrived at no other way.
The static sag is set with the bike under it's own
weight, and is backed up by two further tests; the One G Test (with rider
and normal weight load in place); and measuring the amount of suspension
travel used while riding. To get the springing rates correct for your motorcycle,
this process must be worked through in sequence. If you decide to miss
one of the steps or allow the settings to fall outside the guidelines given,
you'll be missing at least one or more ingredients to getting your suspension
working the way it's designed to.
So, let's discuss exactly what the static sag is -
Static: motionless, inactive. Pertaining to bodies at rest or equilibrium.
Sag: curve downwards under pressure. Give way. Hang loosely - so we are
in affect measuring the "curve downwards of a body at rest". The exact
measurement for what to set the static sag at will differ from bike to
bike, rider to rider, and will vary depending on how the bike is to be
used. There are however some fairly stable guidelines on where to start.
First you need to know how much travel your suspension
has by extending it fully and measuring in the direction of travel. On
the forks this is easy as you simply measure from the top part of the lower
fork leg, to the bottom of the triple clamp.
On the rear, you need to pick two points that are at
each end of the travel. For example, the grab rail and the axle. Unload
the suspension fully by taking the weight off it and measure as shown in
pictures 1 and 2. This will give you the unloaded distance.
To get the fully extended length of the suspension
it's important that you take any sag out by lifting whichever end of the
bike you are measuring. If possible it's best to actually lift the wheel
off the ground when doing so, to ensure you are getting accurate measurements.
This can be done by having someone balance the bike of the side stand (if
a centre stand isn't fitted) while you do the measuring.
Once you have this distance, stand the bike upright,
and allow it to sit under it's own weight, measuring from the same points.
It's best if you give the bike a couple of bounces up and down, then allowing
it to settle before measuring. This guarantees the suspension is settled
to it's true sag. The difference between these two measurements is the
static sag.
The rear sag should be somewhere between zero and 10
millimetres and the front between 20 and 30 millimetres. As mentioned earlier,
there will be some differences from bike to bike and rider to rider, depending
on how you are using your bike, but it should always fall within this range.
For example, during racetrack use you will find that firmer is better (within
reason), whereas on the open road that is not always the case.
#3; The One G Test
The One G Test backs up what we have already done
in setting the static sag of the motorcycle, and takes into account the
particular weight load that is going to be carried and the way the bike
is going to be used. This is the part that most riders forget...so listen
up!
To be effective, the measurements need to be done with
the normal weight load (i.e. the rider) in place. If you are a courier
for example and carry a reasonable weight on the back of the bike for a
large percentage of the time, or you only ever ride with a pillion in place,
it would be a good idea to simulate that situation for the purpose of measuring.
If you were planning a touring trip with baggage, but still wanted the
bike to handle at it's best for the roads you plan to ride, you could reset
the static sag to suit the weight load carried for that period of time,
then change it back to the way it was once the trip is over.
To do this correctly you will need a measuring tape
and three helpers. Two to balance the bike with you in place, while a third
person measures the sag. First, you need to know how much travel your suspension
has by extending it fully and measuring in the direction of travel, just
as we did to set the static sag. On the forks this is easy as you simply
measure from the top part of the lower fork leg, to the bottom of the triple
clamp.
On the rear, you need to pick two points that are at
each end of the travel. For example, the grab rail and the axle. Unload
the suspension fully by taking the weight off it and measure as shown last
issue. This will give you the unloaded distance.
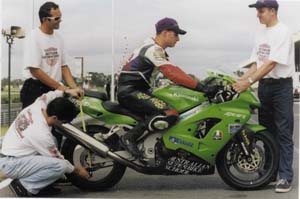
Once you have this measurement, the rider (and any
other normal weight load) should be put on the bike as per the pictures
shown, with helpers holding the bike front and rear. The rider should then
bounce the bike up and down a few times to free up the suspension and put
it in the position it would normally sit in with the rider in place. The
designated 'measurer' should then measure from the same points the first
(unloaded) measurements were taken.
The difference between these two figures (the sag)
should fall somewhere in the vicinity of 25-35mm front and rear. If you
find your bike is either less or more than this, simply adjust the preload
either harder or softer using the preload adjuster, until it falls within
this range.
Often times bikes that have done a few kilometres will
sag way beyond ideal settings, as will new bikes sometimes. As a matter
of fact I have measured brand new sport motorcycles that have never been
ridden and found they have more than 50mm sag front and rear! As you make
adjustments you may find that you get to one end or the other of the existing
springs range. If this happens, it means the next spring available (either
heavier or softer) is probably going to be on your shopping list.
Often times riders try to make up for a lack in one
area of suspension by adjusting another. In this example, if the bike were
still too soft after the preload was adjusted fully, you could turn up
the compression damping to try and slow the speed of movement downwards.
This would begin complications that could severely effect the suspensions
ability to function. If you were to arrive at this point, speaking with
an expert (as opposed to "pub experts") is really the only course of action.
Next issue we'll talk about the final point in getting
the springing right in your suspension, and start to figure out what to
do with the damping.
#4; Measuring the travel
The final part of setting the springing (as we've
been discussing the last two issues) on the suspension is to measure the
amount of travel used while riding. It's important to do this final step
rather than rely on how the bike feels. Often our perception of what the
motorcycle is doing is quite different from what is really happening.
This final step is probably the most simple of all.
To measure how much travel the suspension is using it's just a matter of
putting a cable tie (sometimes referred to as a zip tie) on the shaft of
the forks and the shock. In this way you can see how much of the available
travel is being used by the location of your cable tie after the bike has
been ridden.
To ensure accurate results, you should only measure
the amount of travel being used after riding in your normal environment.
Meaning that if you do mostly ride days and sport riding, just going around
the block isn't going to give you a very accurate idea of what the suspension
is actually doing!
If you find your cable tie is pushed up against the
end of the shaft, chances are your suspension is too soft. On the other
hand, if your cable tie is only half way along the suspensions travel,
chances are your suspension is now too hard. The ideal scene is to have
the swept area (the total amount of travel used) to be only slightly smaller
than the total travel available.
By using the three measurements we have discussed over
the last two issues of AMCT, you now have the tools to set the springing
correctly. As you change the preload to suit one of the settings, you may
find that it makes the suspension fall out of the ideal range in the other
areas. This tells you that your spring may not be the right one for your
application. For example. Lets say you did everything right in setting
the sag and the one G test, but your suspension is bottoming out (using
too much of its available travel).
This would tell me that your style of riding requires
a harder spring set with less preload. This spring would require more force
to use all it's travel, but less to start it moving. Meaning that you can
still get the sag figures correct, while using the right amount of available
travel.
There are far too many possible variations for us to
cover in this short amount of time, but at least now you should be able
to recognise whether or not your suspension is working within the range
it was designed to work.
Next issue: damping controlling the movement of the
spring...
#5; Damping
Now that we have the springing set correctly, it's
time to control the spring movement with the damping. Please note - if
you haven't undertaken the process of setting the sag, doing the "One G
Test" and measuring the travel, you won't find the information on damping
of much value. If you've missed the AMCT issues with this information,
copies are available by contacting the Australian Superbike School, tel
(03) 9792 1322, fax (03) 9792 1075
Down to business... there are only two directions the
suspension moves, up and down. When the suspension is diving or compressing,
it is termed the 'compression' and when it raises or lifts it is called
the 'rebound'. The damping's job is to control the speed of both the compression
and rebound of the suspension, thereby controlling the speed the wheel
can move up and down. This decides what sort of contact (if any) your wheel
with have with the ground, thereby affecting the tyre's traction to the
road.
It accomplishes this hydraulically, by transferring
oil from one reservoir via a piston with a series of valves to another
reservoir. By adjusting the damping you are changing the amount of oil
that is able to go through the valves (the 'flow rate') thereby changing
how quickly the suspension can move. The larger the hole in the valve the
faster the suspension will travel, the smaller the hole in the valve the
slower the suspension will travel. Similarly, the thinner the oil in the
suspension, the faster the travel, the thicker the oil, the slower the
travel.,
On most modern motorcycles there are adjustments for
both the compression and rebound damping both front and rear, along with
the ability to change the oil weight. Before delving into the specifics
of setting up the damping, it is important to realise that both ends of
the bike will effect each other in their set up. Meaning your front forks
may be set up perfectly, but if it is mismatched to the rear in either
the springing or the damping, it will be less effective.
The difficult thing when adjusting the damping is that
there are no rule of thumb measurements that are easily taken and compared
like there is with the springing. In fact unless you have state of the
art data logging equipment and a shock dyno, the decision of how to change
your bike will fall somewhere between the observation of a technician (whoever
you talk about suspension with) and the feedback given by the rider (you).
This is where riders get lost in trying to correct a handling problem,
and place the whole process of correcting suspension into the too hard
basket.
The true difficulty here is that we now open up the
whole subject to the different perspectives given by each of these individuals.
It is no surprise that when data logging (sometimes referred to as telemetry)
first appeared on racing motorcycles, the rider almost always wanted to
go the opposite direction in adjustments to what the data logging system
suggested. Showing conclusively what the experts have known all along...very
few riders actually know what their bikes are doing while they ride them!
Racing has now become much more of a precise science since the advent of
such systems, to the point where a world championship level team wouldn't
be able to function effectively without it.
What this means to you and I is that we are now dealing
with an area that requires some expertise to get right, along with an ability
to observe what the bike is doing while being ridden. If you follow the
guidelines and examples in the coming issues we can at least give you some
idea of what your bike may be doing, and hopefully help you chose a way
in which to fix it.
#6; Damping (continued - final of the
series)
As mentioned in the last issue, there are no hard
and fast measurements with which to set the damping on the suspension.
We also stated that most riders don't know what their bike is really doing
when they're riding it. So the question must be asked...how do you know
when it's right? And how do you know when it's wrong?
I've seen suspension technicians bounce a bike up and
down and make a decision as to what changes to make to the suspension.
Mere mortals like ourselves may observe this and, seeing what decision
they arrive at, start to base similar decisions of our own on this information.
The problem is that we haven't had the technical training they have.
We probably haven't bounced a couple of thousand bikes
up and down before, feeling for what the suspension is doing either. Therefore,
chances are we haven't gained a 'feel' for what good damping should 'feel'
like on a stationery motorcycle.
It should also be noted that this is usually not the
only source of information that the technician will base his decision on.
As a matter of fact, to be as accurate as possible, they will use several
sources of information. So in combination with 'feeling' the bike by bouncing
it up and down, they will look at how the bike is wearing the tyres, if
at all possible (especially in a racing situation) the technician will
try to observe for himself what the bike is doing, along with getting the
riders perspective.
Obviously if you are not racing and you come to a suspension
expert, they will probably not be able to observe what the bike is actually
doing, and will have to base their decision on the other factors. This
should be enough for someone who has the skills to decipher the sometimes
incomprehensible babble that we (as riders) offer, and what he 'feels'
the bike doing.
Our job as riders then is to give the technician accurate
information. In other words we need to observe what the bike is doing and
report it. If you are going to be your own technician, that's fine, just
recognise the different roles you play. On the bike you are the rider,
gaining the information needed to base a decision on. Off the bike you
are the technician and your job is to take that information and base a
decision on it. Don't expect every decision to be correct. Chances are
you'll have to repeat the process of changing these 'hats' more than once
to get it right.
So...what exactly are we looking for? The damping can
only be one of three things. Too hard. Too soft. Or, just right! To help
you understand what effect each of these have let's look at them individually.
Too hard - as a rule, if the damping is too hard, the
bike will feel unstable. If it's too hard in the compression damping the
suspension will not comply with bumps, as the transferring of the force
is too slow, meaning the wheel will tend to skip over the top of the bumps
rather than follow the contour of the road surface. If too hard in the
rebound damping the bike will tend to 'pack down' or 'squat'. This is caused
by the suspension not allowing the bike to raise back up to it's original
position quickly enough. The end result of this is sometimes referred too
as suspension "chatter." Although the bike will feel unstable, it will
tend to feel quite 'stiff' or 'taught.'
Too soft - the interesting thing here is that if the
damping is too soft, the bike will also feel unstable. Only this time,
rather than 'chattering' it will tend to feel 'sloppy,' and possibly 'wallow'
in corners. (wallowing means that the suspension will oscillate without
anything seeming to start it off, like bumps for example) It may also feel
a little like a pogo stick, continuing to transfer the force up and down
the length of the travel. This is particularly noticeable on bikes that
have done a lot of miles.
Just right! - if the damping is working correctly,
you probably won't notice anything! The suspension will keep the wheels
moving up and down as required to keep the tyres on the ground and the
bike stable.
Who was it that said "the more I know, the less I understand"?
The interesting thing about reading information on a technical subject
like suspension is that it will tend to raise more questions than it answers.
I'm sure that over the last few issues we have been focussing on the subject
of suspension, that has happened for you. That's okay. In fact that's what's
supposed to happen.
It's now up to you to use this information and apply
it. Doing so will answer some of your questions, and the ones it doesn't
need to be directed to someone who knows what they are talking about. And...just
in case you're wondering...that's probably not your brother in law or next
door neighbour...
Good luck with your riding...
Steve Brouggy
|

 Made
in Sydney, Australia
Made
in Sydney, Australia