Section 5 - Crafts
My Little Disclaimer: none of these crafts are my own creations. This is just a collection of tried-and-true crafts that I’ve picked up over the years.
Things to collect around the house that will always come in handy for crafts: ![]()
-tops to yogurt/margarine containers (these are great for holding white glue)
-toilet paper rolls
-film canisters
-walnut shells
-styrofoam meat trays (must be disinfected before used in crafts)
-4L ice cream pails (great for storage)
-cereal boxes (the cardboard is good for tracers and other things)
-catalogues/magazines (for collages)
-cloth scraps
Craft Projects described on this page:
If you click on the name of the craft, the link will take you directly to the instructions. Or, you can just browse down the page!
Cloth Butterfly Magnet
Wool Flowers
Pom-pom parrots
Dogwood craft
Camp-hat Campfire
Solar System Necklaces
Flying saucers
Drinking Straw Lei
Toques
Shooting Stars
Pencil Flowers in flowerpots
Hot Chocolate mugs
Dreamcatchers
Warm Fuzzies
Bead Bridging Dolls
Walnut Shell crafts
Paper Bag Owls
Film Canister Stamps
Make your own musical instruments
Halloween
Garbage Bag Ghosts
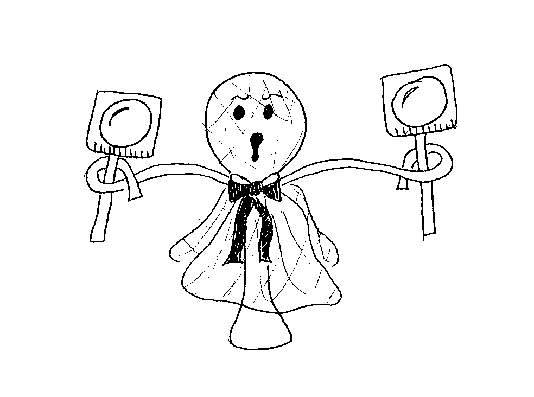
Lollipop Ghosts
Flying Bats
Christmas/Holidays
Joy doorhanger
Clothespeg reindeer
Candycane Reindeer
Christmas Crackers
Bear Ball Ornaments
Deepa Lamp
Rangoli
Kufi
Mini Kwanzaa Music Makers
And on to the crafts...
Materials:
 -cloth scraps, about 9cm x 9cm square
-half a pipecleaner
-piece of magnetic tape (if you want it to be a magnet) or string, if you want it to be an ornament
-glue
Instructions:
-fold cloth like an accordion (or like a paper fan)
-pinch together in center and secure with pipecleaner. Curl the ends of the pipecleaner into antennae.
-glue magnetic tape to back, or attach string to make an ornament
Wool Flowers
Materials:
-wool in two contrasting colours (one for ‘petals’, the other for the center)
-pipecleaner, preferably green. Length depends on how long you want your stems to be
-scissors
Instructions:
-wrap wool (in main colour) 20x around widest part of hand. Set down on table so that one side of the loop is on top of the other—like a deflated car tire (in other words, DON’T lay it down so that you see a circle)
-wrap wool in center colour 8x around two fingers. Set down on top of larger loop, centered.
-wrap one end of pipecleaner tightly around center of both colours of wool and secure.
-cut loops and fan out pieces of wool.
-put your flowers in a vase and enjoy!
Pom-pom parrots
Materials:
-2 pom-poms--one small, one medium, in bright colours
-twig approx. 5cm long
-pipecleaner, approx 15cm long.
-scraps of orange felt or fun foam
-2 small googly eyes
-two or three feathers
-glue (glue gun works best)
-safety pin
Instructions:
-attach pipecleaner to twig to make swing for your parrot (pipecleaner should arc over head)
-glue larger pompom to center of twig for body. Glue smaller pompom on top for head.
-glue on googly eyes and triangle of orange fun foam/felt for eyes and beak.
-glue on feathers as tail
-attach safety pin to pipecleaner and pin to hat.
Dogwood craft
Materials:
 -green and white felt
-whole mustard seeds (~20 per girl–enough to make a small circle)
-tracers for flower and leaves
-scissors
-glue
-safety pin OR small cardboard circle (about the size of the center of the flower–should not be seen in petals) and piece of magnetic tape.
Instructions:
-trace and cut out flower and leaves
-glue small circle of mustard seeds in center of flower.
-glue leaves to edge of flower
-pin to camp hat OR glue cardboard circle and attach magnetic tape and put on fridge.
Camp-hat Campfire
Materials:
|
-brown felt -frozen juice can lids -dried beans -small twigs |
-bits of red, orange and yellow wool -string -hammer and nail -glue |
Instructions:
-use hammer and nail to pierce hole near edge of can lid
-cut felt to shape of can lid and glue on.
-arrange beans in circle (to make stones at edge of campfire) and glue on.
-arrange twigs into campfire in middle of circle and glue on.
-glue on scraps of wool to make flames
-put string through hole and attach to camp hat.
Solar System Necklaces -This is a great craft for Space Camp. Don’t try and do the whole thing in one sitting; break it up into two or three shorter periods.
Materials:
-wooden or paper mache beads roughly sized to represent the planets and the sun. Do NOT use wooden beads that have been pre-painted or finished in any way—the new paint will chip right off. As for sizing, we used 3 different sizes of beads and grouped the celestial bodies into small, medium and large.
-latex acrylic paints (yellow, beige, light and dark brown, light and dark blue, green, white, orange, red, gray)
-paintbrushes
-some kind of small cup to hold paint (little paper drinking cups work well, among other things)
-water-based urethane
-black pony beads (lots)
-cording of some kind (fishing line can work, too)
-twist-ties (lots)
-styrofoam cups
-pictures of each of the planets, for reference
Instructions
-put the pictures of the planets up on the walls where they’re easy to see. Under the picture, it might be useful to write what size bead corresponds with that planet.
-have each girl fold the top part of a twist-tie in half and wedge a bead onto it. This way, the girl can paint the whole bead without getting paint all over her fingers, and when she’s done painting, she shoves the opposite end of the twist-tie into the rim of her styrofoam cup and leaves the bead to dry that way. Unused or dry beads can be stored inside the cup.
-set out small containers of all colours of paint, and let the girls mill around, choosing whatever colours they need to complete their planet. Make sure the girls are painting the correct size of bead (eg: they’re not painting one of the smallest beads yellow for the sun).
-when all beads are dry, pain with urethane to seal and allow to dry again
-thread dry beads onto cording, starting with the sun and following with the planets in the solar system, separated by black pony beads. Try and be semi-correct about the distances between planets. Eg: Mercury, Venus, Mars and Earth are very close together, while the planets are more spread out.
-tie necklace ends together to secure.
Flying saucers
Materials:
|
-frozen juice can lids -plastic pop bottle tops -tin foil -sequins |
-glue -hammer and nail -string -safety pin |
Instructions:
-punch hole in can lid, near edge
-cover can lid and bottle top with tin foil
-glue bottle top to center of can lid (to make roof of UFO)
-decorate with sequins or anything else.
-run string through hole and pin to hat.
Drinking Straw Lei
Materials:
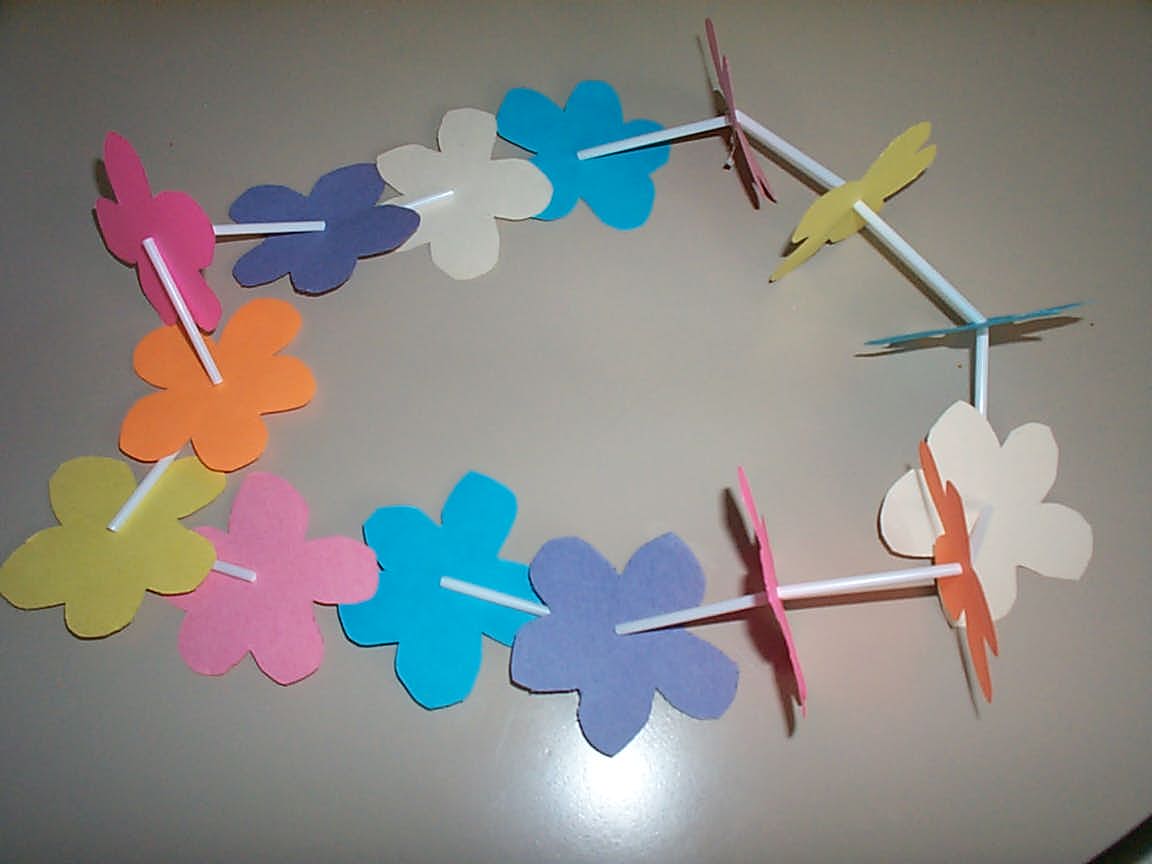 -plastic drinking straws, cut into ~1inch pieces
-construction paper flowers, with small hole in center
-fishing line or string
Instructions:
-cut string to necklace length
-alternate straws and flowers onto string.
-optional: place pony beads on either side of flowers, to stop wobbling.
Toques -these make cute ornaments, as well as hat crafts
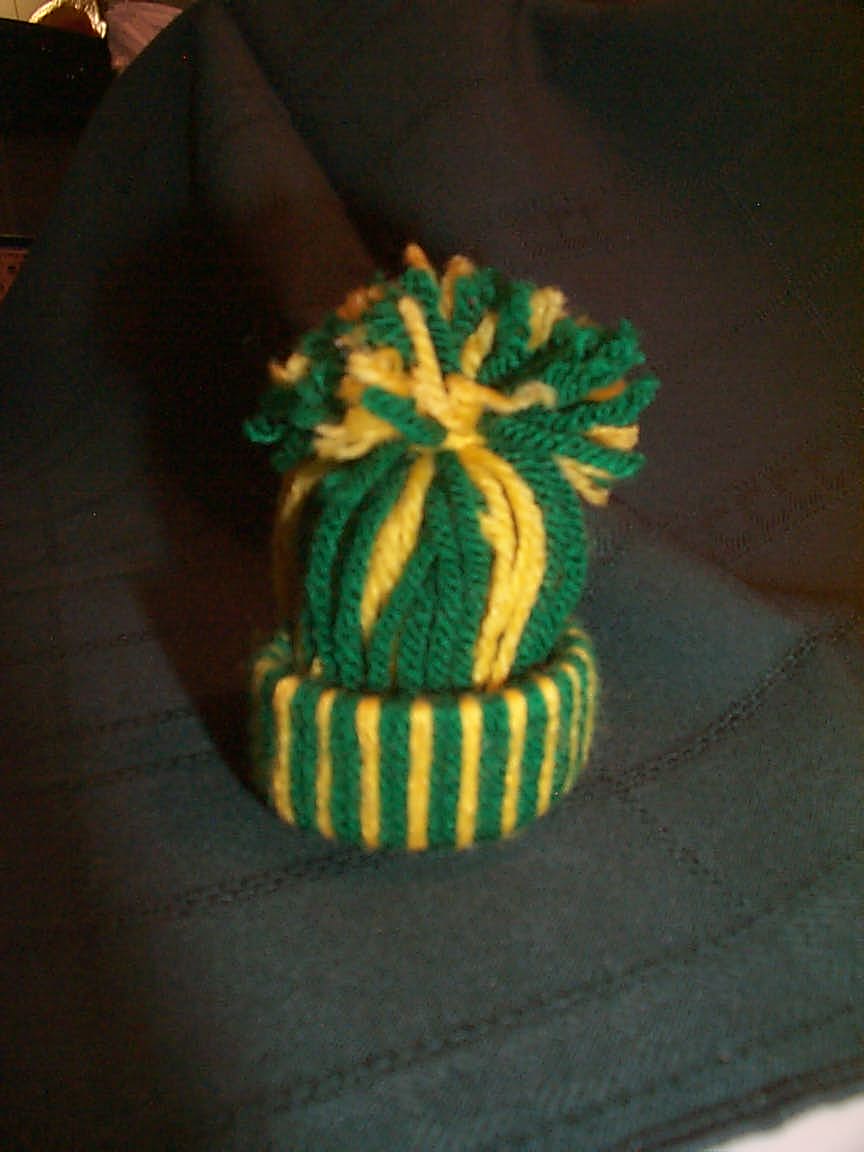 Materials:
-thirty to 40 pieces of wool in two colors, cut approx. 1 foot long.
-two to three cm ring cut from a toilet paper roll.
Instructions:
-fold each piece of wool in half and attach to the cardboard ring using a lark’s head knot. (In other words, poke both ends through the wool loop, around the cardboard)
-continue, alternating colours until the ring is completely covered.
-push all ends of the wool up through the center of the ring, making the ring become the brim of the toque.
-gather the ends together and tie (using another piece of wool) approximately one inch from the ends.
-use the ends of the tying piece of wool to make a loop for hanging your hat, if desired.
-trim the ends of the wool to make a pompom at the top of your toque.
Shooting Stars
Materials:
-dental floss
-beads—various colours and sizes(but not too big); both seed beads and bugle beads (the long skinny ones). Gold and silver work really well.
-foil stars, the kind with holes in the center
-safety pins
Instructions:
-string beads and stars onto dental floss, up to ~20cm long. Tie off end.
-fold approximately in half and wrap around/tie to safety pin.
-pin your shooting star to your hat, or attached to a barrette.
Pencil Flowers in flowerpots
Material(for each girl)
-terra cotta pot (approx 4" upper diameter)
-piece of foam for inside the pot(doesn’t have to be a perfect fit. A square that can be wedged in can work just fine)
-3 pencils, sharpened
-3 thumbtacks(the kind with flat heads—the colored ones are best)
-several sheets of colored construction paper(the stiffer the better–coloured cardstock would probably work even better)
-3 pom-poms, about 1" diameter (optional)
-cardboard tracers for different shaped flowers
-glue and scissors
Instructions:
-wedge the piece of foam down into the pot, so that the top of the foam is a little bit below the top of the pot. The foam should fill a fairly large part of the pot.
-turn the pot upside down and trace its shape on construction paper. Cut the circle out and glue it to the foam; the paper should cover the whole center of the pot.
-trace three flowers in construction paper. The flowers can be the same or different in shape or color.
-push a thumbtack through the center of a flower, and then push the thumbtack into the eraser of a pencil. Repeat for all three flowers.
-optional: glue one pompom to the center of each flower. (Some of the girls may like the look of just the colored thumbtack as the flower centers)
-stick the sharpened pencil head into the foam(remind the girls to think about the placement of their flowers before they stick them in, because you can’t really reposition them once they’re in)
Hot Chocolate mugs
materials: (for one)
-one film canister
-one 5cm long piece of black pipecleaner
-a cotton ball
-a circle of brown felt, about 5cm in diameter
-3 or 4 small (3mm) white pompoms
-one small gold safety pin
-glue
Instructions:
-cut film canister in half and poke two small holes in one side, one directly above the other.
-insert the ends of the pipecleaner and twist them together inside the canister, forming a handle with the loop on the outside.
-put the cotton ball into the bug
-cover the cotton with the circle of brown felt, tucking the edges in and securing with glue
-glue pompoms on top of the felt (for marshmallows)
-attach to camp hat at handle with the small gold pin.
Dreamcatchers
Materials:
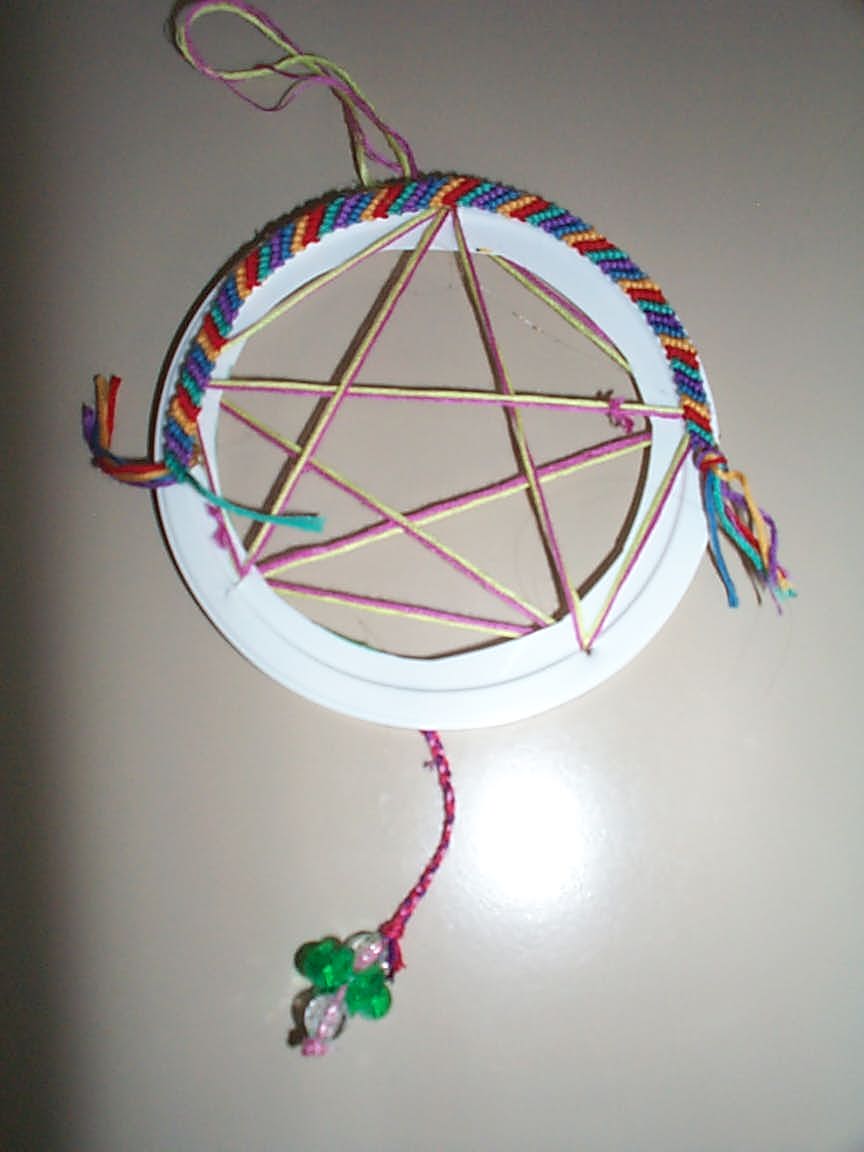 -margarine/yogurt container lids (clear ones are best)
-string/wool
-decorations of any kind: beads, feathers, ribbon, sequins
-scissors
-glue
-hole punch
Instructions
-cut outer lid off lid
-fold lid in half and cut out middle to form a ring
-punch 5 or more holes around the outside edges
tie off string in one hole
-thread string across from one hole to another
-tie a loop on top for a pin or hook for hanging
-decorate as desired.
Warm Fuzzies
-this craft works well after you’ve read the story "A Warm Fuzzy", p94 in the "Campfire Activities" book.
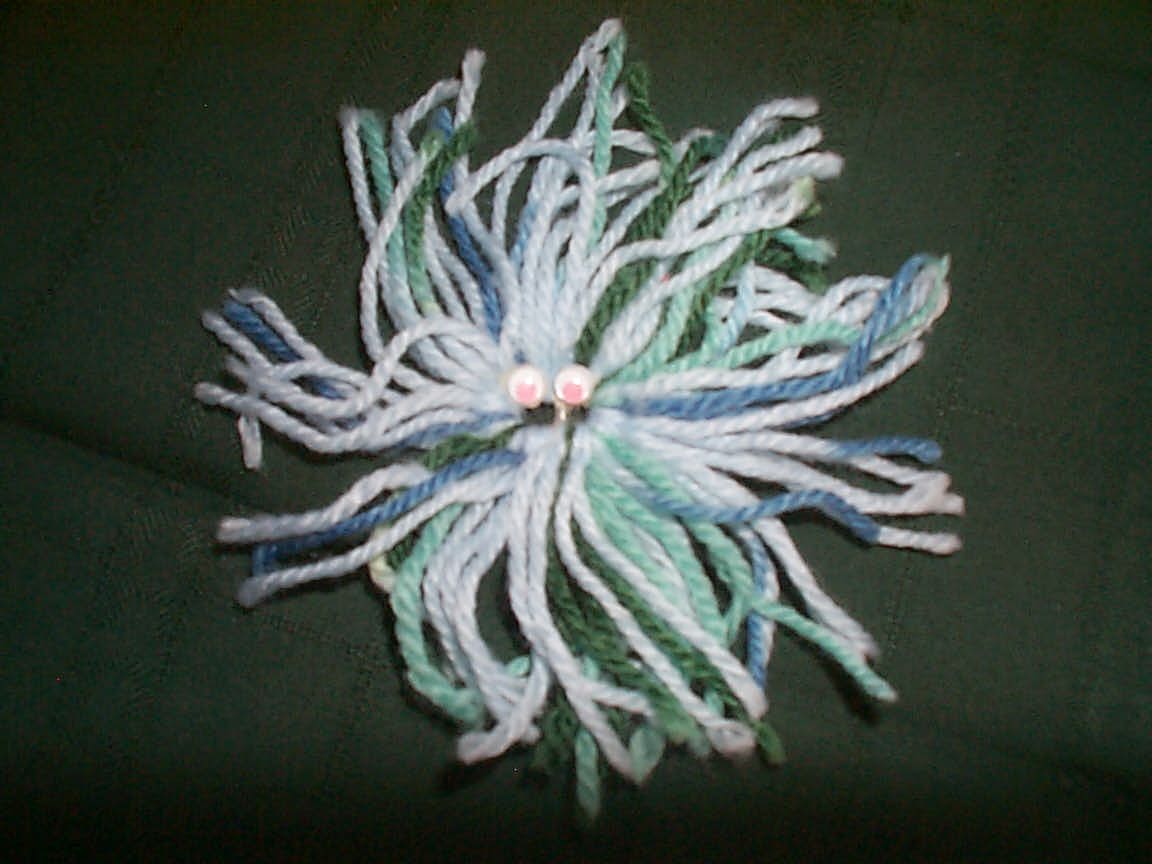 Materials:
-tab from pop can
-wool, any colour; cut into ~15cm lengths; approx 40 pieces
-googly eyes, or circles of felt to make eyes
Instructions:
-wrap pieces of wool around pop can tab, using the lark’s head knot. Continue till tab is completely covered. Do not put wool on middle bar.
-glue on eyes
-can be pinned to hats. Also makes good trader.
Bead Bridging Dolls
-these work really well at a bridging event. Have each girl make two dolls in her branch colours, then trade one of the two dolls with a girl in another branch.
I realize that these patterns are now rather obsolete, as the uniforms have all changed, but you could change the colours to reflect the new uniforms, and the craft would work just as well!!
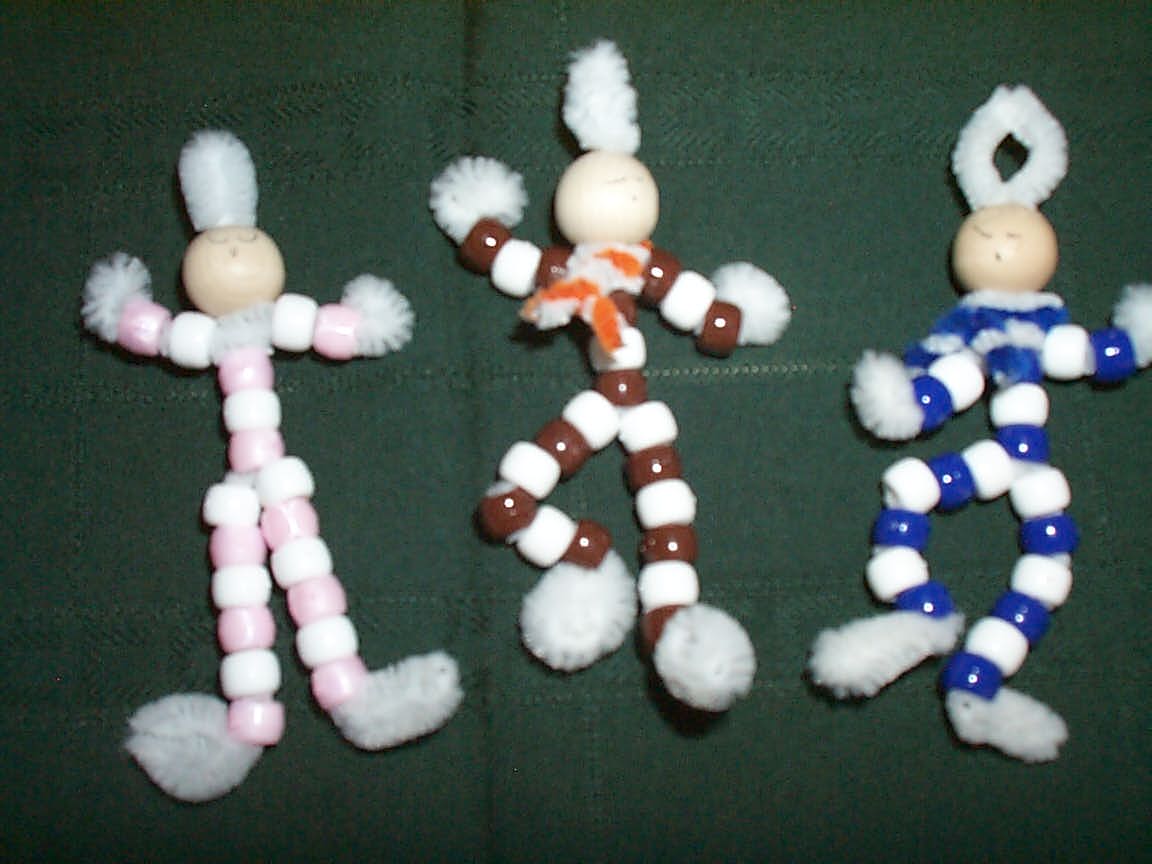 Materials: (for one Brownie doll)
-white pipecleaner; one full length, one ~12cm long.
-9 white pony beads
-10 brown pony beads (or royal for Guides, navy for Pathfinders, Senior Branches, and Leaders)
-wooden bead, 1.5cm in diameter. Preferably with face painted on already, although the girls can draw on their own faces.  -10cm each of very thin white and orange pipecleaners (substitute orange for whatever colour tie that branch wears; for Sparks, these are not necessary)
Instructions:
-fold long white pipecleaner in half, and place wooden bead about 1cm from folded end (folded end should come out of top of head)
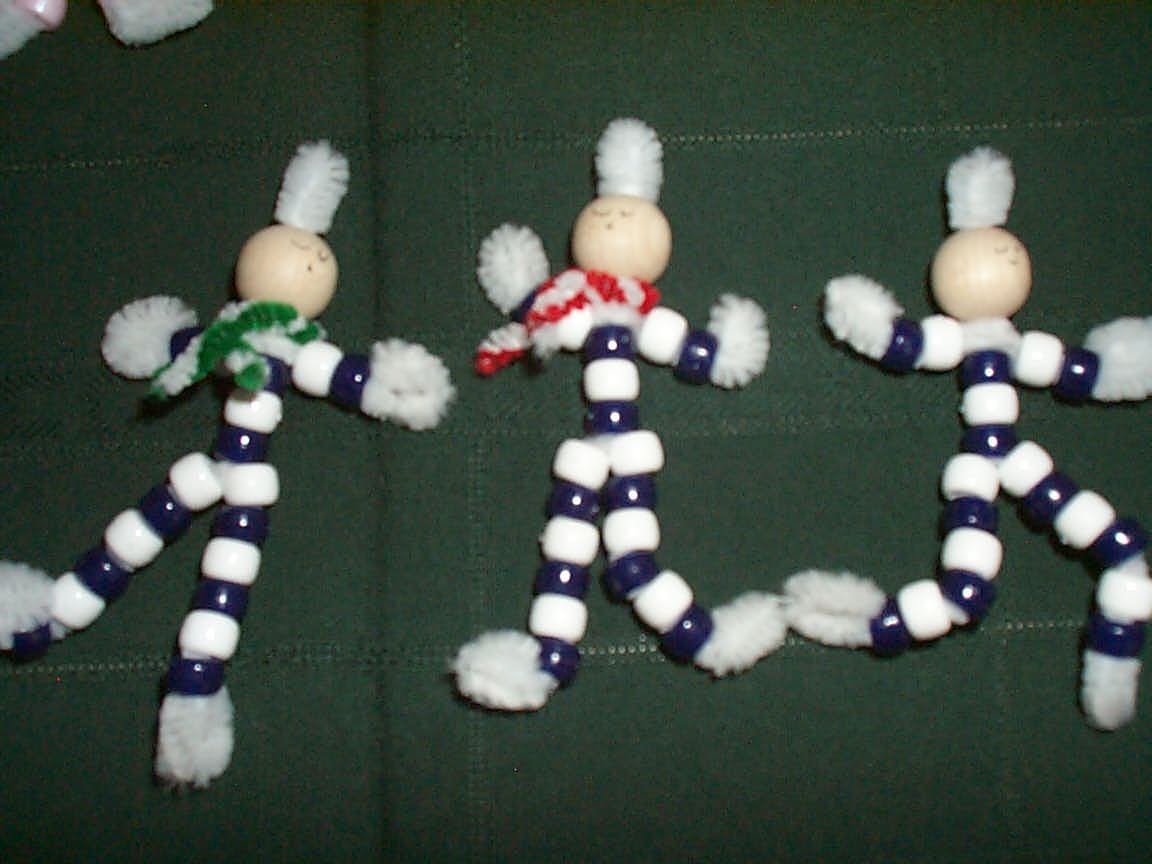 -just below head, twist short white pipecleaner around. Secure. These will be the arms.
-feed one white bead and one brown onto each arm, and roll up the rest of the pipecleaner to make hands.
-just below head, twist short white pipecleaner around. Secure. These will be the arms.
-feed one white bead and one brown onto each arm, and roll up the rest of the pipecleaner to make hands.
-onto body, feed one brown, one white, one brown bead.
-separate two pieces of pipecleaner to make two legs. Onto each leg, feed beads in this order: white, brown, white, brown, white, brown. Roll up the rest of the pipecleaner to make feet.
-twist together the two pieces of thin pipecleaner to make the tie. Wrap it around the doll’s neck, below head and above arms.
Walnut Shell crafts
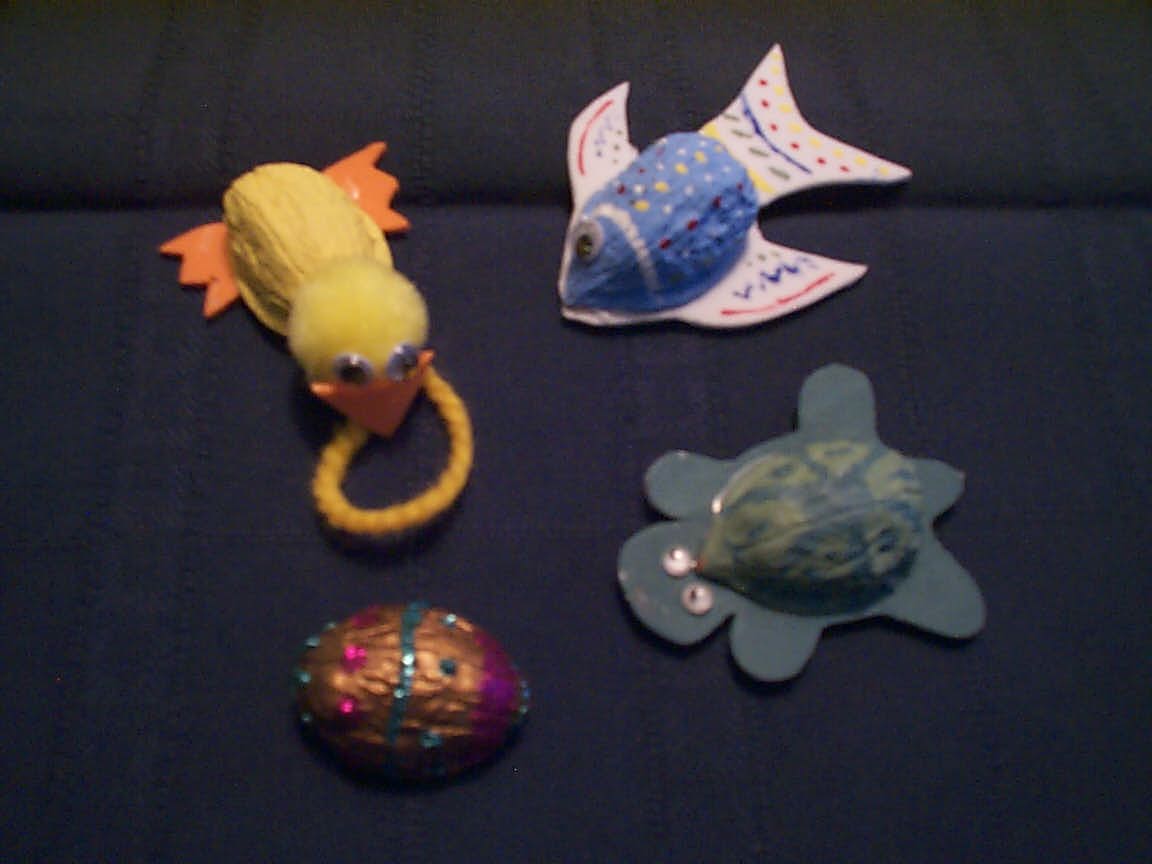 There are about a thousand different creatures and objects you can make, using walnut shells as your base. To describe them all to you would take another ten pages, so I’m just going to give you a basic guideline and you can modify it to make anything you like.
Fun foam works best as a base, as it is stiff enough to not flap around, is easy to paint, comes in lots of colours, and is quite inexpensive (especially if you buy it at the dollar store).
Walnut shells work well as the faces of any number of animals (elephant, monkey, parrot, bear, moose, rabbit, etc). Paint the shell the appropriate colours, as desired, adding googly eyes, felt scraps for beaks or noses, etc. Trace the shell-shape onto the fun foam, and then add on whatever shapes to the fun foam that are necessary to the shape of your animal, such as ears–huge floppy ones for your elephant, little round ones for your monkey, etc.
The walnut shells can also serve as the entire body of other animals, such as a duck, fish, turtle, or skunk. For the duck, add a yellow pompom on the pointed end for the head and glue on a scrap of orange felt for a beak. For the fish, trace the fin-shapes onto the fun foam. For the skunk, trace a tail out of fun foam that sticks out of the rounded end of the shell. For the turtle, the walnut shell is the turtle’s shell; trace his head, legs and tail out of fun foam.
Other non-animal things can be made using walnut shells, including strawberries. So, in a nutshell (pun very much intended), walnut shells are incredibly useful craft supplies, so get your parents to save them for you.
Paper Bag Owls
–> this craft can be used to teach girls about owl biology (talk about why is each part useful)
Materials
-1 brown paper lunch bag
-brown construction paper or fun foam, cut into B-shape (the long part of the B should be as wide as the paper bag) - for facial disk
-two circles, about 4cm in diameter, in light brown or white paper (recycled paper grocery bags work well) - for eyes
-two wing-shapes, cut out of brown construction paper or recycled grocery bags
-orange diamond, about 4cm long, cut out of felt, fun foam or construction paper - for beak
-two triangles, of brown construction paper or recycled grocery bags - for ear tufts
-old newspaper, for stuffing
-felt pens
-glue
-tape
Instructions:
-glue facial disk to front of lunch bag, so that long part of ‘B’ is flush with bottom of bag (aka. the top of the owl’s head)
-glue eye circles to center of the two loops of the B (facial disk). Decorate as desired
-glue beak between the two loops of the B.
-glue wings to sides
-glue triangles/ear tufts to hop of head (aka the bottom of the lunch bag)
-use felts/crayons to decorate as desired.
-stuff crumpled-up newspaper into his body, leaving ~3-4 inches of empty space–do not overstuff.
-gather together open end of bag, leaving ~2 inches of paper at the end, and secure with tape.
-the remaining 2 inches of paper should be flattened out, and if you squish your owl around enough he should be able to stand on his own. If not, prop him up against something. :)
–>This is a fun and easy craft. The more skilled your girls are with scissors, the more cutting you can leave to them. This is a good craft to do if you have Sparks coming to visit your meeting–Owls are kind of a symbol of Brownies, and if you pre-cut all the pieces, the Sparks should have no trouble assembling the craft!
Materials:
-empty film canisters (photo processing stores will give away tons of these)
-scraps of fun foam
-pencils/pens
-scissors
-glue
Instructions:
-plan a simple shape for your stamp and trace it onto the fun foam (you can trace the film canister first, to make sure your stamp is the right size.
-cut out your shape and glue to bottom of film canister.
-stamp away!
–> you can then use these stamps to decorate cards, gift paper, etc. Or make a whole alphabet and use it to stamp messages to each other.
Garbage Bag Ghosts
Materials:
-small white garbage bag (ie. kitchen trash bag—do not buy the ones with the "easy-tie" handles—they alter the shape of the ghost. Get the basic rectangle)
 -wire hanger (dry-cleaners will often give you these for free)
-2 twist-ties (white, if possible)
-4 strips of orange flagging tape, each about 2 feet long (strips of orange garbage bags work, too)
-ball point pen
-permanent marker
Instructions:
-Take one corner of the garbage bag, and push the hook of the hanger through that corner. Push the bag down so it hangs over the hanger in a diamond shape.
-Bunch up one side corner and secure with twist-tie to make an arm. Repeat on other side.
-Use a ball-point pen to make four holes along the bottom edges of the bag, and the tie one strip through each hole.
-Draw on a face with the permanent marker(as well as any other decorations you care to give it).
-hang your ghost in a window, tree or anywhere else you like.
Lollipop Ghosts
Materials
 -plastic spoon
-gauze square, approx 10cm X 10cm
-white pipecleaner
-orange and/or black ribbon, approx 15cm long
-two lollipops (smallish ones are better)
-black felt pen
Instructions:
-Draw a face on the spoon with the felt pen
-To make the head, fold the piece of gauze in half and place it over the spoon.
-To make the arms, wrap the pipecleaner around the neck of the spoon.
-Wrap a lollipop into each hand
-Tie ribbon(s) into a bow around the neck.
Flying Bats
Materials:
-clothespegs
-bat body tracers ) see www.enchantedlearning.com
-bat wing tracers ) craft pages for precise shape
-black poster board
-crayons/colored pencils – optional
-glue
-scissors
Instructions:
-trace and cut one bat body and one bat wing out of black poster board
-Decorate body as desired–can give it eyes, fangs, etc.
-glue bat body (eye-side out) to one side of the clothespeg.
-glue wing to other side of the clothespeg (making sure it’s centered relative to body)
-clip your bat onto anything you like.
Christmas/Holidays
Joy doorhanger
Materials:
-red velvety ribbon, about ~10cm wide and ~25cm long.
-the letters J, O and Y cut out of green fabric or ribbon.
-small bell
-thin green ribbon, ~25cm long
-red thread
-needle
-scissors
-glue
Instructions:
-cut point at end of ribbon.
-glue letters to ribbon (so that J is at top, Y at bottom)
-sew bell onto pointed end of ribbon
-glue green ribbon on top of door-hanger, to make loop to hang over door-handle.
Clothespeg reindeer
–>these sell well at craft fairs
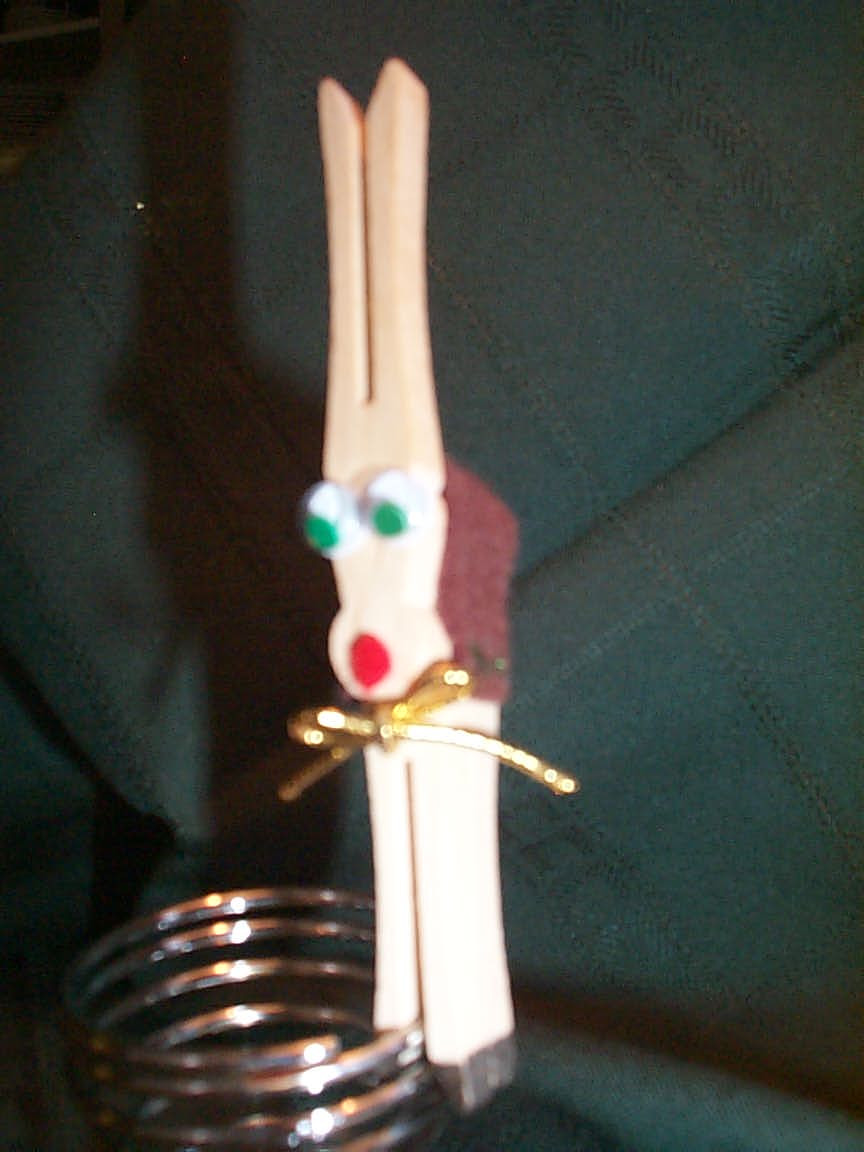 Materials needed (for one)
-3 old-fashioned clothespegs (the kind that are flat on two sides)
-two googly eyes (~5mm)
-thin green ribbon, ~10cm long
-red felt, hole-punched (so you have a little circle)
-square of red felt,
-brown felt pen
-glue
Instructions:
-glue two clothespegs together, flat sides together, to make the body
-colour the ends of the clothespegs brown to make hooves
-glue the square of felt over the rounded end of the clothespegs, to make a blanket over the reindeer’s back
-glue the red felt circle to the flat side of the 3rd clothespeg, at the top edge of the rounded end, to make the nose.
-glue the googly eyes about a centimeter above the nose (use your own judgement on where the eyes look best)
-glue the head to the body. The ends should be pointed in opposite directions, with the ‘body’ of the clothespeg overlapping (this way, the legs point down, the antlers point up, and the head is attached to the body)
-tie the ribbon into a bow and glue it below the reindeer’s "chin"
-slide a branch of a Christmas tree between the legs of the reindeer, and he’ll sit on your tree.
Candycane Reindeer
–>these make great service projects, for table favors for Seniors homes or meals-on-wheels programs.
Materials
-1 regular-sized candycane
-two small googly eyes
-one small red pompom or circle of red felt
-one brown pipecleaner
-piece of green ribbon, about 10-15cm long.
-glue
Instructions:
-fold pipecleaner in half, and wrap center securely around middle of the ‘hook’ of the candycane. Bend the pipecleaner to look like antlers
-glue pompom/felt circle to end of ‘hook’ for nose.
-glue googly eyes halfway between nose and antlers (or wherever you think it looks good)
-tie ribbon around ‘neck’ of reindeer
Christmas Crackers
Materials:
-toilet paper rolls
-wrapping paper
-ribbon
-candy, confetti, balloons, stickers, little toys (like the ones you get out of Kinder Surprise eggs) – to fill your crackers
-scissors
-the actual ‘cracker’ – can be purchased at craft stores or in the craft section of some dollar stores. They’re rather expensive, so if you and your girls want to make a bunch (eg. If each girl wants to make enough for her whole family) just skip the actual cracker part.
Instructions:
-cut the wrapping paper to fit your roll
-wrap paper around tube, and gather and tie off one end with ribbon, leaving one end open.
-insert any goodies and then gather and tie off the other end of your cracker.
Bear Ball Ornaments
–>these sell well at craft fairs
 Materials:
-Christmas balls (you can buy them pretty inexpensively at stores like Zellers)
-Pompoms in bear colours: grey, brown, white, black. For each bear you need one large (for head), five medium (for legs and tail), two small (for ears), and one tiny black or pink one (for nose). All except the nose should be the same colour.
-googly eyes
-glue
Instructions:
-glue large pompom (head) as close to hanging hook as possible (it should be almost right on the hook, so that your bear hangs fairly straight
-glue ears, eyes and nose onto head
-glue four legs and tail onto ball
-hang from your tree and enjoy!
Deepa Lamp –>Divali is the Hindu Festival of Lights, so lights, candles, etc are very important.
Materials:
-modeling clay
-lamp oil
-wick (can be purchased at craft stores)
Instructions:
-mold clay into bowl shape
-place the wick in the center
-fill with a bit of oil
-light your lamp
Rangoli –>these are made during Divali and placed around the house to welcome the Goddess of Prosperity.
Materials:
-paper (coloured paper works really nicely)
-pencils
-glue
-flour, rice, dried beans, etc.
Instructions
-trace your foot onto a piece of paper with a pencil. You can add details, such as individual toes, or just keep it really simple.
-glue flour, rice, dried beans, etc, onto the shape of your foot
-display your rangoli at home to welcome prosperity
Kufi (traditional headwear of Kwanzaa)
Materials:
-black, red and green felt or construction paper.
-scissors
-hot glue gun if using felt, white glue or stapler if using paper
Instructions:
-cut 2-inch wide brown band out of red felt/paper, long enough to go around head with 2 inch overlap. Staple or glue overlap in place
-cut two 1 x 12 inch strips out of each colour.
-form an X with each set of strips and staple or glue at the center
-pile the X’s on top of one another so that they resemble to spokes of a wheel.
-center the brow band on top of the piled X’s. Attach the ‘spokes’ to the band by folding up the ends against the band and stapling or glueing them in place.
-if using a stapler, cover the staple prongs by lining the inside of the brow band with masking or duct tape.
Mini Kwanzaa Music Makers
Materials:
-two empty black film canisters, with tops
-two craft sticks (aka popsicle sticks)
-coloured vinyl tape(aka electrical tape) in red and green
-green, red and black markers
-rice, beans, small pasta or beads.
-scissors
Instructions
-decorate the craft sticks in Kwanzaa colours–red, black and green
-decorate film canisters with colored vinyl tape
-cut a small slit in each top, just big enough to hold craft sticks securely. Fill containers half-full with rice/beans/beads.
-replace tops and push in craft sticks.
-shake your music makers and dance to the beat.