Return to the Growing under Lights Forum
 I have found the BEST cheap flourescent ballast/fixture I have found the BEST cheap flourescent ballast/fixture
Posted by zink 6a (My Page) on Wed, Nov 26, 03 at 12:29
| After reading
nearly two hundred posts on coral/fish forums documenting their
attempts to achieve the best lighting possible, I set out toexperiment
with many different fluorescent bulb types and ballasts. Being very
comfortable with electronics, I played around extensively with the
concept of "overdriving" fluorescent lights, by a simple rewiring of
the ballast wires. This can be done with a wide range of thenewer
electronic ballasts, but NOT the older, heavy magnetic ballasts. While
doing so, I happened upon the least expensive and mostversatile
electronic ballast available. Even without using the concept of
overdriving, which I will explain, these fixtures are a very good
(andbright) deal.
The light is a Home Depot "Commercial Electric" Shop Light which
uses an electronic ballast - a Sunpark SL15. The fixture sells for
only$6.49 at the local Home Depots. Electronic fluorescent ballasts
have become recently popular and can drive lamps more efficiently and
ata higher frequency, which eliminates hum. Electronic ballasts are
designed to power the newer and more efficient T8 bulbs on the
market,but can also operate the old standard T12 bulbs. (T12 = 12/8
inch diameter, T8 = 8/8 inch diameter). Side by side, 32w T8 bulbs in
thiselectronic ballast fixture are brighter that 40w T12 bulbs in a
magnetic ballast fixture. That is just the start. Although I bought and
playedaround with many types of electronic ballasts (32w, 59w, 110w,
HO, etc) I ended up buying many of the Home Depot fixtures after
findingout what I could power with them, mainly by "overdriving".
Overdriving (which requires a ballast that drives 2 or more
lights) involves disconnecting the wires from both ends of one lamp's
socket,and join them to the wires of the the other lamp. This results
in a 32w lamp being driven to output approximately 1.7 times as much
light asnormally produced. This will reduce the life of the lamp,
somewhat, but in the overall picture it is very economical to replace a
32w bulb -even twice as often. With fluorescent lights, over 95% of the
total cost of using the bulb is the electricity, since the bulbs last
so long tobegin with. I used both a current meter and a light meter to
compare my results. The 1.7 times figure was verified by
anotherexperimenter I read and your own eyes can DEFINITELY see the
difference.
The Sunpark SL15 ballast has 2 red wires and 2 blue wires going
to one side of the fixture, with 1 blue, 1 red, and 1 yellow wire going
tothe other end of the fixture. On the first end, combine 1 blue wire
to 1 red wire (either one), then the other blue to the other red wire.
Onthe other end, combine the single red to the single blue wire. The
yellow wire on one end will also be jumpered from one socket to
theother. Just remove the jumper from the unused socket. Now, one
socket will have a red/blue attached to each side of the socket.
Theother socket will have a red/blue and a yellow attached to it. You
have "paralleled" the ballast output and can now drive an incredible
arrayof standard bulb types: 48"-32w, 48"-40w, 36"-30w, most any 24"
bulb. They make a Gro-Lux bulb VERY much brighter than normal.
Iactually lit bulbs that would no longer light in a normal fixture.
The coolest discovery of all, though, was that I could really
light up some special bulbs I was interested in. The power compact
twin-tubeT5 bulbs that come in 36,40,50 and 55 watts (and are about 22"
long) could also be lit. The 40w bulb was INCREDIBLY bright. In
thiscase, one $6.50 ballast with one FT40w (also called PLL40, Dulux-L
40) bulb was WAY brighter than a normal 40w 2-bulb fixture. I alsowas
able to light up a 54w T5 High Output to a blazing fury. Those 54w
bulbs are recent, very efficient (lumens/watt) bulbs on the market.I
built a fixture with 4 54wattT5HO bulbs and 4 Sunpark SL15 overdriven
ballasts which is as bright as a 250w High Pressure Sodium.
I must issue a warning or two. If you don't know much about
working with electricity, you should read up on electrical wiring
techniques andsafety first. I learned electronics just by playing
around with the stuff all my life. It is not difficult to do, though.
The other warning is thatone pallet of fixtures that one of the Home
Depot stores got in had a slightly different ballast with only two
wires going to one end instead ofthree. The ballast apparently worked
on a slightly different principle and could NOT be overdriven.
So basically, all you need to do is buy 2 fixtures, remove the
ballast from one and mount it in the other fixture. Then overdrive them
both.One hell of a bright light. I also took my Dremel and cut some of
the fixtures shorter to make 36" and 24" fixtures, also overdriven
withthose ballasts. I obviously had lots of spare time.
I guess the most important thing to mention is that I put some
houseplants under my overdriven lights, and they have taken off like
I'venever seen them do before. I am loving it.
|
Follow-Up Postings:
 RE: I have found the BEST cheap flourescent ballast/fixture RE: I have found the BEST cheap flourescent ballast/fixture
| Excellent info Zink! This
is just the kind of info I'm interested in. You may have read some of
my posts here. I will have to try out your "hotrodding" of the
electronic ballast. I figured this could be done, I just did'nt know
how to do it. Are you using any other bulbs other than gro lux?
I just don't like the fact that all the grow bulbs have such low lumens
to begin with. Take a look at my post I've linked and see if any of
these bulbs look good. They are the highest output I could find for
their type. They are all Phillips. Thanks much,
Mark ps I'm printing out your post for reference later! Finally someone is doing what I thought could be done. Keep us posted. |
Here is a link that might be useful: bulbs
RE: I have found the BEST cheap flourescent ballast/fixture- Posted by: zink 6a (My Page) on Wed, Nov 26, 03 at 14:54
| Actually,
I just mentioned the Gro-Lux because I had stuck every bulb I had
around into different setups to see how they lit up. I even "overdrove"
a black light I which I had bought for no reason whatsoever. The
two kinds of bulbs I am going to play with, plantwise, are those good
Philips 32w/T8 fluorescents and the PLL40 watt T5 bulbs. Another
note: In the last 3 months I have read and accumulated an extraordinary
amount af data on lights and growing. Previously, I had abandoned the
idea of using the Gro-Lux bulbs for anything but that cool purple glow
because of the low lumen output. Recently, however, I found out that
the small amount of light that the bulbs do put out is almost perfectly
matched and balanced to the nanometer ranges that chlorophyll requires,
and IS a good light source. It just doesn't put out any of the rest of
the visible spectrum. I am refering to the standard Gro-Lux, not the
Wide-spectrum. Wide-spectrum Gro-Lux is not any better for plants -
fish tanks, maybe yes. I think Philips is a great company. I love their bulbs. By the way, I am going to see if those self-ballasted compact spirals have a plant use. They, too, are quite efficient. |
RE: I have found the BEST cheap flourescent ballast/fixture| Thanks Zink, The
gro-lux has been recommended to me by others here. I guess if it has
the correct nanometer ranges and you can drive the "...." out of it,
then you can't go wrong. I will take your advice. I have also looked at
T5's. There is alot to consider when growing under lights. I'm my
smaller bonsai under lights and each tree has slightly different
requirements...to much to get into right now. Thanks,
Mark |
RE: I have found the BEST cheap flourescent ballast/fixture| I
recommend Gro-Lux bulbs. I often see posts concerning their low lumen
count, but one need to keep in mind that lumens are a measurement for
human eyes, not plants. A Gro-Lux bulb has a concentrated light
frequency in the 450 nm range. Therefor, it's great for stimulating
photosynthesis in plants, but not for humans, hence the low lumen
count. One thing I am curoius about, is whether overdriving these
bulbs may somehow change the frequency of light they emit. For
instance, could a bulb with "peaks" in the 450 nm range now output at
550 nm due to the overdriving? In which case, they will appear brighter
to us, but be LESS effective to plants. Just a thought.
-sam |
RE: I have found the BEST cheap flourescent ballast/fixture| I was curious about that also Sam. Zink,
I
am a little confused about one thing. Are you using one Sunpark SL15
ballast for a 2 bulb fixture or one ballast for two 2 bulb fixtures(4
bulbs total)? Why would you have to remove the ballast from each
fixture at all...I thought it was just a rewiring of the ballast while
it is still inside the fixture. Are you possibly saying that 2 ballasts
are put into one 2 bulb fixture. Sorry for the confusion, I just want
to make sure I do it right. You wrote: "So basically, all you
need to do is buy 2 fixtures, remove the ballast from one and mount it
in the other fixture. Then overdrive them both." BTW...The Home
Depot near my house doesn't carry this "Commercial Electric" shop
light. They only carry "Lithonia" brand. They have 3 Lithonia shop
lights all of which are magnetic ballasts. I will call around to the
other Home Depots, hopefully they carry yours. Thanks,
Mark |
RE: I have found the BEST cheap flourescent ballast/fixture- Posted by: zink 6a (My Page) on Fri, Nov 28, 03 at 22:24
| Jazzer, I hope I can clear a few things up for you. First,
in regards to frequency shift due to overdriving, the light color WILL
NOT change. The process is governed by laws of quantum physics which
guarantee that it will not shift color. I will explain. This is
the process that happens, either 60 or 120 times a second with magnetic
ballasts, or 22,000 to 45,000 times a second with electronic ballasts.
The ballast initially provides a high voltage to the filaments at each
end of the fluorescent lamp. When the voltage reaches a critical level,
the gas in the tube (mainly argon with a little mercury) suddenly
becomes ionized, and current rushes through the tube. “Ionization”
means an atom now has more, or less, electrons than it normally would
contain in it’s outer shell. In this case, extra electrons have been
induced to go racing around the “conduction band” of the mercury atoms
to get to the other side of the tube. Sufficient voltage pressure is
created by the ballast to force the gas into ionization. In the
process, the electrons in the outer shell of the mercury atoms randomly
pick up extra energy and go into a higher sub-orbit that normal. Those
electrons then drop back to the original orbit as soon as possible,
which releases an EXACT amount of energy (a quantum level) as a photon.
That photon will ALWAYS be an exact color frequency based on the atom
and it’s outer-shell electron. As far as the mercury atoms go, this
will actually be ultra-violet light (UV), and is not the final color
output of the lamp. The actual color that is emitted from the
tube is based on the type of phosphors which coat the inside of the
tube. The same process that I just described above is repeated there,
at the phosphor coating, when the photons from the mercury atom hit the
tube. There the UV photons are absorbed by the phosphor compounds and
re-emitted at the SPECIFIC QUANTUM LEVEL, or color, as the phosphors
had been designed to emit. The photon(s) emitted cannot possibly
violate the energy levels set by nature. More ENERGY (by overdriving)
will translate to more LIGHT. In this case, it is just as if you shone
more light on an object, and it got brighter, not colored differently. A
side note: Fluorescent lights have notoriously been known for flicker.
This is because with magnetic ballasts the lamp actually drops out of
ionization and get re-ionized 60 times a second. Electrical engineers
discovered that once you speed the process up to at least 4,000 Hz, the
gas stays ionized. This is also a bit more efficient. And, since the
notorious hum would now become a squeal, engineers design electronic
ballast to oscillate above the range of human hearing. No more
noticeable hum. Now, for the Home Depot fixtures. They
are sold here locally (Louisville, KY) in a grey and white box marked
Commercial Electric Shoplight, with the word Shoplight in larger
letters. The part number is 140-904. They do NOT say anything about the
ballast inside, and the HD employees would not be expected to know that
either. I did notice that above the UPC code on the back is HBSL-15, a
reference to the Sunpark SL15 ballast. That is the only indication I
ever saw on the box. Our local Home Depots seem to have had these
fixture constantly in stock for at least 10 months (when I noticed
then). Oddly, in my nearest HD store, they currently have a pallet of
these shoplights which has a ballast that looks the same, but without a
label, and has only 2 wires (1 red + 1blue) coming out of one end. That
end of the lamp is wired slightly different, and is NOT the correct
ballast to use. This incorrect ballast DOES have the HBSL-15 written on
it, but IS NOT the “overdriveable” ballast. The correct ballast has 3
wires (1 red, 1 blue and common yellow) out of one side, and 4 wires (2
red + 2 blue) out of the other side. There also are the black(hot) and
white(neutral) wires which I did not mention. After purchasing
the wrong fixture once, I decided to open the box in another Home Depot
and look. They had a fresh shipment of the shoplights in and they WERE
the correct ballast. What was going on with that one odd shipment, I do
not know. I would open the box first and check for the Sunpark SL15
label on the ballast AND that there are 1 red/1 blue/1 yellow wire
coming from one side of the ballast Finally, the needed details. The
fixture uses a single ballast to operate 2- 48” lamps. Essentially,
what I am doing to “overdrive” is to use that TWO-lamp ballast to drive
only ONE lamp. I am removing the wires going to lamp #2, and pairing
them up with the wires going to lamp #1. (There is really no designated
#1 or #2 lamp in the fixture. That is just for the explanation.) That
will “overdrive” one lamp to about 1.7 times its normal output. That is
why I said to buy second shoplight, and transfer the ballast to the
first shoplight, then overdrive the second lamp, too. You will now have
2-lamp fixture which puts out more light than 3 lamps. Each bulb is
being powered by it’s own 2-lamp (but inexpensive) ballast. I
will describe again how to do it, but first, you will be glad to know
that most ANY multi-lamp electronic ballast can do this. Not only that,
but you can also do a 3x and 4x overdrive with a 4-lamp ballast, but
the efficiency drops. (4x is only 2.4 times as bright as normal). Home
Depot sells a GE ballast for 4 lamps, B432I120RH. Another commonly
available 4-lamp ballast is the Advance REL-4P32-SC. Both of these can
be used to make an overdriven 2-lamp fixture. These two ballasts are
Instant-Start as opposed to the Sunpark being Rapid-Start.
Instant-Start fixtures have only one wire normally go to each socket
with the socket’s two connectors being shorted together. I have
overdriven all of these ballasts with pleasing results. As for the Sunpark: On
one side of the ballast, there are 2 red wires going to one lamp socket
and 2 blue wires going to the other lamp socket. Disconnect the one set
of wires to one socket (either both reds or both blues) and connect
them to the other socket’s two wires. Connect any 1 red to any 1 blue
and then the other red to the other blue. Which red to which blue does
not seem to matter. It just works every time. On the other side of the
ballast, there is 1 red wire going to one socket, 1 blue wire going to
the other socket, and a single yellow “common” wire that is shared by
both sockets. Combine the red wire to the blue wire and leave the
yellow wire in place. You will have to remove the yellow “jumper” wire
you will see between the sockets. That is how they normally share the
yellow wire. The only annoying part is learning the art of twisting and
pulling out the wires from the sockets without breaking them off. If
you use either of the other two ballasts I mentioned above, those are
Instant-Start. Without going into the technical differences now, the
instant-start method has only ONE wire going to each socket, and the
socket will have the two connections (lamp pins) jumpered together.
They are actually a little simpler to wire together – coupling two
wires together instead of two PAIRS of wires. So far I have
overdriven at least 20 ballasts, with no problems. You will be left
with a lot of fixtures - minus a ballast. I used my Dremel tool to cut
some of them up and make custom fixtures, reflectors and what not. Try
this with overdriving: On the workbench, instead of using one 48”-32w
bulb, try lining up 2-24” 17w T8 bulbs in series and jumper two of the
bulb end together - sort of making one long 48” bulb. You will find
that one Sunpark ballast will overdrive them in series like that. THEN,
make yourself a 24” 2-bulb fixture following the wiring you used. You
can make a small, really bright fluorescent light that way. I made a
24” 4-bulb fixture using 2 overdriven ballasts. Even better,
instead of the standard medium bi-pin sockets, find a 2G11($3.50)
socket and a 22” Philips PLL 40w twin tube compact lamp ($10 or less
some places). One 40watt lamp of that type will GLOW LIKE ALL GETOUT
with that ballast. Check out the fish/coral forums. I should try to post the URLs of some of the excellent websites where I learned a lot about this stuff. I hope this helps. Let me know what you are successful with. If
anyone else tries this, please post the results. Myself, I just gotta
remember to actually GROW STUFF instead of playing with lights. |
RE: I have found the BEST cheap flourescent ballast/fixture| Thanks
very much Zink! You cleared things up very well. Now I have a good
understanding of how to do it. My father has a good
electronics/electrical background also. I will look for Sunpark. Thanks
for all the codes and info. I figured the color temp wouldn't
change when driven harder in fluorescents. Incandescents are different
if I'm not mistaken. When dimmed,incandescents change color temp. I
have used "tungsten" bulbs in photography and they make a 3200K and a
3400K bulb. The 3400K burns up faster since it is driven harder I
suppose. My parents have a dimmable fluorescent lamp in their living
room and it doesn't get "warmer" looking as it is dimmed. Incandescents
on the other hand, get very warm,almost candle like(I think around
2500K?)when dimmed. Thanks much....I will try out your system
sometime after the new year when I get a chance and some free time.
Lastly, Do you happen to know how long the bulbs will last when driven
harder? I have been changing my bulbs once a year but since bulbs are
cheap I don't mind changing more often. Mark |
RE: I have found the BEST cheap flourescent ballast/fixture- Posted by: zink 6a (My Page) on Mon, Dec 1, 03 at 10:53
| I
have found an article which has a description of overdriving with a
color diagram included. This article describes overdriving all the way
to 4x, which really produces a lot of light. The URL is: www.plantedtank.net/odno.html There are a couple of links on that page to more info. I
have overdriven by 4x on my work bench, but I can get more use out of
just a 2x overdrive using twice the bulbs. The fish tank people have to
try to get as much light over their tanks as possible in a small area,
so 4x is often more useful to them. |
RE: I have found the BEST cheap flourescent ballast/fixture| Thanks Zink....I'll check the site out. Mark |
RE: I have found the BEST cheap flourescent ballast/fixture- Posted by: zink 6a (My Page) on Tue, Dec 2, 03 at 10:01
| I
thought I would elaborate on the possibility of color change due to
increased lamp current as a result of overdriving. While should be no
color "shift" due to the quantum nature of the emission process, I
understand that the mercury atoms actually emit some small visible
light spikes which increasingly penetrate the phosphor coating when
overdriven. However, in a a side by side comparison of a normal
lamp and an overdriven lamp, the output is so much brighter that the
ability to detect a slight color change is difficult at best. For
those who are interested, here is a link to a major phosphor
manufacurer's list of all their lamp phosphors, the exact color of each
and the width (or bandwidth) of color peak:
www.nichia.com/lamp.html I
read that this phosphor company supplies 40% of the lamp manufacturers
with their phosphors. It is quite a revelation to the technically
inquisitive person. |
RE: I have found the BEST cheap flourescent ballast/fixture- Posted by: lightt z7 Northern VA (My Page) on Sat, Dec 6, 03 at 19:26
Zink,
I did it and I thank you!! Fixtures (at least around here) have gone up to a whopping $7.25 or so....... It would probably be a good idea to:
1.
Explain a little better how to accomplish the wiring. I was able to pry
off the backs of the 4 light sockets without breaking any of the tabs
but broke at least one on the other four. From there it was simple to
just insert the wires from the other ballast but you made some mention
of "twisting" the wires out of the sockets. I dicked around with that
for a long time without success.. never did figure out how you were
doing that. (?) 2. Explain how to release the stop on the power
cable and push it through the fixture so you have enough wire so you
don't have to splice wire together to be long enough to get the light
sockets in place. 3. How you "mount" the second ballast in the
fixture. I took the screw out of the existing one and simply wedged the
second one in next to it. For sure this thing is bright! Hope it has a decent life span............. Terry Light
Oak Hill, Virginia |
RE: I have found the BEST cheap flourescent ballast/fixture| Can
someone take pictures of how this all works and post them with
descriptions? i would really like to see exactly how its done, i am a
visual learner and all these words are just confusing me. thanks ~Ryan |
RE: I have found the BEST cheap flourescent ballast/fixture- Posted by: lightt z7 Northern VA (My Page) on Sun, Dec 7, 03 at 11:44
Ryan,
I'm
exactly the same way but thought I might be able to visualize if I had
the fixtures in front of me... and it was a lot more intuitive once I
made the purchase and was looking at it along with Zink's notes. Sorry
I didn't think to take pictures prior to taking these apart but here's
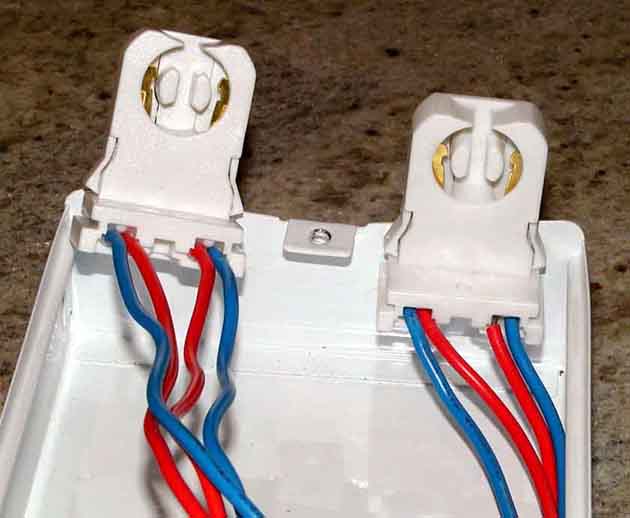
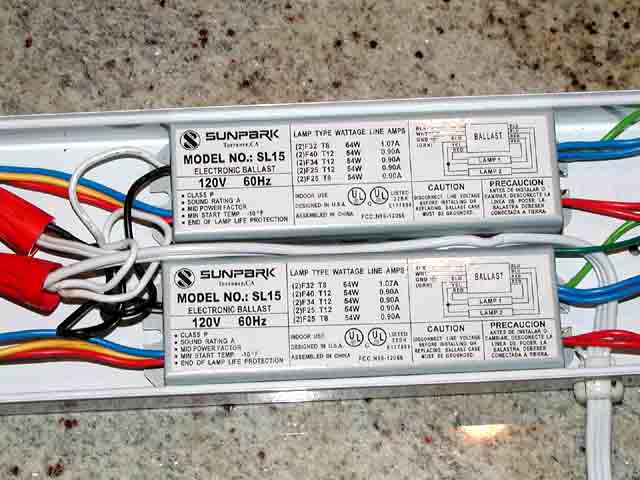
some pictures of the thing put together: The first two is of the side where you have to remove the yellow jumper wire between the two sockets.
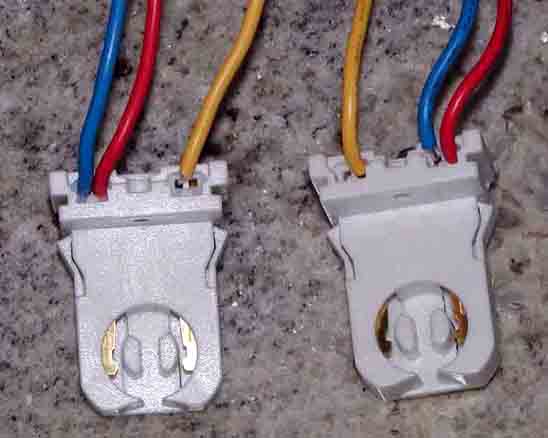
 The next two are of the side where you combine the blues and reds:
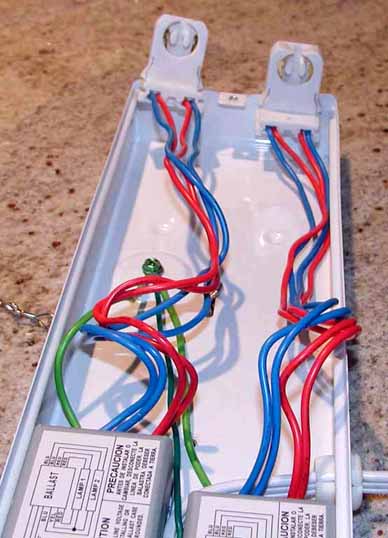 This one shows the power cord crimp twisted out of the fixture to allow more of the cord to be shoved inside the fixture.
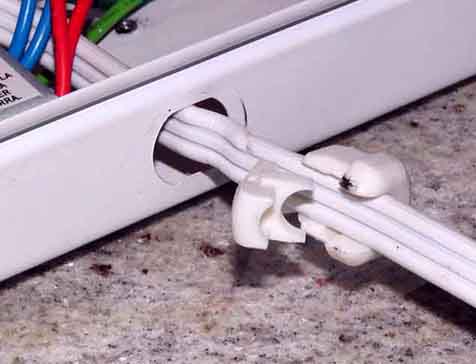 The
power wires were held together with a crimped connector. I squeezed
that connector to undo the ballast wires and then used regular twist on
wire nuts to add the second ballast as shown here.
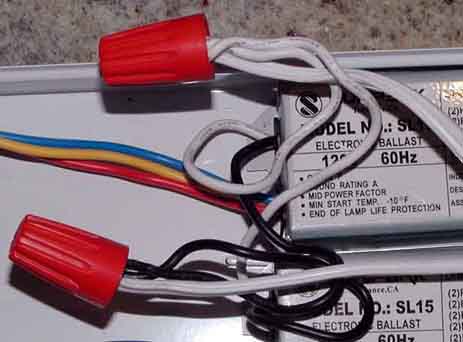 And finally, this shows the two ballasts.
 Hope this is some help.
Terry Light
Oak Hill, Virginia |
RE: I have found the BEST cheap flourescent ballast/fixture
RE: I have found the BEST cheap flourescent ballast/fixture| This
is very interesting. I have a suggestion and a question. My suggestion
is that you don't have to monkey around with getting the wires in and
out of the sockets if you use solderless tap connectors - the ones I
know of are Scotch-loks. Home Depot and Radio shack should have them;
just make sure you get the right ones for your wire size. These let you
tap into a wire without cutting it - for example you could cut off the
red wires in the middle, then lay the blue wire in the Scotchlok, lay
the end of the red wire in it, fold over the top and press it together.
These are real handy for a lot of things. My question is what does
this do to the wattage of these fixtures? I can build them, but my
electrical theory is pretty shaky. Does parallelling the ballasts mean
that one tube is now using 80 watts instead of 40? So you'd be
basically doubling the wattage of all your two tube fixtures? I think I
may already have my timer overloaded, and it could be a consideration
if you are using extension cords, or have other things on the circuit
you're using. Thanks. WW |
Here is a link that might be useful: Picture of a Scotchlock tap connector
RE: I have found the BEST cheap flourescent ballast/fixture- Posted by: zink 6a (My Page) on Tue, Dec 9, 03 at 11:40
| I’m
glad to see someone was able to accomplish the overdrive trick AND take
good pictures of the wiring. That is exactly the way the sockets should
be wired. A picture is really worth a thousand words. I have a digital
camera, but I haven’t tried uploading pictures here. Now what you ought
to do, using caution of course, is see how different bulbs light in
both normal and overdrive mode. I would bet you’ll get a kick out of
trying a PL-L 40watt or Dulux-L 40W “twintube” bulb. It would help to
have a bunch of small jumper cables with alligator clips. I have about
40 jumpers. With them, I can goof off a lot and try whatever lights
combos I can clip together. Terry,
In answer to your 3 questions:
1.
It was a pain-in-the-butt to figure out how to get the existing wires
out of those “push-in-and-stay-in” type sockets. I did not pry the back
off of the sockets. I think I did that once, early on, and broke the
socket apart doing it. I finally developed the knack of doing what I
can only call a “twist and wiggle” technique to get the existing wires
out of their slot. Although I can get most of the wires off, I still
end up breaking off 10-15% of them. Since you end up with a couple of
extra sockets anyhow, you can afford to mess up a few of them. As a
last resort, I would have gone ahead and cut and spliced the wires if I
couldn’t get the wires wiggled out of the socket. Once you push that
wire in, it wants to stay in. Trial and error will hopefully lead to
some useable technique. 2. The little plastic power cable
“pass-thru clip” on the metal case is a little tricky to get loose, if
you need to do that. With the right pair of pliers (I have a needle
nose vice grip) you can compress the clip and get it to squeeze out of
the hole. I often remove it for one reason of another, but sometimes it
is just easier to go ahead and splice the wires that you need to
lengthen. 3. You said, and I saw in your photo, that you wedged
the two ballasts in next to one another. If that works then use it. I
happen to have a lot of screws, drills, and other stuff to use at home.
The existing ballast in that particular light is mounted towards one
end of the fixture. I just drill a couple more holes somewhere at the
other end of the fixture and mount it there. Since the wires are longer
on one side of the ballast than the other, I found out that I can turn
the second ballast around, mount it on the other end, and the wires
will reach just fine. I mount it wherever the wires will conveniently
fit right. By the way, I happened to have spent many years in
an optimistic and opportunistic mode while I picked up all kinds of
good electrical and electronic junk on our city streets during “junk
pick-up week, which is a regular event in all of our neighborhoods. I
have even found computers that still work. That is why I have all kinds
of stuff to play with and break. Now that I am married, I have a
mission to actually use the stuff and not collect it. WeedWoman,
I
have never used the Scotch-lok connectors. If anybody tries them, I
would like to know how well they worked for them. My “twist-and-wiggle”
technique, to remove the wires, feels like a Zen exercise when I do it.
If I am not in the groove, I don’t do well. Wires break off. I take a
deep breath. I close my eyes. I take a deep breath. I try again. As
far as wattage goes, I have measured the power consumption while 2x
overdriving both 32w and 40w lamps. I measured the power in amps, but
converted it to watts here: Normal (Not Overdriven) 1x
F32T8..... 32.3 watts
F40T12... 29.3 watts Overdriven 2x
F32T8..... 54.9 watts
F40T12... 51.9 watts These
measurements are per 1 bulb. The brand of lamp is insignificant. The
line conditions and the brand of electronic ballast used will alter the
readings, but not by much. I have tried other ballasts and got about
the same numbers. Notice that the electronic ballast does not double
the power consumed. The more times a bulb is overdriven, the less
efficient it becomes, as it is starting to drift out of the bulbs
optimal design parameters. A 2-bulb fixture, then, would consume 104
watts total. The old magnetic ballasts with F40T12 bulbs consumed about
that much per fixture! OVERDRIVE NOTE:
Since I began
investigating the overdrive phenomenon, I have done a great deal of
reading on both the electronics theory behind how it works and
testimonials from real world users. Actually, there are several ballast
manufacturers(Fullham, Workhorse, Icecap, etc.) who have been producing
high performance electronic ballasts for many years now. Many of these
ballasts are designed to drive a wide range of bulbs, with full
understanding that many of the allowable bulb combos are definitely
being powered by more current than they were initially built for. Those
ballasts were DESIGNED to be able to do that, and this is exactly what
people in-the-know with fish and coral tanks have been doing for years.
I was delighted to read several discussions by electrical engineers who
discussed how it works, and why it is a good way to get more light from
a bulb. The only detrimental effect, they pointed out, was a reduction
in lamp life. I do not think the reduction in lamp life is significant,
or much of a factor in practical use. The people who have recommended
this have usually stated that they change their bulbs at least once a
years anyhow, and do not have a burn-out by then. I have had 2x
overdriven lamps burning for 12-18 hours a day for nearly a year now-
with no burn-outs yet. Most ALL of the electronic ballasts I have
played with were capable of a variety of overdrive scenarios. |
RE: I have found the BEST cheap flourescent ballast/fixtureGreetings folks;
(sldonham)sam,
since you posted in this thread,and I noticed your background in
electrical engineering,I'm hoping for any further comments on the
validity/rationale of gutting electronic ballasts to increase light
output.Can anyone direct me to published articles(ie
PopElectronics)where someone with an electrical engineering background
has "signed-off" on this approach? Are we not disregarding many of the
specifiers for ballast/lamp compatabilities?
My post is not
intended to discredit this approach; I'm seeking some published
documentation.My perspective is not to do things because they work, but
to try to understand why...thanks.frank |
RE: I have found the BEST cheap flourescent ballast/fixture- Posted by: ojlm Upstate NY (My Page) on Fri, Dec 19, 03 at 14:43
Hey
Guys! I`m Retired from the tropical Fish business.. All this "hoopla"
about lighting has been known for years on Fish tanks -especially those
know as Sealux.For marine fish.
Suggest you visit your nearest reliable Pet store and chat with its owner! GM |
RE: I have found the BEST cheap flourescent ballast/fixture| sorry, but I rather doubt my pet store owner has a degree in electrical engineering.... |
RE: I have found the BEST cheap flourescent ballast/fixture- Posted by: zink 6a (My Page) on Fri, Dec 19, 03 at 16:34
| Pickwick, I
am the guy who began this thread by posting the ballast rewiring
technique. I first saw it being discussed in several of the ‘fish and
coral” forums on the web. I started looking for, and studying,
everything I could find on the how’s and why’s of overdriving
electronic ballasts. The folks in those forums always described their
success with great exuberance. The key thing is the ballast must be the
newer electronic, not the older heavy magnetic type. I had full
confidence that I could easily do it. I have a degree in Electrical
Engineering Technology and have spent many years designing and building
my own power supplies and musical effects. I understand the basics of
what overdriving is doing. First, I am not “gutting” the
ballast. I am rewiring the outputs of the lamps. Electronic ballasts
which operate more than one lamp often show several wiring options,
depending on how many lamps you are going to use. What rewiring to
overdrive lamps does is cause the circuitry to see a different load
drawing the current. The output transistors can do this and still be
functioning within proper specifications. The most telling thing about
the results is that, using a 2x overdrive, the ballast draws less power
with one lamp than it would draw normally with 2 lamps. The two output
transistors are teaming up and actually drawing less amperage than
normal (with 2 lamps). I wanted to supply you with a link of a
discussion I read between a couple of Electrical Engineers with PhD’s.
They discussed the subject at length and completely validated using
e-ballasts that way. I searched a while, but could not find the link. I
will search again when I get home. Their comments, more than any, made
me realize this was a good way to make really bright light. I
have done the same sort of thing with several computers I built.
Microprocessors are almost always capable of running faster, but are
“crippled” by Intel and AMD for marketing scale purposes. Unlike
the microprocessors running at a higher speed, the overdriven ballasts
are actually running below their normal capacity, sharing the duty, and
drawing less than normal. I have done this with 7 different types and
wattages of electronic ballasts and they ALL worked well. I
would like to hear from Lightt and anyone else who might have done an
overdrive rewiring. How is it working? Are you happy with the new level
of light you’re getting? |
RE: I have found the BEST cheap flourescent ballast/fixture| zink, thanks
for all the information :) This forum has been very helpful for me. You
seem like you won't mind a question from someone else(I hope!) I
have an eight foot/four bulb Lithonia light T8 fixture from home depot.
They cost, without lights, about $37.00. Our Home Depot's in Kansas
City do *not* have the smaller 4 foot/2 twin light T8 fixtures
yet(still the old T12 humming type.) What I don't get....is why would I
want to remove a light from each end of this four-light fixture?.. in
other words, if I did what you are saying, I would go from 4 lights to
two on this fixture, right..? Yes, the two lights would be brighter
than the two it would replace, but not as bright as having the orginal
four... What am I missing? thanks for any help, Scott(I can do basic wiring in my house and know enough to run everything through a GFCI just in case...) |
RE: I have found the BEST cheap flourescent ballast/fixture- Posted by: zink 6a (My Page) on Fri, Dec 19, 03 at 23:07
| Scott, I
might be able to answer your questions better if knew what that
Lithonia fixture looked like. I first thought you must have 4-8’ bulbs
in your fixture until I looked at a Lithonia catalogue and saw they
sell “tandem” 2-bulb 48” fixtures in a 96” length (2-48” + 2-48”). Is
that what they are? Since you also said they were T8’s, it is an
electronic ballast, I assume. If you could give me the HD part number
or the Lithonia model number and the ballast model name/number, I might
be able to tell you something. I can tell you about the ballast
removal. The fixture I had referred to in the above posts was the
el-cheapo Commercial Electric Shoplight 140-904. I just saw them in the
HD online site and they were marked “backordered”. It was those
fixtures that I used. What I would do is buy 2 of the fixtures
($14.50 total), remove the ballast one of the fixtures and mount it in
the other fixture. I then had a leftover shell of a fixture, with 4
extra sockets to use if I ever needed. I then could dedicate one
ballast to one bulb. I disconnected the wires, as described in previous
posts, from four sockets (2 bulbs) and joined them together (see photo
above) into only two sockets (1 overdriven bulb). I really
bought extra fixtures, at $7.25 apiece, just to get the ballasts out of
them. I mounted the ballasts in all kinds of homemade configurations. I
had amassed a LOT of fixtures over the years, mostly throwaways, to see
if I could do something with them. I have tools, voltmeters, a
lightmeter, and a big work area, so it was easy to goof off with the
stuff. The $7.25 fixture/ballasts made it all worth playing with. Your
Lithonia ballast is probably overdriveable, but I have seen 2
electronic ballasts that were not. You would NOT have to remove your
ballast(s). What you need is another ballast, per bulb, to ADD to you
fixture. I have bought a couple 4-bulb ballasts, such as the GE
B432I120RH and Advance REL-4P32-SC which I rewired to overdrive 2 bulbs
each. You could buy one of those and overdrive your other 2 bulbs. To
use the above info I gave you, I am assuming that your 96” fixture is
actually tandem 2-48” fixture with 4-32w T8 bulbs. Is that correct? |
RE: I have found the BEST cheap flourescent ballast/fixture| zink, Yes,
it is the tandem one you discribed (2-48" fixture with 4-32w T8 bulbs.
Thanks for checking. Funny, I read over that a few times-thought I got
it right!) No where in town was I able to find el cheapo T8's anything.
I think HD dumped all the excess T12's here. The 96 inch tandem
fixtures the only T8's available...Looked at Lowes also. nada. Hard to
believe but I really searched.... I just checked the Lithonia
fixture ballast. The fixture has one ballast that runs all four 48" T8
lights. The ballast information is: Quicktronic Electronic Ballast,
Sylvania, QT4x32x8 120 ISN SC 120V 60H .95 Amps I think what
you are saying is if this ballast can be overdriven, then I would add
another similar ballast-only it would run two lights on one side and
the original stock ballast would run the other two. Where would
I put this second ballast? I suppose there is room on the other side of
the 96" fixture. Where would I find such a ballast to add? Amazing to think if this works, I could increase my light output by 70% per bulb. It is bright already! Thanks again. I know you don't get paid for this! Scott |
RE: I have found the BEST cheap flourescent ballast/fixture- Posted by: zink 6a (My Page) on Sat, Dec 20, 03 at 0:43
| The
QT 4x32T8/120 ISN-SC is an Instant Start ballast. That is even easier
to overdrive than a Rapid Start ballast because there is only one lead
going to each end of the bulb, instead of two. You will also find there
is a jumper wire, right at the socket, which will connect the two bulb
pins together. That is inherent in an Instant Start. A Rapid Start
ballast has 2 wires connected to each socket because it initially sends
a pre-heating current through the filament in the bulb’s end to aid in
the initial ionization of the mercury/argon gas. An Instant Start
ballast is designed to provide a higher starting voltage, eliminating
the need to pre-heat the filament. You will just have to figure
out where to mount another ballast, or two. You will need either to
acquire 2 2-lamp ballasts to overdrive the other bulbs, or 1 4-lamp
ballast. Since you already have an Instant Start ballast, you ought to
buy the GE/Magnatek B432I120RH that Home Depot sells. It is also a
4-lamp Instant Start electronic ballast, about $25, plus or minus a few
bucks if I remember. |
RE: I have found the BEST cheap flourescent ballast/fixture| zink, your patience with me is admirable. I'm headed to HD tomorrow to get the GE/Magnatek ballast. This is exciting. I did not know about this until I saw your post. Plumerias,
from the equator, are very high light plants. In the greenhouse, the
only thing I *never* controlled was light. Now it is the one thing I
really need to understand and understand quickly. I have learned so
much from all of you. This forum is a godsend. If anyone knows how the
spectrum changes from the equator to say, 39N, I'd like to know. I'd
like to replicate the spectrum of the equator if possible. Also, I'd
like to replicate approximate footcandles of the equator as well.... The
controversy surrounding this reminds me of when I started to use a non
vented heater in my greenhouse. If it was killing people en masse you'd
hear about it-. There are a lot of posts on Google about overdriving
fluorescent lights. Like... it is mentioned all over the internet. I will keep you posted..Everything on GFCI just in case... thanks, Scott |
RE: I have found the BEST cheap flourescent ballast/fixturezink;
again
I must emphasize that I do not wish to discredit your approach,however
I do wish to access published accounts of this method (hopefully from a
respected journal).I have e-mailed contact personnel at the rpi light
site to visit this thread and plan to ask other specialists to visit
here and comment on this approach as well.I don't know if they will
have the time or inclination to do so, but let's hope someone
will...thanks for your patience
regards;frank |
RE: I have found the BEST cheap flourescent ballast/fixture- Posted by: lightt z7 Northern VA (My Page) on Sat, Dec 20, 03 at 12:05
| Unfortunately,
my contribution to this thread is limited to "I dun it". I don't own a
light meter or a voltmeter. I'm not an electrical engineer and I don't
have a PHD, heck I'm not even into house plants. My daughters have a 20
gallon aquarium but my only job with it is to pull out about half of
the "plant that would take over the world" once a month or so. Several
weeks ago I was thinking about upgrading (read: organizing!) the setup
I've been using for starting tomato plants and happened across this
forum and this thread was near the top of page one. Between Zink's
explanation and enthusiasm I figured 15 bucks was worth the experiment.
I didn't even plug in the tubes prior to taking apart the fixtures so I
have no comparison there. What I can say is these overdriven T8's
appear to be well more than twice as bright as the T12 fixture. While
it's too early here to be starting tomatoes, I went ahead and planted
some pepper and herb seeds two weeks ago. The first week I ran the
fixture 24 hours a day (for some additional heat) but once I had some
germination I put the fixture on a timer and now have the lights on 13
hours a day. I'll undoubtedly be able to provide much better
feedback in a couple months regarding growth and durability but at this
point I couldn't be happier with the brightness my eye perceives. Terry Light
Oak Hill, Virginia
p.s.
If someone has a suggestion for some kind of flowering house plant I'm
certainly willing to see how it does under this thing! |
RE: I have found the BEST cheap flourescent ballast/fixture- Posted by: zink 6a (My Page) on Sat, Dec 20, 03 at 14:41
| Pickwick, I
tried, once again, using Google to locate the discussions I had read
between several PhD level Electrical Engineers who WERE lighting
experts. They discussed the “overdrive” effect and how it is a good and
well-established approach to obtaining more useable fluorescent light.
One problem I had in searching is that they did NOT use the term
“overdrive” in their discussion. Probably because in their eyes it was
a simple circuit reconfiguration which has already been known and has
been in use for years by others. One relevant fact – The reason
that your store-bought fixtures do not already do this is because of
the efficiencies mandated by such things as the 1992 Energy Act, which
requires standards of environmental impact and energy efficiency.
Overdriving IS less efficient use of energy, but for the special case
of the grower or fish tank enthusiast it is a welcome application for
their hobby. I did not even try this until I began searching
the web. I normally am a very good searcher and I have many tricks to
find info on nearly anything I want. I have to say I was ABSOLUTLEY
OVERWHELMED at the amount of information I discovered about the
subject. This “overdriving” effect has been a standard, used and
perfected, for YEARS in the realms of the “Fish and Coral” enthusiasts.
I their eyes I am a total NEWBIE to this OD trick. If you want to become as reassured and knowledgeable as I am I can only suggest the following. Go to www.google.com. Try both the “Web” and “Groups” sections. Enter
various different combinations of these words: ballast, overdrive,
fluorescent, 2x, 4x, workhorse, icecap, fullham, OD, ODNO, OVDR,
output, “more light” If you come up with a bunch of hits full
of mindless garbage, you may have to include the term keyphrase
-“net-abuse”, with the quotes aand the minus sign in front, to remove
some junk posts from some idiots. It made me feel like someone
who thought the world was flat and found out everyone else already knew
it wasn’t. I am years late in doing this compared to others previously
in the know. I, too, had your cautious questions in mind, but I found
out what I needed to know and understood what was going on. I
do not recommend that anyone do this without recognizing the cautions
one needs to take around electricity. The starting voltage generated by
a ballast is several times normal house current. |
RE: I have found the BEST cheap flourescent ballast/fixture| zink, I
have the GE B432I120RH ballast now(it has that number but not Magnetek.
It says Universal Lighting technologies.) It was $27 plus tax, just
under $30 at HD. I checked again, still no 2 bulb T8's yet. The Way It is Now:
I
have opened up the fixture and can see the one ballast driving all four
lights. (I wish there was a way to draw here...) You have the yellow wires attaching to the four sockets at the far ends of the fixture. check. then
you have the two reds powering the other end of the bulbs(situated in
the middle of the fixture) and the blues powering the other two(the
other two sockets at the center of the fixture.) Procedure to Overdrive:
Ok.
It looks like I will take the two blue wires from the original ballast
and connect them to a single socket on that side. Then on the new side,
I will do the same. Same with reds. Question: This still requires doing
the jiggle technique, right? Then what about the yellow wires?
They have that jumper(white short wire)between the sockets. Just cut
that out and attach a yellow wire to each end(meaning the end of the
fixture) socket? The net result: that each ballast powers the
two bulbs on that side, right? No more crossovers. I just want to make
sure. I always try to error on the side of caution. The white and black wires are a no brainer. Just connect them. The good news. There is another mount on the other side for the ballast. It looks like I will need extra wire for the new ballast. Home Depot sells this I'm sure... Anything else. What if I screw it up...Will I kill both ballasts? Will sparks fly? I rewired a lot of my old home but never worked with ballasts. I just want to make sure I'm not missing anything. Thanks, Looking forward to trying it out. Scott |
RE: I have found the BEST cheap flourescent ballast/fixture- Posted by: zink 6a (My Page) on Sun, Dec 21, 03 at 15:42
| Scott, After
reading your post, I wrote the instructions below. Then, after reading
over them, I decided that a picture is worth a thousand words. I am
going to post a CLEAR DIAGRAM showing the BEFORE and AFTER for both a
Rapid Start and an Instant Start ballast. I am going to attempt to do
this within the next 24 hours, if I can figure out how to upload a
graphic to this forum. Otherwise, I will refer you to a site to view my
diagram. You may want to wait until I do this, because my diagram
should make the wiring a no-brainer. That should end a lot of typing. Now for the wordy part: Since
you are gonna do this, we shall vow to avoid both sparks and ballast
killing. If you read all of the following, I think you will know what
you are doing. And as for the “jiggle” technique - actually twisting
and pulling at the same time - I was describing removing existing wires
from their sockets. All of the fluorescent sockets I have ever seen
have connections where, once the wires are pushed in, they require some
self-learned trial-and-error method to get them back out. Often they
break off right at the point you need to re-insert a different wire. I
hate that. Luckily, there are almost always 2 insert slots for EACH of
the 2 connecting points. In the case of an Instant Start ballast (what
both of yours are) you can probably still rewire with at least one
broken end stuck inside the socket. With luck, you may not even have
that problem. Also, if you have any non-working fixtures around, you
can scavenge a socket if you need one. Now, I want to make sure
that I know you comprehend one thing in particular about the sockets.
The basic fluorescent bulb, or lamp, has two pins at each end of the
tube. These two pins plug into the socket. On the T8’s and T12’s, this
2-pin plug and socket are called “medium bi-pin”. Inside the lamp, each
pin attaches to one end of a heating filament. The socket itself has
two connection points to insert wires from the ballast, one connection
point for each of the two pins on the bulb. Each one of those two
connection points usually has two “self-grasping” slots to insert a
wire into. In other words - 4 little insert slots for wires on each
socket. With a Rapid Start ballast (not what you have), a
separate wire goes from the ballast to each of the 2 connecting points
on the socket. After the lamp starts up, each of the wires is supplying
current to it’s side of the bulb. With an Instant Start ballast
(what both of your ballasts are), only ONE wire runs from the ballast
to each socket. There, at the socket, there should be a short jumper
wire between connection points which links the 2 pins of the bulb
together. This SINGLE ballast wire can supply current to both ends of
the lamp’s filament at once, because the jumper wire is there. This
jumper is a necessary connection for an Instant Start ballast, so that
the lamp works correctly. There are some sockets used by manufacturers
that already have an internal jumper in the socket - for Instant Start
ballast use only. I haven’t seen one of these, but take note if you
have this type. I will tell you about that in following paragraphs. For
anyone else reading this, the following information is for 4-lamp
Instant Start ballasts only (what you have, Scott) to overdrive 2 lamps
by 2x. Since I cannot see which of the red and blue wires go to
which of the lamps, I will tell you this. What you want to do is,
either - pair up 2 reds and 2 blues (preferred for simplicity), - or -
pair up a blue/red and a blue/red. You probably have several wires that
are quite long going to the tandem fixture. If you want, you could
shorten them to the length you need, and use the pieces you cut off for
extra wire. (Years ago, I ran into a dumpster full of blue, red,
yellow, black and white ballast wires from some retrofit job at a
building. I got this funny feeling about them and took a LOT of them
home. Well, what do you know?) On the other side of the
ballast(s) you will have 2 yellow wires. One wire usually runs to just
one side of one socket. There will then be a jumper wire, from that
socket, to the other socket at that end of the fixture. Each of those 2
sockets should have a smaller jumper wire to short the connecting
points (lamp pins) together. What you want to do is REMOVE (or cut) the
longer jumper (between the two sockets) and leave the short jumpers
(the ones shorting the lamp pins). Now, that yellow wire is supplying
just one lamp socket, instead of two. Remove the second yellow
wire, which should be running to the tandem fixture side, from the
socket it is inserted into. Then re-attach that yellow wire into the
socket you disconnected (the one where you removed or cut the jumper).
You have finished the “yellow” side of the first 2 lamps. Note:
Now
you know what the function of the smaller jumpers are - to short the 2
lamp pins at the end of the tube together for an Instant Start ballast.
If you find you have the type of socket with the lamp pin connections
already shorted, then good. You do not need to short them together. On
the RED and BLUE side of the ballast, you will be pairing up either
red/red and blue/blue - or - red/blue and red/blue, as described above.
(Repeated experiments have shown that either way will work). Insert one
wire into one side of the socket (the lead to one lamp pin) and the
other wire into the other side of the socket (the lead to the other
lamp pin). If you have the kind of sockets which are already internally
shorted, you must connect your pair of wires together at the socket. If
so, there probably will be 2 push-in slots at that spot. Once you have
one pair of wires going into each socket you are finished with that
side. Now, you will have the wires that once went to 4 sets of
sockets (4 lamps driven normally), going to 2 sets of sockets (2 lamps
overdriven). The second GE ballast you bought should be wired
in exactly the same way as the Sylvania. They are both Instant Start
and the wire colors are the same. Just mount it on the second fixture
side and duplicate the wiring. Finish by wiring the AC supply wires
together and remember to keep the ground wire attached. Don’t forget:
black-HOT, white-NEUTRAL, green(usually)-GROUND. Remember, I will be posting a GOOD DIAGRAM soon, if you got lost in my explanation above. |
RE: I have found the BEST cheap flourescent ballast/fixture| zink, Excellent. Very hard to find experts who are willing to be as generous as you are "If
you have the kind of sockets which are already internally shorted, you
must connect your pair of wires together at the socket." My Question:
Does this mean they go in the same hole on one side of the socket? "If so, there probably will be 2 push-in slots at that spot."
Yes,
there are two holes on each side of the socket(total of 4 per
socket.)The two top holes look like they are for the short the lamp
pins. "Once you have one pair of wires going into each socket you are finished with that side."
My
Question: Can I put the both blue wires on both sides of the individual
socket or are you saying to tie them together and have them go in one
hole....? I am talking about the blue and red ones here. What happens
if I put them on both sides of the socket? I think I have the
short jumpers (the ones shorting the lamp pins)that are hard to see
inside the socket. I can see them, but I have to turn the socket upside
down and look in the socket from below. Thanks again. Great explanation. Scott
I hope a diagram isn't too much trouble! If so, don't worry about it!!! Thanks for offering to do the diagram... |
RE: I have found the BEST cheap flourescent ballast/fixture| Do
the HD fixtures that you have Hum? I picked up a HD fixture that is
under discussion and a couple of t8 bulbs so that I could see with my
own eyes what was being discussed. I was disapointed to hear the
hum. I had thought one advantage of the electronic ballust was no
audible hum. On the other hand, every box in the stack of fixtures had
been opened and retaped shut. Maybe I ran into a lode of somebodys
rejects. Regards, Charles |
RE: I have found the BEST cheap flourescent ballast/fixture- Posted by: zink 6a (My Page) on Tue, Dec 23, 03 at 17:00
| Scott, It
took some time to figure out how create do a "publishable diagram". I
used a combination of AutoCAD, Publisher, and Paint Shop Pro to do
this. I had to learn new things about each software program and then
looked upsome HTML codes to display them better. I was something I
needed learn how to do anyhow. I hope this clarifies things. The
ballasts that I listed here are not the only ballasts that can be
overdriven. These are just some of the common ones. If the ballast are
electronic and are wired the same as these diagrams show, then they are
probably overdriveable. Remember, always make sure a
ground wire is connected to the fixture! This is both for safety and it
helps the lamps to start if the metal reflector is grounded.
Here are the DIAGRAMS:


|
RE: I have found the BEST cheap flourescent ballast/fixture| Zink,
you are awesome. I was reading this with a technical curiousity while
realizing that my wife would kill me for bringing any more crap into
the house/garage or starting another project that couldn't be finished
within a few hours. With the clarity of the diagrams, I am pretty
sure that I will be picking up a few items from HD, Wally-world, and
possibly GrayBar. Nice diagrams. Thanks Again! David |
RE: I have found the BEST cheap flourescent ballast/fixture- Posted by: zink 6a (My Page) on Wed, Dec 24, 03 at 1:09
| Charles(Chefcdp), Even
though the electronic ballast is powering the lamps with a 22kHz or
higher current, it is still being derived from 60Hz line current. The
fact that it hums loud enough to annoy you is disappointing to those of
us expecting very silent non-flickering power. Some ballasts are
"noise" defective. You might try to exchange it, claiming you
bought it to use in a "extreme silence" situation. You might also check
one thing. I bought 2 HD fixtures from one shipment which were slightly
different, could not be overdriven, and had a greater than desired hum.
On the "yellow wire" side of the ballast, there were only one yellow
wire and one other colored wire (I forget which). Each wire went to one
pin on one lamp. Then the remaining pins on each lamp were jumpered
together. This was some kind of "series" wiring, not "parallel". I was
bummed but I used them for my garage. |
RE: I have found the BEST cheap flourescent ballast/fixture| Zink, Wow.
Great diagrams! You are a gentleman and a scholar. Funny thing. It
cleared up my q's on the red and blue wires but raised a little tiny
question on the yellow connections...I was at HD yesterday asking the
employees if they knew how to do it. The first thing the guy said,"oh
you don't want to do that, it will cut down on the life of your
bulb..." I said, " I know but I will replace them next year anyway!" The
one follow on I have is I think my instant start sockets(or tombstones
I've heard them called now) have the shorted pins like you said. They
are weird looking with the holes in the bottom instead of the front
like your diagrams. If you could lay the tombstone(or socket) flat, on
the bottom(or what was the bottom) you'd have four holes. The top two
holes look like they have wires inside that short the pins. I tried to
buy add'l Litonia sockets but they only sold the kind that are in your
diagram-with the holes facing you from the front(not underneath on the
bottom like mine.) I wanted to take them apart to make sure. On
your diagrams you have the yellow wire jumping from one hole to the
other on the socket(the OD) On my sockets, the holes are underneath, on
each side -two to a side. If my socket is already shorted(I sound like
I know what I am saying)is it ok to just put the yellow wire in one
side of the socket? I think that is right. Isn't it? I suppose if
nothing happens, then I can cut a little tiny wire to short the pins
(talking about yellow here)..But...I think they are shorted sockets... Come
to think of it, if my blue and red wires have shorted pins inside the
tombstone, should I connect them prior to putting in the hole so the
wire only enters into one hole? *I guess I need to know if the
shorted pins make a difference in your diagram* and if so, would that
change the wiring at the socket. Thanks again. Feel fortunate
to know you and have your help. Almost there I can feel it. I hope I
don't burn you out! I am getting to the point where I am just going to
try it anyway and if I kill a ballast then so be it. Scott
I take full responsibility for my choices. Don't worry! |
RE: 2 ft overdriven ballast| Sorry
if this is a re-post. I tried to post this a week ago, but must have
only hit the preview button and not the post button. Oh well. I know I
should just buckle down and figure this out myself, but just in case
someone has already encountered my problem... After reading the
first few posts on this thread, I made a few overdriven four foot
ballasts, and was pretty pleased with the results. However, I'm
most interested in the 2 ft. mod, (the same configuration as the normal
overdriven ballast, but with two 17w 2 ft. t8's with a jumper wire in
the middle, folded in half to make a nice short bright light. (which
happens to be perfect for my 15 gal. planted fishtank). Anyhow,
here's my problem. When I run the overdriven fixture with the 4 ft
t8's, it runs perfectly, for as long as I have it on. When I switch out
to the 2 footers, (with the short soldered wire jumpering them), it
runs flawlessly for about four minutes, and then begins to flicker.
Actually, flicker is putting it mildly, it looks like a freaking strobe
light. Not wanting to burn my house down or anything, I decided
to try another set of bulbs with a different ballast and different
jumper connection....which acheived the exact same results. In fact, if
I plug the two ballasts in at the same time, they begin to strobe at
the same time, every time. Go back to the four footer...no problem at
all. Something wrong with my soldering job? I've re-read the
original post several times, so I don't think I missed anything...but
if anyone has any ideas, I'd love to hear them. I'm thinking
about just picking up a few of those curved 4 ft t8's, (which also fit
on top of the tank), but then I can only use one ballast (without
stacking- since the curve of the bulb is so wide) instead of two. (four
two foot bulbs right next to each other). Thanks, -c- |
RE: I have found the BEST cheap flourescent ballast/fixture- Posted by: zink 6a (My Page) on Wed, Dec 24, 03 at 18:00
Scott,
An
Instant Start ballast will have only ONE wire going from the ballast to
EACH socket. That wire is supposed to supply BOTH of the two lamp pins
at once, hence the jumper wire between the pins. It does not matter
whether your connections are on the side, or the bottom, of the socket.
You ought to go to Radio Shack, or somewhere, and buy a simple
Continuity Tester. You can use that to see if your wires are connected
or not. Better yet, buy a voltmeter or "multimeter" and teach yourself
to measure voltage, current, resistance and continuity. You will be
happy to be able to use such a tool and it will definitely come in
handy in the future. Clifford,
I am glad you liked the
results. What was the original ballast you used, and what was the other
one you said you bought? Obviously that inspired you to try the dual
17-watters. I am not exactly sure what you did that is causing the
strobing effect. It sounds like something is maxing out, then shutting
down and re-starting. That may be driving something to the edge of
failure, but maybe not. I haven't had that effect happen with any of my
OD lights. I don't know what you soldered, but I never have soldered to
a lamp pin. I connected the two 17w lamps with extra sockets from the
fixtures - the ones I bought just for the cheap ballasts. Since
I am sure some folks would benefit from using the shorter lights in
some overdriven configuration I will post a diagram showing EXACTLY how
that works. I will have to wait until after Christmas to do so. I hope
the details I did post cleared things up a bit. If anyone wants to download those diagrams, "right click" in the Internet Explorer window, and select "Save Picture As...". |
RE: I have found the BEST cheap flourescent ballast/fixture| Zink! Those
diagrams are great! I finally got a fixture w/11" wide refector that I
like( a christmas gift from my wife I might ad). My current fixture
only has a 6 3/4" reflector. The new fixture is a Lithonia 2 4 ft. bulb
fixture. It comes with a magnetic Advance ballast which I will disgard.
I like this fixture because it has a wide reflector like many of the
older shop lights had. It has been hard to find one but my Home Depot
got them in. I guess I'll search out those Sunparks you mentioned for
overdriving unless you think there is a better one. Seems many of them
are overdrivable. I will reread this thread for needed info. The
diagrams are of great help. I'll let you know ASAP how things look
afterwards. It seems overdriving is a valid and growing way to
get more light out of fluorescent bulbs.The TV and film industry has
been doing it for some time now. So have the coral reef and fish people
as well as pro studio photographers. My advice to anyone questioning it
would be to try it out and see for yourself. The kinoflo lights are
very expensive but I'm sure the internal workings are no big
deal....just overdriven electronic ballasts. No reason we can't do the
same on a cheaper level. I'd like to know what brand of ballast the
kinoflos are using? Cheers,
Mark |
Here is a link that might be useful: kinoflo lights
RE: I have found the BEST cheap flourescent ballast/fixture| Of
course they make their own special ballasts....one reason the cost so
much. Go to "ballast specs" I'm no electronics expert but maybe some of
you guys can see if these are "exotic" in nature. Mark |
Here is a link that might be useful: Ballast specs
RE: I have found the BEST cheap flourescent ballast/fixtureRight
now we have a 400W metal halide lamp ballast and another ballast
mounted to plywood. I think the other ballast is for sodium light. The
lights need to be replaced. It is connected to a large umbrella type
fixture. When I went ot buy bulbs, I was amazed at the prices. I also
thought that it would probably cost about
$20 a month for electricity. With
this thread, I started to think that maybe I may be better off selling
the present setup and converting to the "overdrive" ballasts. I could
mount the fluorescents on a shelf setup. I would want to grow both
seeds starts and houseplants and herbs (and possibly tomatoes). Iwant
to keep the plant setup cheap but effective. Does anyone have any input
on whether I should sell what I have and start over with the
"overdrive" considering my requirements? Thanks |
RE: I have found the BEST cheap flourescent ballast/fixture| I
need some extra light for my 30-gallon tank, and it's 30 inches wide,
so it only fits a 24" bulb. I was considering trying this overdrive
technique, but I'd like to know if it's also possible to use the
ballast from a setup that's meant for a bigger 48" 40W bulb and just
use it with my little 24" 17W bulb. Will that accomplish the same
effect as getting a double-bulb ballast and overdriving a single bulb? |
RE: I have found the BEST cheap flourescent ballast/fixture| From Zink ******************************************* I
haven't had that effect happen with any of my OD lights. I don't know
what you soldered, but I never have soldered to a lamp pin. I connected
the two 17w lamps with extra sockets from the fixtures - the ones I
bought just for the cheap ballasts. *************************************************** Thanks
for the reply, now the lights are on in my head and things seem
clearer. One more question, did you jumper 2 wires between the
non-ballast-ends, or just one? (ie, the non-ballast-end sockets each
have four holes on them (or two pairs of holes rather). Did you just
jumper any hole from lamp-socket-one to any hole on lamp-socket-two, or
did you jumper the right side of lamp-socket-one to the right side of
lamp-socket-two, and the left side of lamp-socket-one to the left side
of lamp-socket-two). I suppose I'll just try both ways when I
get home from work tonight. If my intensities look right, and I get no
blinkies, I might be on the right track. ;) Thanks again for the help. -c- |
RE: I have found the BEST cheap flourescent ballast/fixture- Posted by: zink 6a (My Page) on Tue, Dec 30, 03 at 15:30
| I
still hope to post a good diagram, within a day or two, showing exactly
how to connect a pair of overdriven 17watt 24" lamps. I am just taking
a break from any graphics at the moment. I'll at least tell you
this for now. By "non-ballast" side, I am sure you mean the connection
between the two 24" lamps. The filaments on the "non-ballast" side of
the lamps do not have any "pre-heat" function. They just conduct the
current between lamps. For best results, just connect ALL 4 of the
in-between lamp pins together in some fashion. My diagram will show you
several workable variations. You still seem to have a bit of trouble with the lamp socket holes. If there are 4 wire insert holes in your socket, then 2 of the wire-insert holes lead to one lamp pin, and the other 2 wire-insert holes lead to the other lamp pin. There is a very good reason to put 2
insert holes for each pin. That makes it easy to jumper the lamp pins
when they need to be. This is exactly that type of situation. Jumper
both pins on each of the "non-ballast" sockets, then connect the two
sockets. This maximizes the electron flow between lamps. |
RE: I have found the BEST cheap flourescent ballast/fixture| zink, ok, i just plugged it in. I am having trouble seeing if it is much brighter, if at all. The
one thing I didn't do was short the pins together at the yellows
because I thought I might have internally shorted ones in the
tombstone. Would this make a difference? It is still bright and looks fine...Just not sure if it is much brighter. Scott |
RE: I have found the BEST cheap flourescent ballast/fixture| zink: Thanks
for the reply posts, as it turned out, my jumpering was fine the whole
time, I just had broken some of the white bulb clips when I originally
pulled out and replaced the wires for overdriving purposes. All I had
to do was crack open the backs of the clips, reseat the copper leads,
and bingo, no more flashing. (amazing what a difference a solid
electrical connection can make...next time maybe I'll check all my work
before jumping to conclusions). garden boy: I think
that really depends on the application. I'm mostly using my lights on
fishtanks, reptile cages, and a couple of seedling trays. (palms,
passion flowers, agaves, etc...will also be using them for starting
heirloom tomatos, peppers, artichokes, etc in the next few
weeks...short outdoor season in western new york). In my opinion these
overdriven ballasts are an *excellent* replacement for the "commercial
security lights" many people are currently using for their seedlings,
like the 65w compact flourescent from Lights of America. I have three
(two on fishtanks, and one on a seedling tray), and I think my 2 foot
overdriven setups are every bit as bright and effective (in fact maybe
more effective, because I get a better spread of light) as those. As a
bonus, the new setups only cost $11 each instead of $30, are a better
quality than the LOA (I've had several die on me) and apparently use 54
watts instead of 65. Pretty nice. The difference is spread and
intensity. You can definately grow small houseplants and herbs with
these ballasts, but if you want to match the growth you'll get under
your MH, you'll have to litterally have them growing *right* underneath
the lights. I would keep them practically touching. A 400w MH with the
right reflector should give you at least a 3'x3' spread, maybe more,
with great penetration through the folliage. The flourescents won't do
that (at least, not nearly as well). For instance I have a wide veriety
of low-light houseplants in my area here at work. Where I sit there is
zero natural light, but the ceiling is covered with 4 ft. 3-bulb
flouresent fixtures. The plants survive just fine, they even grow a
little bit...but with 4 feet between most of the plants and the lights,
if I was trying to keep my kitchen in stock with mint, basil or thyme,
it wouldn't even come close to cutting it. If you decide to switch, I
would construct some kind of enclosed shelf or wrap-around reflector,
so you can maximize the light your plants get. Also, if you're trying
to take the tomatos full term (as you probably could with the MH and
HPs), I don't think they'll do very well. doviende: As
far as I can tell it's the same, and they seem equally intense (plus
you don't risk breaking clips like I did). I'm not positive if the
ballast "sees" the load differently (being that with the original
wiring it's using "half" of itself to overdrive each bulb, whereas in
the od configuration it's using the "whole thing" for both bulbs)...so
your mileage may vary. Thanks again for the help Zink, nice to find someone patient on an internet forum... -c- |
RE: 400w MH bulbs| garden boy: Forgot
to mention bulb pricing, you mentioned they were expensive, but didn't
say what kind of pricing you were finding. You should be able to get
400w MH bulbs for around $20 if you shop at the right spots. Some
specialty bulbs I've seen are as high as $70 or $80...but who wants to
spend that much...heck, you can buy a while refurbished 400w remote
ballast system on e-bay with a brand new bulb for around $100. Just
thought I'd mention it. I do my bulb shopping at graingers or greybar
(both of which have online catologes if you have a business license/tax
id), but you could probably find them at Home Depot, Lowes, or online
for similar prices. -c- |
RE: I have found the BEST cheap flourescent ballast/fixture| zink, here
is a picture of the socket in my lithonia fixture. I had to wade
through their site...still was not able to find if it was internally
shorted or not. I guess I can short it on the outside and see what happens(the yellow wires) thanks, Scott |
Here is a link that might be useful: http://www.lithonia.com/t8/sp8/details/c.htm
RE: I have found the BEST cheap flourescent ballast/fixtureGreat thread everyone.Thanks especially to Zinc for all the info and the great diagrams.
I
wish I could find a site that discussed the inner workings of the
ballasts themselves. I have a pretty good understanding of how the
lamps work, and how the ballasts get things started. After start up
they are much like a current source that puts out a constant current.
In typical DC power supplies, you cannot put 2 in parallel because the
tend to fight each other, so this is not exactly how the ballasts are
working. Of course they are not DC supplies as they are also switching.
If anyone knows where to find an internal schematic of a ballast, I
would love to see one. None of the manufacturers sites show any of
this. Again thanks for all the good info. Paul. |
RE: I have found the BEST cheap flourescent ballast/fixture| zink, It
has been almost a month since I heard hide or hare from you. Possibly
you will never see this, but for posterity(and to end this thread on an
even 50)... I wanted to post that tonight I shorted the two yellow pins
and *BAM* it worked! The answer with my Lithonia is that the
tombstone/sockets are not internally shorted. When I connected the
yellow sockets with a tiny little yellow wire, it lit up like the sun! I
used my hydrofarm light meter and we decided that they were now 50-60%
brighter! Pretty kewl. Thanks again wherever you may be. Scott
someone now feeling a bit less new |
RE: I have found the BEST cheap flourescent ballast/fixture| I
cannot find this fixture anywhere. Even Home Depot online shows a
backordered status. Does anyone have a source for these fixtures? TomG. - aka Plant_Guy |
RE: I have found the BEST cheap flourescent ballast/fixture- Posted by: zink 6a (My Page) on Sun, Jan 11, 04 at 16:12
| Scott, Actually,
it’s been only two weeks, unless my portion of the planet rotates
slower. Sorry, but I have been keeping quiet, waiting, waiting, quietly
waiting for you to announce that you finally jumpered those damned pins
together. Just kidding! I have been taking care of other things
and haven’t gotten around to posting any more overdrive information. I
am glad to hear that you did get the lights really aglowin’. I did
check out the Lithonia socket link but there was no way I could tell
what was inside of it. I thought I had posted a reply to tell you to
just go ahead and jumper them together to be sure, but I see now that I
didn’t reply. Sorry about that, but you got the deed done anyhow! I
saw in another post that you had bought some kind of meter. Once you
get the hang of taking some measurements, you will be able to track
down and solve a lot of problems. I highly recommend learning just a
little bit about voltage (AC and DC), current and resistance, and how
to measure them. You can buy some very basic, easy to understand books,
that cover a few simple concepts which will broaden your abilities
considerably. You really don’t need to learn too much to be able to
take highly relevant readings of your projects. Once, a friend
of mine had a VERY long speaker wire, running through several rooms,
heavily stapled to his baseboards, door frames etc. It had a short
somewhere. I disconnected the wire at the stereo and the speaker, then
measured the resistance (through the short) at each end of the wire. I
then measured the wire length – while it was still stapled to the wall.
I took the ratio of the wire resistances I measured, multiplied it by
the length of the wire, and BULLSEYE! Exactly at the calculated
distance was one bad staple – it was puncturing and shorting the wire. Did you at least get the results you were hoping for with the lights? Farmer Paul, Years
ago, in the 80’s, I used to build my own DC power supplies. If I recall
correctly, I WAS able to parallel DC power supplies. They were NOT
“switching” power supplies, which may be the difference here. As I
remember, one power supply usually would have a bit more voltage output
than the other. Only if the load pulled the voltage down to the
threshold of the lower power supply would the second one begin to
supply current to the circuit. It really was like paralleling
two batteries to double the available current. If you wire a bunch of
auto headlamps to a stand-alone 12v car battery, they will light and
begin to draw current. If you parallel the battery with another, the
headlamps will brighten AND the current load on both batteries becomes
less. That is the best analogy I can come up with. Also, the 2x
overdriven ballast actually draws less current (verified by
measurement) than if it were lighting two bulbs, instead of one
overdriven one. Zink |
RE: I have found the BEST cheap flourescent ballast/fixture- Posted by: Paul_ z4/5 MI (My Page) on Sun, Jan 11, 04 at 19:40
Zink,
is that 3 wire set up [1 red, 1 blue, one yellow] common only to the
shoplights w/ electronic balasts or do some of shoplights w/ the
magnetic balasts have that too?
: ) |
RE: I have found the BEST cheap flourescent ballast/fixture| zink, I
was suffering from new person paranoia, I must admit. When you think
you ask too many questions and burn the expert out(aka high maintenence
newbie sickness, pain in the arse asker, etc.) I finally had a
friend come over and he said it wouldn't hurt to short the pins
together, and that is probably why to that point, I had only normal
brightness. Yes! Absolutely. Thank you very very very much.
They are so bright, it is very obvious. There is a little hum in the
ballasts, but I assume that is normal and just because of the extra
voltage/current.. I am probably going to upgrade each fixture
now over the next year as I get the money and time..Another reason for
the delay-wife, renter and dog that are trusting me not to do something
stupid...Had to be overly cautious... Thanks again. I appreciate the time you took to make the drawings and answer q's. Scott |
RE: I have found the BEST cheap flourescent ballast/fixture- Posted by: zink 6a (My Page) on Sun, Jan 11, 04 at 21:36
| Paul, Yes,
the Magnetics have that too. The “3-wire setup” you mentioned is
usually on the side of a ballast which shares a common wire (the yellow
one) for the “pre-heat” starting function of a Rapid Start ballast
(2-lamp). I do not know if there is any sort of industry-wide standard,
but this color coding is typical of all the Electronic and Magnetic
ballast diagrams that I have seen. On a 4-lamp Rapid Start
ballast, there are double the number of wires (2 red/2 blue/2 yellow).
Both yellow wires are actually connected to the same common point
inside the ballast, or at least they behave that way. For an Instant Start (2-lamp) version , that “common” side of the ballast always seems to have a single shared red wire. On a 4-lamp Instant Start ballast, the “common” side usually has 2 yellow wires, each shared by a pair of bulbs. Sometimes,
on a 2-lamp Rapid Start ballast, there will be ONLY 2 wires on that
side. This kind of ballast can’t be overdriven. The current flows
through one wire, then through the filament of the first lamp, then
through a jumper wire to other lamp filament, then back to the ballast
via the second wire. If one lamp fails, both will go out. Since
you are discussing Magnetic ballasts, I need to emphasize that rewiring
to overdrive is NOT possible with a Magnetic ballast. You may already
know that, but I’ve gotta mention it anyway. You would regret the
results. I also want to mention that I used the term “pre-heat”
because that is what the filaments in a Rapid Start ballast are doing.
Officially though, there are ballasts which are called Pre-heat
ballasts. They are in the fixtures that use an extra starter device and
are only found in Magnetic ballasts, usually the lower-wattage ones. Scott, You
have every reason to be paranoid. I just recently saw satellite photos
of your lawn furniture posted on a National Security Bulletin. Just
kidding. The hum you are hearing shouldn’t be from EXTRA ballast current or voltage. The reason is this:
A NORMAL electronic ballast with 2 lamps(32wT8) uses about 530 mA of line current [63.6w]
An OVERDRIVEN electronic ballast with 1 lamp(32wT8) uses about 460 mA of line current [55.2w]
The two individual lamp circuits inside the ballast are sharing the lamp load. I measured them several times. Just
an hour ago I was listening to a hum coming from one of my
non-overdriven electronic ballast fixtures. Some of them just hum more
than others. Zink |
RE: I have found the BEST cheap flourescent ballast/fixture| Zink, I
just completed my first overdriven Home Depot fixture thanks to your
helpful diagrams and the explanations and photographs given in this
message thread. I put it on a table beside a normally driven version of
the fixture for a comparison and turned them on. At
first one bulb of the overdriven fixture was nicely brighter but the
other was bright at one end and the rest of that bulb had what looked
like some kind of rocket exhaust standing waves moving around in it. I
wondered if it mattered which end of the bulb was installed in which
end of the fixture, so I reversed the ends of the faltering bulb with
no big improvement. Then, suspecting a "weak" ballast (or a ballast
whose wiring I had done a "weak" job of connecting) I interchanged the
bright bulb and the weak bulb, keeping their ends in the same
orientation. I expected that the faltering bulb would work fine on the
other side of the fixture and the previously bright bulb would have
problems when moved, indicating that I would need to improve my
connections on the problem side. But voila! Both
bulbs were brilliantly lit and obviously way brighter than the standard
fixture. Very satisfactory. The concept is proved, so I have purchased
additional fixtures to bring my total number of fixtures to 16. I may
not use them all for overdriving, but I will be making a fluorescent
plant stand that is mostly if not all overdriven. I
remain curious about my experience "futzing" with the overdriven
fixture to get it to light nicely. Does it matter which way you install
a bulb? Do I need to solder my connections? Is there resistance on the
bulb prongs that needs to be removed by some kind of
cleaning/polishing? I plan to repeat this side-by-side table test on
each new fixture that I assemble. I would like to
express my heartfelt gratitude for the information and expertise you
and others have shared in this remarkable message thread. -- Burton -- |
RE: I have found the BEST cheap flourescent ballast/fixture| Zink, Tom, et al... First
I want to say how absolutely thrilled I am to have found Zink and his
wonderful research. He truly is a godsend to me, who living indoors and
raising Bonsai, have always faced adequate lighting challenges. I only
"found" this forum this morning and I have read every post and
practically have the red/blue, blue/red, jumpered yellow stuck wiring
explanations running through my mind.
This morning I
logged into HomeDepot.com and I backordered the fixtures, then I
proceeded to visit each Home Depot in my area to see their selection
and in hopes to find a spare SL15. Alas, my searching went in vain. I
finally asked one, especially attentive attendant ;-) to do a little
research for me and to check the inventory of all the Home Depot in his
computer inventory. He informed me that NO Home depot, in Cali at
least, has them in stock or is expecting them. I felt a little
disheartened to have heard this (the hope dashing upon rocks syndrome
thing). I informed the young man that the website stated that they
would be shipping from the online store on the 15th of Jan. (just a few
days from now). He told me that it had been his experience that the
fixtures were more than likely going to be discontinued and the online
backorders would be offered a similar replacement. He said that the
original stock of these fixtures may have been a home store purchase of
some surplus stock, which is why the special low price and the
variations in availability.
Zink, I wonder if you may be
able to steer me to another comparible model with the similar wiring
method? I sincerely do appreciate all you have given to this thread.
Bonsaika Z18(SS) Calif.
|
RE: I have found the BEST cheap flourescent ballast/fixture- Posted by: zink 6a (My Page) on Tue, Jan 13, 04 at 10:58
| MaineMan, I
am glad to hear you succeeded in your efforts. I have no idea what the
trouble was when you first tried out your rewired light. Know what? I
have had that happen to me a dozen times. The fixture will seem to have
a problem, I’ll mess around with the bulb, then suddenly it works! I
suspect it is just that something is not seated correctly and doesn’t
fully light until it is jostled into place. Who knows. I never figured
it out. Often, when it is cold and/or the bulb is new, there is a
swirling at the ends of the bulb, until the bulb warms up. Cool lookin’
effect. I shouldn’t matter which end of the bulb is which. You
don’t need to solder any connections, unless that is the only way to
get your wires to contact. Usually, the voltage present is high enough
to overcome a “dirty” connection. If the current is not flowing, the
voltage at the bulb ends rise as if it is going to re-start or
re-ionize the bulb. The filament inside the lamp has a small
resistance (between the two lamp pins) because it provides a heating
function on startup ONLY if you are using a Rapid Start ballast. Basically,
if the fixture I am messing with doesn’t light, I check my wiring first
and then jiggle the connections. That usually works. Bonsaika, Thanks
for the kind words. I do not know what ballasts are in other brands of
shoplights, but if they are electronic, they are likely to be
overdriveable. In the diagrams posted above, I list several ballasts
that are commonly available and will work. I have found that the wire
color-coding I showed is very common. Look for the wiring diagram,
usually found on the top of the ballast, and match it to the rewire
method in my diagrams above. If it is a Rapid Start ballast AND
there are only 2 wires running from the ballast to one end of the
fixture (one going to each socket with a jumper between sockets), then
it is NOT overdriveable. The lights operate in series and cannot be
paralleled. But, as my experience goes, this is uncommon. I do
know that the better brands (Advance, Sylvania, Magnatek, Universal,
GE) seem to work very well. The Sunpark SL15 ballast, found in the
Commercial Electric fixture, has worked for a LOT of different bulb
types I have tried, not just the 32watter’s. Zink |
RE: I have found the BEST cheap flourescent ballast/fixture| zink, I
wouldn't be surprised if the sats were trained on me. If my visits to
the hydro store and here haven't gotten phone bugged, house photoed
from space, and helicopter infrared fly overs, then I would be
surprised!! Back when I had my greenhouse(thought I'd never
have to know about lights, ever...) We had regular heli fly overs. My
neighbors always joked with me about it. I went to Home Depot
today with my new found boldness. I am teaching the guys there what you
taught me. Of course, should anything happen, I have have no idea who
zink is!! NOt to worry...lol I needed to buy more wire. They didn't
have the exact gauge of wire, but the guy said if it was bigger I'd be
ok. Wondering why I just bought a 1000 watter now!! I guess I have money to burn..........NOT! :) thanks again, Scott |
RE: I have found the BEST cheap flourescent ballast/fixture| Zink, "You
don’t need to solder any connections, unless that is the only way to
get your wires to contact. Usually, the voltage present is high enough
to overcome a “dirty” connection." Thanks for the reassurance. I will continue on using the twist-on caps or crimp caps I have been using. "I
have no idea what the trouble was when you first tried out your rewired
light. Know what? I have had that happen to me a dozen times. The
fixture will seem to have a problem, I’ll mess around with the bulb,
then suddenly it works!" That's good to know. I will continue to use that technique. Thanks again. -- Burton -- |
RE: I have found the BEST cheap flourescent ballast/fixture| Note to all, I
used my infrared pyrometer and measure the heat from the regular fluor
bulbs and compared it with the heat coming off the lights of the
overdriven fluorescents. The regular lights inflos-4 foot T8's-were 100F, while the overdriven ones were burning at 120F. Scott |
RE: I have found the BEST cheap flourescent ballast/fixtureZink,
I
bought some Commercial Electric Shoplights,part number is 140-904 and
Ballast HBSL-15 at HD. On the outside box label, it specifies "Uses
2-48" 32 watt T-8 Fluorescent Tubes (Sold Separately)."
However,
inside on the fixture metal frame just beside the socket is the
following: "CAUTION - TO REDUCE THE RISK OF FIRE USE ONLY (2) T12 -
40W, OR (2) T8- 32W, OR (2) T12 - 25W LAMPS INPUT 120VA60HZ.
This
seems to indicate T12 bulbs can be used safely. What is your take on
that? Wouldn't T12 40W give more light? Would overdriving be a problem
with the T12 40W?
Jeb |
RE: I have found the BEST cheap flourescent ballast/fixture| I
have been starting common garden seeds indoors under ordinary household
fluorescent lightbulbs for years with good success. However, the
seedlings always get a little gangly, and so every year I find myself
carrying them outside on warm days, and back in at night from about mid
february until about the first week in May, to get them some "real"
light. This spring I will be travelling more than usual, and may not be
able to do this. I can handle the maintenance of water, to the plants,
but not the in and out part. I have thought about changing to
"grow-lamps" and have visited a lot of sites, but am not fully aware of
the benefits, and still am a little confused. BUT, when I read this
thread, I was convinced that at least SOME growers are serious about
their lighting. You all have at least taken a scientific approach to
all this, but maybe to a few degrees more than I need to do. I
am convinced that I will, indeed, switch to either gro-lux or Phillips
bulbs. I only need about 24 sq ft of lighted space, and am currently
using three fixtures, with two bulbs each. I may expand to 4 fixtures. I
plan, therefore to purchase gro lux, or phillips bulbs, and just
replace the current "ordinary" fluorescent bulbs with the new ones. If
I expand to 4 fixtures, one of them will be the Home Depot fixture. I know nothing about electricity, or ballasts, or wires, or quantum physics, or anything even close. My
first question is: will the bulbs you are recommending, work in my
current fixtures, which use just the common
"work-bench-fluorescent-bulbs"? My second question is: If I
need to purchase the recommended Home Depot fixtures, ok, I will do
that, and then purchase the bulbs. My third question is: and
please forgive the naivity of my question....but, what is the real
advantage of "overdriving" these bulbs, other than just getting more
"brightness". I am assuming that the gro-lux or phillips bulbs are
engineered and designed for plant growth, and don't understand why more
brightness is necessarily "good". I realize that there is some economic
benefit also, but it is worth the effort, and is it possible that these
improvements are something that you all are doing primarily to learn
more about the potential of the various combinations? I have
read every reply to your post and am impressed with the detail to which
all of you have worked this issue, both currently and, apparently in
the past, and will serioiusly consider your opinions. I am growing the
common things, tomatoes, peppers, okra, basil, eggplant, cabbage, kale,
cucumbers, and annual flowers like zinnia, statice, etc. In
your opinions, will I get better seedling and plant growth with the
"overdriving" effects than with just a change to the gro-lux or
phillips bulbs, or is it just too much of a guess to go out on limb? By
"better growth", I mean more compact, and sturdier seedlings and
plants, and less ganglier than I am getting with just the household
bulbs. I do believe that I will get better plants by switching to the
gro lux or phillips, but I am wondering how much more gain I might be
expected to get with the "overdriving" Thanks for any help or comments Good Growing, and Good Lighting, to all of you |
RE: I have found the BEST cheap flourescent ballast/fixture| SeedStarter, Welcome
to these forums. I am new here too. I am certainly no expert, but I
feel I have benefited greatly from the knowledge that has been shared
in these forums and in this message thread particularly. All told, I
have purchased 28 of the Home Depot "Commercial Electric ShopLights"
for use in constructing two plant starting stands. Most of these will
be used to produce overdriven fixtures according to the instructions
given in this message thread. So I far I have made
three successful conversions and a fourth is nearly complete. I have to
cut notches out of its reflector to make it fit within the pillars of
our metal shelves. I will be using a mix of cool white bulbs and warm
white bulbs, all 4-foot T8s. The overdriven fixtures are very
noticeably brighter and somewhat warmer on the bulb, but hopefully not
harmfully warmer on the plants. I have a starter
flat soaking right now to plant three varieties of onions and some
frilly semi-double pansies. That should happen tomorrow. I think both
of those need a lot of extra development time before setting them out
here in central Maine. I would use some "Gro Lites"
T8s if I could find them economically. I purchased a 10-pak of cool
white Philips T8s at Home Depot for $19.97 but unfortunately they don't
have warm white T8s. I have found a local electric supply place with
warm white T8s for about $2.67 each. I wouldn't want to pay much more
than that for Gro Lite T8s, so I probably won't find any for "my
price". I am not convinced that Gro Lites are worth the extra cost, but
if I did get some, I would probably overdrive them. "...but,
what is the real advantage of "overdriving" these bulbs, other than
just getting more "brightness". I am assuming that the gro-lux or
phillips bulbs are engineered and designed for plant growth, and don't
understand why more brightness is necessarily "good"." Most
plants don't get enough light under fluorescents. So I think your
plants would be better off under the brighter light of overdriven
fluorescents. The normally driven T8s I have seem brighter than the
normally driven T12s, but that may be some kind of optical illusion. I
don't have a light meter here (mine is in storage with a lot of other
stuff we haven't moved yet back in St. Louis), so I can't make foot
candle measurements. I think many plants need many
more foot candles of light for sustained growth than they will get from
under any fluorescent fixture, overdriven or not. You might want to do
a search, on the Internet and in bookstores, for the light requirements
in foot candles of the plants you intend to start under lights. Fortunately
plants can do well enough to get to transplanting size under less light
than they would require for sustained growth to maturity. "However,
the seedlings always get a little gangly, and so every year I find
myself carrying them outside on warm days, and back in at night from
about mid february until about the first week in May, to get them some
"real" light." A big problem with seed
starting is that after they have germinated and got their first true
leaves they need a cooler temperature than most houses are kept at. For
stocky sturdy transplants you should grow them at 50 F to maybe 65 F
tops. Growing them warmer makes them spindly. If you had a cool
basement or some other room that didn't require human habitation, you
would probably be better off putting your fluorescent plant growing
fixtures in there. I plan to use our breezeway, because it is unheated
except for the heat that "leaks" to it through our double-wide glass
door. It isn't a true breezeway because it is closed to the outside by
a door on each end and it has lateral doors to the garage on one side
and to our basement "in-law suite" on the other. Our
outside temperatures have been ranging from zero to maybe 20 while the
breezeway temperature stays at about 32. I will have to raise that by
maybe 25 F to make it habitable for seedlings. I am hoping that the
fluorescent lights themselves will provide some heat source. I may try
to add some insulation (it's uninsulated) and possibly a
thermostat-controlled electric heater to keep the temperature above 50
F. You might want to think how you can make it cooler for your
seedlings. Chances are that when you took them outside they not only
got more light, but cooler surroundings as well. Incidentally,
seedlings develop stronger stems if they are exposed to some wind. Some
people use a small electric fan to provide that "wind". I plan to put a
small fan on a timer for our seedlings. Last year we had a problem with
seedlings becoming spindly and I hope to correct that this year. -- Burton -- |
RE: I have found the BEST cheap flourescent ballast/fixture| Scott, "The regular lights inflos-4 foot T8's-were 100F, while the overdriven ones were burning at 120F." Thanks for sharing that info. Many of us don't have an infrared pyrometer. (grin) -- Burton -- |
RE: I have found the BEST cheap flourescent ballast/fixture| Zink,
I'm new here, and I currently have one 2 light 48" fixture, and was
planning on getting another when I ran into this thread. Wouldn't I be
better off to run the four lights as they are than 2 extra bright
ones??? thanks |
RE: I have found the BEST cheap flourescent ballast/fixture- Posted by: zink 6a (My Page) on Fri, Jan 23, 04 at 0:03
| Scott, I
have definitely been curious to know the temperature of some of my
lights. Fluorescent lamps do have a temperature curve for optimum
brightness. I have always thought that most bulbs seem to burn a lot
hotter than what is recommended. Since the cold weather set in, I
noticed that a couple of compact fluorescents in my garage are a lot
brighter than they were before. They still get warm, but definitely
burn brighter. One of the effects of overdriving is that the
bulbs do get hotter. In spite of that, the light output is definitely
increased. I originally found the overdriving technique in the
fish/coral forums. Those folks like to overdrive by 4X to achieve
maximum brilliance. I tried that, but they got too hot for my taste.
Burning at 2x is more efficient. Since I read your post
tonight, I took an overdriven Philips PL-L 40watt fixture out to my
garage (currently 35ºF) and plugged it in. When it warmed up, it was
brighter than it was in the house. I then took it out to my back porch,
(currently 16ºF) and plugged it in. It got dimmer as it adjusted to the
cold. Just like the temp curve said. By the way, the new High
Output T5 lamps are designed differently, with the temperature curve
about 20ºF higher than the rest. Jeb, The really
great advantage of electronic ballasts over magnetic ones is that the
circuitry uses feedback to regulate the current going through the bulb.
That particular ballast will operate a range of bulbs, as indicated
both on the ballast and the specification sheets - which I downloaded.
The lamps that happen to fit that 4’ fixture are the 40wT12, 32wT8,
34wT12 and 25wT12 – all of them 48”. I don’t even know of any other
lamps that would fit that fixture. Whether overdriving or not, the
32wT8 will be the brightest, the 40wT12 will be a bit dimmer, and the
34w T12 and 25wT12 will be a disappointment. I compared them with a
light meter to be sure. The 34wT12 “watt-miser” bulb, developed
over a decade ago, was a joke. It used less energy - but gave off even
less light! To achieve the same light levels took MORE energy! Really
stupid! Believe it or not, I took some 40wT12 bulbs that would
no longer light up in a mag-ballast fixture, put them in an overdriven
HD shoplight, and voila! – they really lit up. The electronic ballasts
have no trouble with the 40watters. The old, magnetic ballasts,
however, will not light up a 32wT8. Who cares,… we’ve got e-ballasts
now. I, personally, do not know what you would do to create a
fire hazard if you mount the bulbs properly. I have tested the SL-15
ballast, as you can read somewhere else here in these posts, on an
impressive variety of lamps. Most everything worked quite successfully,
and were certainly no fire hazard to me. It’s just a “cover-your-ass”
disclaimer. THE best 40wT12 to use in an overdriven fixture is
the Sylvania Gro-Lux Standard bulb. As I have come to find out, the
Gro-Lux Standard (not the Wide Spectrum) has the best formulated
phosphor coatings of any 40w grow lamp. It has a low lumen output, but
ALL OF IT concentrated in the proper wavelengths, actually giving off
more, better light. SeedStarterABC, The reason that
common light fixtures are not overdriven is because the efficiencies of
general purpose lighting were mandated by the Energy Act of 1992, to
meet certain energy use specifications. That was a really good
legislative act that resulted in improved general-use lighting. The
reason for overdriving (only recently possible) is to get more light
out of a fixture - for special purposes such as growing plants. There
are some ballast manufacturers (Fullham, Icecap, Workhorse) that cater
to these specialties. Their ballasts can overdrive a variety of lamps,
and are sold for that purpose. The official term for more light from
ballast is “high ballast factor”. The nice result of that
energy legislation is that the 32wT8 lamps, with an electronic ballast,
now put out more light, more efficiently, than 40wT12 fixtures used to.
You can get really good light just using a non-modified e-ballast
shoplight and T8’s. However, “overdriving”, as I described above, will
get you 70% more light per bulb. No matter what, if you buy a
shoplight with an electronic ballast, you will be able to use 32w or
40w lamps. Just don’t use 34wT12’s or 25wT12’s. If you bought
shoplights that require them (so-called energy savers), buy new
fixtures (plant savers). Bbled, Yes, you will get
more light using 4 bulbs in normal fixtures than using 2 bulbs in
overdriven fixtures. The idea of overdriving is to maximize the light
per fixture, usually because of limited space or “high-light” loving
plants. Or just because it’s so damned cool once you see it.
Overdriving the seemingly dim Gro-Lux Standard bulbs is rewarding. They
aren’t dim anymore! Zink |
RE: I have found the BEST cheap flourescent ballast/fixture- Posted by: Thuja z4 WI (My Page) on Sat, Jan 24, 04 at 13:23
Wow,
that's a ton of illuminating info. The temperature readings are
interesting to me. I imagine these fixtures are engineered with a wide
margin of safety but I wonder about how far into this margin can we
safely tread? I'll admit to being pretty boring person. I don't even
push my CPU beyond its stated frequency. I saw the smoking AMD CPU
videos and decided against it. I'm not an electronics expert so I'm
cautious about experimenting with it. Anyway, even if you don't
overdrive the fluorescent lamps they work well enough for me. Eeek! The
T8's, etc. are great. Keep 'em coming. Thanks.
 |
RE: I have found the BEST cheap flourescent ballast/fixture- Posted by: zink 6a (My Page) on Sat, Jan 24, 04 at 16:37
| Funny
you should mention the CPU overclocking. I have also overclocked every
CPU I own - if possible. What you might not know about the AMD video is
that CPU was not even overclocked. The testers took several
machines operating at normal speed, started running a
processor-intensive game, and then removed the heat sinks to see what
would happen. The AMD chips went belly-up really fast. The lesson
there: Definitely secure your heat sinks and fans. Here is the difference in comparing "overdriving" CPUs and ballasts.
>>CPUs
Every
time the chip manufacturers upgrade their process, almost all of the
new chips are immediately capable of running at a much higher speeds.
Intel and AMD purposefully cripple some of the chips (clock-multiplier
locking) and give them a lower mHz rating. As nuts as it may seem, this
is done for marketing purposes to maintain an array of CPU speeds to
sell. Tech savvy folks who know about this trick can determine the
actual potential speeds, and run the CPU closer to the processor's true
limit. Some brave geeks will construct elaborate heat sinks and try to
go beyond the max.
>>Ballasts
When you re-arrange the
wiring to overdrive a ballast, you are sharing the "lamp load" between
the individual lamp circuits. The ballast itself is actually
UNDERDRIVEN, since it is now sending LESS total current to a single
lamp than it would normally be sending to two lamps. It is the lamp
that gets OVERDRIVEN. The ballast is running cooler, the bulb running
hotter. This does not burn out the bulb, although it's life is
shortened a bit. This is quite acceptable for the special purpose it is
done for - obtaining more intense light for your plants. By the
way, all of my CPU overdrives involved finding out my peak stable
speed, then dropping back a few mHz's. It is very safe - as long as you
keep your heat sink attached. NONE of my CPU's ever fried! Unfortunately,
I did have plans to build my next computer with an overdriven AMD chip.
Thanks for the video info. I do gotta be REAL careful now. Zink |
RE: I have found the BEST cheap flourescent ballast/fixture| Zink, thanks so much for your overdriving instructions. I just fixed up two Commercial Electric Shoplights to your
specifications. Thanks to the photos and diagrams the wiring part was a
real breeze. They really look bright. The punched out triangular tab, that holds one balast can easily hold two
side by side after drilling four more little holes to screw them down and
new big hole on the side of the channel for the power cord. That screw they use as a ground post is really tough. I had to use Liquid
Wrench, a lighter and a power drill to get it free. Generally I avoid
using a power drill in a situation where the vibration could affect
electronic circuitry. The sheet metal screws that are included to attach the reflector to the
channel are no good. I used the kind for metal computer cases. I don't see why I can't bolt two overdriven shoplight channels together
side-by-side, wire them in parallel to a single power cord and cut one
side off of two reflectors and end up with an overdriven four-lamp fixture. Does this sound OK? An aside on overclocking: A couple of years ago I had a tweakable
computer in a top-floor, un-airconditioned Manhattan tenement apartment
right under a black tar roof. In July and August, the overheating alarm
went off, so I opened the case, looked into extra fans and discovered the
world of overclocking. I put two extra fans in and was able to clock it
up a bit. The best example of watercooling I saw was a guy in Malaysia running his
water jacket tubes through his aquarium. If you would care to e-mail me, I could tell you about an experiment I
did with a computer and a small fluorescent tube. |
RE: I have found the BEST cheap flourescent ballast/fixture| Hardy, "I don't see why I can't bolt two overdriven shoplight channels together
side-by-side,
wire them in parallel to a single power cord and cut one side off of
two reflectors and end up with an overdriven four-lamp fixture. Does
this sound OK?" Of course I, too, am
waiting until Zink weighs in on this, but it sounds OK to me. I have
already trimmed the corners of some reflectors to make them fit inside
the vertical round supports of chromed wire shelves. I used a 32-tooth
hacksaw, which was rather slow and noisy. How would you cut off the
reflector portions? Sheet metal cutters? Nibblers? My problem with
sheet metal cutters is that I always have a righthand cutter and
frequently find myself in a situation where I need a lefthand cutter. I
suppose I should get both. Nibblers have the advantage of not being
righthanded or lefthanded, but I wonder if they could handle these mild
steel reflectors. I think Zink uses a Dremel tool.
Gotta get me one of those. I like the deals Amazon.com has, and the
"digital" model looks like the one for me. Some websites made it seem
that many of the Dremel accessories (drill press, router,
router/shaper, etc.) would not be compatible with the digital model,
but Amazon seems to have more up-to-date information with respect to
that. Do you have any special technique in mind for
getting nice straight cuts on the reflectors? Would you finish the raw
edge to smooth it and possibly paint it with some kind of white enamel?
Do you plan to cut down in the "bottom" of the groove or do you have in
mind a better place or better way to make the cut? Industrial can
opener? (grin) Incidentally, there are two grooved
sections on each side of a reflector in which you can cut, but I have
learned the hard way (did the first one wrong) to use the outer
groove, because the inner groove is needed to fit with the "body"
section of the fixture. Good thing I have several "left over"
reflectors. (grin) -- Burton -- |
RE: I have found the BEST cheap flourescent ballast/fixture- Posted by: Tripod z8 Central TX (My Page) on Sun, Feb 8, 04 at 0:30
| Just
went to HD and Walmart and purchased one each of their cheapest 2 bulb,
48" shoplights. Neither had an electronic ballast. The cheapest
E-ballast 2 bulb, 48" fixture HD had was $28. They also had the GE 4
bulb E-ballast by itself for $28. Has anyone found a cheap (i.e. <$10) two bulb fixture with and electronic ballast? I wish I had Zink's luck! |
RE: I have found the BEST cheap flourescent ballast/fixture| Tripod, "Has anyone found a cheap (i.e. <$10) two bulb fixture with an electronic ballast? I wish I had Zink's luck!" The
Home Depot here in Augusta, Maine has them and has had them for several
months. They sell a lot of them. I have bought three batches of them,
for a present total of 28, and I will probably buy some more. So far I
have made four conversions, all successful. HD's price for the fixtures
has risen to $7.98, possibly because of the demand for overdriveable
fixtures. -- Burton -- |
RE: I have found the BEST cheap flourescent ballast/fixtureMaineMan wrote: I am hoping that the fluorescent lights themselves will provide some heat source. Believe
me, if you have enough of them, especially if they're overdriven, you
won't have much problem keeping the area warm, assuming it's not
terribly large. Last winter, I started plants in the basement,
using a total of 8 48" fixtures (not overdriven), with 40W lamps. The
fixtures caused the 15'x15' room to become noticeably warmer. So much
so that from mid-February on, I didn't have to run a space heater in
the room, which I usually do. Jason |
RE: I have found the BEST cheap flourescent ballast/fixture| Jason, "Believe
me, if you have enough of them, especially if they're overdriven, you
won't have much problem keeping the area warm, assuming it's not
terribly large." That's encouraging to
hear. The breezeway isn't very large; it is about 22' x 6' 4" but it
isn't insulated, and one side has an exterior wall. We do plan to
insulate it, so the lights may very well supply much of the heat
needed. My primary concern is during the dark cycle
at night when the timer(s) have the lights turned off, when the
temperature may drop too low. We'll provide an electric heater for
sure, and maybe an alarm if the temperature goes significantly below
the temperature the electric heater is trying to maintain. -- Burton -- |
RE: I have found the BEST cheap flourescent ballast/fixture| Tripod, "Just
went to HD and Walmart and purchased one each of their cheapest 2 bulb,
48" shoplights. Neither had an electronic ballast." Since
your local Home Depot does not stock the particular fixture that Zink
recommends, you might want to buy it online here at this link to Home
Depot: Home Depot I
tried inserting a direct link to the specific product, but the link
always contains a session ID that expires after a few minutes, so I
will describe how you can find the product online for yourself. You
don't need to register at Home Depot just yet. At the upper left of the
Home Depot home screen, click on "SHOP" and go down and click "Lighting
and Fans". Under the Lighting & Fans links, choose Fluorescent
Lighting. On the Fluorescent Lighting page you may see the Commercial Electric 4 Ft Shop Light
featured at the top right of the page as a kind of "special" and, if it
is, you can click on the orange title to open the product info page. If
it is not currently featured here, click on the "Troffers, Strips, Shop
Lights" link to bring up the first 10 of about 25 products with a
default sorting of "Highest Price" first. Change the sorting to "Lowest
Price", which brings the $7.25 Commercial Electric 4 Ft Shop Light to
the top of the list. Click on its orange text to open the page showing
full product information for it, as follows: Commercial Electric
4 Ft. Shop Light
Model HBSL-15 Shop
light fluorescent lighting will save up to $35.00 in energy* costs
(*Based on 11c/kilowatt hr., 4hr/day over the life of the product as
compared with a magnetic ballast). Energy-saving, uses 75% less energy
than an incandescent. Longer lasting, lasts up to 20 times longer than
an incandescent. Ideal for use in basements, work areas, laundry rooms,
recreational areas, attics and more. Extra long 5 ft. power cord.
Instant-on electronic ballast. Uses two 48 in. fluorescent tubes (not
included). Internet/Catalog # 162474
Store SKU# 140904
Price: $7.25/ea The
online price is only $7.25. I am paying $7.98 at our local Home Depot.
That difference in pricing might help to pay for the shipping. The
model number and Store SKU number 140-904 agree exactly with the boxes
I have been purchasing, but there is a small chance that these might be
like the one sample that Zink purchased that weren't overdriveable. I
don't know for sure, but I think you could return an online Home Depot
purchase at your local Home Depot if you needed to. You would need to
bring your paperwork. But I would be very surprised if these aren't the
"genuine article" capable of being overdriven. -- Burton -- |
RE: I have found the BEST cheap flourescent ballast/fixture| I
am not sure about other Home Depots but the one that opened by me this
week is selling instant on, electronic ballast shoplights for 4.95
each. this is probably just for the one over by me tho so i am gonna go
over there and stock up. for anyone living in the chicago or suburban
areas around it want this deal, go to the new Home Depot in either Elk
Grove Village, or Carol Stream. Feel free to email me for directions or
help. |
RE: I have found the BEST cheap flourescent ballast/fixture- Posted by: Tripod z8 Central TX (My Page) on Sun, Feb 8, 04 at 17:47
| MaineMan, Thanks
for the help. I have already been online at HD and ordered 6 of the
fixtures. With shipping, they come out to about $9.00 each. Not bad
considering the magnetic ballast ones in the local stores are $8.50. Earlier
in the thread someone said that HD.com was out of stock of the HBSL-15
models and was substituting another brand. I hope this is not the case.
Keeping my fingers crossed. |
RE: I have found the BEST cheap flourescent ballast/fixture- Posted by: zink 6a (My Page) on Sun, Feb 8, 04 at 21:17
| Hardy T/ MaineMan, My
tool of choice for these customizations has definitely been my Dremel!
My wife bought me a Dremel set for Christmas several years ago, per my
request. When I started playing with it, I was so thrilled I went out
and bought every accessory I thought I might use. What a tool! I do
recommend the variable speed model, if anyone does buy one. Don’t
forget to buy a pair of safety glasses too! Never Dremel without them!
Also, don’t EVER solder circuit boards without pants on. Although these
shoplight alterations don’t require soldering, this is a very good
warning. Been there, and won’t ever do it again. One thing that
would be a tedious job with the Dremel is cutting a metal reflector
along it’s length. Hardy-t was going to cut one edge off and combine
reflectors. The Dremel is perfect for small cuts, but I would want to
use a bandsaw for a longer cut like that. I have done all kinds of
different alterations to these fixtures - cutting them in half,
combining reflectors, and mounting the ballasts in different fixtures.
I would keep on the lookout for people discarding fixtures. I have used
reflectors from other people’s dead fixtures. Repaint them with a
glossy white enamel/laquer/whatever and they are good as new again. Hardy-t,
I would like to hear how the customization went. Many years ago I
removed some 4-lamp fixtures from a condemned building. I added another
ballast to some of them and made 6-lamp fixtures. A year ago, I removed
the old magnetic ballasts from one fixture and put in overdriven
electronic ballasts instead – some of them were the Home Depot
shoplight ballasts. The ballasts were a tight fit, but the fixture is
almost too bright to look at! Since the subject of heat has
been brought up here, I should point out that it is the bulbs
themselves that run hotter, not the ballast. Several overdriven bulbs
in one fixture might put out a bit more heat than normal, but not
anywhere as much as an HID lamp. I have been reading in these
posts that many Home Depots do not have the good overdriveable fixtures
in stock. They seem to always be in stock here locally, although the
price has ranged from $6.25 to $7.99. I have no idea why. For those considering buying the Home Depot Commercial Electric Shoplight 140-904 (grey box), I want to post this: - - - - - CONSUMER ALERT!! - - - - -
Home
Depot sometimes ships a load of these shoplights with the WRONG type of
electronic ballast for overdriving. The ballasts look the same, but do
not have a label, and have only two wires (a red and a yellow) going to
one end of the fixture. The correct ballast has a label on it and 3
wires (a red, blue and yellow) going to that side of the fixture. Both
ballast types have 2 red and 2 blue wires going to the other side of
the fixture. (As you may know, I am ignoring the black and white power
supply wires here). I recently stopped by my Home Depot and they had
another pallet of the WRONG fixtures for overdriving, again. I would
open up a box before purchasing, just to see if it has a label on the
ballast.
- - - - - CONSUMER ALERT!! - - - - - I did
purchase a couple of the wrong ballasts a while back. Last night, I
tried to wire one of those weird “unlabeled” ballasts in an alternate
configuration that I had used successfully on another ballast. It
didn’t work and I fried the ballast. The other ballast rewire I was
trying to mimic was an Advance REL-2S110 ballast, which was not really
overdriveable. It is designed to operate 2-T12/HO lamps, from size
F48/60w to F96/110w. I was able to wire it to drive 3 or 4 bulbs, both
F48/60w and F32’s. They lit up, but only the F32’s were using a little
more current than normal, and were a little brighter than normal. I
tried that same successful wiring scheme on the HD “wrong” ballast and
it died. For those who may be interested, I purchased a GE 2D
55watt “torchiere” bulb the other night. I hooked it to an overdriven
SL-15 ballast and it worked just fine. It was drawing .39A of current.
I looked up a ballast designed for the 2D/55w, and it listed .45A of
current to attain a ballast factor of 90%. I would like to have
attained a better current draw on that one. I have used the SL-15 to
power 54watt T5/HO lamps to exact current specifications, for a full
100% ballast factor. Zink |
RE: I have found the BEST cheap flourescent ballast/fixture| Instead
of using the jiggle and wiggle method of removing the wires from the
tombstone, a small sharp object may be inserted along the wire and
pryed one way or the other (up or down)while pulling gently on the wire
and this will release the wire without damaging it or breaking it off.
I used an actual 'dental pick', and I imagine a large sewing needle
would work as well. A standard O-ring pick seems to be a little too
large. Also, using this method will release the wire without damage to
the tension-type connector so it may be used over again. seedseller1 |
RE: I have found the BEST cheap flourescent ballast/fixture- Posted by: zink 6a (My Page) on Mon, Feb 9, 04 at 19:42
| Are
you sure you tried that with the HD shoplight tombstones(sockets)? You
described the normal method for extraction and it usually works just
fine. These sockets did not succumb to that technique. After trying
about 12 to 15 objects, INCLUDING a large sewing needle, guitar string,
surgical tools, small nails, and wires of many sizes - I gave up and
began twisting. I have that method down now. Zink |
RE: I have found the BEST cheap flourescent ballast/fixture| Zink, I
think there is a chance that SeedSeller's dental pick technique could
work well. I have been using a twist-while-pulling technique that has
worked every time, including the first time, but on occasions I have
gotten too agressive and broken off a short piece of the solid copper
wire in the socket. That concerned me that the loose piece of bare
copper wire might bounce around and short something, so I removed the
back from a spare socket to see what I was up against. (I broke the
back piece in the process but I think, with the right technique, it
could be removed and replaced without damage.) First, I saw that the small loose piece of wire was confined and not in danger of causing a short. Second,
I saw how the socket "worked" with the solid wire being inserted in
through an undersized gap pushing up against an inward slanted piece
that lets it in, but tends to jam into the wire to prevent its
extraction (and makes a good electrical contact with the bare wire.)
That explained how my "unscrewing back and forth while pulling"
technique worked and why it left all those fine "screw threads" on the
extracted wire and why, if you pulled too hard, you could cut/break off
the remaining part of the wire. Unfortunately I don't have a dental pick or anything equivalent. But I think it would
be desirable to extract the wires without damaging them or the socket,
because you are committed to reuse some of the sockets. The only damage
I have done to a socket is to leave a short broken-off piece of copper
wire loose inside, but captured in a cavity within the socket where it
cannot cause a short. As for the damaged extracted wires, I just
re-strip them to expose the needed extra bare wire. A
pair of sewing needles of the right diameter, inserted on each side of
the captured wire, might serve to hold up the "trap door" enough to
release the wire. The sewing needles should be hard enough to prevent
the "trap door" from cutting into them and preventing their removal. I
plant to investigate SeedSeller's technique, since I think it is valid
if you have the right tool(s). In the meantime I will patiently pull
and wiggle as I have been doing. I have a whole stack of fixtures still
awaiting the overdriving conversion. I also have onions, pansies, and
african violets growing under overdriven fixtures and I will be
planting a flat of coleus tonight. All of those little plants thank
you, Zink. -- Burton -- |
RE: I have found the BEST cheap flourescent ballast/fixture- Posted by: zink 6a (My Page) on Mon, Feb 9, 04 at 21:50
| seedseller1, After
my last post, I decided to investigate why I couldn't remove the wires
by your method, which do I prefer to use. Normally, you can slide a
thin object (pin, nail, wire) adjacent to the wire and wedge apart the
metal that is clamping the wires in. That is a standard technique with
these types of inserts. Since I had plenty of extra sockets leftover
from my customizations, I decided to investigate. I found that
there were 2 slightly different wordings stamped on the backs of them,
so I took both types apart. Internally, they were exactly the same. First
off, I found that the two adjacent insert holes, while connected to the
same piece of metal, do not share the same "clasping flap" of metal.
This means you cannot insert a wire, or whatever device, into one slot
to relieve the gripping pressure on the wire inserted in the adjacent
slot. Second, even though I had FULL view of the internal
workings, I found it nearly impossible to insert anything useful along
side the wire I wanted to remove. The only device that could possibly
work would have to be - needle thin, bent at the end for about 1/8",
and as strong as steel. Even with a full view of the insides I could
not do it. Although I was dismayed that it was harder than I
thought, I did figure out how to "twist and wiggle" the wire even
better than before. I don't see how you do it with these particular
sockets (tombstones). Zink |
RE: I have found the BEST cheap flourescent ballast/fixtureZink--
The
dental pick I used was an actual dental pick, very small and made of
stainless and fit nicely along the wire. I had visualized what I
thought I needed to do and it worked very well. I will confess that
when I went to reuse one of the sockets it didn't appear to hold the
wire as firmly as I would have liked, so I too dismantled one of the
tombstones and found that I had bent the connector with enough force
that it did not return to its original position. A little shove with a
pocket-sized srewdriver and I had bent the connector back to its
original form and it held the wire as securely as new. I found it was
so easy to pry the backs off the tombstones that I did everyone of them
to make sure they started out like new before I reinserted the
wires--some needed it and some didn't. The easiest way I found to
remove the back was to pry along each side furthest away from the
contacts with this same "pocket sized" (1/8" ?) screwdriver and after
loosening the top end, inserting the driver straight down the middle
towards the contacts. Slight rotation popped the bottom end loose
allowing clear visablity of what was going on in there. In fact, this
worked so well for me that when I do my next one, I think I'll pop off
the back first, push the wire inwards to relieve the pressure on the
contact and pry up on the contact with my pick from the back side and
pull the wire free. This will allow me to reshape the connector before
reinserting the wire if necessary. What do ya think?
Seedseller1 |
RE: I have found the BEST cheap flourescent ballast/fixture- Posted by: zink 6a (My Page) on Tue, Feb 10, 04 at 0:05
| SS1, You
are a better man than I. I just sat here and busted up 2 more sockets.
I think some of these have more glued places than others. I am sure I
have had the back off of one of these things before.. without breaking
it. At least there are other ways to get the job done. Some
people are more comfortable cutting and splicing in the new wire. I do
it that way when I have to. Zink |
RE: I have found the BEST cheap flourescent ballast/fixtureZink-
After
walking everybody through this procedure as well as you did, don't
belittle yourself by saying I'm the better man! My tombstones evidently
were assembled on a Monday morning or Friday afternoon, as they didn't
appear to have any glue on them. They were the same Homey D's with the
SL-15 electronic ballist. Mine turned out great. Thanks again for your
help and I guess everybody who's done it will use their own technique
and for those who haven't we've exposed them to enough possibilities. Thanks, SS1 |
RE: I have found the BEST cheap flourescent ballast/fixture- Posted by: Tripod z8 Central TX (My Page) on Tue, Feb 10, 04 at 14:59
| Zink, et al: Looks like I need some help. I
just receieved the HD shoplights with the Sunpark SL-15 ballasts via
UPS. Wired a couple up as per your instructions and diagrams (quite
easy and straight forward), but the bulbs seem no brighter than a
normally wired fixture! I have tried both T8 and T12 bulbs. I
have also removed the wires from one set of "tombstones" and moved them
over to the other set in case the first was bad. Any suggestions! |
RE: I have found the BEST cheap flourescent ballast/fixture- Posted by: Tripod z8 Central TX (My Page) on Tue, Feb 10, 04 at 17:12
| After
a second (and third) look, it does appear that the overdriven bulbs are
a LITTLE brighter than the normally wired ones. Maybe 20% brighter. Is
this normal, or should I expect a larger increase in brightness? |
RE: I have found the BEST cheap flourescent ballast/fixture- Posted by: zink 6a (My Page) on Tue, Feb 10, 04 at 19:40
| Tripod, The
first thing that I thought of was that maybe you had combined the wrong
wires at one end of the fixture. I have encountered low light output
many times. Once, I found I had combined the 2 red wires together on
one pin, and the 2 blue wires together on the other pin. The correct
way is to combine a red/blue and a red/blue. I made this mistake even
after I had rewired a bunch of fixtures. The other low light
problem I have had, several times, was because I thought I had inserted
the wires well into the socket/tombstone. That mistake was easy to fix.
Usually one wire would fall back out after I moved the fixture some. I
was happy to see it happen, because then I knew what my problem was. It
is also possible to have a bad or weak ballast. I haven’t had that
happen yet. Since I have plenty of room on my workbench, and plenty of
jumper wires, I would separate the wires back to the “normal”
condition, with 2 bulbs, and see if the ballast still lights both of
them normally. If so, it should overdrive just fine – I would think. If
you do compare a normal fixture with an overdriven one, make sure you
compare T8’s with T8’s, and T12’s with T12’s. They two types can be
different enough to skew a comparison. In my experiences so far, every time I had low light problem, it was fixable. Zink |
RE: I have found the BEST cheap flourescent ballast/fixture| Tripod, "After
a second (and third) look, it does appear that the overdriven bulbs are
a LITTLE brighter than the normally wired ones. Maybe 20% brighter. Is
this normal, or should I expect a larger increase in brightness?" In
my experience, it's normal that when you first apply power to the
overdriven fixture that at least one bulb is not as bright as it should
be. If you have read all the messages in this thread, you will see that
I always have to "futz" with a fixture to get it working properly. When
it is working properly, it is a lot brighter. The 70% figure that is usually quoted is accurate in my estimation. I
always do a table test of a fixture as soon as I complete it. It put it
on a table, face up, side-by-side with a normally driven fixture and
turn both on, and then observe and compare. I have never had a
fixture work optimally upon first power up. I notice which bulb is
dimmest, power off, and swap ends on the "dim" bulb, and re-apply power
to both fixtures. If there is still a problem, I interchange the bulbs
in the overdriven fixture, keeping the end orientation the same and
retest. If there is still a problem, I swap ends on the weaker bulb and
retest. I refer to this process of repeatedly changing the bulb
orientation/installation as "futzing" with the fixture. I
have no idea what is actually going on. Maybe I am just roughing up the
bulb prongs or the socket contacts. It isn't supposed to matter how you
install the bulbs. For me, it appears to matter, and the process of
finding a "sweet" bulb installation is a matter of trial-and-error. As
soon as I find it, I leave the overdriven fixture in that configuration
and put it aside. Days later when I install the fixture in a plant
stand over seedlings it appears to have retained that "sweet" bright
configuration. On one shelf of my main plant stand I
have one non-overdriven fixture, and it stands out in stark contrast
with the two overdriven fixtures beside it on that shelf. When
you are comparing bulb brightness, make sure it is the exact same make
and model of bulb. My cool white Philips T8s look brighter than my warm
white Philips T8s, and that holds whether the bulbs are in an
overdriven fixture or a normally driven fixture. If you compared an
overdriven warm white bulb with a normally driven cool white bulb, you
might be disappointed and your 20% figure would be about right. If
futzing with the bulbs doesn't work, you might want to follow Zink's
suggestion and open the fixture and make sure your connections are all
good. I have started using insulated crimp connectors instead of
screw-on connectors for more "solid" connections, although my first two
screw-on fixtures are working well too. I mount the
second ballast at the other end of the fixture and pop-rivet it in
place there, along with a second ground wire connection to the fixture
body. I scrape off the paint at the second ground wire connection point
to assure a good electrical connection. A Dremel tool would make that
easier. I was worried that mounting the ballasts side-by-side might
cause problems, although that is probably unfounded. But the
opposited-ended scheme does give better mechanical balance to the
fixture. I do have to add a couple of "parasitic" line voltage wires
down to the second ballast. Good electrical connections are important,
but I agree with Zink that soldered connections are unneccessary. Incidentally, I am glad UPS at least delivered overdrivable fixtures. That wasn't an absolute certainty. -- Burton -- |
RE: I have found the BEST cheap flourescent ballast/fixture- Posted by: Tripod z8 Central TX (My Page) on Wed, Feb 11, 04 at 15:11
| Zink & MaineMan, Thanks
for the advice. I did go through and thoroughly check the wiring,
connections, bulbs types, etc. Everything is solid. The fixtures are
working, and they are brighter than normally wired ones in side by side
comparisons (with the same type bulbs). I think it may simply
be a matter of subjective comparisons. When I look at the overdriven
bulbs, I do not see a 70% increase in light output, but I do see a
noticable increase. I have now replaced the original three fixtures
over my plant area with three overdriven ones. The area is definitely
brighter (and warmer), so I think everything is working as it is
supposed to. Another possible problem with visually judging the
light increase is that by the time I have rewired and tested the
fixtures, I am nearly blind from all that light in such close
proximity! Talk about seeing spots! Thanks again, guys. |
RE: I have found the BEST cheap flourescent ballast/fixtureI just bolted two overdriven Commercial Electric Shoplights together and
wired them together in parallel. Now I have four overdriven fluorescent
tubes in one fixture with one power cord. They are NICE AND BRIGHT. One
flickers just a little, but I'm not worried about that. I cut one flange off the side of each reflector. Actually, I didn't cut
them myself. I took them to a friend who has a table saw with a blade for
cutting metal. He cut them for me on the outside of the groove, and filed
them a bit afterwards. I have two cool white 34W T8 lamps in the center and warm white T12 lamps
on the outside for the second phase of my "one month cool, one month cool
and warm" routine. I put the warm whites on the outside because
phototropism tends to follow the cool whites, and I want them to grow
straight. I have two probably-non-overdrivable cheap shopligths. I took them apart
to see. They have a ballast on one end of the fixture. The ballasts have
no name or markings, just some resistors, a thing like a shiny brown
sausage (capacitor?) and a heavy square ring (transformer?). Now I can clean up and put away the electrical stuff and concentrate on what I
am groiwng. Thanks, Zink and everyone for the help and inspiration. |
RE: I have found the BEST cheap flourescent ballast/fixture| Hi Guys, Great thread on Overdriving. Thanks Zink for the information. Did you mentioned earlier in the post about driving a 22" CF bulb? I have a question about the ability to drive 8w t5 bulbs with the Sunpark Ballast. Is
it possible to do it and how would I wire it? Would I wire them in
parallel? How many 8 Watt T5 bulbs could I run of 1 ballast? Any information would be greatly appreciated |
RE: I have found the BEST cheap flourescent ballast/fixture- Posted by: trant z6 NY (My Page) on Thu, Feb 19, 04 at 14:31
| WOW,
this is awesome- I'm gonna try this out this weekend! One question,
what bulb should I use? The gro-lux or one of the standard T5 ? Where's
a good place to buy these bulbs online? |
RE: I have found the BEST cheap flourescent ballast/fixture- Posted by: zink 6a (My Page) on Fri, Feb 20, 04 at 1:16
| CCR, I
discovered that one of the best bulbs to overdrive with an electronic
ballast is an FT40TT lamps, such as the Philips PL-L40w or the Dulux-L
40w. They're difficult to look at when OD'ed. I mounted 4 of
them across a large reflector (about 12" wide) from an old 2-lamp
shoplight, which I cut in half!(24" long). I haven't used the thing,
yet. Every now and then, I just turn it and and laugh at how bright it
is. I think I'm getting about 18,000 lumens from the thing! That's
equal to about a 250w MH. Do you know the designation/name of
the T5 bulbs. I recently found that an overdriven Sunpark SL-15
supplies EXACTLY the specified mA to drive a Philips 54w T5/HO bulb (I
measured it). I have generally found that, within tube sizes,
for whatever wattage a ballast will drive, it also drive nearly that
same wattage added together from smaller lamps wired in series. For
instance, using 2-17w T8 lamps in place of 1-32wT8. The lamps should be
wired end-to-end, wiring BOTH lamp pins together. You can even SHORT
the two pins (preferred) on the facing lamp ends, but DON'T short the
leads to the ballast (unless it is an INSTANT-START ballast, then ALL
lamp pins are shorted at their ends). Zink |
RE: I have found the BEST cheap flourescent ballast/fixture| Thanks So much for the information. That
is exactly what I was hoping I could do, but needed confirmation since
my eletronic knowledge is not good enough to be confident in it. I
am actually trying to increase the wattage density using UVA
(Blacklights) Bulbs for use in a Photocatalytic Reactor. I need to use
short Bulbs because of the reactor design. I am still determining
whether I will be using f8T5's or f15T8's so I don't have a model
number yet. What do you mean by shorting all the pins at their ends since I am hoping to use an instant start ballast? I hate to take up all you time on this post.
Is there any place you found on the web that explains how to wire bulbs
in series and how many bulbs you can wire end to end or is this from
your knowledge and experiece? Thanks for all your help |
RE: I have found the BEST cheap flourescent ballast/fixture- Posted by: dbri ne oklahoma (My Page) on Sat, Feb 21, 04 at 12:40
| is it safe to overdrive a bulb, considering part of their design is to limit harmful UV output? |
RE: I have found the BEST cheap flourescent ballast/fixture| Are
those 40 Watt FT40TT lamps triphosphor lamps? I'm curious as to why the
are so much brighter to the human eye. Because of the photropic curve
if they had a spike around 550 nm and put most of their output there
they would seem very bright though thir total PUR/PAR would be the same
as a wider spectrum, 3 spike triphosphor. In other words, the total
number of photons emitted would be the same but they'd be concentrated
in the highly sensitive (to the human eye) green region. Fun experiment. RJ |
RE: I have found the BEST cheap flourescent ballast/fixture- Posted by: zink 6a (My Page) on Sat, Feb 21, 04 at 16:12
| RJ SoftheM, Yes,
they are triphosphor, as are nearly every single CFL being manufactured
nowadays. The "way too small" SPD graph on the Philips product info
page shows the color temperatures available. Their difference in colors
appears mainly due to changes in the amount of green and blue being
output, with the 4100K lamp delivering the most blue:
http://www.lighting.philips.com/nam/prodinfo/compact_fluorescent/p2812a.shtml It sounds like you lit one up. Did you get to OD one of them? dbri, From
extensive reading of lamp design discussions, there should be no more
UV coming from a single overdriven lamp than using two normal lamps,
all of the wavelengths get boosted in intenity. The UV ouput just
increases with the visible light. No more dangerous than using a higher
wattage to begin with, or using more lights to begin with. By the way, I liked your prairie pics and the "get-a-life" links. I need the reminder. Zink |
RE: I have found the BEST cheap flourescent ballast/fixture- Posted by: trant z6 NY (My Page) on Sat, Feb 21, 04 at 23:37
| Quick question: Is
the ballast by default able to handle something like a T5 bulb
(assuming you've refitted the plugs for a T5 lamp and adjusted the
distance). Or do you have to overdrive it in order to even power a T5? |
Post a Follow-Up
Please Note:
This thread has reached the upper limit for the number follow-ups
allowed (100). If you would like to continue this discussion, please
begin a new thread using the form on the main forum page.
Return to the Growing under Lights Forum
| |
|