3M Club Chess Club: Mate in 64 Solution
NOTES ON A CHESS PUZZLE
BY GUSTAVE CHARLES REICHHELM, 1877
(Given to Me by Ray Marcotte, 1994)
(Notes by Mike Maloney, [[email protected]] March 1998)
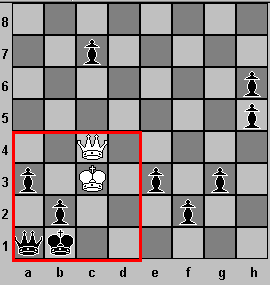
Initial Position:
Problem: White to move and mate in 64
FIG. 1: THE INITIAL POSITION
OUTLINE OF NOTES ON SOLUTION
1. Initial Part: Capturing Black’s Major Pieces
(If you are not familiar with the general ideas of chess puzzles, read
Section 9.)The solution begins as follows.
|
Move |
White |
Black |
Comments |
|
1 |
Kxc3+ |
Kb1 |
|
|
2 |
Qxf5+ |
Ka2 |
2. …Kc1 leads to 3.Qc2# |
|
3 |
Qf7+ |
Kb1 |
|
|
4 |
Qh7+ |
Ka2 |
|
|
5 |
Qxg8+ |
Kb1 |
|
|
6 |
Qh7+ |
Ka2 |
|
|
7 |
Qf7+ |
Kb1 |
|
|
8 |
Qf5+ |
Ka2 |
|
|
9 |
Qd5+ |
Kb1 |
|
|
10 |
Qd3+ |
Ka2 |
|
|
11 |
Qc4+ |
Kb1 |
|
|
12 |
Qxf1+ |
Ka2 |
|
|
13 |
Qc4+ |
Kb1 |
|
|
14 |
Qe4+ |
Ka2 |
|
|
15 |
Qd5+ |
Kb1 |
|
|
16 |
Qxh1+ |
Ka2 |
|
|
17 |
Qd5+ |
Kb1 |
|
|
18 |
Qd3+ |
Ka2 |
|
|
19 |
Qc4+ |
Kb1 |
|
|
20 |
Qxa6 |
|
|
2. First Set of Real Choices for Black, and Establishing Position P1 in Lower-Left Corner
Now it is time to pause and discuss the situation. The position after 20. Qxa6 is as follows:
FIG. 2: POSITION AFTER MOVE 20 BY WHITE
For the first time, Black is not in check, and has some real choices about what move to make. The possible moves for Black are as follows.
For possibilities a, b, and c, White plays Qf1#.
Now consider case d. If Black plays 20. …g2, then 21. Qd3+, Ka2 22. Qd5+, Kb1, 23. Qxg2. Later discussion will explain how the play can go on from this position. In general, as will become clear in the following discussion, Black’s best strategy is not to advance a pawn until he has to.
So now consider case e, where Black plays Ka2. In this case, the play proceeds as follows.
|
Move |
White |
Black |
|
20 |
|
Ka2 |
|
21 |
Qe6+ |
Kb1 |
|
22 |
Qc4 |
|
This leads to the following position. White has K on c3, Q on c4; Black has K on b1, Q on a1, pawns on a3, b2, c7, e3, f2, g3, h5, and h6.
FIG. 3: POSITION AFTER MOVE 22 BY WHITE ("P1")
Focus in particular on the position in the lower-left corner of the board, where we have the following:
Let’s call this position of the pieces in the lower-left corner P1. We will be returning to P1 frequently in the following play.
3.Changing from White’s Move to Black’s Move in Position P1
After 22. Qc4, we are in position P1 and it is Black’s move. In the overall play that continues from this point, we will be returning to P1 frequently; when we return to P1, it will sometimes be Black’s move and sometimes White’s move. If we are in P1 and it is White’s move, White will want to force a return to P1 with it being Black’s move. White does this as follows.
|
White |
Black |
Comments |
|
Qe4+ |
Ka2 |
(if B:Kc1, W:Qc2#) |
|
Qe6+ |
Kb1 |
|
|
Qc4 |
|
(back to P1, Black to move) |
So whenever we are in P1 and it is White’s move, the White Queen can simply move around the triangle from c4 to e4 to e6 and back c4, and then we have returned to P1, but now it is Black’s move.
4.Overall Strategy for White to Finish the Game (and the Line V1)
To re-summarize, the position after 22. Qc4 is as follows.
Now the possible moves for Black can be summarized as follows.
If Black makes any of the moves a, b, or c, White plays Qf1#. So now Black must advance one of the pawns on files c through h.
The strategy for White can now be summarized as follows. Consider the V-shaped line from a6 to f1 to h3; call this line V1. All of the pawns on files c through h are of course behind V1. When the pieces in the lower-left corner of the board are in position P1 and it is Black’s move, Black must advance one of the pawns on files c through h. Now it is White’s move. If none of the Black pawns on c through h have reached the line V1, the White Queen moves around the triangle from c4 to e4 to e6 and back to c4. Now the pieces in the lower-left corner are back in P1, but it is Black’s move. Again, Black must advance one of the pawns on files c through h. White forces this pattern to repeat until, eventually, one of the Black pawns on files c through h reaches the line V1. When a Black pawn reaches V1, White captures the pawn, and then forces a return to P1. (The pawn on file c, of course, can only advance to the line V1 when the White Queen has left c4.) White forces this cycle to be repeated until all of the Black pawns on files c through h have been captured, and we are back at P1. At this point, Black must make one of the moves a, b, or c mentioned above (either Kc1, Qa2, or a2), and checkmate follows quickly.
Now consider the details of how, when a Black pawn reaches the line V1, White manages to capture the pawn and then force a return to position P1.
5.How White Captures a Pawn That Has Reached the Line V1
If the advancing pawn arrives at e2 or f1, the White Queen makes an immediate capture. (Forcing the return to P1 will be discussed later.)
If the advancing pawn comes to g2, the play goes as follows. W:Qe4+, B:Ka2, W:Qe6+ (if the Black pawn has not advanced to c6, W could play Qd5+), B:Kb1, W:Qg6+, B:Ka2, W:Qg8+,B:Kb1, W:Qxg2). Note that, before White makes the capture, White must force the Black King to b1, to keep the Black Queen confined. Again, forcing the return to P1 will be discussed later.
If the advancing pawn comes to h3, the play goes as follows. W:Qe4+, B:Ka2, W:Qe6+, B:Kb1, W:Qxh3.
For the pawn on file c, the case is a little different. If this pawn advances to c4 while the White Queen is busy capturing some other pawn, then the pawn on c4 will of course be captured if the White Queen can return to c4. The discussion in the following sections will show how the White Queen can always find a way to return to c4. If the Black pawn advances to c5 after all of the pawns on files e through h have been captured, and while the other pieces are in position P1, then the situation depends on who has the move. If it is Black’s move, then Black must move either Kc1, Qa2, or a2; in any of these cases, White next plays Qf1#. If it is White’s move when the Black pawn is on c5, White plays Qxc5. If Black makes any move except Ka2, White plays Qg1#. If Black plays Ka2, the play continues as follows: W:Qd5+, B:Kb1, W:Qc4 (back to P1).
6.Forcing a Return to P1 After Capturing a Pawn on V1
Outline of This Section
6.1: Introduction and Summary of the Position
6.2: Case 1 - White Has Captured on h3
6.3 Case 2 - White Has Captured on g2
6.4 Case 3 - White Has Captured on f1
6.5 Case 4 - White Has Captured on e2
6.6 Case 5 - White Has Captured on c4
6.1: Introduction and Summary of the Position
Now consider the various cases of forcing a return to P1, after the White Queen has captured one of the pawns that has advanced to V1. Let’s begin by considering the capture on h3, and then move left, considering in order the captures on g2, f1, e2, and c4.
When White has captured a pawn on V1, the position may be summarized as follows. The Black pieces in the lower-left corner are in position P1 (K on b1, Q on a1, pawns on a3 and b2). The White K is on c3. The White Q is somewhere on V1 (wherever it has just captured the pawn), and the other Black pawns, on files c through h, are all behind V1.
6.2: Case 1 - White Has Captured on h3
6.2.1: Introduction to Case 1, and Sub-Cases a, b, c, and d
When White captures on h3, the possible moves for Black are as follows.
In case a, White plays Qe6+. If the Black pawn on file c has not advanced to c5, then, Black must play Kb1, White plays Qc4, and we are back in P1 (and it is Black’s move). If the Black pawn has advanced to c5, then Black can get out of check either by playing Kb1 or by playing pc4. If Black plays pc4, White plays Qxc4+. Now the play continues as follows: B:Kb1, W:Qe4+, B:Ka2, W:Qe6+, B:Kb1, W:Qc4 (back to P1).
In other sub-cases to be considered below, the situation will also arise where the Black King is on a2, and White puts Black in check by moving his Queen somewhere onto the diagonal line from e6 to g8. In general, Black will have two options for getting out of check: either move the King to b1, or, (if the Black pawn on file c has reached c5), advance the pawn from c5 to c4. If Black plays c4, then the White Queen captures on c4, and White then forces a return to P1 as just indicated above. In general, if Black sacrifices the pawn on file c, that simply shortens the number of moves to checkmate. In the following parts of these notes, therefore, we will often not explicitly consider the option where Black gets out of check by sacrificing the pawn on file c.
For cases b, c, and d, W plays Qf1#.
6.2.2: Sub-Case e: Black Plays g2
In sub-case e, W plays Qxg2. Now the position is as follows.
For e1: W:Qg8+, B:Kb1, W:Qc4 (P1)
For e2, e3, e4: W:Qf1#
For e5: W:Qxf1+, B:Ka2, W:Qf7+, B:Kb1, W:Qc4 (P1)
For e6: W:Qe4+, B:Ka2, W:Q6+, B:Kb1, W:Qxe2. Now the possible plays for B are as follows:
For e6a: W:Qe6+, B:Kb1, W:Qc4 (to P1)
For e6b, e6c, e6d: W:Qf1#
For e6e: W:Qxf1+, B:Ka2, W:Qf7+, B:Kb1, W:Qc4 (to P1)
For e6f, first note that, since the situation we are considering in this Section (Section 6.2) started with W capturing on h3, the pawn that moved to h3 must have come from h4; so if B has another pawn on file h, that one must be behind h4; so in case e6f, the advancing pawn will not reach h3. So in case e6f, W simply plays Qc4, and we are back to P1.
For case e7, note also that, as just explained for e6f, the advancing pawn will not reach h3. The position for case e7 may be summarized as follows.
Thus, for all possibilities in Sub-Case e, White can force a return to P1.
6.2.3: Sub-Case f: Black Plays f1
From here, the play goes as follows: W:Qxf1+, B:Ka2, W:Qf7+, B:Kb1, W:Qc4 (back to P1).
6.2.4: Sub-Case g: Black Plays e2
From here, the play goes as follows: W:Qf5+, B:Ka2, W:Qe6+, B:Kb1, W:Qxe2. The position now is as follows:
For case g1, W plays Qe6+, B must play Kb1, W plays Qc4, back to P1.
For cases g2, g3, and g4, W plays Qf1#.
For case g5, the play continues as follows: W:Qxf1+, B:Ka2, W:Qf7+, B:Kb1, W:Qc4 (back to P1).
For case g6, the play continues as follows: W:Qe4+, B:Ka2, W:Qe6+, B:Kb1, W:Qg6+, B:Ka2, W:Qg8+, B:Kb1, W:Qxg2. Now the possible moves for Black are as follows:
For g6a, the play goes as follows: W:Qg8+, B:Kb1, W:Qc4 (back to P1)
For g6b, g6c, and g6d, W plays Qf1#.
For g6e, the play goes as follows: W:Qxf1+, B:Ka2, W:Qf7+, B:Kb1, W:Qc4 (back to P1).
For g6f, first note again that this whole sequence started with Black advancing a pawn from h4 to h3 (and then White capturing on h3). Therefore the Black pawn remaining on file h must be behind h4. From here, the play continues as follows: W:Qe4+, B:Ka2, W:Qe6+, B:Kb1, W:Qc4 (back to P1).
Now consider case g7. Here, Black advances a pawn on file c or h. As noted before, this case (Case 1, Section 6.2) began with White capturing a pawn on h3; that pawn must have come from h4; so if Black has another pawn on file h, that pawn must be behind h4; so if Black advances a pawn on file h, that pawn does not reach h3. Note also that in our present sub-case (Sub-Case g, Section 6.2.4), the White Queen is on e2. So White simply plays Qc4, returning to P1.
6.2.5: Sub-Case h: Black Advances a Pawn on File h or c
We now must consider the final sub-case of Case 1 (Section 6.2). Case 1, Section 6.2, begins with White having just captured a pawn on h3. In this final sub-case (Sub-Case h), the next move by Black is to advance a pawn on file h or c. Remember that Sub-Case 6.2 began with White capturing a pawn on h3. This pawn that was captured on h3 clearly had just come from h4; so if there is another Black pawn on file h, that pawn is behind h4; so if Black now advances a pawn on file h, that pawn will not yet reach h3.
There are now 2 sub-sub-cases to consider, first when the Black advancing pawn has not reached c4 (on line V1), and second when the Black advancing pawn has reached c4.
If the Black advancing pawn has not reached c4, the play continues as follows: W:Qf5+, B:Ka2, W:Qf7+, B:Kb1, W:Qc4 (back to P1).
If the Black pawn has advanced to c4, the play goes as follows: W:Qf1+, B:Ka2, W:Qxc4+, B:Kb1. This is position P1, but it is White’s move. Now White moves around the triangle from c4 to e4 to e6 and back to c4, and then we are back in P1, and it is Black’s move.
We have now considered all of the sub-cases of Case 1 (Section 6.2). We have shown that, if White captures a pawn on h3, it is always possible for White to force a return to position P1.
6.3 Case 2 - White Has Captured on g2
Remember that the strategy for White is always to capture a pawn as soon as it reaches line V1. Thus if White captures on g2, that means that a Black pawn is not on h3. The position can be summarized as follows.
In case a, the play goes as follows: B:Ka2, W:Qg8+, B:Kb1, W:Qc4 (back to P1).
In cases b, c, and d, White plays Qf1#.
In case e, the play goes as follows: B:f1, W:Qxf1+, B:Ka2, W:Qf7+, B:Kb1, W:Qc4 (back to P1).
For cases f and g, there are more possibilities.
6.3.2 Sub-Case f: Black Plays e2
Here, the play proceeds as follows: W:Qe4+, B:Ka2, W:Qe6+, B:Kb1, W:Qxe2.
The position now is as follows.
We are now in nearly the same position as in Section 6.2.4 (Sub-Case g of Case 1), except that now Black does not have a pawn on g3, and thus Black does not have the option of moving g2 (option g6 in Section 6.2.4). The same analysis used in Section 6.2.4 can be used here to show that White can force a return to Position P1. There is only one possible difference: in the present case, it could be possible for Black to advance a pawn to h3. In this sub-case, the play goes as follows: B:h3, W:Qe4+, B:Ka2, W:Qe6+, B:Kb1, W:Qxh3.
The position now is as follows:
In sub-case f1, the play goes as follows: B:Ka2, W:Qe6+, B:Kb1, W:Qc4 (back to P1).
In sub-case f2, the play goes as follows: B:f1, W:Qxf1+, B:Ka2, W:Qf7+, B:Kb1, W:Qc4 (back to P1).
In sub-case f3, there are 2 further sub-cases. If the advancing pawn has not reached c4, the play goes as follows: W:Qf5+, B:Ka2, W:Qf7+, B:Kb1, W:Qc4 (back to P1). If the advancing pawn has reached c4, the play goes as follows: W:Qf1+, B:Ka2, W:Qxc4+, B:Kb1. We are now back at P1, but it is White’s move; as discussed earlier, White now moves around the triangle from c4 to e4 to e6 and back to c4, and we are then back to P1 again, but now it is Black’s move.
This completes the consideration of sub-case f (where Black played e2).
6.3.3: Sub-Case g: Black Advances a Pawn on File h or c
As noted earlier, the position before Black advances the pawn may be summarized as follows.
Here, there are 3 sub-sub-cases to consider: either the advancing pawn has not reached the line V1, or the advancing pawn has come to h3, or the advancing pawn has come to c4.
If the advancing pawn has not reached the line V1, the play continues as follows: W:Qe4+, B:Ka2, W:Qe6+, B:Kb1, W:Qc4 (back to P1).
If the advancing pawn has come to h3, White plays Qxh3. The position now is a simplified form of Case 1, as discussed in Section 6.2. This is ‘simplified’ in that now Black does not have a pawn on g3, so we do not have to consider the possible Black move g2 (which was Sub-Case e of Case 1). Except for this, the analysis of Case 1 (Section 6.2) can be used to show how White can force a return to P1.
Now consider the sub-sub-case where the advancing pawn has come to c4. This is very similar to one of the sub-sub-cases already discussed in Section 6.2.5. The play goes as follows: W:Qf1+, B:Ka2, W:Qxc4+, B:Kb1. This is position P1, but it is White’s move. Now White moves around the triangle from c4 to e4 to e6 and back to c4, and then we are back in P1, and it is Black’s move.
This completes the discussion of Sub-Case g, and also the discussion of Case 2. We have shown that, if White captures a pawn on g2, White can then force a return to position P1.
6.4 Case 3 - White Has Captured on f1
Remember that the general strategy for White is to capture a Black pawn as soon as it reaches the line V1. So if White captures on f1, that means that there is no Black pawn on e2 or g2. The position for this Case can be summarized as follows.
Note that Black is in check. Therefore Black must move Ka2. Then White moves Qf7+, Black moves Kb1, and White moves Qc4, back to P1.
6.5 Case 4 - White Has Captured on e2
The position for this Case can be summarized as follows.
Excluding the moves that lead to quick checkmate, the possible moves for Black are the following.
For Sub-Case a, the play goes as follows: B:Ka2, W:Qe6+, B:Kb1, W:Qc4 (back to P1).
6.5.2 Sub-Case b: Black Plays g2
6.5.2.1 Introduction to Sub-Case b
Here, the play goes as follows. B:g2, W:Qe4+, B:Ka2, W:Qe6+, B:Kb1, W:Qg6+, B:Ka2, W:Qg8+, B:Kb1, W:Qxg2.
The position now is as follows.
Excluding the moves that lead to a quick checkmate, the possible moves for Black are as follows:
For Sub-Case b1, the play goes as follows: W:Qg8+, B:Kb1, W:Qc4 (back to P1).
For Sub-Case b2, the play goes as follows: W:Qxf1+,B:Ka2, W:Qf7+, B:Kb1, W:Qc4 (back to P1).
6.5.2.2 Sub-Case b3: Black Advances a Pawn on File h
For Sub-Case b3, either the advancing pawn has reached the line V1 (at h3) (call this Sub-Case b3a), or not (call this Sub-Case b3b).
If the advancing pawn has reached h3, the position is as follows.
For b3a1, the play goes as follows: W:Qe6+, B:Kb1, W:Qc4 (back to P1).
For b3a2, the play goes as follows: W:Qxf1+, B:Ka2, W:Qf7+, B:Kb1, W:Qc4 (back to P1).
For b3a3, note that, since the White Queen is on h3, the advancing pawn must be behind h3. The play now goes as follows: W:Qf5+, B:Ka2, W:Qf7+, B:Kb1, W:Qc4 (back to P1).
For b3a4, there are again two possibilities: either the advancing pawn has reached V1 (at c4), or not.
If the advancing pawn has reached c4, the play goes as follows: W:Qf1+, B:Ka2, W:Qxc4+, B:Qb1. This takes us back to P1, but it is White’s move. White now moves around the triangle from c4 to e4 to e6 and back to c4, and then we are in P1 and it is Black’s move.
If the advancing pawn has not reached c4, the play goes as follows: W:Qf5+, B:Ka2, W:Qf7+, B:Kb1, W:Qc4 (back to P1).
This completes the consideration of Sub-Case b3a, where a Black pawn has advanced to h3.
Now consider Sub-Case b3b, where the advancing Black pawn on file h has not reached h3. Here, the position is as follows.
So, in both Sub-Case b3a and Sub-Case b3b, White can force a return to P1.
6.5.2.3 Sub-Case b4: Black Advances a Pawn on File c
Now consider Sub-case b4; here Black advances a pawn on file c. Again, there are two possibilities to consider: either the advancing pawn reaches line V1 (at c4) (call this Sub-Case b4a) or it does not (call this Sub-Case b4b).
First consider Sub-Case b4a. The position is as follows.
Now consider Sub-Case b4b. Here the Black pawn on file c is behind c4. In this case, we can more quickly return to P1, with Black to move, as follows: W:Qg6+, B:Ka2, W:Qg8+, B:Kb1, W:Qc4
This completes the consideration of Sub-Case b of Case 4. We have shown that, if White captures a pawn on e2 (Case 4), and if Black then moves g2 (Sub-Case b), White can force a return to position P1.
6.5.3 Sub-Case c: Black Plays f1
The position for this Sub-Case can be summarized as follows.
The play goes as follows: W:Qxf1+, B:Ka2, W:Qf7+, B:Kb1, W:Qc4 (back to P1).
6.5.4 Sub-Case d: Black Advances a Pawn on File h
The position for this Case can be summarized as follows.
Consider first Sub-Case d1. Here, the play goes as follows: W:Qe4+, B:Ka2, W:Qe6+, B:Kb1, W:Qxh3. The position now is as follows.
Now consider Sub-Case d2. In this sub-case, the advancing pawn on file h has not yet reached the line V1 (at h3). In this sub-case, the play goes as follows: W:Qe4+, B:Ka2, W:Qe6+, B:Kb1, W:Qc4 (back to P1).
This completes the analysis for Sub-Case d.
6.5.5 Sub-Case e: Black Advances a Pawn on File c
The position for this Case can be summarized as follows.
Consider first Sub-Case e1. Here the play goes as follows: W:Qe4+, B:Ka2, W:Qxc4+, B:Kb1. This is back to position P1, but it is White’s move. White now moves around the triangle from c4 to e4 to e6 and back to c4, and now we are back in position P1 and it is Black’s move.
Now consider Sub-Case e2. Here the play goes as follows. W:Qe4+, B:Ka2, W:Qe6+, B:Kb1, W:Qe4 (back to P1).
This completes the consideration of Sub-Case e, which is the final sub-case of Case 4. We have now shown that in Case 4 (where White has captured a pawn on e2), White can always force a return to P1.
6.6 Case 5 - White Has Captured on c4
This is the final case that we need to consider to show that, after White captures a pawn on V1, White can always force a return to position P1. The position for Case 5 can be summarized as follows.
Excluding the moves that lead to quick checkmate, the possible moves for Black are the following.
6.6.2 Sub-Case a: Black Plays g2
Here, the play goes as follows: W:Qe4+, B:Ka2, W:Qe6+, B:Kb1, W:Qg6+, B:Ka2, W:Qg8+, B:Kb1, W:Qxg2. The position now is as follows.
6.6.3 Sub-Case b: Black Plays f1
Here, the play goes as follows: W:Qxf1+, B:Ka2, W:Qc4+, B:Kb1. This takes us back to P1, but it is White’s move. White now moves around the triangle from c4 to e4 to e6 and back to c4, and then we are back in P1 and it is Black’s move.
6.6.4 Sub-Case c: Black Plays e2
Here, the play goes as follows: W:Qe4+, B:Ka2, W:Qe6+, B:Kb1, W:Qxe2. The position now is as follows.
6.6.5 Sub-Case d: Black Advances a Pawn on file h
Here, there are two possibilities: either the advancing pawn has reached the line V1, at h3, or not.
If the advancing pawn has not reached h3, the White Queen simply moves around the triangle from c4 to e4 to e6 and back to c4, and we are back to P1, and it is Black’s move.
If the advancing pawn has reached h3, the play goes as follows: W:Qe4+, B:Ka2, W:Qe6+, B:Kb1, W:Qxh3. The position now is as follows:
We have now considered all of the possible cases in which White has just captured a pawn that has reached the line V1, and we have shown that, in every case, White can force a return to position P1. After all of the pawns on files c through h have been captured, and we are back in position P1, the play continues as follows. If it is White’s move, White moves his Queen around the triangle from c4 to e4 to e6 and back to c4. Now we are back in P1, and it is Black’s move. Now the possible moves for Black are the following:
For all 3 of these cases, White simply plays Qf1#.
7.One Particular Play-Out of the Game
At the end of Section 3, we had shown how, after move 22 by White, White had captured all of Black’s major pieces, except the Queen. At this point, Black has many choices about which moves to make - in particular, about which pawns to advance. The analysis in Sections 4 through 6 has shown that, no matter what Black does, White can finally force checkmate. To complete our solution of the puzzle, all that is needed is to show that, no matter how well Black plays, White can always complete the checkmate in 64 or fewer moves. This section shows one particular play-out of the game (starting from the position that we left in Section 3, namely the position after move 22 by White). In this play-out, the first pawn that Black advances to the line V1 is on file g. White completes the checkmate in 64 or fewer moves. This section shows two different versions of the last few moves of the game, depending on what Black does with the pawn on file c. The following section (Section 8) shows another play-out of the game (again starting from the position that we left in Section 3, after move 22 by White). In the play-out in Section 8, the first pawn that Black advances to the line V1 is on file h. In Section 8 also, White completes the checkmate in 64 or fewer moves.
In both Sections 7 and 8, one important strategy for Black, to prolong the game as much as possible, is that when the pawn on file g advances to g2, the pawn on file c should be on c6. This forces White to use several more moves to capture the pawn on g2 and then return to position P1. Another important strategy for Black is not to advance the pawn from f2 to f1 until the other pawns on files e through h have been captured. Having the pawn on f2 means that White cannot capture the other pawns on files e through h until these pawns reach the line V1. If Black did not have the pawn on f2, White could capture some of these other pawns before they reached V1, and thus shorten the game. Finally, note that a general strategy for Black is never to advance a pawn before he has to.
The analysis here begins from the position at the end of Section 3, after move 22 by White. At this point, the position is as follows.
|
Move |
White |
Black |
Comments |
|
22 |
|
h4 |
|
|
23 |
Qe4+ |
Ka2 |
|
|
24 |
Qe6+ |
Kb1 |
Now White will return to P1, and Black will have to advance a pawn again |
|
25 |
Qc4 |
h5 |
|
|
26 |
Qe4+ |
Ka2 |
|
|
27 |
Qe6+ |
Kb1 |
|
|
28 |
Qc4 |
c6 |
|
|
29 |
Qe4+ |
Ka2 |
|
|
30 |
Qe6+ |
Kb1 |
Now note that, as discussed above, the best strategy for Black is to not advance the pawn from c6 to c5 until after advancing the pawn from g3 to g2 |
|
31 |
Qc4 |
g2 |
Now the pawn on file g has reached the line V1, so now White must capture this pawn |
|
32 |
Qe4+ |
Ka2 |
|
|
33 |
Qe6+ |
Kb1 |
|
|
34 |
Qg6+ |
Ka2 |
|
|
35 |
Qg8+ |
Kb1 |
|
|
36 |
Qxg2 |
Ka2 |
|
|
37 |
Qg8+ |
Kb1 |
Now White returns to P1, and then Black must advance a pawn |
|
38 |
Qc4 |
c5 |
|
|
39 |
Qe4+ |
Ka2 |
|
|
40 |
Qe6+ |
Kb1 |
Now White returns to P1, and then Black must advance a pawn |
|
41 |
Qc4 |
h3 |
|
|
42 |
Qe4+ |
Ka2 |
|
|
43 |
Qe6+ |
Kb1 |
|
|
44 |
Qxh3 |
Ka2 |
|
|
45 |
Qe6+ |
Kb1 |
Now White returns to P1 |
|
46 |
Qc4 |
h4 |
|
|
47 |
Qe4+ |
Ka2 |
|
|
48 |
Qe6+ |
Kb1 |
|
|
49 |
Qc4 |
h3 |
White has returned to P1, and Black must advance a pawn |
|
50 |
Qe4+ |
Ka2 |
|
|
51 |
Qe6+ |
Kb1 |
|
|
52 |
Qxh3 |
Ka2 |
|
|
53 |
Qe6+ |
Kb1 |
|
|
54 |
Qc4 |
e2 |
|
|
55 |
Qxe2 |
Ka2 |
|
Now the position is as follows.
FIG. 4: POSITION AFTER MOVE 55 BY BLACK
The first ending of the game, starting from this position, is as follows.
|
Move |
White |
Black |
|
56 |
Qe6+ |
c4 |
|
57 |
Qxc4+ |
Kb1 |
|
58 |
Qe4+ |
Ka2 |
|
59 |
Qe6+ |
Kb1 |
|
60 |
Qc4 |
f1=Q |
|
61 |
Qxf1+ |
Ka2 |
|
62 |
Qf7+ |
Kb1 |
|
63 |
Qc4 |
Qa2 |
|
64 |
Qf1# |
|
The second ending of the game, starting from the position after move 55 by Black, is as follows.
|
Move |
White |
Black |
|
56 |
Qe6+ |
Kb1 |
|
57 |
Qc4 |
f1=Q |
|
58 |
Qxf1+ |
Ka2 |
|
59 |
Qc4+ |
Kb1 |
|
60 |
Qxc5 |
Ka2 |
|
61 |
Qd5+ |
Kb1 |
|
62 |
Qc4 |
Qa2 |
|
63 |
Qf1# |
|
8.A Second Play-Out of the Game
This second play-out again starts from the position at the end of Section 3, after move 22 by White (Fig. 3). At this point, the position is as follows.
|
Move |
White |
Black |
|
22 |
|
h4 |
|
23 |
Qe4+ |
Ka2 |
|
24 |
Qe6+ |
Kb1 |
|
25 |
Qc4 |
c6 |
|
26 |
Qe4+ |
Ka2 |
|
27 |
Qe6+ |
Kb1 |
|
28 |
Qc4 |
h5 |
|
29 |
Qe4+ |
Ka2 |
|
30 |
Qe6+ |
Kb1 |
|
31 |
Qc4 |
h3 |
|
32 |
Qe4+ |
Ka2 |
|
33 |
Qe6+ |
Kb1 |
|
34 |
Qxh3 |
Ka2 |
|
35 |
Qe6+ |
Kb1 |
|
36 |
Qc4 |
h4 |
|
37 |
Qe4+ |
Ka2 |
|
38 |
Qe6+ |
Kb1 |
|
39 |
Qc4 |
h3 |
|
40 |
Qe4+ |
Ka2 |
|
41 |
Qe6+ |
Kb1 |
|
42 |
Qxh3 |
Ka2 |
|
43 |
Qe6+ |
Kb1 |
|
44 |
Qc4 |
g2 |
|
45 |
Qe4+ |
Ka2 |
|
46 |
Qe6+ |
Kb1 |
|
47 |
Qg6+ |
Ka2 |
|
48 |
Qg8+ |
Kb1 |
|
49 |
Qxg2 |
Ka2 |
|
50 |
Qg8+ |
Kb1 |
|
51 |
Qc4 |
c5 |
|
52 |
Ke4+ |
Ka2 |
|
53 |
Qe6+ |
Kb1 |
|
54 |
Qc4 |
e2 |
|
55 |
Qxe2 |
Ka2 |
The position now is as follows.
In summary, the analysis in Sections 1 through 6 shows that there is a systematic procedure that White can use which will always force Black into checkmate. The analysis in Sections 7 and 8 gives convincing (to me) evidence that White can always complete the checkmate in 64 (or fewer) moves. I think that this completes the solution of the puzzle. (If you have comments, I would appreciate your sending them to me at [email protected].)
I have enjoyed working on the puzzle, and thank Mr. Reichhelm, who composed the puzzle (in 1877), and Ray Marcotte, who gave the puzzle to me in 1994.
9.General Points About Chess Puzzles
In most chess puzzles, you are given a position from which White can force checkmate in a specified number of moves; White moves first, and there is only one first move by White which will make it possible for White to force checkmate in the specified number of moves. This first move by White is called the key. After the key, the puzzle can have many variations, depending on what Black does. You have to find the key, and then show that, no matter how well Black plays, White can force checkmate in the specified number of moves.
In many of the puzzles that you see (for example, in newspapers), White must mate in 2 moves, or at most 3. Thus the puzzle considered in these notes (White to mate in 64) is unusual.
One special class of puzzles are called miniatures. In these, the total number of pieces on the board at the start is no more than 7. A book of puzzles that I like is called Miniature Chess Puzzles, by Colin Russ (St. Martin’s Press, New York, 1981).
Here is an example of a miniature puzzle.
White to mate in 2.
This is a reasonably easy two-mover. It was published by K. Wojtyla in 1948. (Wojtyla’s uncle was the famous Polish chess puzzle composer M. Wrobel. Wojtyla later became better known for other things.)