 |  |  |  |  |  |  |  |  |  |  |  |  |  |  |  |  |  |  |  |  |  |  |  |  |  |
|
|
Jaeger Restoration (cont.) |
|
|
Updated 6/09/00 |
|
|
|
Since I had the head off, I was only one easy step from pulling the piston and putting in new rings. Even though the compression seemed good, I could hear some leakage past
the rings. So, the piston came out and new rings went on, and the cylinder was honed. The cylinder is in excellent condition with very little wear. Once the new rings are seated compression should be great. |
|
|
 |
|
|
The freshly honed cylinder. The dark ring in the cylinder is where the rings stop at the top of the stroke. There is very little ridge here. |
|
|
|
|
|
|
In retrospect, it was a good thing I took the piston out. The rod bearing was very loose and in the end, I took out shims totaling 0.040"!
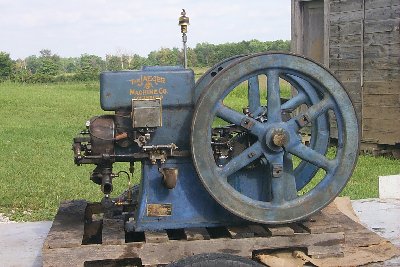
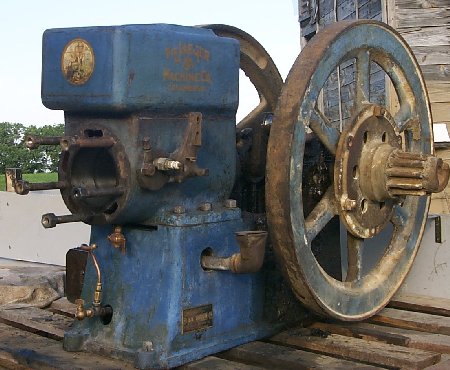
I decided that
I should really clean up the areas close to the head so that all that grease wouldn't run down on the nice clean head. What I found underneath all that gunk amazed me - a nice original blue engine with all original decals intact! The paint is stained
in many places from the years of grease and oil and crud. The decals, Hercules on the front, Jaeger on the side, are in fairly good shape although the Hercules decal has very faded black lettering. It was much clearer when I first uncovered it, but the
ink faded when I washed the area with gas. Compare this picture with the one at the top of restoration page 1! |
|
|
|
 |
|
|
|
Here are the decals from the water hopper. |
|
|
|
 |
|
|
|
 |
|
|
|
|
|
Well, after getting that much of it clean I decided to just keep right on going. So, over the next week I kept at it when I had time. I took off the entire
governor assembly (which comes off with only two bolts) and took it completely apart and cleaned it. It was thoroughly covered with old stiff grease and grime. I cleaned the rest of the engine then started the reassembly process. The gov. assembly was
first, then the piston and rod. That turned out to be an interesting process due to the size of the piston. It is 5" in diameter and my ring compressor didn't go nearly that far. So, I ended up using a 5.5" radiator clamp, and slid the piston in one
ring at a time. Get one ring in, open the clamp up, move it to the next, get that one in, move to the last one. Took a little longer, but worked good!
After the piston and rod came the head. New head gasket, slipped the head on and torqued down
the nuts. All that remained was the magneto and trip linkage. These were missing when I bought the engine and during the winter I had bought a mag. from a fellow in Minnisota, and my wife bought me the trip linkage from Hit & Miss Enterprises for
Christmas (I had it on my list!). All this went together flawlessly and I then timed the mag. trip. There is a "SPARK" marking stamped in the flywheel, and after consulting my Hercules operating manual, I timed the engine by adjusting the linkage so
that the mag. tripped when the SPARK was level with the top of the exhaust valve/mag trip push rod. Before I knew it, it was time to put gas in the tank and yank on the flywheel! So, at 10:55pm on 6/1/00 Ol' Blue barked again for the first time in
many years. On the second pull of the flywheel it coughed and on the third it started! Big puff of blue smoke, loud bark, it sounded wonderful! First time running it ran very fast, in fact I thought it was going to run away even though I knew the
governor mechanism was free and working correctly. I got nervous and pulled the plug wire. I then adjusted the gov. down a long way, but it still ran fast, so the next day I put a much lighter spring in the gov. Now it runs nicely at "show
speed"! |
|
|
|
 |
|
Here's the "After" picture once I cleaned all the grease and grime off and re- assembled it. It really looks nice! I've decided to leave it original since the paint and decals
are in really good condition. |
|
|
|
|
|
 |
|
|
|
<<< Back to the Engine Page |
|
|
|
 |
|