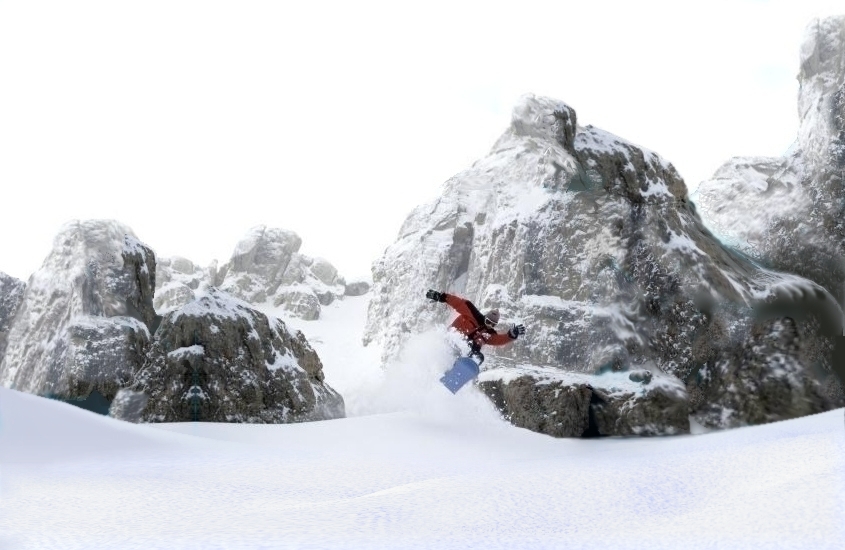
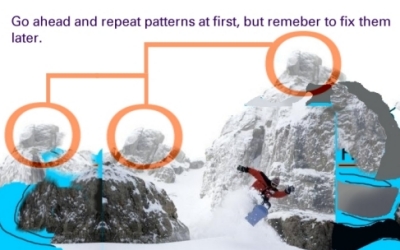
The above picture is only partly a photograph. It's also partly "matte painting."
|
|
|
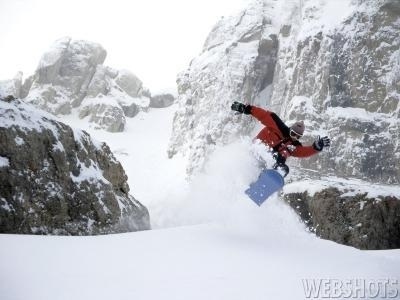
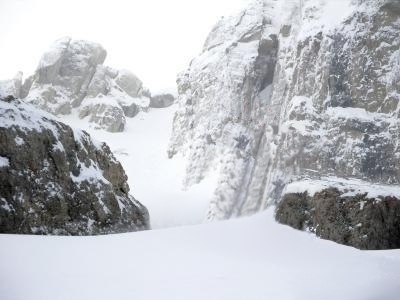
To your left is the actual image, the only part that wasn't "painted." This picture of a snow boarder among the rocks and snow isn't really a video image, but imagine if it was for the sake of this demonstration and how-to lesson. The picture is really a 400 by 300 pixel .jpg I took from a site called
"web shots." Webshots is a good place to get stock photography to use in these kinds of operations. At least for practice. You may have to buy some of them if you want to actually use them. At a certain point thought it's no longer the original image, it's yours. When that point comes I'm not sure.
Matte painting rocks and snow is easy. Skip ahead to the bottom and click the next link to see something more sophisticated.
|
|
The advantages of a matte are these:
- It's an inexpensive way to add scale and size to your visual world.
- It allows you to film a scene with a cheaper digital camera. For example you can use a lower definition format like miniDVD to film actors in selected environments or against a green screen and then paste them into a higher definition picture.
- The moving image can be placed anywhere on the final matte painting. You can even turn your lower resolution camera sideways and use a more vertical image.
- Several shots can be used in the same matte painting.
- Animated elements can be added.
- Matte planes can be layered for a simplistic 3D effect.
The limitations of using a matte shot are:
- It requires that the original shot be from a camera locked into position or carefully planned movements only. Unless using sophisticated methods, no change in perspective, no pans or tilts. Areas around the edge of the frame have to be perfectly still throughout the shot so they match up with the matte painting. Not even shadows can cross the out of frame line.
- Actors and props can not move out of frame without special handling. They would have to be painted in.
To do it you need only two things, first software and
hardware that can grab each frame of a film or digital video and turn it into a digital still picture format format useable by another software program, a photo painting program, and second, an artist who knows how to use the photo-paint program and has a copy of it.
I only own the photo-painting software for this operation. I have Corel 8 Photopaint.
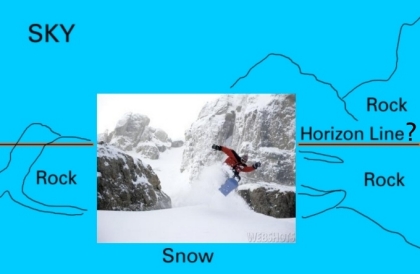
What's done to produce this kind of image? It's actually rather easy to do if you have the right software. Most of it is really a kind of collage technique that involves copying areas of the original image and pasting them on to the new areas. First you decide what the size of the final image is to be and where the original image will go and just copy any frame from the sequence you want a matte around onto the new picture you will paint on.
|
|
|
1.
First you make a solid color "frame" that's the size of your final movie image and then you paste one frame of the locked down location shot exactly where you want it to appear in the matte painting. Then you rough out a plan for where you want more rocks or whatever will be in the matte painting. |
|
|
|
2.
Next you start copying and pasting sections of the image you want to match to onto the solid color frame. Starting with big chunks and then copy smaller and smaller bits and painting them into the larger picture. |
|
3.
|
After the Matte painting is finished, it's now a computer image file of any type you might desire, jpeg, targa, tiff, and at any resolution, from a 720 by 480 with a 16:9 aspect ratio (for miniDVD systems) to a 2K x 1K pixel resolution with 1:1 aspect ratio that might be used in a feature film. It still has to be composited with the rest of the shots taken with the DVD camera and transfered to 35mm film. Several alternatives are availbable. If given every shot from the locked-down original sequence I can paste them onto the matte painting and then make a soundless .mpg, .avi or .mov (Quicktime) movie sequence that can be played on computer (I currently don't have software for making Quicktime but I plan on getting it soon). Or I can just email or upload the finished matte painting to whoever is putting together the other shots and let them handle finishing the job.
At this time it's best I deliver only the matte painting and someone else does the final composite because I have a serious hardware and software limitation; I'm limited to mostly 24 bit color formats and a 24 bit color monitor. In theory I can produce several 48 bit RGB color formats, Tiff (.tif), Corel's native format (.cpt), and Adobe Photoshop's (.psd) as well as 32 bit CMYK formats, including a jpeg format in 32 bits. However, I can't see the extra colors on my monitor. To do film and TV work at more professional level I really should upgrade my hardware and software because higher bit depths are generally used in those jobs. There are ways to work around this if final composites are done by someone else, lite tints can be applied after my images are converted to 48 bit format to represent a hazy backround, but it's a minor hassel for those people.
There's a reason I've called my site CHEAP Illusions. You won't pay as much because I am technically limited at this time. How cheap? Email me and tell me about your project and I then I'll tell you. Or, click HERE to learn a bit more.
Ultimately, you'll probably need the services of a company like
DVFilm to transfer your DV or HD to 35mm film, or to transfer Quicktime files on computer disk to 16mm or 35mm format, presentable in any theater worldwide. They also can add a soundtrack compatible with Dolby SR movie theaters, Dolby SRD (digital) compatible soundtrack available for 35mm Anamorphic 35mm (Scope) format. Even 70mm prints are available.
DVFilm can enhance your DV movie using their REMBRANDT SYSTEM to prepare your movie for transfer to film or digital projection, including: Restoration: fix out-of-focus shots and reduce image noise Color correction: balance color between scenes and between shots within a scene Film motion: create film-like motion by converting to 24 frames/sec and then back to interlaced video Soundtrack: mix dialog and sound effects, music scoring, Dolby Surround mastering
They also have a booklet, SHOOTING DIGITAL, written by the chief engineer at DVFilm. It's a 200-page guidebook written specifically on shooting DV for transfer to film with detailed info on the Panasonic DVX100 24P camera.
|
|
|
|
Alternative:
I can also paint out the snow-boarder and the matte paiting can be used as a backgrount. |
|
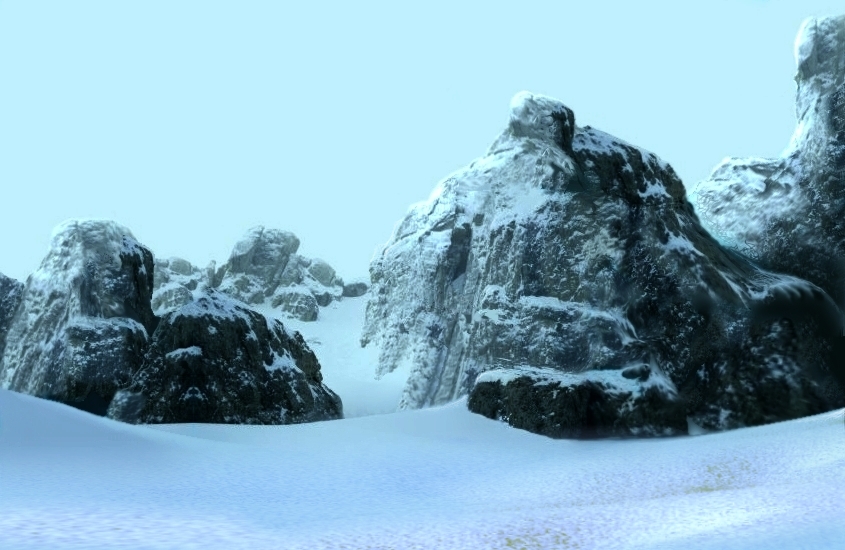
The above picture is only partly a photograph. It's partly "matte painting."
|
|
|
Next
Click the picture on your left to go to the next page.
There you will learn some more sophisticated uses for matte painting involving perspective tricks, layered matte paintings and ways to get around my 24 bit color limitations.
|
|