|
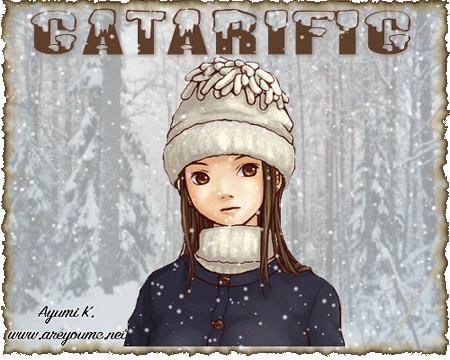
WINTER'S ON ITS WAY
Supplies Jasc's Paint Shop Pro - all versions. Xenoflex 2 Filters. The filter we will be using is called burnt edges. If you do not have Xenoflex 2 Filters, you can make the picture with a square edge and border as well. Scenic Winter Picture and Tube of Choice. This beautiful scenic picture was downloaded from Stock.xchng, Royalty Free Photograph site. Be sure to visit this site and see the extraordinary photographs. This adorable girl image was created by Ayumi K. Please visit her exquisite online gallery by clicking here. VDL Adreneline's Snowflakes Filter which you can download here. Almonte Snow Font which you can download here.
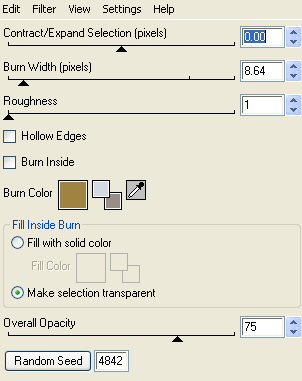
Step 1 Open up a transparent image 500 width by 400 height and open up the winter scenic picture you will be using. Make your transparency active and go to Selections/Select All. Make your scenic picture active and go to Edit/Copy. Make your scenic picture active and go to Edit/Paste Into Selection. Go to Selections/Select None. Step 2 At the Material Palette, left click the top color box. When the Color Selection Window opens up, select a light silver shade or type in this color #D3DAE0. It is a nice color that will blend well with the snow. Step 3 Go to Layers/New Raster Layer and flood fill this new layer with the light silver shade. Open up your layer palette and move the opacity setting on this layer over to the left until you see the scenic picture layer below blend with the top layer. I moved my opacity setting to about 52. Go to Layers/Merge/Merge Visible. Step 4 FOR THOSE WITH XENOFLEX 2 Go to Effects/Plugins/Alien Skin Xenoflex2/Burnt Edges and use these settings:
I used #A08341 for the burn color - but you can change that if you like. DO NOT GO TO LAYERS/MERGE/MERGE ALL FLATTEN - only those without Xenoflex 2 will be doing that. FOR THOSE WITHOUT XENOFLEX 2 Go to Layers/Merge/Merge All (Flatten). Go to Image/Add Borders. For color, select black, border width 5 and symmetric checked. Step 5 Have your tube graphic open and go to Edit/Copy. Make your tag graphic active and go to Edit/Paste as New Layer. If the image is too large, go to Image/Resize using the percent option, bicubic resample and resize all layers NOT checked. Left click the mover tool and move the image to where you would like it on the tag. Step 6 Go to Layers/Merge/Merge Visible. Step 7 Adding the Text Go to Layers/New Raster Layer. At your Material palette, in the top color box, select the color white (for the snow caps) and in the bottom color box select the color you wish for your text. For font type, select the Almonte Snow font. For Floating Text If your text is floating - do not deselect. Go to Effects/3D Effects/Drop Shadow and use these settings: Vertical and Horizontal Offset 2, Opacity 80, Blur 5 and Color Black. Go to Selections/Select None and then go to Layers/Merge/Merge Visible. Vector Text If you are using Vector text, left click the layer where your vector text is and convert it a raster layer. Go to Effects/3D Effects/Drop Shadow and use these settings: Vertical and Horizontal Offset 2, Opacity 80, Blur 5 and Color Black and then go to Layers/Merge/Merge Visible. Step 8 Add you copyright information to the Merged Visible Tag. ADDING THE SNOWFLAKE FILTER Step 1 Left click the selection tool and set it to rectangle, add (shift) feather 0 and draw a selection around the entire tag. We want to do this because when we add the snowflakes we do not want the snowflakes animating outside of the tag. Step 2 Go to Layers/Duplicate and do this two times so you now have three layers to your tag. Step 3 Close off the top two layers (left clicking the eye on those layers) and make sure you are now on the bottom layer (it will be highlighted in dark blue). Go to Effects/VDL Adrenaline/Snowflakes and use these settings: Amount 27, Size Range Begin 19, Size Range End 0, Hardness 28, Transparency 0, Basic Snow and Random Seed 0. Step 4 Close off the bottom layer and go to the middle layer and open it up (left click the red x on the eye). Make sure you are on that layer (it will be highlighted in dark blue). Go to Effects/VDL Adrenaline/Snowflakes and use these settings: You will only change the Amount and Random Seed as follows: Amount: 55 and Random Seed 91. Step 5 Close off the middle layer and open up the top layer. Make sure you are on that layer (it will be highlighted in dark blue). Go to Effects/VDL Adrenaline and use these settings: You will only change the Amount and Random Seed as follows: Amount: 64 and Random Seed 182. Step 6 Open up all the layers and save this file as a psp or psd file. We are now ready to animate. Click here to continue
|