FLASHLIGHT TAG
Supplies Jasc's Paint Shop Pro Versions 7, 8, 9 or 10. Tube of choice. I used one of Saturn Alice's awesome images. Be sure to visit Saturn Alice's terrific online gallery by clicking here. Gif-X 2.0 Filter. This is a commercial filter by U-Lead. There is a trial version you can download at the Ulead Site. Tramage Filters which you can download here. The filter we will be using is tow the line. Font of choice. Step 1 Open up a transparent image 500 width by 500 height and the tube graphic you will be using. Step 2 At the Material Palette set the top and bottom color boxes with deep solid colors that coordinate with the graphic you will be using. The colors can be either from different color families or from the same color family. Step 3 Left click the top color box and when the color selection window opens up, select gradient, linear style, foreground-background with angle set to 39 and repeats set to 0. Flood fill the transparency with the linear foreground-background gradient. Step 4 Go to Effects/Plugins/Tramages/Tow the Line and use these settings:
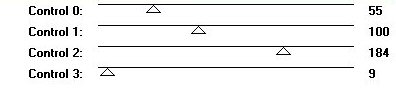
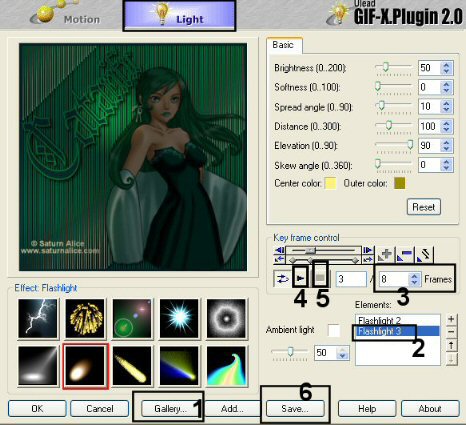
Step 5 Go to Image/Resize using the percent option at 80%, Smart Size and Resize All Layers NOT checked. Step 6 Go to Adjust/Sharpness/Unsharp Mask and use these settings: Radius 5.95, Strength 154, Clipping 9. Step 6 Left click the crop tool and draw a rectangle around your tag (eliminating all of the extra transparency). Either left click the check mark in the crop ribbon or double left click within the rectangle to crop the tag. Go to Layers/Merge/Merge All Flatten. Step 7 Go to Image/Add Borders. When the border selection window opens, select a deep color for the border, symmetric checked and width 5. Step 8 Open the tube graphic you will be using and go to Edit/Copy. Make the tag image active and go to Edit/Paste as New Layer. If your image is too large, go to Image/Resize using the percent option, Smart Size and Resize All Layers NOT checked. Step 9 Go to Layers/Merge/Merge Visible. Step 10 We will now add text. Select the colors you want for your text and apply your text using the floating option. Once you apply your text do not deselect. Go to Image/Rotate/Free Rotate, Direction Left and Degrees 45. Do not deselect. Step 11 Go to Effects/3D Effects/Drop Shadow and use these settings: Vertical and Horizontal Offset 2, Opacity 80, Blur 5 and Color Black. Go to Selections/Select None. Step 12 Add your copyright information to the tag. Step 13 Go to Layers/Merge/Merge All (flatten). Step 14 Go to Selections/Select All. Go to Effects/Plugins/Ulead Effects/GIf-X 2.0. Select the light tab.
Step 15 To view the animation - open up animation shop and click the view button at the top of the screen. The animation should be fine as is and not need any resizing. We hope you enjoyed this tutorial. Purrs, Nikki, Nichie and Sue
|