
by Nick Macro [email protected]
* 'aumix'
* 'sox'
* 'dap'
* 'soundtracker'
These are everything you need to make music on your Unix distribution, including Linux distributions such as Mandrake, Debian, RedHat, SuSE, and Berkeley distributions such as FreeBSD, NetBSD and OpenBSD.
In the future, much audio and music software, and the most energetic area of development is likely to be on Unix, especially with Mac OS X being FreeBSD based. Being able to install cutting-edge audio programs yourself is a useful skill in this exciting area.
I�ve divided this article into several sections:* Introduction to Unix and GNU explains the background to Unix and Open Source software.
* If you do not have a Unix installed, Obtaining and Installing a Unix will show you how to get started.
* Soundcards, Drivers and Unix Devices is an introduction to the 4 types of drivers on Unix you may encounter.
* If you�re having problems getting your soundcard to work, then Installing Soundcard Drivers is an in-depth look at how to get your soundcard working, including Compiling the Kernel.
* If you are missing one of the pieces of software we look at, then in Package Managers and Downloading Software, we look at getting the the binary packages for your computer, and the role of Package Managers.
* Copying Software from CD and DVD looks at how to browse software from CD or DVD, such as your distributions or a Magazine cover disk, including an introduction to some basic Unix commands. Here also is About Unix Commands and Other Common Commands
* If there is not the program for your computer, then in Compiling the Software we see the advantages of Open Source to make our own applications, building on the basic Unix commands.
* In A Suite of Unix Audio Software I present the software, and give tutorials on Using the Software including the song format that can be played and edited on all computers, and represents an Open Source format for songs. Also included here is a Brief Tutorial of SoundTracker
* Mac OS X and Unix looks at how OS X's Terminal lets us use OS X as another BSD Unix. With the addition of X Window, graphical applications should work with the instructions here. The non-graphical Unix sample format converter 'sox' is useful and easy to compile.
No knowledge of Unix, Linux, or computer programming is assumed. Neither is unlimited patience!
Many of the Unix techniques here, such as: mounting drives, compiling and installing software, dependant libraries, the Kernel and soundcard driver modules, are now automatic with distributions such as Mandrake. You may never have to type anything to use Unix, but by following the tutorials here, reading documentation, and consulting discussions on the Internet, you can be a Unix wizard!
Introduction to Unix and GNU
Although Linux has held the spotlight, it is only one of many Unix's.
Linux is a Unix, like Hoover is a vacuum cleaner!
Unix was invented in 1969 by Ken Thompson at Bell Labs (later AT&T). Since then many companies such as Sun Microsystems and Silicon Graphics (SGI) have changed and added to it. Berkeley University (UCB), added the network layer, and optimisation. Unix is as much a product of academia as industry.
Linux may be seen as a hybrid of the two Unix 'standards': the academic Berkeley (known as Berkeley Standard Distribution or BSD), and the commercial AT&T. Mac OS X is Berkeley Unix based. SCO/UnixWare, Sun's SunOS/Solaris and SGI's IRIX are based on AT&T Unix.
If it were not for these standards and common origins, Unix's would seem to be as different between themselves as between other OS's, making it hard to get software written for one to work on another with a totally different architecture.
The high-level programming language C enables source code to be compiled ('made') into binary executable application (such as '.EXE') for different architectures and distributions. For instance, Sun SPARC and SunOS (now Solaris), SGI and IRIX, Intel Pentium and Linux. Possibly, even, Mac PowerPC and Think C, Intel Pentium and Microsoft Visual C++.
Unix itself is written mostly in C, meaning the C compilers are the first building block to a new distribution such as Linux or the popular FreeBSD. Most people's first experience of Unix will be at college on a Sun or SGI, though the whole Internet runs on Unix.
Because Berkeley and AT&T software were only available under licence, or not at all, these vital free C compilers were practically single-handedly written by the amazing Richard M Stallman's GNU project, and made freely available on the Internet under the GPL. GNU stands for GNU's Not Unix, a recursive acronym!
The GNU compiler is called gcc; the Window Manager, GNOME; and the library of buttons or 'widgets' that graphical software uses on screen, the GNOME Tool Kit (GTK). Software written for GNU should work on all computers that have these GNU programs, in practice all Unix's.
The GNU licence, known as the GNU Public Licence (GPL), allows you to do whatever you wish with the program, as long as the licence stating this and the C source code remains with it, hence Open Source. This also encourages people to add to the code.
Open can mean 'inclusive of many companies', not necessarily Open Source, for instance the Open Sound System (OSS), the commercial soundcard drivers for all Unix's, is sold, but is not Open Source (you cannot get the C source code), and although there is a free (for no money) Open Source version, it lacks many soundcards and features.
The GNU Public License is a manifesto of Copyleft, which gives you the right to copy, a concept that fits well into the Internet's implicit concepts of sharing and downloading. Because Linux would not exist without the GNU compilers, it is often referred to as GNU/Linux.
'Free' in this context means freedom, without restriction, although often free to download as well. Many Linux's are commercial and sold, though they contain mostly free software. You may be paying for the reproduction of the CD, and not the CD contents. 'Free Beer' is another key concept, meaning 'I'll buy you small beer for your help!'
That something is 'not for profit' is not necessarily bad for business. To enlarge market share, a campaign may aim to raise awareness of a company or product. The Internet is particularly good for this. For instance Java is made available by Sun to raise people's awareness of how important Sun are in running the Internet's backbone. A band may release music on the Internet to get a wider audience and feedback without the lead time of a full scale release.
As Unix is robust (might run for years), industrial strength, and very responsive (low latency), it is a perfect basis for a musical instrument, such as a sampler.
One or more soundcards, often built into the computer, which may be a laptop, provide CD quality Full-Duplex audio. With Full-Duplex you can play and record at the same time, which is important for turning University�s Sun Workstation into an effects pedal! See the 'sox' tutorial on how to do this.
Soundcards, Drivers and Unix Devices
For PC based Unix's running OSS/Free I recommend using good Creative Labs
soundcards, and not one with 'Value' or 'V' in the name as these tend to
be cheap clones made by Creative Labs themselves.
Other soundcards that work because they are standard are Windows Sound System / Crystal Codec / CS4241 compatible ones, and Audio Codec 1997 / AC97 compatible, commonly built into motherboards and laptops. If your laptop has a non-standard chip you may have problems as you cannot change it.
Chips known to work are the Yamaha DS-XG in some Sony Viao�s, and the NeoMagic 256AV and 256ZX found in Sony, HP and DELL laptops, including the Latitude. The NeoMagic driver is not full-duplex because NeoMagic refuse to provide documentation, "hiding behind their receptionist as if in a state of siege".
Many soundcards can be made to work with a legacy DOS games compatible mode driver 'sb', that allows playback only, no sampling, which is no fun!
There are 4 main sets of drivers. Sun, OSS, SGI and ALSA.
Drivers come with a file SOUNDCARDS that should be consulted to see if your soundcard is supported. For ALSA consult the supported Soundcard Matrix
http://www.alsa-project.org/alsa-doc/index.php3?vendor=All
See the section Installing A Soundcard Driver on how to get your soundcard working if it does not work automatically when your distribution is installed.
Unix has 'device' files that appear as special files provided by the Kernel (the OS itself), in the '/dev' directory. These represent the devices or soundcards themselves for the software to access. Unix filenames use the slash '/' seen on the Internet, in place of the DOS '\', known as a backslash.
The purpose of these files is that software can treat the soundcard as just another file to be read from and written to. Some examples are in 'Using Sox'. All devices in Unix apart from network cards appear as devices in '/dev'. Making everything a file is a key Unix concept, making everything appear in a single file system, including hard drives, CDROM's and audio devices.
Sun Microsystems drivers and software use the file '/dev/audio', as do the SGI drivers. Because Sun and SGI hardware have totally different architectures, these are written by the companies themselves. In the case of Linux for Sun SPARC Workstations, Sun modified Linux to work with its hardware and drivers. The chips may be the same as in PC's, such as CS4241, or Ensoniq ES1371 used in the Creative Labs PCI 128 soundcard, meaning the drivers can have common code across architectures.
The Sun drivers themselves are based on the drivers of the cool black NeXT Cube Multimedia Workstations of the early Nineties.
The Open Sound System, OSS/Free, is the basis of the Linux and FreeBSD soundcard drivers. As well as '/dev/audio' for compatibility with Sun, (which by default is speech quality), it has its own CD quality device, misleading known as '/dev/dsp'. Some cards have Full-Duplex supported only in the commercial version of the OSS. SCO/UnixWare comes with the free OSS driver for only one soundcard.
The Advanced Linux Sound Architecture (ALSA) is an Open Source GPL set of drivers. As well as being OSS compatible, they have their own native mode, with devices such as '/dev/sndC0D0'. http://www.alsa-project.org
Other drivers are NetBSD and OpenBSD�s solid reworking of the ALSA drivers for Creative Labs, CS4241 and AC97. They are Sun compatible, but also have a compatibility library 'ossaudio' for the OSS, to enable Linux audio applications to work. It has additional devices such as /dev/sound0, that do not reset to speech quality after being closed. FreeBSD also has its own drivers, newpcm for Creative Labs cards and compatibles, with devices such as '/dev/pcm0.'
You will see the name of the devices used often in the setup of audio software, so you can change which soundcard you are using. Other device files are '/dev/mixer', the mixer volume control, with '/dev/mixer1' for the second soundcard. On Sun you have '/dev/audioctl' and the commands 'audioctl' and 'mixerctl' instead for adjusting the mixer volumes.
Obtaining and Installing a Unix
You may of course already have perhaps Debian GNU/Linux, Mandrake, or
the popular FreeBSD installed on your computer, in which case, see
which of the 4 audio programs you have, and skip to A Suite of Unix
Audio Software.
The minimum hardware specification for this article is a 300Mhz processor, with 800x600 graphics. Older Intel Pentium I systems may not be able to boot from a CD in the CDROM drive, making it hard to install from CD. In this case the install should be done from the hard drive.
Unix's and Linux's can be bought from large bookshops (Red Hat and FreeBSD). You now get complete distributions on Linux magazine cover CD's and DVD's (Mandrake and Slakware).
You can also buy from the Internet, from places like Linux Emporium, http://www.linuxemporium.co.uk (Debian GNU/Linux), or from the distributions own web site.
CD images for burning can be downloaded free off the net (RedHat http://www.redhat.com/apps/download, FreeBSD ftp://ftp.freebsd.org/pub/FreeBSD, NetBSD ftp://ftp.netbsd.org/pub/NetBSD has Mac PPC version) but beware it might take a night or day on a modem without broadband.
For a computer connected to the Internet a Boot Floppy can be made from the distribution�s Web Site, and the rest of the installation proceed automatically via the Internet, a neat trick if you have a direct Internet connection in a media assisted office.
To Install, put the CD into the computer and reboot it. I recommend you use a separate hard drive and remove your Windows one, for initial peace of mind. Computers can be made dual-boot Windows/Unix with software such as LILO, GRUB (Linux), booteasy (BSD) and OSL2000 (Windows).
After rebooting the computer will 'Beep'. Push DELETE key (on keyboard near the arrow keys, not BACKSPACE '<-' on top right corner of the alphabet keys), immediately, while the computer is counting its RAM memory, to get into the BIOS (often AWARD BIOS). On some computers and laptops you push F1 or another function key to get into the manufacturers configuration program (Compaq, IBM, Toshiba). The right key is normally written on the starting screen.
A Menu item here such as Standard Features will have the Boot Sequence as: 'C, CDROM, A'. This means to boot first from the hard drive, and then from the CDROM. We are going to change this to boot off the CDROM first.
Using Page Up key on keyboard cycle through this until you have: 'CDROM, C, A'. After installation this should be changed back to as it was.
Exit, Saving this change. The computer will reboot and the CDROM light flash as it boots off the CDROM.
Installation is easy and automatic. You may be asked questions such as the time zone (GMT), the computers name (for example, 'Madonna' or 'Tecra'), and the password for the Administrators Account, known as the 'root' account. This should be more than 8 characters long, memorable, and not written down plainly in a place that people can see.
You may skip network setup if you won�t use a network under Unix, but if your computer is on a network, it would be a waste not to use it. Network setup is either automatic with DHCP or you need to assign an IP number, similar to a unique phone number for your computer. Either ask your network administrator for this, or note the setting under Windows in Control Panel / Network / TCP/IP, or use 192.168.0.1 for the first computer on your network, 192.168.0.2 for the second.
You will get a chance to select which software or sets of software to install. Select all the audio software, which may be in a distribution set 'Multimedia Workstation'. Select GNOME Window Manager, and KDE (another nice window manager) as well if you like. Select everything related to Development or 'dev', for the compilers and libraries.
A web browser such as Mozilla, Opera or Lynx should be selected. Netscape may not be included for licencing reasons.
Your OS should install, along with the software. Reboot the computer, and enter the BIOS again with DEL to change back to booting in order: 'C, CDROM, A'. The computer should boot for the first time off the C: harddrive, into Unix, and finishing installing.
You should now be able to log in as the Administrator 'root', with the password you chose, and you can explore your Window Manager, GNOME or KDE to see what cool software you have. To type commands, you need to run an XTerm or Command Tool containing a Shell, such as GNU BASH (Bourne-Again Shell, Berkeley TCSH (T-Shell) or AT&T KSH (Korn Shell).
Package Managers and Downloading Software
After installation, you can use a Package Manager to add or
remove software from your system. As well as the software
packages that come with your CD and DVD distribution, they can
also update and access all the software known to the
distributions Web site.
Debian software comes as filename extensions '.deb'. RedHat, Mandrake and SuSE binaries come as '.rpm'. Using the command 'alien' that comes with Debian, you can convert RedHat packages to Debian packages, so you can use these as well. These packages are similar to Windows '.cab' or '.zip'.
Software ending in .tar.gz or .tar.bz2 are the source code. BSD binaries also come as compressed tar archives, but with the extension shortened extension '.tgz', though this may also be the source.
Unix software often needs libraries and other packages, like compression types. These are known as 'dependencies'. Package Managers handle this for you, such as 'rpm program' (RedHat), 'rpmdrake' (Mandrake), 'dselect' or 'apt-get program' (Debian), or 'pkg_add -v program' (BSD). These commands are typed in the XTerm Shell.
Read the manual page, with eg. 'man rpmdrake', and follow the intructions in 'Copying Software From CD and DVD', then install it with the appropriate command (one of the list above).
Packages may be on another CD in your distribution, or downloadable with Mozilla from your distribution�s web site, the software's own Web site, or a package search engine like http://www.rpmfind.net which has Red Hat, Mandrake and SuSE binary RPM packages.
The first two, non-graphical pieces of software, 'aumix' and 'sox' are on the Mandrake distribution, the graphical pieces, 'DAP' and 'soundtracker' are on the 'contrib' collection, a further 2 Gbyte.
Debian packages can be found on http://packages.debian.org/stable/sound, and FreeBSD packages from http://www.freebsd.org/ports/audio.html.
BSD's go a step further, having a 'ports' collection. This is on the distribution CD, and is installed to '/usr/ports' (FreeBSD and OpenBSD) or '/usr/pkgsrc' (NetBSD). You can compile the whole distribution at once from within this directory. The source code is not included, but is downloaded from the Internet, patched, compiled and installed all automatically!
In the worst case, that you cannot get a binary package that installs automatically we are going to compile the software ourselves from the source code, which you can only do if it is Open Source! You only have to follow the instructions in �Compiling software�. In this case you will need to download the source, along with the distributions own 'patches' to make it work.
Copying Software from CD and DVD
In Windows, the Mac, and many Unix Window Managers CD's show up
immediately after putting the CD in the CDROM drive. Equally,
removing a CD is just a matter of pushing the eject button,
and the Icon disappears.
Historically, this has to be done by hand on Unix by mounting and unmounting the CDROM device. This is the same for all devices including tape backups. Buffered data may have to be written before the media is removed, eg. floppy disks.
When typing commands with long filenames, hitting TAB will complete the command for you, TAB twice will give you the choices. If you get stuck, hit TAB twice!
After putting in the CD, in the Window Manager, run an XTerm containing a BASH shell, and type on Linux:
mount -t iso9660 /dev/hdb /cdromThe 'hdb' assumes your CDROM or DVD drive is the second drive on your system. If it is the third, use 'hdc'. For a Berkeley BSD system type:
mount -t cd9660 /dev/cd0a /mntFor completeness, to be able to type '/cdrom' instead of '/mnt', MaKe a Directory '/cdrom' with
   mkdir /cdrom
   mount -t cd9660 /dev/cd0a /cdrom
Once mounted, you can explore the CD using the 'cd' Change Directory command and the 'ls' LiSt command.
   cd /cdrom
   ls
and the contents of the CD will be shown on the screen. If there are so many files it scrolls off the screen, you can see a page at a time with the paging command 'more':
ls | moreThe '|' joins one command to the other, and is on the left side of the keyboard next to SHIFT on the '\' key, and has to be used with SHIFT held. If you are lost on an American keyboard, it may be the '#', on the right of the keyboard next to the large RETURN key.
If there is a README file on the CD it can be viewed with the following command, then Q to Quit.
more READMEIf we are looking for binary packages to install, there may be a packages directory under BSD, in which we find a package to install, which we copy to the root Administrators home directory.
   cd packages
   ls
   cp program-1.2.tgz /root
In this case, the programs we are looking for is one of the 4 pieces of software we are using: aumix, sox, dap or soundtracker.
Red Hat packages are often in a RPMS directory. If we have found the program in the LiSt, we can then copy it to 'root'.
   cd RedHat
   ls
   cd RPMS
   ls | more
   cp program-1.2.rpm /root
To leave a directory, we go 'up' a directory, and LiSt.
   cd ..
   ls
Debian packages end in '.deb', we can search for these with the 'find' command, and install our program with:
   find /cdrom -name "*.deb" | more
   cp /cdrom/pool/main/p/program/program-1.2.deb /root
The '*' means 'anything', so '*.deb' means anything ending with '.deb'.
We can search the whole CD for the source code to a program, find it, and the '.diff' patch code to make it work for this distribution, change to this directory, and copy the files to the home or working directory of the Administrator 'root' with (Debian)
   find /cdrom -name "*program*"
   cd /cdrom/pool/main/p/program
   cp program-1.2.tar.gz /root
   cp program-1.2-3.diff.gz /root
You will find it frustrating that before you can remove a CD you have to unmount it with the U-MOUNT command , unless you have an automounting window manager, or use the small application 'xvmount'.
umount /cdromIf you are still in a directory on the CD, your Unix will say 'device busy'. So return to the 'home' directory of 'root', then push the eject button on the CDROM, with:
   cd
   umount /cdrom
Like many Unix commands, mount, like finger, is not named descriptively, rather as a slightly rude pun!
   cd directory                      change directory
   cd ..                             go to the directory 'up' from this one
   cd                                go 'home' to root's home directory /root
   ls                                list files in directory
   ls | more                         list files page by page
   more README                       view text file, Q Quits
   mount -t cd9660 /dev/cd0a /mnt    access CD on Berkeley (BSD)
   mount -t iso9660 /dev/hdb /cdrom  access CD on Linux
   umount /cdrom                     change CD
   mkdir directory                   create a new empty directory
   cp file /director                 copy file to a directory
   cp file file2                     make a second copy of a file
   mv file foo                       rename a file
   mv file directory                 move a file into a directory
   mv file ..                        move a file out of a directory
   rm file                           remove a file, there is no retrieving it!
   rm -rf directory			 remove a whole directory, think twice before using!
   cat file                          show whole file on screen, similar to DOS 'type'
   logout or  CTRL+D                 finish with BASH shell in XTerm window
foo -a -b -c 5 file1 file2Older BSD and AT&T commands give a command summary with '-h' (in DOS �/h�), GNU commands use '--help', and the 'man' Manual page should always be read:
   more -h      2>&1 | more
   more --help       | more
   man more
The '|' pipe between commands feeds the output of one into the next. Unix commands are flexible, general purpose and modular, a key concept being that they can be combined to solve more complex problems, for instance, to find the largest text files that have 'program' in the name:
du *.txt | sort -n | grep -i program | more
   du                                 Disk Usage, size of files
   sort -n                            Sort alphabetically or '-n' numerically
   grep fred file                     Print only lines with 'fred', or '-v', without fred
   df                                 Disk Free, free space on all drives
   ps                                 Programs you have running
   top                                Top programs running on processor
To do this we:
* Uncompress it, and unpack the files in the 'tar' archive (similar to '.ZIP')
* Uncompress the patch, and apply the patch for our distribution
* Configure it for the features that our distribution offers
* Make (automatically compile) and Install it.
This may sound complicated, but the point is that other people have already done all the hard work of adapting the software and making sure that nothing goes wrong. We just Unpack, Patch, Configure, Make and Install the program.
The configuration script knows all the things the program needs to work and submits our distribution to a Unix 'exam' for this functionality, anticipating problems we might have in our Unix being different from expected. Both patching and configuring means all potential problems should be resolved or identified correctly.
In fact often it can be shortened (for the impatient) to the simple and standard:
   tar -zxvf program-1.2.tar.gz && zcat program-1.2.diff.gz | patch -p0
         && cd program-1.2

   ./configure && make && make install
In X Window, rather than GNU software the �make� command is:
xmkmf && make && make installOn Berkeley BSD Unix:
make depend && make && make installSome of the filenames might be slightly different from those in examples, with extra version digits, like 1.2.3-4, and '_' instead of '-', like program_1.2.tar.gz. If in doubt, check by typing the commands below and writing down the result.
   ls *.tar*
   ls *.diff*
Or for lazy people, if in doubt of what to do, hit TAB once to complete the filename, twice to see what files match.
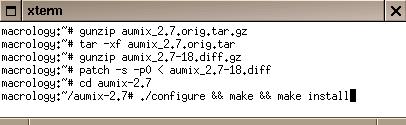
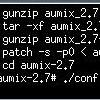
First we uncompress the program code.
gunzip aumix_2.7.orig.tar.gzIf the file ends in '.bz2' then it uses different compression. You may have to add this package from your distribution.
bunzip2 aumix-2.8.tar.bz2Then we unpack the source code into its own directory
tar -xvf aumix_2.7.orig.tarThe patch is uncompressed (Linux only)
gunzip aumix_2.7-18.diff.gzAnd the patch applied
patch -p0 < aumix_2.7-18.diffThe patch is called '.diff' for 'differences' under Linux. Under BSD there may be a number of patches, named 'patch-aa' for the first patch, 'patch-ab' for the second. You will need to run the patch command for each patch file.
If the patch fails, it may not matter, try the �make� compiling command anyway. If 'patch' says 'patch already applied, do you want to reverse it?' hit 'n' for 'No', as it is already done. If it says 'cannot find chunk', then the patch is not for this version of the software. Use 'more' to view the patch to see which version it wants to upgrade.
Another reason patches don't work is differences in the directory name of the software. You may have to rename the file to remove the '.orig' part, or have different punctuation like '-' and '_'. Some patches need to be run from within the directory of the software, with
   cd aumix-2.8
   patch -p0 < ../patch-aa
'../' means in 'a file in the directory above', similar to 'cd ..'.
Read the patch with 'more' to see what directory name it expects on the first line. If the patch is for version 1.3 of the software, and you have downloaded version 1.2, then, renaming it to program-1.3 will NOT work!
Once unpacked, we then go into the directory
cd aumix-2.7The software is �configured� for �features� that it might have, similar to plug-ins. These use libraries already installed on your distribution that they are 'dependant' on.
In the case of aumix, the basic text version must have a library called 'ncurses' for screen cursor manipulation; drawing with text, as 'aumix' is dependant on ncurses.
You may have this, or have to install it before compiling aumix. 'ncurses' or the older proprietary AT&T 'curses' comes with all Unix's on the first CD. If you do not have it, follow the instructions in 'Copying Software from CD and DVD' and install the 'libncurses5-dev' package from '/cdrom/pool/main/n/ncurses' with 'dpkg '-i libncurses5-dev.deb' (Debian).
Now, we are ready for the main part:
./configure && make && make installThe commands will stop if something is missing or irregular from your distribution�s install. If this happens, do not panic. Read the screen closely for clues to what is missing. It will almost certainly be on your distribution's CD. 'aumix' needs only 'curses' to work, which has been included in your distribution.
The graphical GTK version of 'aumix' needs the GTK development library libgtk-1.2-dev package to be installed from your distribution CD.
All being well, you should be able to run aumix by typing
aumixin a XTerm BASH shell, or, for the GTK version, perhaps
aumix &Congratulations! All being well, you have watched the Unix equivalent of a complex piece of machinery making a difficult job very easy. The �make� command knows how to compile any piece of source code for us.
If you have problems, read the configuration options with
./configure --help | moreYou can disable features that are causing problems, for example:
./configure --without-gtkAnd read the installation instructions and other documentation that comes with the source distribution
   more INSTALL
   more README
  tar -ztf program-1.2.tar.gz      View contents (-t) of an archive with
                                   compression '-z'
                                   Note: all tar commands have the '-f' to
                                   specify that a Filename comes after, else
                                   it (historically) uses a
                                   tape device, hence the name TAR, 'Tape
                                   Archiver'

   bunzip2 program-1.2.tar.bz2     uncompress archive using newer bzip2
                                   compression

   gunzip program-1.2.diff.gz      uncompress the patch

   gunzip program-1.2.tar.gz       uncompress archive
   tar -xvf program-1.2.tar        eXtract archive Verbosely, listing
                                   contents as extracted

   tar -zxvf program-1.2.tar.gz    getting clever, combine above 2 commands
                                   at once with '-z'

   patch -p0 < program-1.2-3.diff  patch the software for our distribution

   cd program-1.2                  go into the program directory
   more INSTALL                    read instructions, may be generic
   more README                     software's own instructions, may include
                                   installation
   ./configure --help | more       see what features are available
                                   '.' means 'this directory'


   ./configure --without-gtk       gtk version causing problems, just make
                                   curses version
   ./configure                     run the configuration program for your
                                   distribution
   make                            compile the program in its directory
   make install                    install the program, usually into
                                   /usr/local/bin for use
   make clean                      leave just the source code, delete working
                                   files
   cd ..                           leave directory, going to the directory
                                   'above'
   rm -rf program-1.2              delete directory when installed
                                   USE WITH CAUTION
Assuming that the sox source '.tar.gz' has been copied into '/root', along with the patch '.diff', or 'patch-aa', we can do the following to unpack and patch it.
   ls sox*.tar*
   ls sox*.diff*
   tar -zxvf sox-12.17.3.tar.gz
   zcat sox-12.17.3-4.diff.gz | patch -p0
   cd sox-12.17.3
'zcat' uncompresses the file on-the-fly, and feeds the result into the input of 'patch. So 'zcat' is a small script that combines 'gunzip' and 'cat'. This is also a good example of the flexibility and use of the '|' command.
We can now do the standard
./configure && make && make installThis should configure, compile and install sox, the 'rec' and 'play' scripts, and the manual pages, 'man sox', 'man soxexam' and 'man rec'.
'./configure' will look for ogg-vorbis libraries (a Linux alternative to MP3), if it finds it. Sox will look to see which audio drivers to use, Sun, OSS, ALSA.
One of the things it looks for to determine this is the location of the 'soundcard.h' audio API file, that varies between Linux, Sun and BSD.
   ./configure --help              shows available compilation Features
   ./configure --with-alsa-dsp     ALSA drivers
   ./configure --with-oss-dsp      OSS drivers
   ./configure --with-sun-audio    Sun style drivers
   ./configure --with-ogg-vorbis   Specify ogg-vorbis.
Equally, you can do '--without-feature' to force a feature to be ignored.
XForms can be downloaded in many binary formats from:
The version on here is 0.89. Version 1.0, as FreeBSD and NetBSD packages, and RPM's can be found here:
http://linux.maruhn.com/sec/xforms.html
And the source code can be downloaded from:
http://ims.uni-stuttgart.de/ftp/pub/X11/contrib/xforms-1.0.tar.gz
To compile DAP you need to have xforms installed properly. This is normally in the directory /usr/X11R6/FORMS. Before compiling you should set this variable. Read the INSTALL text file for more details:
export FORMS=/usr/X11R6You need the OSS for NetBSD and Solaris for DAP to work.
DAP does not need patching. To uncompress do:
tar -zxvf dap-2.1.5.tar.gz && cd dap-2.1.5To compile on various architectures: (Intel Pentium is often known as i386 compatible)
   make -f Makefile.alpha     Linux/Alpha
   make -f Makefile.linux     Linux/i386
   make -f Makefile.netbsd    NetBSD/i386
   nmake -f Makefile.sg       IRIX
   make -f Makefile.sun       Solaris
To install, simply copy the file DAP with:
cp main/DAP /usr/local/bin
Consult the INSTALL file for more information.
./configure --helpand add (or disable) these in the standard compile command, eg:
./configure --disable-splash && make && make installWith all these features enabled, soundtracker is dependant on 28 libraries! Luckily most of these are to do with gnome, but these in turn have some dependencies.
The 'splash' screen at the beginning (obviously not important) needs the package GDK_PIXBUF, if we do not have this, it can be disabled as above. If a feature is not found, it is automatically disabled.
The Envelope Editor uses little scrollable envelope 'widgets', from the GDK (related to GTK) canvas widget. This normally comes with GNOME, so if we have installed GNOME then we should have this. As well as GNOME, we need libgnomeui-dev which depends on imlib-dev, and libgnorba-dev, which depends on liborbit. These all should come on the first or second CD of your distribution. 'imlib' deals with images, and will want the libraries for formats 'libjpeg', 'libtiff', 'libungif' and 'libpnm'.
To use external formats such as Microsoft 'WAV', soundtracker uses the audiofile library, which should come with your distribution.
To use the rather cool optimised floating point mixing code, which is writen in 8087 assembler code, you need the the GNU Assembler Preprocessor, 'gasp'. I could only find this in the source distribution of GAS, the GNU Assembler. Unpack 'gas' and compile just gasp.c with 'make gasp' or 'gcc -o gasp gasp.c', then install it with 'cp gasp /usr/local/bin'. You can delete the 'gas' directory as it is quite big. Of course, if you are not on a Intel Pentium architecture, you cannot use this feature!
Soundtracker can work with OSS, Sun, SGI and ESD (The Enlightenment Window Manager Sound Demon). The ESD and ALSA drivers have latency problems, and are not recommended. ALSA instead should be used in OSS compatible mode, using Soundtracker's OSS code.
The Sun version '--enable-sun', needs to be patched. The patch has two extra files, sun-input.c and sun-output.c. The patch adds these files in the relevant places. The major change, apart from a small amendment to a 'sed' script in './configure' that deals with the possibility of the GNOME library version having 4 digits, eg. 1.2.3.4, seems to be to change it from working with GNU gthreads to working with POSIX threads, pthreads.
Installing Soundcard Drivers
Many Unix distributions will automatically detect your soundcard, with a driver
built into the Kernel (BSD) or as a module detected when your distribution is
installed (Linux).
To help, write down the IRQ, DMA and Port setting for your card any any details of drivers in Windows Device Manager. You may have to enter these values manually.
If your soundcard is not detected, and not one of the Creative/CS4241/AC97 types already discussed in Soundcards and Drivers above, then consider changing it for a more standard card that is detected. Cheap unbranded cards with their own (not Windows) drivers installed are less likely to work other than in DOS compatibility mode.
Driver Modules are often named after the chipset, not the brand of the card. Remove your card and visually examine the major chips. There is often a Codec chip (CS4241) which is the 'bridge' between the computers bus and the A to D chip itself (AD1848) often by Analog Devices.
Watch closely at boot time for which modules are installed, and for details of your driver or chip name. If necessary reboot the computer and keep your eye on the screen, or type 'dmesg' to get the boot messages.
After boot, you can check to see which OSS drivers have been detected with
cat /dev/sndstatIf your card is not automatically detected, then you may have to either manually insert the driver (Linux) or recompile the Kernel with the code for your card (Linux and BSD).
ALSA drivers come as modules that are installed. After compiling and installing ALSA run this script that comes with ALSA to create the '/dev' device files. ALSA also comes as easy-to-install RPM or DEB.
./snddevicesWith other driver sets and distributions you may have rebuild the audio device files in '/dev' after successful detection or installation of a + second soundcard with:
   cd /dev
   ./MAKEDEV audio
   ./MAKEDEV audio1
Debian has an Module Manager 'modconf'. In this you can select soundcard drivers under 'Misc' including the OSS/Free ones. It will try and autodetect the soundcard. If this fails you may have to enter the IRQ, DMA, Port and any other settings such as second record DMA, and the Roland MPU401 MIDI IRQ and Port.
The details of these driver and module specific parameters are given in the Kernel Source 'Documentation/sound' directory for a variety of cards. In particular you should read the Introduction and OSS documentation in here.
If 'modconf' works, the settings will be saved, and the module inserted at boot time automatically from now on by kerneld.
You can try inserting the modules by hand with (for DOS compatibility mode cards)
modprobe sb.oor
insmod sb.o irq=5 dma=1The parameters here being in the relevant documentation. After successfully inserting the driver, to permanently register the driver with kerneld do:
depmod -aYou can see which drivers have been inserted with:
lsmodSometimes the driver parameters above have to be hand entered by editing a file 'conf.modules' for older Linux's or 'modules.conf' for newer, with your favourite text editor such as 'vi', 'Emacs' or the popular Pico.
Compiling the Kernel
The Kernel comes as either a package of source or a source '.tar.gz'
on the first CD of your distribution.
It will be unpacked, or need to be copied and unpacked to '/usr/src/linux' (Linux) or '/usr/src/sys' (BSD). See 'Copying Software From CD and DVD' for how to do this. There will be a README in this directory with further instructions.
make clean mrproper xconfig dep bzImage modules modules_install installYou will need the following dependent packages to recompile the Linux Kernel that come on the CD with it:
   libc6-dev, bintools, bin86 (for Intel), make, LILO
   gawk, bzip, shellutils, gcc version 2.91.66 for later kernels.
See 'Copying Software From CD and DVD' on how to install these if you are missing them or use a Package Manager. In particular you need bin86, the Intel version of binutils (Intel platforms only), as the Kernel traditionally does not use the GNU Assembler (GAS) tools.
You will also need the TK development library such as tk8.3-dev package for 'xconfig' or change this to 'menuconfig' and you will need the libncurses5-dev package. Just plain 'config' asks you one by one which drivers you want. All create a '.config' file that selects which Kernel elements to include.
'xconfig' gives you a menu driven utility, including the OSS/Free drivers, in Misc. Drivers can be 'M' modular or 'Y' in the Kernel itself. Select your soundcard type or chipset, including hardware parameters you may have written down from Windows, as specified in the Kernel sound Documentation '/usr/src/linux/Documentation/sound'.
After compilation of the Kernel, which takes a while, it will be installed. Before rebooting, type 'depmod -a' to include new driver modules. Your soundcard should show up on the next reboot. General Linux documentation on this process such as README's, FAQ's, HOWTO's, and in particular about the multi-boot manager LILO must be consulted for more information on this.
   config GENERIC
   cd ../compile/GENERIC
   make depend && make
Reboot the computer and watch for references to 'audio0' or 'audio1' for the second soundcard. You may have to remake the '/dev' devices as shown above.
You may want to uncomment 'USERCONFIG' in 'GENERIC', which enables you to change parameters such as IRQ at the boot prompt. As well as configuring the Kernel Source, 'config' may also be able to change these parameters at any time, like Windows Device Manager.
A Suite of Unix Audio Software
There are many distributions of Unix including Linux,
which come with a variety of different pieces of audio software.
In this article I look at 4 pieces of software that form a complete Suite of audio software, everything you need to make music with samples.
There are also synthesisers for Unix too, like FreeBirth (a GPL clone of Rebirth), aRTs and SpiralSynth.
This set of software is commonly found on all Unix's including Linux's, and work with all the soundcard drivers:
* 'aumix', a Mixer to adjust levels, similar to Windows Volume Control.
* 'SoX', a simple Recorder and Player, similar to Windows Sound Recorder.
* 'DAP', a Sample Editor, similar to SoundForge or ProTools.
* 'soundtracker', a Sampler/Sequencer similar to ACID or Cubase SX
All Unix's come with a mixer, to manipulate audio input and output sources, levels, and balances. Most common to all distributions is 'aumix', a text utility that also has a GTK graphic interface. GNOME comes with its own mixer, 'gmix', and the KDE Window Manager has 'kmix'. Other mixers are the X Window mixer 'xmix', and the Motif (Microsoft look-alike) mixer, 'xmmixer'. 'sox' also comes with all Unix's. If you do not have soundtracker, you might have the similar CheeseTracker (NetBSD).
Either look through the Window Manager's (GNOME or KDE) menu's in Audio or Sound or Multimedia to try running the software, or type the name from the XTerm Shell. If there is the item in a menu, it doesn't mean it's installed, it may be missing. You will need to add it with your distributions Package Manager (see below), or follow 'Copying software from CD and DVD'. Equally, some distributions will install the software the first time you try to run it!
by Takagi Junjo, Christian Weisgerber and others.Aumix is available from:
http://jpj.net/~trevor/aumix.html
In the formats:
SourceThe current version at time of writing was:
2.8It has dependencies:
ncurses, GTK is optionalYou run it by typing,
# aumixOr, so you can carry on typing, with the GTK version:
# aumix &
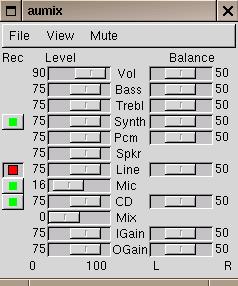
With the GTK interface you can adjust the input and output sources, levels, and balances with the mouse. Clicking on the button to the left of the Line-In fader will turn it red, make this the recording source.
If you have connected an external input, such as a mini-disk to Line-In, you will have to do this to record, though you will hear it from the Output.
With the text interface, you use Up an Down Arrow keys on the keyboard to move to the fader, and Left and Right keys to decrease and increase the volume. Tab will flip between the volumes and the balances, similarly operated. Moving to Line-In and pushing SPACE key on the keyboard will make Line-In the recording source. Pushing Q will Quit.
If you have recorded only silence in rec, sox, dap or soundtracker, then check Line-In is selected. Other reasons might be that the level is too quiet, the soundcard driver has got an incorrect record DMA (often is 1 or 5), or the soundcard driver is in DOS compatible mode, instead of its native mode.
To force aumix to run in the curses text version, and adjust the levels for a second soundcard mixer:
aumix -C -d /dev/mixer1
by Lance Norskog, Chris Bagwell, Juergen Mueller, Guido Van Rossum and others.Sox is available from:
In the formats:
RPM, DEB, NetBSD Package, SourceThe current version at time of writing was:
12.17.4.It has dependencies:
None, ogg-vorbis is optionalSoX, the Sound EXchange is usually on the first CD of a Unix. It allows you to convert between sample formats, and also comes with easy to use front ends 'rec' and 'play'.
Sox involves typing in a window similar to a DOS Command Line, which should be on your windows manager menu as XTerm or the BASH shell.
To record a Mono, CD quality sample enter the 'rec' command below, while giving it an input source such as Line-In, Mic or Audio CD. (see 'aumix' instructions for selecting an input source).
Hold CTRL (bottom left of keyboard) and tap the C key to stop, then enter the play command to hear it.
  rec -s -w -c 1 -r 44100 sample.wav
  CTRL+C
  play sample.wav

   -s -w       Signed Word, 16 bit samples
   -c 1        Mono, 1 channel
   -r 44100    sample rate 44.1khz, CD quality
   sample.wav  filename, sox guesses the type from the .wav extension
To check the size of the sample (uncompressed audio is big) type:
ls -l sample.wavThis sample can be Imported into DAP, and Loaded as a sample with Load Sample into SoundTracker.
Sox converts between two sample formats, the input and output, with
sox input-stuff output-stuffIn the 'rec' command the input file is the soundcard, in 'play' the output file is the soundcard. The commands being short for:
                ( input format and filename          )   (output format and filename)

rec:     sox -V -s -w -c 1 -r 44100 -t ossdsp /dev/dsp   -t wav sample.wav


                (input           )   (    output       )

play:    sox -V -t auto sample.wav   -t ossdsp /dev/dsp
The extra parts of the commands are '-V', for verbose, gives you more
information on what is going on, and '-s -w' for Signed Word, a 16 bit sample.
An 8 bit sample would be '-u -b' for an Unsigned Byte. Wav's have format
information in them, and sox tries to adjust to the output format,
and guess the input format, so the play command is simpler. The soundcard is a special type of file, known as a device, but is treated as being just another sample format type, with the '-t ossdsp' for the OSS dsp type device, and the file being '/dev/dsp'. If we had a second soundcard, then this would be '/dev/dsp1' on Linux, and for Sun '/dev/audio1', with the type '-t sun'.
To convert from a Mono, 8 bit, 8khz raw sample to a Mono CD quality WAV:
   sox -V -t raw -r 8000 -c 1 -u -b input.raw    -t wav -r 44100 -c 1 -s -w output.wav

   -V          Verbose, print more information
   -t raw      Just raw data!
   -r 8000     Sample rate of 8khz.
   -c 1        Mono, 1 channel
   -u -b       Unsigned Byte, 8 bit samples
   input.raw   File is called input.raw

   -t wav      File type of WAV
   -r 44100    CD quality sampling of 44.1khz
   -c 1        Mono, 1 channel
   -s -w       Signed Word, 16 bit samples
   output.wav  File is called output.wav
Sox does quite a bit of work to do this, as it has to scale 8 bit values to 16 bit, and resample from 8khz to 44.1khz with a resampling algorithm.
A 16 bit sample has two bytes in it, the order of which *depends on the computer architecture*. If you are trying to play a sample made on Intel Pentium which is 'little-endian' on a Sun SPARC, which is 'big-endian', you will only get noise. The bytes have to be exchanged with sox '-x' flag.
Both rec, play and sox can have a effect added to the end of the command. This can be one of:
   resample, bandpass, bandreject, chorus, compand, echo, echos, fade, filter,
   flanger, highpass lowpass, phaser, pitch shift, stretch, vibro
              (the world-famous Fender Vibro-Champ effect!)
The parameters are supplied numerically after the effect name. For
a small reverb, or a psychedelic flange try:
   sox old.wav new.wav reverb .5 1000 100

   sox old.wav new.wav flanger 0.6 0.87 3.0 0.9 0.5 -s
These can be added to rec or play, to add an effect to your recording or playback.
To turn a Sun Workstation with Full-Duplex drivers into an effects pedal try:
   sox -t sun -c 2 -r 44100 -s -w /dev/audio -t sun -c 2 -r 44100 -s -w /dev/audio
                   flanger .6 0.87 3.0 0.9 0.5 -s
Because of the different way it does Full-Duplex, on Linux you need two
soundcards to do this:
   sox -t ossdsp -r 44100 -sw -c 1 /dev/dsp -t ossdsp /dev/dsp1
                    flanger .6 0.87 3.0 0.9 0.5 -s
For more information, see the Sox manual page, the rec and play manual page, and
the Sox Examples (Cheat Sheet) by typing:
    man rec
    man sox
    man soxexam
The examples are from the Linux Cookbook, part of the Linux Documentation Project (LDP)
available from http://www.linux.ucla.edu/LDP
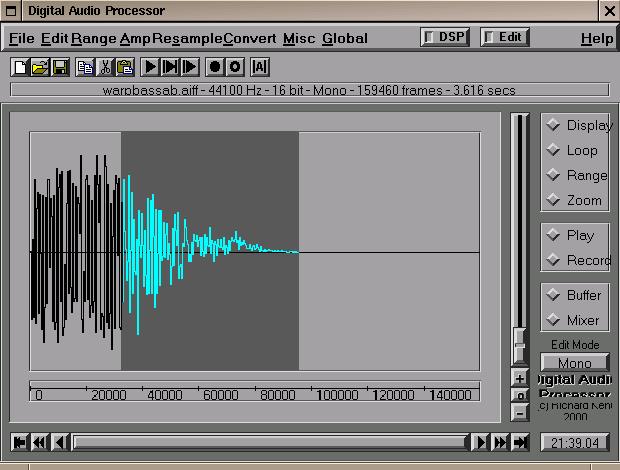
by Richard KentDAP is available from
http://www.cee.hw.ac.uk/~richardk
In the formats:
Mandrake 9.1 RPM, SGI IRIX 6.5 Binary, Solaris 2.7 Binary, SourceThe current version at time of writing was:
2.1.5It has dependencies
xformsSee the compiling section for downloading xforms binary packages and more information.
As well as being a fully functioned sample editor, DAP has the following effects:
   Reverb (Moorer, Schroeder, multi-tap), Delay (stereo, modulated,
   multi-tap, multi), Flanger, Phaser, Distortion, Filter, Auto pan,
   Gate, Compressor/Limiter
These all have many parameters that can be adjusted with the 'Adjust' Button, on the effect dialogue. After calculating the effect, you can preview the wet/dry mix with a clever interactive mixer, after pushing the Play button. Push the Stop button and either Cancel the effect or Ok, apply it.
The Tool windows are on Radio buttons on the right hand side of the screen. If your Window Manager does not Close them, then click again on the Radio button to remove the Tool.
Before using the Record Tool you have to create a new buffer, with New, specifying format and length. If the fields here are blank, you should upgrade your XForms library from 0.89 to version 1.0.
Other Tools are the Play Tool, the Display, Loop, Range and Zoom Tools. There is also a multiple edit Buffers Tool, with the amazing and unique Mix Play tool, that allows you to interactively mix 2, 4 or even a whole Desk of all the Buffers!
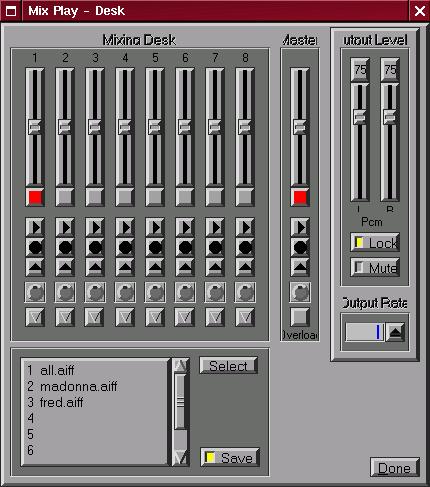
The Mixer tool opens DAP's own fully featured (OSS only) Mixer.
DAP has the usual sample editor scroll and zoom bars around the sample view. Menu items allow normal sample editing functions. Wav's can be worked with by Importing and Exporting, or using 'sox' to convert to DAP's native SGI AIFF format.
Consult README and FEATURES for more information.
by Michael KrauseSoundTracker is available from:
In the formats:
DEB, RPM, SourceThe current version at time of writing was:
0.6.7It has dependencies:
GTK+ 1.2.2, audiofile 0.1.5, GNOME 1.0.1, GASP
The format was originally invented to get a song on a floppy disk, hence the Music On Disk (MOD) name. Even 16 bit songs are smaller than the equivalent MP3, perhaps 1-2Mbyte vs 5-10Mbyte for MP3.
Extended, any number of CD quality 16 bit samples can played at once, one per channel. Another 16 bit format is the '.IT' format used by the Linux cheesetracker. MOD�s can be played on the backward compatible SoundTracker.
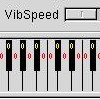
Effects are sequencer orientated and include:
   argpeggio, portamento up, portamento down, vibrato, tremolo,
   volume slide, sample offset, filter cutoff and resonance
It is a good idea to start by listening to other people's other people's songs. There are literally 10,000 example songs on the internet in this format. As the format is not 'mixed down', you can remix them and use other people's samples, which stimulates production of songs between groups of people. You should credit where you got samples from if you have 'ripped' them from someone else's song.
Here is an example song by Mortimer Twang (actually a MOD)
The format represents a portable, cross-platform, Open Source standard of music making. Songs in this format are 'Future Proof', and in fact will sound better in the future than when made, as player technology features such as Dolby Surround are added to standard players like WinAMP http://www.winamp.com that play them, or 'XMMS' for Unix.
SoundTracker is (of course!) compatible with PlayerPro Editor for the Mac http://www.quadmation.com/pphome.htm, on which you can also edit the standard '.XM' format. This also has some unique graphical features.
You will need the �lha� program to decompress these files. This will come
with your distribution, or you can download the source, and compile it
yourself (it has no dependencies).
ftp://ftp.netsw.org/system/tools/fileutils/archive/lzh/lha04.tar.gz
For Windows, use the command-line:
http://www.pluto.dti.ne.jp/~yasuki/software/download/LHA213.EXE
For the Mac, use Aladdin�s Stuff-It expander
http://www.stuffit.com/mac
To play, edit, and remix XM files on Windows, you could use ModPlug Tracker.
http://www.modplug.com/modplug
Another artist making �Open Source� music is Mortimer Twang.
http://www.mono211.com/modsoulbrother
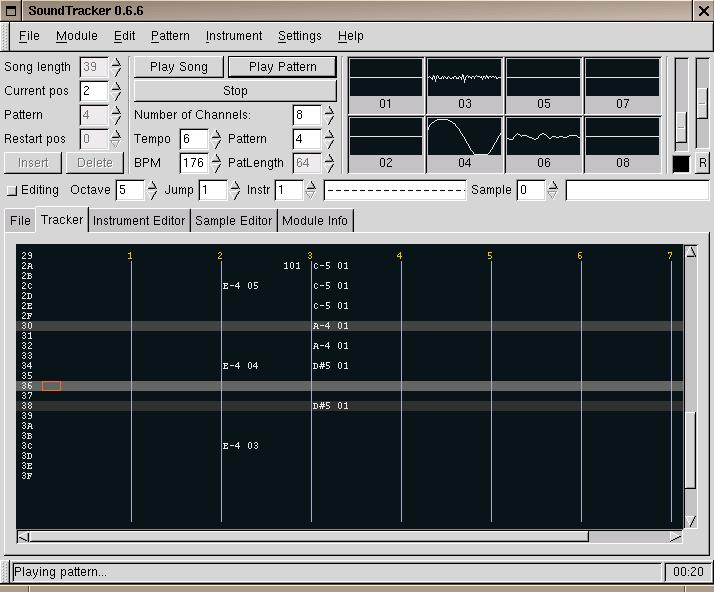
'Patterns' are played in any order in a list, so they can occur more than once.
Starting with the top left of the screen, 'Song Length' is how may patterns in the song. The 'Current Position' is where we are in the list of Patterns. 'Pattern' is the one being played at the moment, which will be displayed and the same as 'Pattern' control to the right, unless we are Asynchronously Editing, which allows us to edit at a different place than is playing.
The 'Restart Position' allows the whole song to loop.
The 'Tempo' is how many 'ticks' of the BPM per row are played. 'BPM' is the same as for any other machine. If you change the Tempo from 6 to 3, the song will play at double the BPM.
'Number of Channels', allows us to add or remove Channels. The Oscilloscopes are on the right of the screen. The left mouse button mutes and unmutes a single channel, the right mouse button solo's the channel and any muted channels, useful for live performance. On the far right (unmarked) are the main Volume, and the Pitch with R button to Reset to normal pitch.
The 'Editing' radio button, middle left, is controlled by pushing ESC on the keyboard, so you can switch to and from recording notes while the song is playing. The 'Octave' is the octave the Q row of keys on the computer keyboard plays, similar to a piano keyboard. The 'Jump' is how many rows to skip after entering a notes Step-Wise.
Further across this middle strip are the 'Instr' instrument number and 'Sample' number, along with editable comment, that will be played on the computer keyboard like a piano.
The current instrument and sample can be played from the computer keyboard or a MIDI keyboard. Two octaves of keys on the keyboard rows 'Q-P' white piano keys, middle C, '1-0' (black piano keys, middle C#, and 'Z-M' lower C, 'A-L' lower C# play notes on the sample.
Across the middle of the screen we can select different screens, or panes, 'File, Instrument Editor, Samples Editor, Module Info'.
In File, you can load songs or samples from a File Browser, as well as mixing down the whole song with Render Wav. I tend to use File, Save As, though, to save my songs, remembering to include the .xm extension in the filename.
The Tracker contains the sequencing information, which instead of being time-coded like MIDI is played at the BPM/Speed.
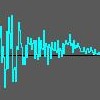
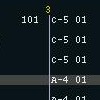
We can see a table of this sequencing information, with each channel being a numbered column relating to the Oscilloscopes in the top right of the screen. Here is a made-up column entry
Note  Inst Vol Effect
    |   |  |   |
   C-5 01 30 106


   C-5   is the note to be played, C, octave 5, in this case
   01    is the instrument number to play it on, that we can see in the sample editor
   30    is the volume column, with 30 being quiet, 00 off, and FF loudest
  106    is the effect column. 1 is the effect Porta Up, 06 is the parameter of how fast
In the screenshot, we can see on Channel 3, we note E-4, E, octave 4 being played
on instrument 05 and 04. In the oscilloscope we can see a waveform in Channel 3.
At the top of this column '101', effect Porta Up, Speed 01. For more details of
effects consult Menu Help/XM Effects. It may be easier to see these in action
in a downloaded example song.
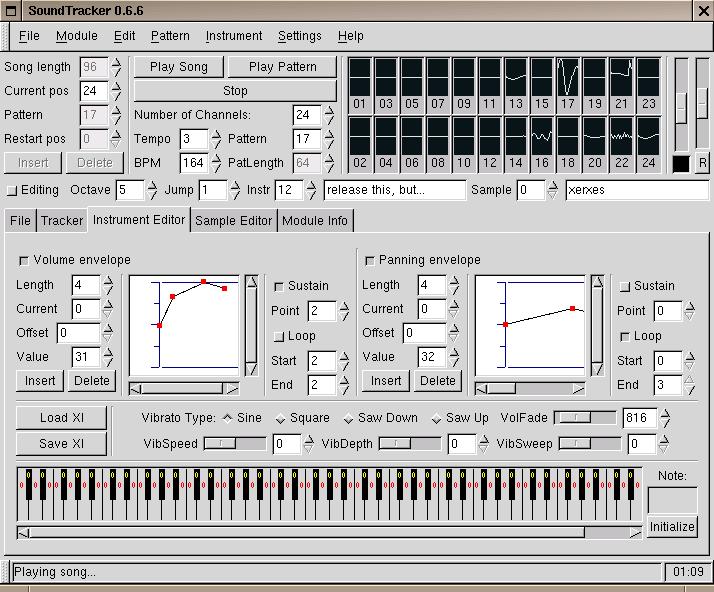
In the Envelope Editor we can see a Volume and a Panning envelope displayed graphically (using the GNOME canvas widget), and Sustain and Loop points relating to the red points in the graphs. Also here we have Vibrato, Load and Save XI, which is the Instrument file format.
Below this is a keyboard with numbers on it relating to a keyboard 'layer' or 'patch'. Different samples, which are on the right in the Module Info screen, or on 'Sample' below the Oscilloscopes, can be assigned to different keys, for instance, a drumkit of samples, so you can jam on it! Clicking on the keyboard changes this key to the currently selected sample within the instrument.
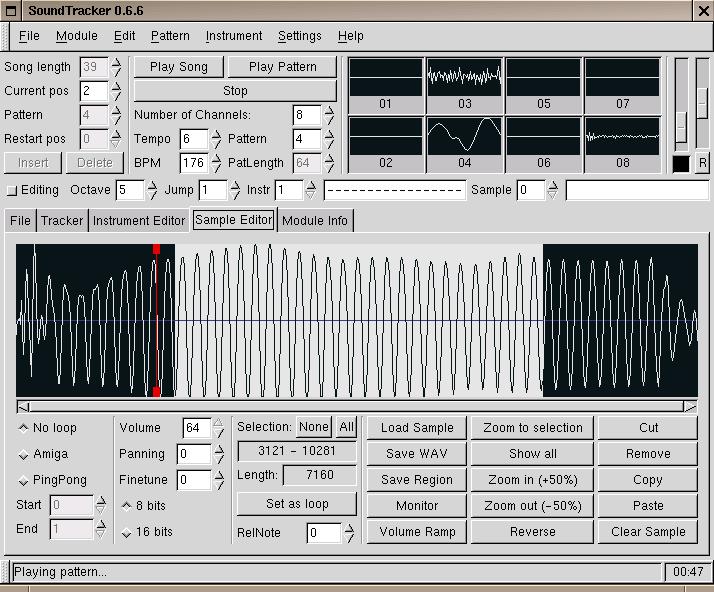
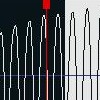
In the 'Tracker' we could see that channel 4 was playing Instrument 1. Here we can see Instrument 1 as a sample. It can also be seen on Oscilloscope 4. The Red line shows at which point the sample is being played. I have 'selected' some of the sample, shown in white. Normal sample editor functions like 'cut' are on buttons below this. We can tune and loop the sample here. The 'Monitor' button starts the sampling window, allowing us to record.
Audio Configuration lets us choose the driver: Sun, OSS, ESD, ALSA. On the pulldown we can select a different device for Playback Output, Editing Output and Sampling Output. For instance, Editing and Playing on '/dev/dsp' the first soundcard, and sampling at the same time on the second soundcard '/dev/dsp1'! You can also adjust the format, and the latency, for example '11ms'.
At the bottom we can select either a integer32 mixer, or the amazing 'kbfloat' mixer from OpenCP player, featuring 'High-quality FPU mixer, cubic interpolation, .IT style resonant filters'.
For a live DJ performance, two SoundTracker's can be run at once, on different soundcards, the audio devices being '/dev/dsp' for the first, '/dev/dsp1' for the second. The soundcards can be 'chained' to mix the outputs, or use an external DJ mixer. As you can change the pitch and BPM independently on both songs, and mute and unmute Channels, while jamming notes on the computer or a MIDI keyboard, there is much artistic scope in this!
Brief Tutorial
Go to the Sample Editor, and click on Monitor, while feeding your computer a
signal from Line-In, Microphone or CD. You should get an oscilloscope showing
the live input signal. If you do not, check the mixer, such as 'aumix',
'gmix' or 'kmix' that your source is selected. If you still do not get a
signal, then consult Installing Soundcard Drivers.
Click on 'Start sampling', then 'Ok' to stop. Push key 'Q' on the computer keyboard to play the sample. It should sound exactly the same as your input source. If it is too quiet, put the Master Volume slider in the top right of the screen to the middle. Trim the sample by selecting with the mouse, and using on-screen 'cut' button.
Change to the Tracker screen/pane. Push ALT GR on the computer keyboard, the right hand Alt key next to the spacebar to start the empty pattern playing.
Jam on your sample with the octave on the keboard from the key 'Q' - note C, white notes, and above, key '2', note C#, black notes, and across the keyboard. The lower octave is from key 'Z' and across the keyboard to the right. You can change the octave with the F keys (Function keys top of keyboard) or the Octave control above this pane.
Pushing ESC on keyboard changes to/from record mode, and the notes will be recorded into the pattern. Push TAB to move to the next column, and record a second Channel of notes. Push SPACE bar to stop. Shift TAB moves back a column.
Push 'Insert' to add a a new pattern. On 'Current pos' control push the Up button to change to select the second in order pattern. At the moment this is the same pattern, so push 'Up' on the 'Pattern' control to play a different pattern. Change to this new blank pattern in the 'Pattern' field to the right, next to the Oscilloscopes.
Add some notes to the second pattern, using ESC as before, Right CTRL key will then play whole song in order. Push SPACE to stop.
Assuming you have a 'WAV' file recorded, perhaps with 'rec' under the 'sox' tutorial, we can load this in.
Click on 'Sample Editor' and change to the second Instrument with the Up arrow on the 'Instr' control in the middle of the screen. Click on 'Load Sample', and browse for a WAV. This should be loaded into the sample editor.
You can jam on this. Go back to the 'Tracker' and with Right CTRL, 'Play Song' and ESC, add it to the third Channel by pushing TAB three times. Shift TAB moves back a Channel. SPACE bar stops playing.
Effects can be entered using Cursor Right and Left keys within a column. Change BPM to taste.
Save the song using the menu, File, Save As, click in the Selection field and type the filename 'test.xm'. Click Ok. Congratulations! You have made your first song that will play identically on any computer!
Read the README that comes with the source for more instructions on keyboard shortcuts and using Soundtracker.
Mac OS X and Unix
OS X is based on FreeBSD and has a Unix Shell Window to type Unix commands.
This is in Applications/Utilities/Terminal, and runs 'tcsh', the T Shell.
This is similar to the XTerm/BASH Window on Unix.
The T shell is the Berkeley BSD Unix command interpreter and adds filename completion, and other functionality to the C Shell, which has a C like programming language incompatible with plain 'sh' or the GNU BASH shell.
OS X 'Terminal' has all of the common Unix commands in this article, such as 'cp', as well as administration commands such as 'ps' and 'top', 'df', 'du'.
Additional commands are curl, download web pages; ncftp, easy ftp downloading. It comes with the standard Unix text editors, BSD 'vi' and GNU Emacs, as well as the popular Pico. You also get the 'man' Manual pages with OS X.
You can read about OS X's Unix facilities on http://www.developer.apple.com/unix.
X Window is the Unix Windowing system. Mac OS X can compile and run X Window applications. To do this you need X Window itself.
One version, XDarwin, is free from http://sourceforge.net/projects/xonx.
Apple have recently released their own X Window (X is known fully as X11R6) including the server itself that runs the display, libraries for development and utilities such as 'imake'.
This, and gcc are included in the Xcode Tools, from http://www.developer.apple.com/sdk.
You can read more about this on http://www.apple.com/macosx/features/x11.
Open Source projects can be downloaded from http://www.developer.apple.com/darwin/projects.
In particular to compile software you will need: 'bsdmake', BSD make or 'gnumake' GNU Make. Also from the Open Souce page you should get:
   gnutar, gnuzip, grep, gnudiff, awk, yacc, m4, cctools, bison, less,
   zlib, zsh and autoconf
One thing to be aware of is that 'tcsh' the TENEX shell that comes with OS X is incompatible with './configure', and you need either the Bourne shell plain 'sh' or the compatible GNU BASH shell.
Other Open Source software can be downloaded from http://www.versiontracker.com/macosx.
The GNU Image Editor, GIMP, is available from http://www.apple.com/scitech/physicalscience/unixports, as is the vital GTK and XForms libraries that software in this article are dependant on.
The normal commands for compiling software under Unix, the GNU configure and X Window 'xmkmf' X Make Make File (uses X 'imake') should work.
   ./configure && make && make install      (GNU Configure, needs 'sh' and 'sed')

   xmkmf && make && make install            (standard X Window compile and Install)
As 'sox' has no dependencies, it should be the easiest to compile (GNU configure style), and is a useful sample format converter, to familiarise yourself with Unix commands.
So pretty much all the dependencies and tools needed to compile the software in this article runs on Mac OS X. What's the bad news?
Well, Mac OS X doesn't have the vital Unix audio device, '/dev/audio' or /dev/dsp'. It has its own proprietary API, Core Audio. Apple say:
   'If you are porting an application that uses Linux's soundcard.h or
    [Sun's] Solaris's audioio.h you should find similar API's in Core Audio,
    and rewrite your code using our Core Audio API.'
It shouldn't be hard to add this API to any of the software here as another,
fifth type of driver, with the added './configure' option '--with-osx-audio'. For a programmer, writing a small C interface on top of Core Audio API could make it look like a normal audio device, compatible with all software without change. All drivers have the common functionality of Open, Close, Read (sample), Write (Play). Unix audio uses IOCTL calls to change such things as sample format and rate, which could be translated into Core Audio calls.