Please note that for this Tutorial I have included all the tools that are needed except the
Filter Factory Gallery B, Fluttering Flag. If you don't have this particular Plug In go to
Filter Factory and download it now FREE,
Filter Factory Galleries.
The Filter Factory is an excellent site for Plug In Filters and PSP Tips.
The instructions for installation are also included at this site and it is really easy
if you
just follow their step by step directions.
�

-
Open a new file 350 x 350 pixels with the background set White and choose 16.7 million colors.
Choose your colors. Set Foreground Color to Pink (R-255, G-215, B-215) and Background
Color to White�(R-255, G-255, B-255).
- From the Tool Palette select the "Line" tool and set Width to 10. Starting at approximately
28,38 draw your Banner. From the Tool Palette select "Flood Fill" set for (RGB Value, Tolerance 10, Fill Style-Solid Color) and fill your banner.

�
-
Your banner should now look similar to my
example at the left. If you are having trouble
making one, download mine by right clicking
your mouse and selecting Save as Image. �� - Choose "Image|Deformations|Wind" and set attributes to (From Left|Strength 10) and click OK.
- Change your Foreground Color to Red (R-255, G-0, B-0). We are going to add text to the Banner now.
Select the "Text" tool and place it in the center of the banner. The font I used is Nadianne with attributes set at (Bold,
Size 28, Antialias On, Alignment Center, Floating On). Enter text Hearts and click OK. (If you don't have this font another
fancy font will work just as well, I just really like Nadianne and use it a lot for text effects). With the text still
selected choose "Image|Special Effects|Cutout" and set attributes to (Fill Interior with Color Off, Interior Color Foreground
Color, Shadow Color-Red, Opacity-164, Blur-20, Vertical-3, Horizontal-3 and click OK). Repeat the Cutout effect, with Shadow
Color-Black, Vertical=-3, Horizontal=-3). Add Drop Shadow Color-Red, Opacity-180, Blur-10, Vertical-3, Horizontal-3.
- Choose "Image|Plug In Filters|Filter Factory B|Fluttering Flag", there are six attributes set them in this order to
190, 150, 255, 0, 0, 0 and click OK. This is the last step for our banner.
TEXT - Be My Valentine
- Select Text Tool and click the center of your Image. Use the same font Nadianne, Size 36. The attributes will stay the same
but this time we will type in the text Be My Valentine using three rows. While text is still selected, choose "Image|Special Effects|Cutout".
Apply the same Cutout and Shadow effects as you did for the Heart text. Deselect text.
CUPID
- Open the Cupid Image and save the original just to be safe. Now choose "Edit|Copy", "Edit|Paste|as Transparent Selection" and line it up
to the left of your text. While it is still selected choose "Edit|Paste|as New Selection" and line your second Cupid to the right of
the text. While it is still selected choose "Image|Mirror." Pretty easy right?
Please feel free to copy my Cupid Image
by right clicking your mouse and
selecting Save As Image.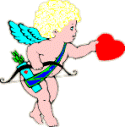
HEARTS
-
Add some hearts as I did or use your imagination.


Use my samples by right
clicking your mouse and
selecting Save As Image.
Resize to fit your taste.

BORDER
-
You will need to change Red to your Background Color on the "Color Bar".
Choose "Image|Add Borders" and set attributes to (Symmetric On, Size 15).
Select the Border with the "Magic Wand", then "Image|Special Effects|Buttonize"
set for (Edge Size 4, Transparent Edge). While the border is still selected we
will give it a 3D effect by selecting "Image|Add Drop Shadow" (Color-Black, Opacity-190,
Blur-10, Vertical-2, Horizontal-2). Repeat Shadow, Vertical=-2, Horizontal=-2). Our Valentine
is finished, honest, except for:
FILE REDUCTION
- Choose "Image|Resample" set to (Custom On, Maintain Aspect Ratio On, and resize to 200 x 200 pixels.
- Colors|Decrease Color Depth - 256 colors - OK.
- Colors|Count Colors - (make a note of the number).
- Colors|Increase color depth to 16 Million.
- Colors|Decrease color depth by X colors, type in your number, click OK. We just decreased our file size by a significant amount, a very important tip.
- Save Image as gif.
Top of Page|Paulie's Home|PSP Tutorials|PSP Links|Next

Registered � Trademark